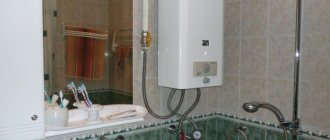
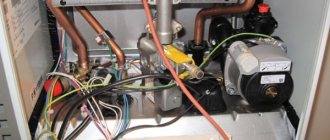
Repairing a geyser cannot be compared with any other home appliance in terms of its complexity and the number of possible technical problems. Only repairing gas boilers at home can be more complex and rich in possible technical nuances. If you can still try to repair the water heating device yourself, then it is best to entrust the maintenance and repair work of the heating boiler, regardless of the amount of built-in automation, the presence of a secondary circuit and the manufacturer, to a certified specialist.
What can you repair in a gas water heater with your own hands?
Of course, a gas hot water heater does not always wear out or break so thoroughly and irrevocably that it is impossible to do without the help of a specialist. According to reviews from the same mechanics of the gas maintenance service, in 70% of cases, repair of geysers comes down to routine maintenance and elimination of minor defects, usually associated with low quality parts or incorrect adjustment.
The list of works available for repairing geysers at home can include the following:
- Minor repairs and repackaging of coupling and nut joints of pipelines;
- Replacing the elastic membrane in the water-gas column regulator;
- Cleaning and adjusting the operation of the draft sensor;
- Cleaning and washing the heat exchanger;
- Ignition board repair.
A separate category can include such operations as repair and soldering of heat exchangers.
It is clear that there is a certain category of expensive hot water heaters, full of automation and electronics, which there is simply no point in even trying to repair at home. For example, repairing Electrolux or Vaillant geysers will cost less at a service center due to the high cost of spare parts. The exception is particularly important components, such as a three-way valve or ignition board; it is better to buy them from an authorized dealer, even if the price is higher. This is the only chance to carry out repairs and not destroy an expensive Italian or German speaker with substandard spare parts.
Repair of geyser Oasis
Chinese Oasis water heating devices have attracted attention on the domestic market, primarily due to their low price and simplicity of design, which allows for do-it-yourself geyser repair in almost any problem situation. The structure and format of the main parts are very similar to most domestic systems, so there are no problems with disassembly and repair, even if there are no repair instructions or diagrams for the Oasis gas water heater.
It is known from practice that Chinese Oasis gas appliances suffer from three types of defects:
- Rapid battery discharge;
- Failure of spark plugs;
- Water leakage on the seal of the membrane water pressure sensor.
In the first case, the problem with the batteries manifests itself in a rather unusual way; the indicator display pleases with blue or green light, but when you try to turn on the gas water heater, nothing happens. Repair of such a defect is carried out by simply replacing conventional salt batteries with alkaline cells with increased charge capacity. They should last for at least a year.
Disassembling the Oasis for repairs
If drops of water begin to appear under the column, this most likely means that repair of one of the flow parts of the water heating apparatus will be required. To determine the cause of water leakage and carry out repairs, the Oasis must be disassembled. First of all, it is necessary to remove the outer cladding of the device. To do this, remove the handles and unscrew the screws in the lower part of the body.
The next step is to disconnect the connectors from the indicator panel and microswitch.
We gain access to the future place of repair - the membrane water pressure control unit.
We repair the gas water heater control unit
In order to remove the pressure control unit, you must carefully disconnect the microswitch connector and remove the two screws securing the heat exchanger flange to the unit body.
It is clear that before repairing a gas water heater, the water must be turned off and the remaining water pressure in the system must be released by opening the tap.
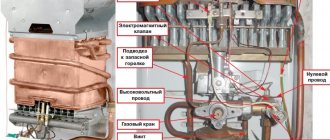
For repairs, you will need to additionally remove the gas block of the water heater and the burner device.
The removed unit can be disassembled for repair by removing four steel screws. Typically, steel fasteners stick strongly to brass, so the joint is pre-treated with VD-5 or brake fluid.
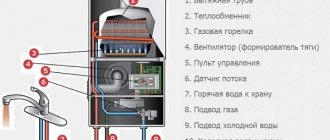
The pressure control unit operates as follows:
- Inside the housing there is a cavity divided by a membrane into two parts. Water approaches on one side, in the second cavity there is a round float, on which water presses through the membrane;
- The float has a rod that passes through a rubber seal. When the hot water tap is opened, the flow fills the cavity in the block, pushes the rod through the gland through the membrane and float and presses the contact on the microswitch;
- The circuit closes, the gas opens, and the ignition device is activated.
It is clear that the surface of a steel rod, when in contact with rubber, intensively corrodes and becomes covered with cavities. Each movement of such a rod leads to catastrophic wear of the oil seal, which begins to leak within a year. In addition, during any repair, at the first opportunity it is necessary to change the membrane to a high-quality rubber one.
A situation often occurs when, before repairing the seal, the geyser begins to boil and spew steam. This suggests that the membrane also needs to be cleaned of dirt and, if possible, replaced.
Repair of the geyser electrode system
Chinese manufacturers of Oasis geysers always like to save on the quality of the materials used. An example is a situation where a new, fully operational gas water heater stops igniting even with a working water and gas control unit and ignition board.
The reason is the failure of one of the three spark plugs of the burner flame. The design of the burner device is such that in order to ignite the gas, it is necessary that all three spark plugs be in good working order.
Repairing the gas water heater ignition system begins with identifying the faulty spark plug. To do this, you need to remove the cladding, turn off the lights and shade the room. When starting the gas water heater, you can see how on one of the spark plugs the electric discharge strikes not into the gas flow, but much lower, into the housing.
The situation is extremely dangerous and requires urgent repair of the ignition system of the gas-air flow in the column. Repairs cannot be postponed, even if the column lights up the second or third time it is started. When starting, a large amount of a mixture of gas and air is pumped into the fuel chamber and exhaust device, and if the ignition of the column is triggered with a long delay, an explosion and fire are possible.
For repairs, it is necessary to dismantle all three spark plugs, clean them of carbon deposits and oxidation products. One candle definitely pierces the body, the rest are unknown in what condition, so all three are put in an insulating heat-shrinkable polymer tube, at least three or four layers. During the repair, you will need to insulate the clamping bar in the same way, which secures the spark plugs to the burner body.
Possible breakdowns
Any geyser repairman will tell you that this device is considered potentially dangerous, so its maintenance should never be trusted to people who do not have the necessary qualifications. But for general information, it is recommended that you familiarize yourself with the list of common breakdowns and how to fix them.
Popping sounds while working
If you periodically hear popping noises coming from the water heater when heating water, it is better to immediately seek help from a professional. It is quite difficult to adjust the equipment without special training, so it is recommended to trust the master and refuse to try to fix everything yourself.
The reasons for this malfunction may be:
- The gas pressure is too weak, due to which air enters the burner and leads to micro-explosions, which the human ear perceives as loud pops.
- Strong pressure when the flame flares up quickly, interrupting periodically.
To eliminate such problems, it is usually sufficient to adjust the equipment and clean it. This may seem like a simple procedure, but you still shouldn’t do it yourself. A specialist will cope with this work better and faster.
Smells like gas
If, after turning on the column, the room begins to smell of gas (more precisely, odorants that are added to the fuel so that you can find out about a leak in time), then this is more than serious and even dangerous. In this case, you must immediately turn off the device, turn off the gas supply, and also open all windows, doors and turn on the hood (if equipped) to ensure constant ventilation of the room.
After all these manipulations, you need to call the emergency gas service at 104 (for home phones) or 040 for mobile phones. It is better to wait for the team on the street; you should not try to repair the gas water heater yourself, because... You can only make the current situation worse.
The flame doesn't light up
The device may not light up for many reasons. First of all, you should make sure that the pilot light is lit. If the problem is in this particular part, then it can be solved quite simply - a gas technician is called from the utility service, who cleans the element or replaces it with a new one.
An option to solve a problem with a gas water heater is to study the instructions or call a specialist
In dispensers with electric ignition, a special indicator located on the body of the device indicates that the flame does not appear and the gas supply stops. The first step is to study the instructions. Perhaps it describes a way to solve the problem (sometimes just inserting a new battery is enough). Otherwise, you can contact your dealer, manufacturer, or repair technician for clarification.
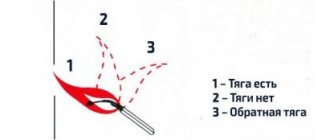
Also, the column may not ignite due to lack of draft in the ventilation well. This assumption is easily confirmed or refuted when a piece of paper or a burning match is brought to the grate. If it is noticeable that there is no draft or it is too weak, then you will have to clean the ventilation shaft. During this procedure, complex elements of equipment are not affected, so you can perform it yourself or still contact a specialist.
Wear of the water membrane can also lead to this unpleasant situation. This part tends to deform over time, as it is constantly exposed to loads, which is why it gradually loses sensitivity and ceases to perform its functions. Unfortunately, this cannot be avoided; even in devices from serious European manufacturers, the membrane has to be replaced every 4-7 years. To determine whether this small detail is really the problem, you need to turn the water tap to the maximum. If the column still turns on at the strongest pressure, then it’s time to change the membrane.
It is also recommended to check the filter located in the water inlet of the device. Insufficient water pressure is often a reason that can prevent the column from turning on. This is usually caused by blockages. The filter is not considered gas equipment, so it can be easily replaced without the involvement of a specialist.
Goes off during operation
If the burner ignites, but after a while the flame goes out, then the problem is most likely with the temperature sensor. This part is designed to prevent the device from overheating . This malfunction most often manifests itself as follows:
- The column lights up, works normally for a while, and then goes out. Subsequent attempts to turn it on do not produce any results. After about 20 minutes, the installation still manages to be ignited, but the situation repeats itself. The reason for this may be that the sensitivity of the bimetallic sensor is too high.
- The device does not turn on at all or occasionally. And if yesterday the water was heated, but today the burner is no longer functioning, this means that a short circuit occurs, which activates the safety valve.
It may be necessary to contact a warranty service center
. The first malfunction is considered a warranty case, but may be seasonal in nature and appear only on hot summer days or in winter, when all the windows are closed and the heating is working at maximum. At the same time, the temperature in the room is increased, and the device does not have time to cool properly. You may encounter this problem after the warranty has expired, and then you will have to carry out repair work at your own expense.
In the second case, you need to check the insulation of the sensor conductor. It may have worn out and needs to be replaced. Gas workers will not help here, such a malfunction is not their profile, and it is not worth doing the repair yourself. It is better to contact an authorized service center or the manufacturer.
Heat exchanger maintenance
Often, a geyser stops working due to malfunctions of the heat exchanger. In this case, consumers may experience weak water pressure and heating, as well as hear strange noises coming from the device.
Often the cause of geyser failure can be scale in the pipe.
Most often, the reason for the malfunction of this component is scale that has coated the inner surface of the copper tubes. Because of this, throughput and heat transfer are reduced. It is worth considering that soot and dust can accumulate between the exchanger plates, which can also interfere with normal heating. If the owner knows how to work with his hands and has an understanding of the structure of the column, then he can try to make the repairs himself. First you need to correctly remove the faulty part:
- The device is disconnected from the water supply and the gas is turned off.
- Under the water section of the heat exchanger, unscrew the plug and drain all the liquid from it.
- The drainage and water supply pipes are disconnected from the unit (green arrows in the photo).
- Unscrew the screws (blue indicators) and remove the fixation plate (yellow arrow).
If you have an idea about the structure of the column, then you can try to fix it yourself.
The part is thoroughly washed to remove soot, dust and other contaminants. Then, for half an hour, they are immersed in a container with a solution of water and any detergent, and the nodes are cleaned with a brush with soft bristles. If the scale cannot be removed, you will have to pour a special solution based on citric acid into the pipes, which is definitely found in the kitchen of almost all housewives.
To do this, 0.5 liters of water are heated to +40°C and 50 g of citric acid are dissolved in it. Moisten the parts with the product, leave for 15 minutes and rinse thoroughly under strong pressure. The procedure can be repeated several times until all dirt and scale are removed.
Heater leak
Over time, the equipment wears out, so owners of old speakers may encounter leakage problems. In this case, repairing the heater will involve replacing the radiator, the price of which is usually 25-35% of the cost of the device. To this it is worth adding the payment to the master, and you get a tidy sum, so in order to save money, you can independently solder the damaged areas. Most often they are found on the tube located outside the heat exchanger.
If there is a leak in the heater, you can try to solder it yourself
The work is carried out according to the following algorithm:
- The installation is turned off, the liquid is drained from the radiator and the nut is removed from the pipe supplying cold water. Typically, the speakers are installed above the taps, so the moisture flows out easily on its own. The remaining can be removed using a compressor or vacuum cleaner.
- The leak area is treated with sandpaper and wiped with solvent.
- Tinning is done with a powerful soldering iron, rosin is used as a flux, solder is any available alloy.
- The damaged area is covered with a thin layer of solder, after which its thickness is increased to 2 millimeters.
The work is completed by inspecting the tube along its entire length. In places with a green coating, new leaks will soon appear, so they should also be soldered. Usually this procedure does not seem difficult to experienced craftsmen.
When installing and servicing geysers, it is important to perform the work carefully and carefully, because a careless mistake can lead to irreversible consequences. Therefore, to repair such equipment, it is better to contact specialists or a gas service.
Repair of geyser Neva
Most models of Neva geysers have proven themselves to be simple and easy-to-repair water heating devices. They are far from the reliability of European models, but repairing them is much cheaper, and you can almost always do it yourself.
Failure and subsequent repair of a spark plug is considered by the rules to be an atypical case of breakdown, therefore, after performing repair work, it would be correct to look for the cause of the defect. Most often, plastic burnout occurs due to condensation flowing through the ventilation system onto the body of the gas burner.
How to repair a heat exchanger union nut
One of the most common defects of Neva geysers for almost all models is the low quality of the metal of the heat exchanger. According to the rules, the heat exchange circuit through which water moves should not come into contact with aluminum parts, for example, a gas burner or a control unit. Any such contact can cause electrochemical corrosion of the copper walls, and then repair will simply be useless.
In addition, the rules for tightening the union nuts that secure the heat exchanger to the regulator and outlet pipe are not always followed. With each heat exchanger removal and repair, the nuts cut a thin, barely visible path into the copper wall. Ultimately, the flared end and part of the copper pipe simply break off the tenth time of twisting.
In this case, you have to trim and level the area of the breakdown, install a new nut with an external thread, and connect the heat exchanger to the control unit with a regular flexible hose. Any other repair option, as practice shows, turns out to be short-lived.
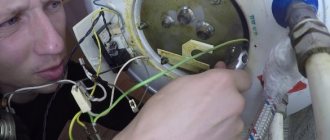
Repair of a microswitch in the geyser starting system
A situation similar to the Oasis with dead batteries also happens with the Neva gas water heater. When you try to start the Neva, the indicator board lights up, but the gas burner does not ignite. Sometimes the column can be turned on 4-5 times.
In this situation, repair of the microswitch is required due to premature wear of the part or improper adjustment of the unit.
The switch is located next to the water pressure control unit. When the column starts, the membrane on the block pushes out the rod, which unlocks the switch contact. Unlike the Oasis, all parts of the unit, including the rod, are made of brass, so there is no corrosion; the microswitch itself must be repaired and replaced.
To perform repair work, you need to disconnect the connector, unscrew two M3 screws and remove the switch housing from the strip, as in the video
Replacing the microphone is easy. You can buy an original part for 400-500 rubles. in a specialized salon or purchase an analogue for 50 rubles. in any radio parts store. There is no difference for repairs; in both cases they will sell a part from Chinese consumer goods.
In order to carry out the repair, you will need to unsolder two wires with a connector from the switch legs, put on a heat-shrinkable tube and solder them to the contacts of the new part.
At the final stage of repair, the switch is screwed with old screws onto the mounting strip on the block. Next, you need to adjust the position of the microswitch body so that the rod completely releases the contact when moving. This is done using mounting screws. One of the screws bends with a radius; accordingly, by rotating it, you can move the switch body in the desired direction.
Repair of the Junkers geyser
The advantage of domestic geysers is their high resistance to overloads and poor quality of water, and first of all, gas. Experts say that German equipment traditionally shows long service life without repair, but under one condition - the system must be protected from power surges in the network and equipped with protective filter elements that soften the hardness of the heated water.
But even in such conditions, you have to periodically carry out minor repairs on the Junkers geyser yourself. The reason is simple: automation, ignition and ignition devices turn out to be very sensitive to dirt, dust and rust in household gas. On dirty gas fuel, the igniter is the first to fail.
To restore the column, you will need to remove the cover and pull out by hand the thin profiled aluminum tube that ensures operation in standby mode. The tube is carefully cleaned with copper wire and washed with alcohol. Due to the high content of iron pentacarbonyl in the gas, fine metal dust falls on the walls of the gas pipeline, killing the spark plugs and igniter.
Filters practically do not retain pentacarbonyl, so craftsmen often replace the aluminum tube with a copper one of larger diameter. The new gas pipeline is wrapped around a heat exchanger, which ensures the decomposition of carbonyl in the pipe before entering the ignition zone.
In addition, dirty gas forces you to regularly open and clean the gas burner of the column.
Geyser does not heat water well
This can happen for several reasons.
- The simplest reason is that the gas water heater is not selected correctly . You saved money and bought a low-power heater that is unable to satisfy your hot water needs.
- The second reason is low gas pressure in the pipes (in the apartment). Call a gas technician to check the system.
- The third reason is a common blockage (nozzle, filters, scale, hoses, etc.), some types of which are described above. You can check this by the color of the fire, which changes from time to time. This is evidenced by the presence of soot.
You can only adjust the temperature and clean the column yourself.
Remember! Self-adjustment of the gas water heater and troubleshooting requires special care. If the work is performed poorly, not only you, but also completely innocent people may suffer. If you have the slightest doubt in your abilities, you should turn to gas service professionals.
Repair of heat exchangers of geysers
One of the most severe cases of column damage is considered to be burnout, fracture or through corrosion of the copper heat exchanger. In the first two cases, repairs are performed only by replacing the part with a new spare part. In the case of through corrosion, thin, 02.-0.5 mm holes are formed on the walls of the heat exchanger, through which water flows out of the circuit.
A defect, as a rule, is detected by intense soot formation, water leakage and a drop in pressure in the circuit when the tap is closed.
To repair the heat exchanger, you will need to remove it from the geyser mount. Next, the copper surface is cleaned of layers of soot and scale and subjected to a hydraulic test.
The easiest way is to identify the location of corrosion by pumping air or water under excess pressure. For example, the output of the heat exchanger is plugged with a rubber plug, and air pressure is applied to the inlet using a hand pump. The geyser heat exchanger is immersed in a container of water and the location of the damage is determined.
You can repair the damage at home by soldering with copper-silver tin solder. The first is used to restore the hottest spots located close to the flame front. To seal with tin, the copper surface is etched with a solution of zinc in hydrochloric acid, heated with a torch and tinned with a massive piece of solder. For normal operation, the thickness of the tin patch must be at least 0.5-0.7 mm.
After repair, the heat exchanger is checked twice more - using traditional air injection and holding it under operating water pressure after installing the unit on a gas water heater. The pressure in the circuit should not drop for at least 15 minutes.
Bosch geyser repair
Water heating gas appliances produced by Bosch are distinguished by their compact size and enormous automation capabilities. The more components and mechanisms there are in the design, the greater the likelihood of failure.
Bosch WR10 water heating systems are characterized by two types of breakdowns - random shutdown after a successful start and leaking seals due to high water hardness.
Arbitrary shutdown can occur for three reasons:
- Loss of draft in the chimney;
- The ignition electrode is dirty, as a result of which the automation does not recognize the very small ionization current and turns off the gas supply. Repair comes down to regular cleaning of the electrodes;
- Triggering of the heat exchanger overheating sensor.
The last case is the most relevant. The overheating sensor is a bimetallic plate with contacts. When a certain temperature is reached, the plate bends and opens the contacts.
To restore it, you first need to check the operation of the sensor, for example, short-circuit the contacts directly with a paper clip or copper wire. If the geyser continues to operate normally, then you need to buy and replace the sensor. Severe overheating means that the gas flow regulator will need to be adjusted and tested.
The gas water heater turns on with a bang
Be sure to change the batteries in the gas water heater on time, because if they are dead, your water heater will start making popping noises when turned on. Also, due to dead batteries, the speaker may turn off spontaneously.
These sounds when turned on and during operation indicate the following:
- due to the low gas pressure, some air got inside the system (into the burner), which caused a micro-explosion;
- the flame breaks out due to the high gas pressure;
- nozzle clogged;
- low ventilation draft;
- The batteries are low.
On your own, you can only fix the malfunctions described in the last two paragraphs.