Convectors are becoming more common every year as heating equipment in city apartments, country houses and many commercial real estate properties.
The market offer is replete with a choice of models with different functions, numerous installation options and the most advanced design developments. Therefore, giving preference to heating based on air convection, and this is what distinguishes a convector, there is simply no need to make such equipment with your own hands.
Choose a convector and save!
Today it is possible to purchase high-quality heating equipment at very affordable prices. But at the same time, such equipment will be more reliable and have a guarantee from the manufacturer, which cannot be said about a homemade convector. In addition, such a heater is very unsafe during operation.
But it is quite possible to save on the installation of certain types of convectors, for example, by installing an electric convector yourself.
To do this, simply mount the equipment on the wall using brackets, which are most often sold along with the equipment. It is impossible to install a gas convector with your own hands - this requires the qualifications of craftsmen, confirmed by special permits for working with gas equipment.
Such equipment must also be accepted into operation by the relevant service. During the operation of convectors, from time to time it may be necessary to repair a breakdown. If it is better to entrust the already mentioned gas equipment to specialists if it is not working properly, then it is quite possible to repair an electric convector with your own hands.
Most often, in such devices it is enough to simply recheck and repair the electrical connection and the equipment is ready to work again.
Quite new equipment for heating rooms. Previously used only in commercial premises, today they are increasingly used in residential buildings for heating panoramic windows and metal-plastic entrance doors. Thanks to the use of convectors, cold air is effectively cut off from living areas, additionally heats the room and eliminates the appearance of condensation on double-glazed windows. Condensation most often forms on large double-glazed windows, and this can also occur at relatively high air temperatures in the room. Condensation creates many problems, and not only aesthetic ones. Water flows down and further onto the floor; constant humidity destroys the flooring material and contributes to the appearance of fungi and mold.
Significantly increasing the temperature in the room to prevent the appearance of condensation is not economically profitable, especially nowadays with the high cost of energy resources. Convectors built into the floor solve all problems with minimal financial losses.
Reliability and long service life are largely due to the simplicity of the equipment.
Regardless of the models, they all consist of several elements.
- Housing (box).
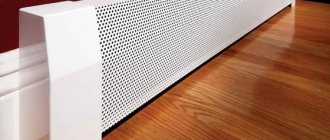
Made from galvanized or alloy steel sheets with a thickness of 0.5 mm. Some models are coated with polymer powder dyes to increase resistance to corrosion processes. The body is laid flush with the finishing coating, precise adjustment of the spatial position is carried out by special screw devices. Inside the box there is all the equipment, water shut-off and control valves, electrical cables, etc. The specific list of elements depends on the type of convector. The dimensions of the housing vary widely, which allows them to be installed under various types of floors. The appearance of the case does not matter; it is completely hidden by the decorative grille. - Heat exchanger.
There may be a water radiator or an electric heater. To increase heat transfer, special technical solutions are used or the number of radiators is changed. - Decorative lattice.
It is made of stainless alloys, alloy steel, and there are options made of wood. Through the decorative grille, cold air enters the convector and heated air is removed. The grille is double-sided; after critical wear on one side, it turns over.
Heating adjustment is carried out using manual or electromechanical devices, heat exchange is done using a natural or forced method.
It is advisable to make the decision to install a convector at the stage of planning the flooring. What parameters should you pay attention to when selecting a heater?
Case material
If the device will be installed near the entrance doors, then it is advisable to choose a model with a stainless steel body. The fact is that during the winter period snow can get into it, high humidity and elevated temperature accelerate the oxidation processes of the metal by an order of magnitude. There is a lot of moisture in indoor pools, bathrooms, etc. Even high-quality galvanizing cannot withstand such difficult operating conditions for long. One more thing. A decorative closing grill rests against the body. If it is subject to significant loads, then the housing must be selected from thick, durable materials; it is to this that the loads are subsequently transferred.
Case dimensions
Manufacturers offer products of various lengths, widths and depths. How do these parameters influence the choice of a specific convector?
- Length
. It is desirable that it be equal to the width of the window or doorway. If such options cannot be found, then professionals recommend installing two convectors in a row, their total length must meet the requirements described above. - Width.
It does not have any particular influence on the technical parameters; when selecting a model, it is recommended to pay attention only to the interior design of the room. - Depth.
A very important parameter. For residential premises, it is recommended to buy low convectors; they are much easier to install on thin floors of buildings.
Keep in mind that the linear dimensions of the case depend on the number and capabilities of the equipment and elements installed in it.
Heating method
Convectors can have water or electric heaters. Electric ones can be installed on all types of floors, they have completely autonomous control. Water, respectively, only in rooms with floor heating systems. This somewhat worsens the technical characteristics of the devices; the temperature of the coolant depends on the temperature in the overall system. This feature limits the possibility of built-in convectors.
Another difference between water and electric types of convectors. Electric ones can be installed at any convenient time; to do this, you only need to partially dismantle the flooring. It is recommended to install water systems only simultaneously with the installation of a floor heating system; if this condition is not met, the combined system will not function.
Radiator dimensions
The efficiency of heat transfer depends on two factors: materials of manufacture and surface area. All manufacturers use materials with maximum thermal conductivity during the production of devices; there is not much choice here. Changing heat transfer is mostly done by adjusting the size and number of radiators. But this parameter must be consistent with the size of the windows or doors.
Ventilation type
Air can pass through the heat exchanger due to natural movement or with the help of electric fans. The first option works more reliably; convectors can be installed in any premises, including those without electrical wiring. The disadvantage is the insignificant power of the convector, and the change in heat transfer occurs outside the user’s wishes.
Forced ventilation is performed using axial or radial fans. The air flow speed does not depend on external conditions; the convector can change its performance taking into account the specified modes. Disadvantages - the installation process becomes somewhat more complicated, and the noise in the room increases. Keep these device performance characteristics in mind when making your selection.
Grill type
In most cases, gratings are made of durable metal alloys. They can be rolled up or stationary. When choosing, it is recommended to pay attention to two parameters: physical strength and appearance. The greater the load on the floor covering, the higher the strength of the lathing should be.
Operating pressure
For private residential buildings, this indicator does not matter; the pressure in water supply networks for various purposes does not exceed 3 atm, and the minimum operating pressure for all types of convectors is never less than 10 atm. As for apartment buildings, buy devices with maximum pressure testing values. Before the start of the heating season, water supply systems in houses are tested with high pressure; convectors must withstand it.
Additional control and monitoring equipment
To control and change operating modes, electromechanical or mechanical instruments and devices are used. The elements are located directly in the housing, and control can be from a remote control. Electronic models allow you to program not only the temperature, but also the frequency of on/off. The choice of convector type depends on the wishes of use and the operating characteristics of the room.
Transforming a conventional electric convector into a wireless one
Background
My private house is heated using electric convectors. Everything about them is good: ease of installation, automatic temperature control, day/night mode and 50% power mode. But there is also a minus - the air temperature sensor is attached directly to the convector body, so it heats up and cools down along with it. Because of this, the convector turns on/off much more often than we would like; it is impossible to set the desired air temperature in the room, because the real one will be lower by 5 degrees, and constant switching of the relay has a negative effect on reliability. It was possible, of course, to lengthen the temperature sensor and move it further away, but this is not our method. Because I have been involved in wireless technologies for a long time and have some experience, so I decided to equip the convector with a wireless temperature sensor. This will allow you to place it anywhere in the room, without pulling wires, and if necessary, use not one, but several sensors and calculate the average temperature in the room. (Under the cut pictures)
Rework
As I already said, I am closely involved in wireless technology and have experience on this topic. ZigBee is ideal for monitoring various sensors, and I have been using the JN5148 from Jennic (purchased by NXP) for a long time as a ZigBee microcontroller. To quickly make prototypes, I made myself several modules with this microcontroller.
Module diagram (clickable):
The module circuit includes the microcontroller itself, external program memory for it (a mandatory component for the JN5148), quartz, capacitors along the power lines, and an RF part with an antenna. For a quick start, you only need a programming connector and a 3.3 V power supply. I ordered scarves from seeedstudio, cheap and cheerful. They are great for quickly making something. The temperature sensor was also made in advance and was waiting in the wings.
Sensor diagram (clickable):
The TMP102 microcircuit from Texas Instruments was used as a temperature meter. The microcircuit is quite inexpensive, measures temperature with an accuracy of 0.5 degrees in the range -25..+85, has a current consumption of 10 μA in active mode and 1 μA in sleep mode, is very compact, and also operates in the supply voltage range from 1.4 to 3.6 V, which important when powered by a single lithium battery. Otherwise, the sensor circuit differs from the module circuit in the presence of a battery, a divider for measuring its voltage, a power switch and a programming connector. To finish with the hardware and move on to the actual rework, I’ll get ahead and say that at first I only wanted to measure the temperature, transfer it to the convector and somehow slip it into the microcontroller instead of its native sensor. Subsequently, the idea arose to set the temperature threshold also remotely, from a PC. For this I used a USB whistle with the same JN5148. Scheme (also clickable):
The whistle circuit includes the circuit of the module discussed above and a USB-UART converter on the FT232R chip, which is also a programmer for the microcontroller. Now let's move on to reverse engineering. A Ballu convector with a power of 1000 W with an electronic control system was used as a test subject. Having disassembled the convector, I found 2 boards: a power board and a control board.
Power board:
Control board:
The power board contains a network power supply, a +5V voltage regulator on the L7805, 2 relays that include either a 500W (50%) or 1000W (100%) load and a buzzer. The thermal fuse and air ionizer are located separately. The control board contains a microcontroller, buttons, and a seven-segment temperature indicator. Inspection showed that a semiconductor diode is used to measure temperature, which is known to have a fairly linear dependence of the forward voltage drop on temperature. The diode is connected to the upper arm of the supply voltage divider, and the voltage from the divider is supplied to the ADC input of the microcontroller. Based on this measurement scheme, the easiest way to emulate a temperature sensor is to supply the convector ADC with voltage from the DAC, which is on board the JN5148. Because The supply voltage (and at the same time the reference ADC) of the controller in the convector is 5 V, and the reference voltage of the DAC is 2.4, it is necessary to increase the voltage from the DAC using an op-amp by approximately 2 times. Based on this, we draw a diagram of a temperature sensor emulator (clickable).
In addition to the module, it includes an op-amp amplifier, a 5 V - 3.3 V converter for powering the JN5148, and a programming connector. Next we make the board: iron, etch, drill, tin, solder.
We install the board in place and start coding. By the way, the fact that the control board is disconnected from the power board turned out to be very convenient. It is enough to apply +5 V to it and it can work completely autonomously, so I installed it in the convector after complete debugging of the system.
Programming
Experimentally, I measured the dependence of the temperature measured by the convector on the voltage at the ADC input.
It can be seen that in the middle of the range the difference between the actual and ideal characteristics is approximately 1 degree, so I decided to write the corresponding DAC codes into the array and, depending on the temperature, take the required code from the array and send it to the DAC.
As a basis for programming, I used a template from Jennic - JN-AN-1123-ZBPro-Application-Template, which can be downloaded here. It implements all the basic functionality of the ZigBee network, which runs on the JenOS operating system, proprietary to Jennic for its microcontrollers. Those who are interested can download the template and have a look, but I will only provide the most important code here. This system contains all types of ZigBee network devices: coordinator (convector), router (USB whistle) and sleeping end device (sensor). Let's start with the simplest thing - a USB whistle. He scans the UART for a byte from the computer and sends the received byte to the coordinator. The scan function is an operating system task that runs once every 50 ms. It checks whether the command has arrived and issues all incoming commands to the message queue, which is processed by the main task.
OS_TASK(APP_CommandScan) { APP_tsEvent sCommandEvent; int16 word; //Read the word from the UART word=i16Serial_RxChar(E_AHI_UART_0); //If successful if(word != -1) { //Send a system message with the command code sCommandEvent.eType = APP_E_EVENT_COMMAND; sCommandEvent.sCommand.u8Value = (uint8)word; OS_ePostMessage(APP_CommandEvent, &sCommandEvent); } //Restart the task timer OS_eContinueSWTimer(APP_tmrCommandScan, APP_TIME_MS(50), NULL); } In the main loop, all incoming commands are sent to the coordinator. //A system message has been received about the acceptance of a command via UART if (APP_E_EVENT_COMMAND == sAppEvent.eType) { //Create an APDU pointer PRIVATE PDUM_thAPduInstance s_hAPduInst = PDUM_INVALID_HANDLE; //Format the APDU to transmit the command s_hAPduInst = PDUM_hAPduAllocateAPduInstance(apduCommand); //Write data for transmission into APDU PDUM_u16APduInstanceWriteNBO(s_hAPduInst, 0, //Starting position for writing “b”, //Format string, transmit one byte (b) sAppEvent.sCommand.u8Value); //Set the APDU size to 1 byte PDUM_eAPduInstanceSetPayloadSize(s_hAPduInst, 1); //Send data, indicating the cluster, sender and receiver endpoints u8Status = ZPS_eAplAfUnicastDataReq(s_hAPduInst, MYPROFILE_MYCLUSTER_CLUSTER_ID, USBSTICK_MYENDPOINT_ENDPOINT, THERMOSTAT_MYENDPOINT_ENDPOINT, 0x0000, //Recipient address (in this case, coordinator) ZPS_E_APL _AF_UNSECURE, 0, &u8SeqNum); } The temperature sensor wakes up once per second (the time, of course, is adjustable), measures the temperature and battery voltage, sends everything to the convector and goes to sleep again. PRIVATE void vSendSensorData() { uint8 u8Status; uint8 u8SeqNum; //Create a structure for the measured data SensorData NewSensorData; //Measure the temperature and voltage of the battery NewSensorData.TempValue = TempMeasurement(); NewSensorData.BattValue = BatVoltageMeasurment(); //The MAC address is read once at startup //and sent to differentiate between multiple temperature sensors uint32 MacH, MacL; MacH = MacAddr.u32H; MacL = MacAddr.u32L; //Create an APDU pointer PRIVATE PDUM_thAPduInstance s_hAPduInst = PDUM_INVALID_HANDLE; //Format APDU to transmit temperature s_hAPduInst = PDUM_hAPduAllocateAPduInstance(apduTemperature); //Write data for transmission into APDU PDUM_u16APduInstanceWriteNBO( s_hAPduInst, 0, //Starting position of the written data “wwbh”, //Format string (in this case we //want to write two 32-bit variables (ww) //one 8- bit (b) and one 16-bit (h) MacH, MacL, NewSensorData.TempValue, NewSensorData.BattValue); //Set the total size of the sent data to 11 bytes PDUM_eAPduInstanceSetPayloadSize(s_hAPduInst, 11); //Send the data in a broadcast packet indicating cluster and sender endpoint u8Status = ZPS_eAplAfBroadcastDataReq(s_hAPduInst, MYPROFILE_TEMPERATURE_CLUSTER_ID, TEMPSENSOR_TEMPSENSORENDPOINT_ENDPOINT, 0xFF, ZPS_E_BROADCAST_ZC_ZR, ZPS_E_APL_AF_UNSECURE, 0 , &u8SeqN um); } The coordinator, in turn, determines who the data came from and if it is temperature, then sets the appropriate voltage at the output of the DAC, and if this is a command from a computer, it issues impulses to the temperature setting buttons (emulates a press).Temperature setting function: void SetTemp(int8 temp) { //Check that the temperature is within the range if(temp > 33) temp = 33; else if(temp < 0) temp = 0; //Set the DAC voltage corresponding to the current temperature vAHI_DacOutput(E_AHI_AP_DAC_1, temp_levels[temp]); } Receive data: //If data has arrived from the temperature sensor if(MYPROFILE_TEMPERATURE_CLUSTER_ID == sStackEvent.uEvent.sApsDataIndEvent.u16ClusterId) { //Read PDUM_u16APduInstanceReadNBO(sStackEvent.uEvent.sApsDataIndEvent.hAPduInst, 8, “bh”, &ReceivedT empSensorData); //Set the temperature SetTemp(ReceivedTempSensorData.TempValue); } else //A command has arrived from a USB whistle { //Read PDUM_u16APduInstanceReadNBO(sStackEvent.uEvent.sApsDataIndEvent.hAPduInst, 0, “b”, &Command); //Issue a pulse that emulates pressing the corresponding convector button if(Command== '+') { vAHI_DioSetOutput(0, (1 << PLUS)); vDelay(50); vAHI_DioSetOutput((1 << PLUS), 0); } if(Command== '-') { vAHI_DioSetOutput(0, (1 << MINUS)); vDelay(50); vAHI_DioSetOutput((1 << MINUS), 0); } }
And finally, a video of the system working:
Useful links: Description of the JenOS operating system Description of the ZigBee Pro stack Description of functions for working with JN5148 peripherals Archive with the project Archive with diagrams
And also, the article was published on May 7, so happy Radio Day everyone!
Brief list of manufacturers
To make your choice easier, we suggest familiarizing yourself with the most well-known manufacturers of convectors; their products have positive reviews from numerous consumers.
| Brand name | Technical specifications |
| Manufactured in Poland, can be with natural or forced convection. The thickness of the aluminum radiator plates is 0.22 mm, the steel frame is coated with zinc-magnesium. The diameter of the main copper tubes is 15 mm, body dimensions are from 100×50 mm to 200×100 mm. It is equipped with aluminum, wooden or stainless steel gratings. | |
| They can be with or without fans, the depth of the box is 18–35 cm, the width is 9–20 cm. It is used as additional heating of the room, installed near entrance doors and stained glass windows. The small installation height allows the devices to be mounted on thin interfloor ceilings. | |
| German convectors for in-floor installation. They can have radial and tangential fans, and there are electric heating options. Depth 7–19 cm, width 18–41 cm. A wide range of models makes it possible to increase the scope of use of the equipment. Maximum pressure 16 atm., working pressure 10 atm. They can function in one- and two-pipe heating systems. | |
| The box is made of galvanized steel, width 14–42 cm, depth 6–19 cm. Manufactured in Belgium, small dimensions significantly expand the scope of use. They can have natural or forced ventilation of the heat exchanger. Service life is at least 30 years. | |
| Hi-End devices operate with forced or natural ventilation. Manufactured in Germany, the company was founded in 1972. Depth 9–20 cm, low noise fans. The heat exchanger has aluminum fins and can withstand temperatures up to +120°C. | |
| Produced in the Czech Republic, they have a reduced height (from 5 cm), which allows the devices to be installed on thin flooring bases. The box is made of stainless steel. They have a wide selection of decorative grilles. | |
| During manufacturing, the most modern technologies are used, due to which the efficiency is significantly increased. Convectors are manufactured in Germany, the frame is made of powder-coated galvanized steel. Width 10–42 cm, depth 8–20 cm. A wide range of sizes allows consumers to choose the best option, taking into account the size of the room and the specific installation location. There are options with natural and forced ventilation of the heat exchanger. | |
| The devices are manufactured by a domestic company, the casing is made of galvanized steel, there are options with and without fans. Depth 7–19 cm, width 20–40 cm. Heat exchanger tubes are copper, aluminum lamellas. The thickness of the lamellas is 0.5 mm, the diameter of the tubes is 16 mm. Designed for working pressure 15 atm., pressing pressure 25 atm. There is manual or automatic control of operating modes. | |
| They are widely used in Europe and our country, the casing is made of galvanized steel, and electric heater options are available. They can work both for heating and cooling a room with natural or forced convection. Depth 9–20 cm, width 14–37 cm. | |
| The manufacturer is a Polish company; they may have one or two heat exchangers, which increases heating performance. Housing made of alloy sheet steel, depth 7–34 cm, width 18–38 cm. Tube diameter 22 mm, coolant temperature up to +90°C, operating pressure 10 atm. |
Each company produces a wide range of equipment according to technical characteristics, which makes it possible to find the most suitable convector option, taking into account the maximum number of different factors.
Violation of installation technology can cause troubles during operation of convectors. Particularly big problems arise when convectors with water coolant break down. It is for this type of device that we will give step-by-step instructions. For installation you will need a set of keys and sealing thread. You need to start work by assembling the heat exchanger. The prerequisite is that the final floor covering has not yet been installed.
Assembly of heat exchanger elements
Step 1.
Bring the box indoors and open it. Before opening, pay attention to the top and bottom, otherwise there will be difficulties when removing parts of the convector. Check the contents. Inside the housing there should be a heat exchanger, adjustable legs, adjusting bolts and washers, a decorative grille, connecting, shut-off and control valves.
Step 2.
Take two valves out of the package, unscrew the connecting nuts with fittings.
Step 3.
Screw a special thread onto the thread for sealing, the number of turns is at least 5–8.
Important. The thread must be wound along the thread; while tightening the fitting, it should be tightened and not loosened. This is a very important condition; if it is not met, water leaks will certainly occur. You will have to disassemble the already installed convector and eliminate the problems.
Step 4.
Hold the outlet of the heat exchanger pipe with one wrench, and with the second, screw the valve tightly into place. The valve inside has a hexagonal key hole. There is no need to apply too much effort; the thread reliably copes with its task. Use the same method to assemble the device’s faucet.
The heat exchanger is ready. It is advisable to first test the tightness of the connections. To do this, you can connect it to the water supply using flexible hoses and open the water supply. Everything is normal - you can start installing the case.
Purpose of in-floor convectors
Installation of in-floor convectors is justified if there are elements in the room that create heat losses. These include:
- Floor-to-ceiling glass doors;
- Entrance areas to the loggia with windows and thin doors;
- Exits to the terraces;
- Panoramic windows (stained glass).
The decorative grille is the only thing that an in-floor convection heater produces.
If the ratio between the window area and floor area is sufficiently small, significant heat losses occur . In addition, an unpleasant cold emanates from the giant glazing. The problem is partially solved by installing triple-glazed windows, but they are expensive. Therefore, we feel free to buy in-floor convectors and begin installing them ourselves.
These heating devices are compact, but require niches of suitable depth for installation. Metal boxes (housings) of convectors are installed here, after which they are secured using special fasteners. The whole thing is covered with a decorative grille on top - this is just a brief instruction so that you have a general idea of future installation with your own hands.
Housing installation
Step 1
. Screw the adjusting screws into the threads and open the holes for supplying pipes to the floor heating system. They are closed with removable flaps.
Step 2.
Place the housing in its place of installation, using a bubble level to set it in a strictly horizontal position. This is a very important stage. If the heat exchanger is at an angle, then there is a high risk of airing it, as a result it will not work at full capacity. In addition, the grate will not be located in the same plane as the flooring. Check the position in several directions, constantly tighten or unscrew the adjusting bolts.
Important. When installing the housing, take into account the zero level of the floor covering. It is in this plane that the decorative grille of the convector should be located.
Step 3.
After installing the housing, you need to fix its position. To do this, use adjustable legs made of perforated steel plate. Fix one end to the body using bolts and washers, and the other to the base of the floor. To fix it to the base, you need to use dowels of the appropriate length and diameter. After fastening, check the position of the device again and, if any deviations are found, correct them.
Step 4.
Place the heat exchanger in the housing; there is a special place for it. Insert the plastic pipes of the floor heating system into the holes, measure their length and cut off the excess with a special pruner.
Step 5.
Using a special portable welding machine for plastic pipes, heat the ends and attach them to the tap and valve fittings.
Step 6.
Using a nut, screw the elements to the heat exchanger, while constantly holding the fittings with a second key. It is made of stainless alloys, and they have low physical strength. Exceeding the maximum load can cause cracks. Another unpleasant property of such alloys is their low resistance to metal fatigue. This means that even not very strong tightening forces, applied over a long period of time, cause cracks to appear and the metal “gets tired.”
Step 7
Connect electrical cables to the module. For this purpose, a terminal block is installed; the connection diagram is in the instructions for using the device. The module automatically supports user-specified convector operating modes. When connecting the power, you must turn off the network; all work must be carried out in strict accordance with the requirements of the PUE.
Step 8
If you fix the convector body with cement-sand screed or polyurethane foam, be sure to insert special spacers into it to prevent deformation.
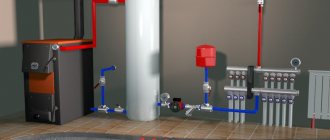
We looked at an example of installing a convector with hybrid heat distribution; the device is connected to a common floor heating system. The coolant temperature in the convector is the same as in the system, which somewhat limits the capabilities of the equipment.
General tips for installing a convector after installing the final flooring
Such situations may arise during construction work; the installation location of the convector should be provided during the installation of the flooring and heating system. The dimensions of the recess must correspond to the dimensions of the housing with a margin of 2–3 cm around the perimeter; the length of the plastic pipe outlet must guarantee trouble-free connection of the device. They are always made with a reserve, the excess length is then cut off.
Installation diagram of convectors, indicating the dimensions of the niche for equipment
It is recommended to install the convector at a distance of no more than 30 cm from the window, otherwise the double-glazed windows may fog up - warm air will not heat their surface. The thickness of the thermal insulation layer under the convector body should be adapted to the overall height of the finishing coating; it is advisable to use the same thermal insulators as under the main floor surface.
Most convectors have a right-hand standard connection, but you can change it yourself or, at the time of purchase, select the type that matches the existing wiring. Place the fans in the housing on the side of the window or doorway; they should capture cold air. Due to this placement, the efficiency of the device increases and the microclimate in the room improves.
It is imperative to connect the Mayevsky tap to the heat exchanger; it is located at the coolant inlet. The Mayevsky tap allows you to vent the convector; failure to perform this operation may cause the device to malfunction.
The power connection is carried out according to the diagram, and the fan rotation speed can be changed with a potentiometer. After completing the electrical installation, all open connections must be covered with special sealed covers. Make sure that the rubber gaskets do not have mechanical damage. Mount the controller to the wall at a height of approximately 1.5 m from the floor, this position is convenient for use.
Video - Installing a convector
A homemade niche for a convector built into the floor is often made in private houses during their construction. A homemade niche allows you not to buy ready-made heating ducts, but to assemble a heating system built into the floor from standard radiators.
Selection of convectors
Installing an in-floor convector may seem like a rather complicated process. Therefore, we will describe everything step by step, starting with the choice of equipment. We can install electric or water heating devices in front of panoramic windows or in front of the entrance area - it all depends on the type of main heating in the building.
Electric in-floor convectors operate on a 220 Volt network and are designed to heat households not connected to gas mains. Their design most often already includes fans of one design or another (axial or tangential). The disadvantage of electrical appliances is their high energy consumption, but in some situations they are irreplaceable. But to connect them you only need wires.
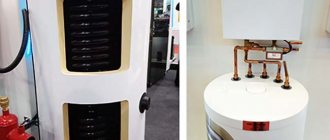
The device of a water convector installed in the floor.
Water convectors have a similar design - they have heat exchangers connected to the heating system. For this purpose, metal or plastic tubes are used, which require certain skill for their installation. In this regard, electric in-floor convectors win - for their installation and connection you only need wires of a suitable cross-section .
When planning the installation of an in-floor convector, pay attention to choosing a model with forced convection. These devices have the following advantages:
- Higher warm-up speed;
- Increased operating efficiency in rooms with a ceiling height of 3 meters;
- Effective removal of moisture from the entire glazing surface.
By choosing in-floor convectors with low-noise fans, you can increase heating efficiency and prevent noise sources from appearing.
Niche for a convector built into the floor - device
The easiest way is to make a niche on the ground floor in the earthen floor.
- The niche must be covered with a layer of waterproofing. Moreover, the waterproofing of the niche must be combined with the waterproofing of the main floor.
- The size of the niche should match the size of the radiators. There must be a distance of at least 100mm from the walls of the niche to the edges of the radiator. The distance from the edge of the niche to the window should be 50-250 mm.
- The general design of the niche for the radiator is clearly visible in the figure. This is a diagram of a niche for a radiator on the first floor of a house.
- If a niche needs to be made on the second and third floors, it is necessary to provide for lowering the floor beams to the required height.
- The niche can be plastered, but it must first be insulated. It is better to use polystyrene foam. This is a rigid insulation that will further strengthen the niche. Insulation will reduce heat losses due to unnecessary floor heating.
- It is better to make the “trough” of the niche itself from galvanized steel. It will additionally serve as a heat reflector. You can cover the niche (instead of steel, with ceramic tiles).
- The edges of the niche need to be trimmed with a corner for laying a decorative lattice.
Installation of radiators in a niche
We are considering the simplest convector built into the floor. This is a convector with natural circulation. The niche for the convector built into the floor is already ready, let's start installing the heat exchanger.
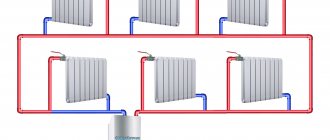
The coolant moves through a two-pipe heating system. It is supplied by one pipe, and by the second pipe it is removed from the radiator. A thermostat with a Mayevsky tap is installed at the input, and a shut-off valve is installed at the output. Everything is the same as when installing radiators on a wall, only in a horizontal plane.
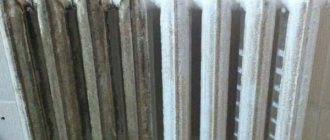
Water heating radiators, or simply batteries, used in centralized heating systems, distribute heat throughout the rooms using the principle of passive convection. This approach is very irrational in terms of heat loss, especially if the battery is located in the corner of the room.
For this reason, there are convection radiators equipped with a fan that improve heat distribution throughout the room by accelerating air circulation between the battery sections.
In this master class I will show you how to upgrade a regular battery to a convector battery with your own hands.
Step 1: Fan Assembly
I took 4 fans Brushless DC Cooling Fan 7 Blade 24V 120mmx120mx25mm
.
This type of fan is very quiet and was a good size for my battery. A combination of 4 of these fans is enough to cover the entire length of my pipe.
Fan characteristics: - 7 plastic blades - speed 1600 rotations per minute - air flow 58 cubic meters. ft/min — noise 38 dB. — power supply: DC 24V, 0.20A
These fans cost me 1,200 rubles including delivery. Structural strength is provided by cable ties that pass through holes in the corner of each fan and connect them together.
Step 2: Connecting the Wires
The fans use standard 2-pin connectors, just like motherboards. They hold copper cables well. You can also combine 2 connectors with a small piece of cable by inserting one into the back of the other.
This will help reduce the number of cables connecting the fans to the power supply. The power supply is connected by a 2-wire AC cable on one side and DC cables from the fans on the other.
The photo does not show the switch and the standard plug at the end of the AC cable. I took the power supply like this - 24V Universal Regulated Switching 25W Power Supply
.
Step 3: Check the fans are working
I connected the fans and checked their operation before installing them under the battery.
Step 4: Legs and other finishing touches
I equipped my fans with 4 legs from angle iron cut into 15cm lengths. Then I simply placed the section under the battery. As a result, I got excellent heat distribution throughout the room, with the help of almost silent fans consuming a total of 24 W:
Fans: 4*0.2A*24V=19.2 W - power consumption: 80% of the total supply - total power: 19.2/80%=24W
This is how I pumped my standard hot water radiator up to the convection radiator.
Gas convectors are significantly inferior in popularity to similar electrical equipment. First of all, because the installation of this equipment requires a centralized gas supply or, at least, gas in cylinders. In addition, electrical equipment is safer. However, the operation of gas devices is cheaper, so a gas-type convector is an excellent solution for a country or country house to maintain a normal indoor microclimate. The topic of today's article: do-it-yourself gas convector - its installation and use.
General device
The components of a gas convector are:
- A heat exchanger that heats the air in the room.
- A programmer is a device for maintaining and controlling air temperature.
- Control panel with indicators.
- Gas valve that allows you to control the gas supply.
- Fan - to supply air to the heat exchanger and valve.
- Fan - for forced supply of heated air into the room.
Important! The operating principle is quite simple. The operation of the device is based on the physical phenomenon of convection. Warmed air rises, and cooled air falls down. The devices can operate on the principle of natural or forced convection (in this case, the device is equipped with a special fan).
Device and general principle of operation
In-floor convectors, similar in appearance, are quite capable of becoming a good replacement for any traditional wall-mounted heating radiators. The name of such devices is due to the rather simple principle of operation of in-floor heaters. Thanks to the special design, thermal energy is transferred as efficiently as possible through convection.
The fan in the system supplies heated air
The passage of cold air currents around the heat exchanger causes an increase in temperature and a decrease in the density level, which is accompanied by the rise of heated air upward and its entry through the decorative grille into the room. Instead of rising warm air masses, air with a lower temperature regime rushes into the heating device.
The device provides cold air in and warm air out
Devices installed in the floor are most often made on the basis of a stainless or galvanized steel body, which is characterized by increased resistance to corrosion.
The body of the device contains many parts, including several decorative grilles and a heat exchanger
The diagram shows the components of the convector:
- 1 — device body;
- 2 - internal heat exchanger;
- 3 — decorative grille;
- 4 — AC tangential type fan;
- 5 - large decorative grille;
- 6 — small decorative grille;
- 7 — edging decorative profile;
- 8 — mounting and adjusting legs of the device;
- 9 — adjustment screws;
- 10 — mounting bolts;
- 11 — ball valve;
- 12 — shut-off and control valve;
- 13 - flexible liner;
- 14 - gasket.
The inside of the device is equipped with a built-in heat exchanger in the form of a horseshoe-shaped bent copper tube. Aluminum fins are used to increase the surface area of the heat exchanger. The upper part of the convector is equipped with a decorative grille made from wood, aluminum and steel.
The performance indicators of the device are influenced by the temperature regime of the supplied coolant and the intensity of the air flow that is created near the heat exchanger. Modern heating devices are able to operate in a wide temperature range of the coolant - 45–90° C.
The built-in tangential ventilation element helps to increase the level of performance and the rate of heat transfer, through which the intensity of air flow increases.
Advantages
The positive aspects of such a heater include:
- Economical, quick heating of the room.
- Easy installation, the ability to install a gas convector with your own hands.
- No need for water heating.
- Reasonable price.
- Unlike an electric appliance, a gas appliance does not burn oxygen.
- Autonomous operation mode.
- No connection to the power grid.
- Possibility of connecting the device to a gas cylinder.
Classification
Gas convectors are mainly divided according to two criteria: power and design. The power issue is more or less clear. You need to choose a device that can heat the room.
Depending on the design, the following heaters are distinguished:
- Floor-standing - installed on the floor. No special skills are required to install the floor-standing device. The device can heat fairly spacious rooms.
Important! Disadvantages include significant weight and the need for a foundation.
- Wall-mounted. This is a more compact option. The device fits perfectly into your home interior. Most often it is mounted above a window to create a thermal curtain from cold air. The power of the devices is low. They are suitable for use in houses up to 100 square meters.
Important! In addition to floor and wall devices, there are also built-in ones. They have a beautiful design, and not only do not spoil, but also decorate the interior. In terms of their parameters, convectors do not differ from the wall-mounted version. The downside is the difficulty of installation (you need to prepare a niche in advance for installing a gas convector with your own hands.
When choosing a convector, be sure to pay attention to the material from which the heat exchanger is made. It can be steel, copper or cast iron.
Important! The most common option is steel, but a cast iron heat exchanger provides greater efficiency and is more durable. The copper heat exchanger is efficient and durable, but the cost of the device is high.
Advantages and disadvantages
In-floor structures have both pros and cons. Having dealt with all these points, you can understand which heating is best to choose for a particular room.
Among the advantages of radiators built into the floor, it is worth noting the following:
- a fairly long service life, which will allow you to not think about repairing or replacing it after installing the radiator;
- radiators built into the floor have quite high performance, but the costs are minimal;
- they are reliable, trouble-free and also environmentally friendly;
- radiators built into the floor are hidden from prying eyes and do not spoil the interior with their appearance. They do not take up space, so they do not interfere with the placement of furniture;
- Such models make it possible to install a panoramic window.
With all these advantages, there are points that significantly reduce the popularity of these radiator models.
The disadvantages include the following:
- to install such radiators, it is necessary to increase the ceiling height;
- the price of such structures is much higher than that of simple floor or wall models;
- if the ceiling height is more than three meters, then radiators built into the floor will not work. It is better to purchase wall structures;
- In addition, this type of radiator is much more difficult to install;
- If the radiator has a forced convection function, then the electricity bill will increase significantly. Such models also contribute to the spread of dust.
Floor-mounted radiators can be divided into two types.
- Electrical. Such designs have closed-type heating elements where plates are installed. They can be copper or steel. Radiators are manufactured in accordance with all safety requirements for electrical appliances, and are also equipped with fuses to protect against failures. Such models are used in those houses where there is no connection to centralized heating.
- Water batteries are a metal tube with plates. Such a radiator is connected to the central heating system using pipes. Similar structures are also made from copper, aluminum or steel.
Although radiators with copper heaters are quite effective in terms of heating, they are difficult to use in centralized heating conditions in apartment buildings.
What do you need to install a convector with your own hands?
- Drill and drill bits for it.
- Pipe cutter
- Adjustable wrench, wrenches.
- Hammer.
- Spatula.
- Gas tap.
- Silicone (high temperature, plumbing).
- Screwdriver.
- Self-tapping screws, dowels.
Important! First, you need to choose the place where the convector will be located. Don’t be lazy to study GOST, according to which the heater will be located under the window. All surfaces and furniture need to be covered with textiles, since the work ahead will be quite dusty.
How to make a convector with your own hands: installation algorithm:
- Decide on the location of the hole for entering the gas pipe.
- According to the diameter of the exhaust pipe, drill a hole through the wall. A hammer drill is ideal for this.
Important! This is the most labor-intensive stage of the work. The hole will have to be punched quite large, and there will be more dust than we would like.
- Drill holes to mount the heater and drive dowels into them.
- Connect the exhaust pipe to the convector and seal the joint with silicone.
- Secure the heater to the wall using self-tapping screws.
Important! At this stage, you cannot do without an assistant, since the device is quite heavy.
Types of convectors
Convector chimneys can be used to heat both one room in which the boiler or stove is located, and adjacent rooms. In accordance with this, two types of equipment can be distinguished:
- chimney-convector-1 – heating device;
- chimney-convector-2 – equipment for heating air in two adjacent rooms.
We recommend that you read: Replacing old pipes with polypropylene on your own
Chimney-convector-1 of the first type is used to increase the efficiency of heating one room. It is most often installed in country houses and baths as an alternative to water heating or electric convectors.
Chimney-convector-2 consists of a central pipe, from which two coaxial horizontal pipes extend in different directions. They are carried through holes in the walls into adjacent rooms, where they serve as heating radiators.
The average height of a single convector chimney is 65-100 cm, the diameter of the inner pipe is 110-115 mm, and the outer metal casing is from 220 to 300 mm.
To increase the area of the convector, stainless steel sheets or metal pipes of smaller diameter are welded to the outer casing, between which air pockets are formed. The air passing through them is heated and mixed with the cooling air in the room. In this way, there is a constant heat exchange between the chimney and the room.