Hello readers of my blog! Today we will talk about how to properly install a heated floor regulator with your own hands. It would seem that the matter is not tricky, but when you are faced with this problem, you have to think about how to do it correctly, what preparation to do, what materials to choose. Thus, I decided that this article would be useful to someone, and I am devoting my efforts to this subject. In it I will answer a number of questions that will arise immediately before How to properly install a heated floor regulator with your own hands, and some even after that. This topic is quite broad, because before work, thorough preparation is necessary, but how to do this? And this is a separate topic. You can learn about all this in great detail in the article below.
Choosing a thermostat for heated floors
As a rule, a heated floor thermostat is purchased separately, guided by its functions, appearance and set of options for the heating system itself.
The underfloor heating thermostat is designed to maintain the selected temperature on the floor surface and in the room itself.
The basic principle of operation of the underfloor heating regulator is to turn off the heating system after the temperature in the room or on the floor surface reaches a predetermined level. After the temperature drops by at least one degree, that is, the floor begins to cool, the thermostat turns on the heating system again. By constantly monitoring the temperature, this device helps to significantly save energy consumption.
Maintaining a constant temperature is the main, but not the only function of a heated floor thermostat.
With its help, you can heat a room to a given temperature by a certain time. It is very convenient to do this in the cold season, by heating the room in the evening, turning off the heating system at night, and in the morning, by the appointed time, the thermostat itself will heat the floor and air to the desired temperature and it will be much more comfortable to get up. To do this, you need to properly install the electric heated floor.
Existing types of underfloor heating temperature controllers
Despite the fact that currently there is a large selection of floor heating thermostats, all of them can be divided into three main groups:
Heated floor thermostats can be equipped with various temperature measurement sensors.
There are also built-in and overhead temperature controllers for heated floors. The first ones are built into the wall like, for example, a socket, and the second ones are mounted inside a special box.
Regulator calibration
Calibration of the electromechanical regulator is carried out as follows:
- Measure the temperature in the room. This will be the calibration zero (normal);
- Remove the regulator cover (1);
- Using a screwdriver, set the knob dial to the room temperature (2.3);
- Replace the handle.
conclusions
Taking into account that the thermostat is not a complicated device, the choice of thermostat should be based on your financial capabilities and interior design. But in fact, the seller gives a guarantee for the heated floor sold and completes the system with a thermostat; you only choose its type.
Other articles in the section: Floor heating
- Water heated floor system: principle of operation, device, description
- Three elements of an electric heated floor: the electrical part of heated floors
- Concrete and floor heating systems
- Warm floor under linoleum
- Infrared floor heating
How to properly connect a floor heating regulator
Connecting a heated floor temperature controller does not require special education or any special skills.
This can be done independently if you have a minimum of electrical knowledge and follow a certain sequence of actions. First of all, you need to choose and purchase the device itself. Then it must be prepared for connection.
First you need to inspect the device to visually exclude the possibility of breakdowns and damage.
Then, in accordance with the list provided by the manufacturer, it is necessary to check the presence of all the components listed in it. Then the reliability of the means for strengthening the apparatus and the correct connection of the thermocouple are checked. Only after this can you proceed directly to connecting the thermostat.
The connection diagram for the heated floor temperature controller is shown either in the operating instructions or on the body of the thermostat itself. After studying it, you can easily connect the device yourself. Any type of underfloor heating thermostat has special terminals for connecting wires, each of which performs specific functions:
IMPORTANT!!! All work on connecting and adjusting the heated floor thermostat must be done after first turning off the voltage.
The last step is to check whether the device is functioning correctly. To do this, you must adhere to the following sequence of actions:
If it is necessary to reduce the desired temperature, you need to turn the relay to the selected position and the power supply should stop, which indicates that the device is functioning correctly.
If, as the temperature increases, there is no voltage in contacts No. 3 and No. 4, then you need to check the operation of the heated floor temperature sensor. To do this, using a special device, you can measure the resistance in the wires and compare them with the passport data. If the parameters do not match, then you may need to replace the heated floor temperature sensor.
If you purchased a programmable sensor, a message about a possible malfunction will appear on its panel.
There is another method for checking the correct operation of the floor heating thermostat. To do this, you can connect the heating system directly. To do this, with the voltage turned off, you need to connect contact No. 4 to contact No. 1, and contact No. 3 to contact No. 2 and apply voltage to the network, wait about half an hour, try the floor, if it gets hot, then the cause of the defect is in the regulator itself warm floor temperature.
Is it possible to connect an electric heated floor without a thermostat?
To heat a private house or apartment, underfloor heating systems are often used. Today this is a good option, because installing the system efficiently and evenly heats the entire area of the room, while saving space.
When it comes to heating a room, consumers often ask the question: “ Is it possible to connect a heated floor without a thermostat ?”
Theoretically, this is possible: the heated floor is connected to a regular switch. Let's consider the pros and cons of operating such a system without installing a thermostat.
How does underfloor heating work without a thermostat?
Note that the desire to connect a heated floor without a thermostat often arises for one of three reasons:
- Desire to save money on purchasing a regulator;
- If it is not possible to install a thermostat, because... the renovation has already been completed;
- When organizing underfloor heating of small areas up to 1 m2 (for example, heating a dog house, brooder, etc.) when the cost of the regulator is 2 times more than the cost of the heater itself (for example, an IR film segment)
In general, the installation technology is the same everywhere. Heating elements under the floor covering are placed in the right places: located only where there is no furniture or where it is on legs and connected directly to the power supply.
The user can only turn the heated floor on and off with a switch - independently.
When the floor heats up and becomes hot, it must be manually turned off to avoid overheating and damage to both the heating elements and the floor covering.
Manual switching on/off without a thermostat is very inconvenient
: Constant monitoring is required. Leaving the heating system on without supervision is fraught with trouble. In addition to damaging the flooring and equipment, using appliances in this manner consumes a large amount of electrical energy.
Before looking for the answer to the question “ Is it possible to turn on a heated floor without a thermostat ,” read what will happen to the floor covering if you do not turn off the heating system in time.
- Parquet board. If the parquet board is frequently heated above 26 degrees, the boards will begin to deform and creak.
- Laminate. When the heating of the floor reaches above 35 degrees, the laminate coating may emit an unpleasant odor, toxic substances (formaldehyde), and begin to dry out, forming gaps between the joints.
- Natural linoleum heated to 27 degrees and above tears, stretches, melts. Synthetic linoleum (PVC) loses color, begins to rise, and phenol begins to be released.
- Carpet. When heated above 30 degrees, it stretches and burns.
- Tile. If the underfloor heating system is installed without a regulator under porcelain tiles, then if it is turned on for a long time, the heating element itself will quickly fail.
In any of these cases, when connecting an electric floor without a temperature controller, you will have to change either the floor covering or the heating elements.
Connecting a film heated floor without a thermostat
A logical question for users who are interested in whether it is possible to connect a film heated floor without a thermostat. When the infrared film is connected directly to the power supply, it heats up. The film is heated until it reaches its maximum performance. There are different models and manufacturers whose maximum heating reaches 50, 70, 110 degrees or other values.
An infrared floor can be connected without a thermostat in the following cases:
- infrared film is not installed under a decorative floor covering (laminate, linoleum, parquet board, etc.);
- the power of the IR film corresponds to the required heating temperature (for example, at 220 W/m2 the heating temperature will be ~50 degrees Celsius);
- The effect of overheating of the heating film when it is turned on for a long time is completely eliminated;
- Heat is removed from the heating film unhindered and continuously over the entire area.
Also, do not rely heavily on the so-called self-regulating infrared film
. Many people believe that such infrared film can be connected without a thermostat, but this is not entirely true.
An example of connecting a heating film without a thermostat for long-term operating modes would be to buy a heated mat, which you can buy in our online store. With proper use, such mats can work continuously throughout the heating season.
Self-regulating infrared film without thermostat
In these products, when the film gradually heats up, the heating power begins to decrease as the resistance increases. This way the film is protected from overheating if the floor surface has poor heat transfer.
However, this effect begins to appear only after heating to a temperature above 50 degrees Celsius, and even if the power is reduced by 30%, the self-regulating film heats up further. And if it does not fail, because it has a rather low melting point, then the high temperature can damage the floor covering itself.
At the same time, adhering to the conditions described above, the film self-regulating heated floor
also
be connected without a thermostat .
Is it possible to use film heated floors without a thermostat ? Without a thermostat, the consumer needs to stay at home all the time, control the heating temperature, and not leave it on unattended.
If this is the only source of heating for a house or apartment and there is no possibility of control, then within a few hours after turning off the device the room will become cold, especially in winter.
Therefore, regardless of the type of heated floor and type of floor covering, installing a thermostat is mandatory !
The savings on purchasing a thermostat are not comparable to the cost of dismantling and repairing the floor covering, which may become unusable due to non-compliance with the temperature regime.
If the renovation of the room has already been completed, you can always install a surface-mounted thermostat directly on the wall, organizing the power supply using external cable channels.
In case you equip a dog house, drying chamber, brooder, etc. with infrared film. It is allowed to connect a film floor without a thermostat, provided that the requirements described above are met.
Features and functions of a thermostat in heated floors
You can save on energy costs and preserve your flooring by installing a temperature sensor.
The thermostat is an electrical device that provides control over the air (floor) temperature when heating equipment is operating. The temperature sensor is installed before the finishing floor covering is laid.
When the floor warms up to the set temperature, a signal is sent to the controller and it automatically turns off the heating. The thermostat itself does not turn off, but continues to monitor the situation. When there is sufficient cooling, a sensor is triggered, sending a signal for the system to turn on again.
Is it possible to connect a heated floor without a thermostat : “NO”
, and there are several reasons why monitoring equipment should be installed.
1. Comfort
Without connecting a thermostat, there is no full comfort. After all, the surface can heat up quite strongly. This depends on the flooring material used, on the heating element itself and its power. It is the thermostat that regulates the heating and ensures the selected temperature in the room.
2. Savings
When underfloor heating is constantly on, energy costs increase. If a thermostat is built into the system, it is adjusted to the required heating level. When the temperature reaches the set level, the thermostat turns off the heating. The thermostat itself consumes no more than 2 W per hour (1.5 kW*month)
3. Extending the service life of the floor surface and heating device
If a thermostat is installed, the floor surface will last much longer than without it. When the device automatically turns on and off, and does not work on a constant basis, the service life of the heated floor system will increase significantly.
Heating of the room depends on the type of heated floor and the installed floor covering. Using a thermostat
allows you to maintain a constant temperature in the room around the clock. There is no need to constantly monitor the heating level of the system: reduce the temperature or turn off the equipment completely when needed.
Connecting a cable electric heated floor without a thermostat
The operating principle of cable electric heated floors without a thermostat is somewhat similar to infrared films. also strictly not recommended to turn on such devices without a temperature controller.
for long operating modes.
Please note that in film and cable floors we are talking specifically about long-term heating modes. If you need to test the operation of an electric floor without a thermostat, for example after installation, you can safely turn it on for heating for 5 to 20 minutes.
The exception here is heating cables for external use. These heating cables are not intended for laying underfloor heating and are mainly used in snow melting and anti-icing systems.
A special type of self-regulating heating cable can safely operate without a thermostat throughout the entire heating season.
There are also modifications of a resistive heating cable with a plug at the end of which a thermomechanical thermostat is installed and additional installation of the regulator is not required.
However, remember that self-regulating heating cables should not be used in heated floors (although in practice there are often cases when unscrupulous builders use such cables in a heated floor system). This is primarily due to the fact that the service life of such cables is several times lower than that of special cables for heated floors.
How to choose the right floor heating thermostat
Now there is a large selection of underfloor heating regulators. To purchase a high-quality and reliable thermostat, you first need to pay attention to the manufacturer’s brand. It is better to take a device from a well-known, trusted manufacturer that provides guarantees of product quality.
For example, devi brand thermostats have a number of advantages: they are easy to use, 5 possible temperature modes are set using one temperature control knob.
The floor heating regulator of the French brand “legrand” is characterized by a large number of various options. With its help, maximum accuracy is ensured in maintaining the required temperature for a long time, there are 4 temperature levels, all the necessary information is displayed on the display. The “energy” brand thermostat gained its popularity due to the ability to quickly and easily configure the heating system “to suit you.”
Many models of underfloor heating temperature controllers combine several functions, from which you can choose the best option that suits you.
Another important factor when choosing a thermostat is the purpose of the floor heating system itself. If you just need to heat the floor to a certain temperature, then you can use a simpler regulator. If you want to be able to set the heated floor controller according to time so that the temperature of the floor and air in the room warms up before you come home from work, then it is better to choose a programmable controller.
A conventional remote temperature sensor is mounted directly into the floor. An infrared sensor that is installed on the wall is considered more accurate. If the floor is the main source of heat in the room, then it would be better to purchase a heated floor thermostat with two sensors, which will simultaneously control the temperature on the surface of the floor and the air in the room.
How to install a thermostat for a heated floor Today, the floor heating system is becoming very popular, because it can be installed under different floor coverings, even under tiles. This heating can be used as main or additional. To maintain the optimal temperature, as well as for economical operation of the system, you need to install a temperature controller. In such a device, you can easily set the required air temperature in the room, which it subsequently controls itself. Since the installation process itself is not complicated, you can do it yourself.
The set includes a thermostat and temperature sensor. The temperature sensor is installed using a plastic corrugated tube. The sensor in the corrugation is placed in the screed.
New sensors have a programming function.
Thanks to this function, the owner can set the temperature controller so that during his absence the heated floor will operate in economic mode. At the same time, a certain time before the owners arrive, the device goes into normal mode, thereby heating the room to the required temperature. Despite the fact that the cost of a programmable thermostat is more expensive than a regular one, it is better not to skimp on it, because it pays for itself in 2 seasons.
About the role of the sensor
It should be remembered that in setting up a heated floor there is one irreplaceable part - this is the sensor. The control unit adjusts the floor heating and saves electricity. Programmable devices provide the greatest savings, but they are expensive.
The ability to customize the heated floor as needed saves energy and, accordingly, money.
The effect lies in the correspondence between the electrical power of the floor and the meter. Heating the floor to the required temperature is only possible with sufficient power. Therefore, when purchasing, you need to be interested in the characteristics of the product.
In some cases, in large rooms it is necessary to connect more than one regulator.
An important point is the type of setting. You should find a way for yourself not to make holes in the wall, but to limit yourself to a box for a thermostat. Do not deviate from the recommendations in the instructions.
Both functionality and appearance are all significant factors. You can consult with specialists. You need to be especially careful when installing insulated floors in rooms exposed to moisture (bathrooms).
Under no circumstances should the control unit be installed inside; you need to run the cable to the heaters through a hole in the wall and place the sensor in the corridor.
We recommend: How to lay a heated floor on the ground?
Electronic tuning equipment is capable of servicing different operating modes of floor heating with a high degree of energy saving. But this is an expensive technique.
- Related Posts
- How to connect a warm water floor in a house from a gas boiler?
- What is a warm floor National Comfort?
- How does automatic floor heating work?
- How to lay cable heated flooring?
- How to make a warm floor?
- How to make a warm floor from a heated towel rail?
Choosing a location for installing the temperature controller
Before connecting the heated floor thermostat, you should select a suitable installation location.
If you choose the right place in which the device should be placed, this will contribute not only to ease of use, but also the entire heating system will be able to work correctly.
Therefore, when choosing where to install the thermostat on the wall, it is important to consider the following points:
Preparation and commissioning
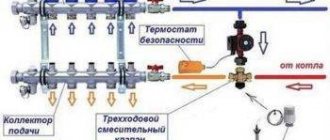
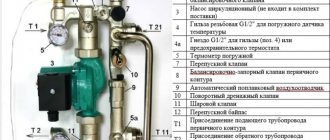
When setting up heated floors, a thermal head is used in the form of a regular tap, which is installed to supply water and for reverse flow. Such a system is not assessed unambiguously:
- firstly, saving money on circuit installation is a plus;
- secondly, complications in operation, that is, frequent use of the thermal head disables it and requires immediate replacement.
We recommend: Pros and cons of heated floors
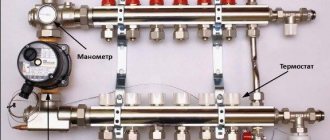
A convenient device is called a flowmeter (or rotameter), which is installed near the collector on the holes of the circuit. Adjustment in this situation means monitoring device readings (0.3...0.5 liters).
The first launch, performed correctly, reveals weaknesses, failures, and possible malfunctions in the floor heating system.
Every year, with the onset of cold weather, heating is started.
Preparatory work
Before connecting the temperature controller, be sure to pay attention to the instructions that come with it. The point that specifically addresses the installation of the sensor and the procedure for carrying out this work deserves special attention, because these processes differ from different manufacturers.
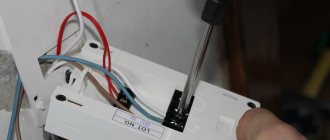
First, you need to remove the front panel and carefully disassemble the control mechanism; on simple models it is in the form of a wheel.
To remove it using a screwdriver, you need to pry off the element, and then unscrew the screw that secures the front panel to the mechanism itself. Other models have special plastic latches that hold the front panel in place. To remove it, just press the latches with a screwdriver and it will snap off.
However, if you cannot remove the panel, you should not remove it using mechanical force. After all, in this way you can easily break the latches, and to solve such a problem you will just have to buy a new regulator. To avoid this problem, you just need to carefully study the instructions and try to remove the panel again, but in the correct sequence.
The next step is to purchase devices for installing a heated floor thermostat.
The first thing you need to have is a corrugated pipe. Usually it comes complete with a sensor, but if the manufacturer does not provide such a kit, then it must be purchased separately.
The ideal corrugation diameter is 16mm. In order to determine the required length of the corrugation, you should determine at what height the temperature regulator will be installed, and at what distance from the wall the temperature sensor will be located. Next, from the indicated height, using a tape measure, you need to measure the length to the sensor, which will be in the floor.
Connecting the thermostat to the mains
Connection can be made in two ways:
In order to connect the regulator in the second way, you need to install it under the socket.
To do this, a hole is made for a regular socket box. Using a crown, a hole is drilled into which the box is installed. There are also special boxes in plasterboard; thermostats can also be installed in these boxes.
Usually the cable comes complete with a thermostat, the wire length is up to 3 meters. It is connected to a temperature controller and a temperature sensor.
For the entire circuit to work, you must connect a thermostat with a temperature sensor and a heated floor. Before connecting, make a groove from the temperature regulator to the floor and lay the wires using the diagram that is in the instructions. We talked about how to perform wall slitting in a separate article:
Please note that the markings on the thermostat may be different and, accordingly, the connection diagram will be different (for example, the power cable will be connected to terminals 1 and 2).
It is also important to understand that not all houses have the opportunity to connect the regulator to a three-wire network, because many old houses do not have grounding. There are also single-core or double-core underfloor heating, this also affects the installation method.
Connection diagram for a heated floor thermostat with grounding and without a grounding wire:
The temperature sensor is installed under tiles or other floor coverings, so it should be installed in such a way that in the event of a malfunction it can be removed without damaging the floor covering. Despite the simple connection diagram for the thermostat, it is important to carefully read the instructions, because if the connection is incorrect, the heated floor will not work.
This is the technology used to install a heated floor thermostat in the bathroom and other rooms. Now you know at what height to install and how to correctly connect the wires from the heating system and temperature sensor to the regulator.
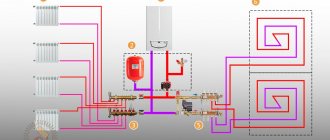
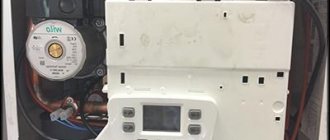
Heated floor regulator
Electric underfloor heating is gaining great popularity. Due to its versatility, this heating system can be installed in almost any room or on a glazed balcony.
The underfloor heating regulator is an important element of the system that controls the temperature regime; it also allows you to significantly optimize energy consumption.
Unlike a water heated floor, where you can do without such an element, in electrical systems the connection diagram necessarily provides for the installation of a regulator. For reference, in underfloor heating systems where water is the carrier of thermal energy, thermostats are sometimes used to control the pump or valves. But such an implementation is the exception rather than the rule.
About heated floors and thermostats
As an introduction, let us remember what a heated floor system is and the basic principles of its operation.
Very briefly. We remember that a heated floor system is designed for primary or additional heating of a room; the heated floor is installed hidden in the floor, and the types of heated floors are divided according to the method of generating heat (heating method), namely:
- Water heated floor, in which heating occurs due to heat transfer from warm water circulating through the system;
- Electric heated floor, in which electrical energy is converted into thermal energy through thermal cables or infrared film.
So, the thermostat is an integral part of an electric heated floor. In water heated floors, the temperature is regulated somewhat differently.
Classification
Electronic controllers also include a touch-sensitive and programmable temperature controller. Programming modes allows you to set an operating algorithm for a specific time of day or days of the week, which significantly reduces energy consumption.
As an example, we can cite products from brands such as Devireg, Din, I-warm, Eberle, Gira, RTC, etc. Many manufacturers produce models equipped with a remote control that allows you to control the device via infrared radiation (Energy, Roomstat, Oventrop, Unica, Rehau, etc.).
A two-zone (two-channel) temperature controller allows you to set the necessary floor heating parameters for two different rooms. Accordingly, two independent switching relays, triggered by two temperature sensors, are used for control.
This implementation scheme allows you to control the temperature in each room from one device (Jung, Ensto, Menred, Merten, Valena).
Depending on the installation method, devices are usually divided into overhead and built-in. The first are mounted directly on the wall, for the second you need to make a hole, similar to the one for built-in sockets.
Operating principle of the thermostat
Thermostats are special devices for adjusting the thermal conditions in a room depending on weather conditions. They are reliable, easy to operate, and, as a rule, serve for many years without breakdowns or failures in configuration modes.
The devices are designed to be used by people of any level of knowledge. That is, they can be controlled, including by teenagers and the elderly.
Thermostats are designed to set the minimum temperature for each room in the house individually. This is especially true for models with programming of the device’s operating mode throughout the day.
The working tool is the remote thermostat of the “warm floor” system (WTP). Its purpose: when the temperature set on the device is reached, open or, on the contrary, close the electrical circuit.
As a result of this action, the system stops or resumes heating. Thermostats are divided into the following types:
Mechanical structures
The temperature sensor is a bimetallic plate that closes the contacts of the heating mats. When the temperature in the room rises, the plate bends and opens the electrical circuit, resulting in the supply of electrical energy being stopped.
Once cooled and straightened, the plate closes its contacts again, resuming the cycle.
The temperature in the room is changed by rotating a special wheel. Despite the primitive design, minimal functionality, and the impossibility of installing a remote control, the mechanical thermostat continues to be used due to its features:
- ease of settings during operation;
- low cost;
- reliability of the design when operating at high and low temperatures;
- independence from energy interference;
- The device automatically turns on with electricity after it is turned off.
We recommend: Features of the “combined heating: warm floor and radiators” system
Electronic thermostats
Thermistors are used as temperature sensors in relay (electronic) temperature controllers. Thermistors, when the environment heats up, change the resistance to the electric current, which is recorded by the control chip that transmits the relay signal.
The relay winding opens the contacts, breaking the circuit, and the power circuit is de-energized.
The ambient temperature drops by 1 degree, no more, the circuit closes, resuming heating of the “warm floor” system.
There are models of electronic thermostats to which other isolated sections of heated floors, equipped with their own sensors, can be connected.
Electronic or relay thermal structures are more advanced in comparison with mechanical analogues and have the following advantages:
- sensor, remote element of the thermostat, can be installed in any convenient place in the room;
- the set temperature and the recorded current data are displayed on the display;
- the ability to control the temperature in several zones of the “warm floor”;
- the temperature sensor records the temperature and displays it on the display with an accuracy of a few fractions of a degree;
- It is possible to equip it with a remote control unit.
The electronic circuits of thermostats largely depend on the voltage state in the electrical network.
When voltage drops and short-term power outages occur, disruptions in the stable operation and settings of the electronic device microcircuit are observed. When calculating the cost, electrical structures are much higher in price than their mechanical counterparts.
How to choose
First of all, you need to decide on the type of device. Mechanical devices are easy to operate, inexpensive, but have poor functionality. As a rule, they are installed in small rooms, for example, in a bathroom or glazed balcony.
Electronic devices are preferable because they allow you to control the operation of the heated floor over a wider range. Depending on the power of the heating cable (film heating element), the appropriate thermostat is selected.
Separately, we note that a programmable controller is more suitable for large office spaces than for an ordinary apartment. In this case, you can set different operating modes for the period when there are people in the room or not.
Agree, there is no point in heating an empty room to a comfortable temperature.
When choosing a regulator, you should pay attention to the manufacturer; products manufactured by well-known brands are famous for their high quality and reliability, in contrast to devices from unknown Chinese companies.
Considering that electronic temperature controllers are quite complex devices, make sure that in your city there is a certified service center that services the products of this manufacturer. Otherwise, when malfunctions occur, repairing a failed device may become problematic.
Ways to regulate heat
Modern floor heating equipment is adjustable depending on the desired mode:
- heat the whole house;
- heat the floor in a separate room;
- establish different temperature heating in several rooms.
You can adjust the heating manually. The homeowner independently sets and controls the heating of his home to the level of his personal feeling of comfort.
Users often want to know how to set up their home water heating mechanism:
- the temperature of the thermal energy carrier is regulated;
- Collectors and mixing units can be regulated.
The reference points here are measurements of the coolant temperature in the distributors during supply or return flow. For water heating, heat sensors are mounted on the collectors. They are part of the thermostatic valves through which the heated floor is adjusted.
Connection
As a rule, each underfloor heating temperature controller comes with instructions, following which it won’t be difficult to make the connection yourself. Remember that the heating element control device is connected to the system last.
Actually, all that is needed for this is to correctly connect the power, sensor and heating cable (or heating panel).
As a rule, the terminal block has a corresponding signature, so there should be no problems with the connection. Devices are always equipped with a temperature sensor, therefore, the question of choosing one will also not worry you.
After installing a mechanical heat regulator, it is immediately ready for use. Installation of a programmable device does not mean it is ready for operation; it will need to be configured.
Before you test turn on the heated floor, make sure that the heat regulator is connected securely and correctly, otherwise the device may not function correctly or even fail.
Moreover, the warranty does not apply to this case.
Setting up the control product
Many beginners have a question about how to set the required data value on the thermostat. Despite the complex design of the products, making adjustments yourself will not be difficult. To do this, again, you should return to the attached instructions. For mechanical products, settings are made on the equipment itself using a temperature relay and a lever for adjusting power. For digital products, power and temperature are set using buttons. It is more difficult to make settings on a programming product. You can set different temperature conditions in it, for a certain time of day, by day of the week. Therefore, before setting the values, you need to be thoroughly familiar with all the menu functions. Configuration of such equipment can be done both on the product itself and through the remote control.
In this article we looked at connecting a wired thermostat for a heated floor. But don't forget about wireless products. The distinctive feature between these two products is that wireless thermostats do not operate via an electrical network, but using batteries. Therefore, before giving your preference to one or another type of thermostat, you should not lose sight of the options for its performance.
AdminAuthor of the article
Did you like the article?
Share with your friends:
Comments (4)
- Adam Sep 19, 2021 at 7:58 am
How much does it usually cost to install a thermostat?
Answer
- German 12 Sep 2021 at 17:29
Useful article, I decided to buy the same thermostat. It's simple, let's take it!
Answer
- Mikh 09 Sep 2021 at 12:35
A good thermostat, with IP65 it can be installed in the most humid places. For example, a bathhouse.
Answer
- lia 04 Sep 2021 at 15:58
Thank you very much for the article, are there any more photos and examples of how this is implemented? How much did it cost to repair?
Answer
Review of prices in various CIS cities
If you need to buy a regulator to control your underfloor heating system, the information in the table on the average cost of the Teplolux TR-515 device in various cities of Russia and the CIS may be useful.
Considering the prevalence of this model and the manufacturer’s wide dealer network, the cost variation in different regions is insignificant.
Design and purpose of a temperature sensor
So, the temperature sensor for a heated floor system is a thermistor protected by a glass bulb, and also has a copper conductor about 3 meters long for connection to the thermostat.
In addition to the glass bulb for tile floors, the temperature sensor itself is also protected by a gel shell. The conductor is insulated with high-quality PVC (polyvinyl chloride) to protect it from external influences and damage. The length of the conductor can be increased, and naturally, reduced, up to 50 meters, the main thing is that there is an undamaged sensor at the end of the conductor.
To easily replace it in the future, it is recommended to place this structure in a metal-plastic tube, even if the manufacturer included a plastic corrugation with a diameter of 16 mm.
The metal-plastic pipe has a smoother inner surface, so it is much easier to remove and install, as well as connect a new temperature sensor in case of failure. These types of temperature sensors are installed in hard floor coverings (under tiles or porcelain stoneware).
Another type of sensors recommended for laminate, carpet, that is, soft types of flooring material, are special plastic cylinders that are connected to the end of the electrical cable.
The principle of operation of the temperature sensor is very simple; when the temperature changes, its resistance changes, thereby giving a signal to the thermostat to turn on or off the heated floor system from 220 V, the most common network in everyday life.
Programmable electronic devices
Programmable thermostats are designs that store the data of the set temperature regime. Such devices are installed in systems with built-in electric heating elements.
They provide an automatic process for setting and adjusting the temperature in equipment designed for cooling or heating systems.
The need for thermostats is to provide devices equipped with elements for changing temperature indicators, turning them on/off when certain temperature parameters are reached.
With the help of thermostatic structures, the controlled environment will have the desired temperature.
The operating principle of programmable devices is the same, regardless of the device they are built into:
- a temperature sensor, built-in or remote, must transmit accurate information to the thermostat, which regulates the temperature by increasing or decreasing the power of the heating device;
- the efficiency and quality of operation of “warm floors” with any heating element depends on the temperature sensor;
- temperature sensors are placed in the room so that they are removed from points that affect temperature changes, since distortion of the sensor readings will introduce an error into the operation of the thermostat;
- high-quality operation of the sensors allows the temperature controller to maintain comfortable environmental conditions in the room;
- thanks to the accuracy of transmitting readings to the control device, the floor covering will not be overheated and damaged;
- advanced functions of the programmable thermostat microcircuit provide individual temperature settings for a separate room depending on the time of day or other requirements;
- The operation of the energy system at home is stabilized, which is necessary for calculating the economical consumption of electricity in Moscow.
We recommend: What concrete is suitable for a warm water floor?
There are the following types of temperature sensors used in the “warm floor” system. any of them can be built into the thermostat housing or installed at some distance:
- the sensor for determining the ambient air temperature must be provided by the air circulation of the given room;
- infrared elements designed to remotely measure the temperature of a heated floor covering can be built into a programmable thermostat or separated into a separate unit. For such a combination, the only requirement must be met: the absence of obstacles between the sensor and the controlled surface. the distance between them must be equal to or exceed 30 cm;
- contact elements for measuring the temperature of the floor surface are a structure consisting of a wire connected at one end to a thermostat. The other end with a thickening is placed in a corrugated tube located under the floor surface;
- combined sensors for measuring floor surface temperature.
Several sensors can be connected to a contact thermostat, which allows servicing several zones in one house or apartment into several rooms for different purposes.
Installation sequence
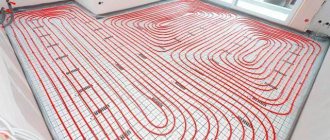
Let's move on directly to the installation of the heated floor and temperature sensor.
First you need to determine the location of the thermostat, which will be located outside. It is most often located at a height of about 1 meter from the floor. Its mounting is similar to a regular socket.
Then you need to make grooves or grooves for laying two plastic pipes.
One for the power wire leading to the heating element, the other for the electrical wiring of the sensor. The tube for the temperature sensor will be located on the floor. Such a gasket will make it possible to carry out repair work without removing the tiles, at least to replace control elements.
It is not possible to completely replace the heating element if it is installed in a screed. It is important that when laying a pipe or cable corrugation there are as few bends and turns as possible. This will simplify the replacement of a failed temperature sensor in the future.
The next step is thermal insulation, it is performed individually for different types of heating elements, for example, for a heating cable it is used as a damper tape or other insulation, the thickness of which is at least 1.5–2 cm.
After this, the heating element is installed and secured with wires being connected to the thermostat box.
Installing and connecting a heated floor temperature sensor has its own subtleties. In order to prevent solution from getting inside the tube where the sensor is located, its end on the floor is securely sealed with electrical tape or tape. It is not recommended to connect the entire system through an outlet; it is better to supply power from a circuit breaker and through a contactor (starter).
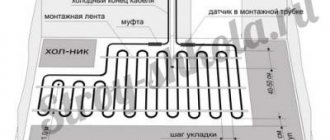
The temperature sensor should be installed at a distance of 0.5 to 1 meter from the wall on which the thermostat is installed, and also exactly in the middle between two adjacent turns of the heating cable. After installation, it is recommended to secure the temperature sensor with mounting tape or foil tape.
If a film heated floor is being laid, the temperature sensor must be installed under the heater sheet, as shown in the photo below. Please note that thermal insulation must be laid under the temperature sensor, otherwise the heating system will not be effective.
Important point! The location of the temperature sensor should be selected so that it is away from other heating sources. Otherwise, errors will occur and the warm floor will not work as it should.
The connection diagram for the heated floor temperature sensor is as follows:
Before making a screed, you need to check the functionality of the warm floor and the temperature sensor itself. As a rule, the resistance of both elements is measured. The system is considered operational if the resistance differs by no more than 10% from the passport data.
In order for the assembled circuit to be as safe as possible, it is recommended that in rooms where electric floor heating is carried out, protective shutdown devices are installed, which, in the event of a breakdown, will disconnect the circuit from the voltage, thereby protecting a person from falling under electrical potential. In damp areas this can be deadly.
Methods for installing a thermostat
Before connecting any type of electric floor, you should choose where to install the thermostat. Using this device, the system will be controlled during operation and a comfortable room temperature will be maintained. A thermostat is also necessary to connect the heating elements to the power supply. Thermostats are available in a wide range; they can be simple mechanical devices or smart devices. In any case, it is important to understand how to connect the floor heating regulator.
Devices equipped with a built-in sensor for recording indoor air temperature must be located in places protected from heat sources, at a distance of 1.5 meters from the floor.
Before starting installation work, you should choose a method for connecting the heated floor controller. This may be the included socket or a standard connection to the electrical panel.
Each heating floor temperature controller shows a connection diagram. With its help, installing a heated floor temperature sensor becomes accessible to a simple home craftsman.
After installing the thermostat, you can begin connecting the cables; first, a phase is supplied to the distribution box, and then ground and zero. A recess is made in the wall in the form of a groove, where two plastic tubes will be placed. One of them will contain the power wires of the heating cable, and the other will contain the wires of the internal sensor, which is installed under the floor covering. After completing these measures, proceed to installation and connection of the heated floor to the thermostat.
Selecting a thermostat
I would also like to touch upon the thermostat itself, which plays a very important key role in this heating system. There are the following types of temperature controllers for heated floors:
Electromechanical. The clarity of such adjustment is approximate, so achieving a specific set temperature is quite problematic.
The main advantage of such a device is its low price.
Electronic. Setting the desired value is done using touch buttons and has fairly clear settings and the ability to set the temperature limit down to one degree.
Programmable electronic. By installing such an element, you can not only regulate the temperature in the room, but also turn on the heating according to a schedule, or only when there is a person in the room.
By the way, some thermostats already have a built-in sensor, which makes it possible to control not only the temperature of the floor, but also the air in the room as a whole.
As a result, I would like to remind you about the rules for working with electrical equipment; all connection work is carried out with the power turned off.
At the same time, it is necessary to ensure that no one, except the person performing this work, accidentally supplies voltage dangerous to human health and life. This is where our technology for installing a heated floor temperature sensor with your own hands ends. We hope the information provided was useful to you!
Well, now it's time to finish the article. All the material I wanted to share has been reviewed. I hope it will be useful to you, and you will use it if you need to install a heated floor regulator with your own hands. Improve your own practical skills and gain new knowledge, as they say: “It’s never too late to learn!” That's all, thank you for your attention, successful and easy repair!
Thermal regulation of electric floors
The electric unit that warms the floor can be configured, and the operation of the heating device can be adjusted. This is done by turning the heating on and off, adjusting the temperature, and adjusting the repeatability of the process of turning the thermal elements on and off.
Thermostats for electric heated floors
Special panels allow you to control the electric adjustable floor. They differ in appearance, in the installation destination, in the means of fastening and in the number of connected sensors.
Thanks to the control panel, energy is saved and the temperature can be adjusted without overheating.
The operating principle of the panels is special:
- An electric heated floor is set up quite simply using an electronic-mechanical regulator with a meager set of functions. Manual control of a wheel like an iron. The wheel is connected to a regulator that maintains a constant temperature. In this case, simplicity is the best solution both in terms of price and strength (rarely breaks, easy to repair);
- The digital control panel functions as an electronic mechanical regulator. The difference is that instead of a wheel there are buttons or a sensor. The control unit is equipped with electric sensors that measure the overall temperature in the apartment and transmit this data to thermostats;
- A modern detail is a thermostat that can be programmed. It has several sensors built into it to measure temperature indicators. These sensors send information to the control device (controller). It is capable of simultaneously maintaining different temperatures in individual rooms;
- and the most modern regulators are controlled from the Internet. For example, when leaving home, you can turn off the heating, and when returning home, turn on the system from your phone. The floor will be warm when you arrive.
We recommend: How to connect a heated floor from a stove?
When choosing your underfloor heating option, it is recommended to take a closer look at the digital project. The advantages consist of ease of use and affordable price.
In addition, the variety of design solutions helps to integrate into the overall flavor of the apartment’s design. It is also important that the dimensions of the sensors and heating objects match.