Is it possible to lay linoleum on a heated floor?
Linoleum as a flooring is a controversial material. On the one hand, it is known to most homeowners as a primitive, cheap type of flooring. This is partly true. Back in the days of the Soviet Union, linoleum was everywhere in new buildings. Therefore, the question of the compatibility of linoleum with a “warm floor” is not a question for the owners of such housing - there is no money for a more expensive coating, where will they get heating systems from.
On the other hand, certain types of linoleum made from other raw materials have appeared on sale. Therefore, it is impossible to answer the question posed in the introduction unambiguously. It is necessary to understand the types of material. After all, judging by the prices, it is made from natural products that behave differently at elevated temperatures.
Linoleum can be:
- natural (marmoleum). It contains natural ingredients such as linseed oil, wax, pine resin, cork oak bark chips, and dyes made from natural materials. The floor covering has increased fire resistance, wear resistance, and a long service life. The material does not deform when temperature and humidity change, it is safe for humans - it contains no allergens, and no harmful substances are released when heated.
Marmoleum. The top layer is marmoleum. The middle layer is a flexible wood-resin solid (sometimes called MDF). The bottom layer is jute fiber covered with cork crumbs, linseed oil and resin.
There are also disadvantages:
- price. The cheapest models can be purchased for 700 rubles/m2;
- requires careful transportation, especially in winter - fragile;
- For installation you need a flat surface - a 2 mm bump will definitely come out.
- vinyl. Made from PVC with additives of lime, talc and kaolin - they add strength and elasticity. Pros: affordable price, easy care.
Vinyl linoleum.
Minuses:
- does not tolerate both high and low temperatures. In cold weather it loses elasticity, cracks and becomes deformed. The waves and bubbles that appear are not removed;
- When heated above 27oC, it releases harmful substances. Many manufacturers limit the heating ceiling to +28oC;
- operational life is limited to 10-15 years;
- It smells bad on hot days.
- rubber (relin). It is made from waste rubber crumbs, mainly car tires. Bitumen and sulfur are added to give strength and elasticity. The material is durable, strong, can withstand severe frosts without loss of elasticity, does not deform, and is in the middle price range. There are two minuses - when heated, it deforms and also begins to release substances with an unpleasant odor;
Relin.
- glyphthalic or alkyd. The most expensive linoleum flooring - 1 m2 costs 2,200 rubles. and more. In addition, it is produced only to order. It consists of alkyds obtained directly from 5 types of oil (tung, linseed, cottonseed, sunflower, hemp). This, by the way, explains the high price. Consists of 3 layers; The top one is a durable glyphthalic varnish, the middle one is an alkyd body, the bottom one is a fabric base. In all operational characteristics it meets the requirements of today. Minuses:
- crumbles at low temperatures, and therefore transportation is not recommended in winter;
- deforms at a temperature of about +40oC;
Alkyd linoleum on a felt basis.
- colloxylin (nitrocellulose). Already from the name it is clear that the basis of the floor covering is nitrocellulose. Gypsum and red lead colloxylin are added. Available without base.
Among the advantages:
- high plasticity;
- water resistance;
- strength;
- environmental cleanliness;
- durability.
Flaws:
- highly flammable;
- practically does not isolate noise;
- conducts heat well;
- limited set of colors - only three: brown, red-brown and gray.
Colloxylin linoleum.
From the above characteristics we can draw two conclusions:
- Linoleum can be laid on a “warm floor”, but only certain types.
- Only one type of linoleum can be laid on a “warm floor” from water heating - marmoleum. The rest, due to temperature jumps near the heating system up to 35-40°C, become deformed or begin to release harmful substances.
Choosing linoleum for laying on a warm floor
Having made sure that linoleum can be laid on a “warm floor”, all that remains is to choose the type of flooring. Here you can give two pieces of advice: short and detailed.
Brief advice is to recommend buying linoleum with special markings for “warm floors”: three arrows and a snake (see photo). The icon is applied to the reverse side of the material.
Marking linoleum for heated floors.
But this answer does not take into account some nuances. Therefore, you will have to give detailed advice:
- marmoleum. Can be installed on any heating system: water, cable, infrared;
- vinyl. It has no special markings. This means the floor covering is incompatible with heated floors. But there are nuances here. Indeed, at temperatures above +27oC, PVC linoleum first begins to release harmful substances, and then comes in waves and bubbles. If we take a water heating system and an electric cable one, then they operate in the +25-28oC mode. This means that vinyl cannot be laid on such “warm floors”. But there is also infrared film, which heats the room using a wave method. In this case, the floor covering heats up to +21-23oC, after which the thermostat turns off the power supply. And this is compatibility. In this case, you can use linoleum with or without a backing - homogeneous;
- rubber. Strictly not for installation on heating systems located in the floor pie;
- glyphthalic (alkyd). According to its performance characteristics, it is ideally suited for electric “warm floor”: cable and infrared. It is not recommended to lay it for water heating due to possible temperature surges above 35oC (electric heating does not have such problems);
- colloxylin (nitrocellulose). Due to its easy flammability, it is not recommended to lay it on an electric heated floor. It handles temperature changes well. Therefore, the owners, at their own peril and risk, can place it on a “warm floor”. True, there is another problem here - the aesthetics are lame.
Which heated floor to choose for linoleum
The choice of a floor heating system depends on several factors:
- type of living space;
- type of linoleum.
Water-heated floors can be used in private housing construction: country houses and cottages, provided that the flooring is natural linoleum. There are simply no other combinations. Electric cable flooring can be installed in apartments and private houses under marmoleum and glyphthalic linoleum.
IR film is used as the main and additional heating in any premises under natural, vinyl and glyphthalic linoleum. If you evaluate heating systems based on efficiency and ease of installation, then the choice is clearly in favor of an infrared floor. You can verify this by looking at the articles “Which underfloor heating is better - water or electric?” and “Which warm floor for tiles is better to choose?”
Taking into account the choice made, we will consider in detail how to install an infrared “warm floor” under linoleum.
Expert advice on installing heated floors
A few tips from experts will help extend the life of linoleum laid on a floor with a heating system.
Compatibility of tiles and linoleum with heated floor systems
When choosing the type of heated floor, the decisive factor may be the financial issue. A water floor, although considered the most suitable for linoleum, requires significant installation costs and a high professional level of installation specialists. An electric floor is easier to install, but power calculations confirm that it is quite energy-consuming to operate.
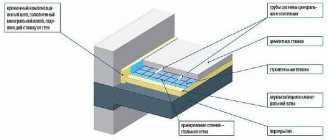
Infrared does not require a mandatory screed, but may not withstand external pressure due to its thin design. When installing it, you will need to lay a hard layer between the coating and the heating films. For it you will have to buy a more expensive commercial or semi-commercial option or marmoleum.
For all types of heated floors, the quality of the electric thermostat is important. Overheating the coating will cause blistering and cracking. Installing a heated floor is a complex procedure; if you have no experience in such work, it is better to contact specialists.
Related video: Installation of Caleo underfloor heating under laminate and linoleum
Selection of questions
- Mikhail, Lipetsk — What discs should I use for cutting metal?
- Ivan, Moscow - What is the GOST for rolled sheet steel?
- Maxim, Tver - Which racks for storing rolled metal products are better?
- Vladimir, Novosibirsk — What does ultrasonic processing of metals without the use of abrasives mean?
- Valery, Moscow - How to forge a knife from a bearing with your own hands?
- Stanislav, Voronezh — What equipment is used for the production of galvanized steel air ducts?
Materials and tools
To assemble a “warm floor” under linoleum you will need:
- infrared “warm floor” kit, which includes:
- film with elements emitting infrared rays (sold in different widths: 50, 60, 80 and 100 cm);
- electrical wires;
- special clips for fixing the film on the insulation;
- contacts in the form of clips;
- bitumen-based tape.
- temperature sensor with wires;
- Temperature regulator;
- foil insulation (you can buy a backing with foil or lavsan on one side 3 mm thick);
- electrical tape for insulating wire twists;
- metallized tape;
- knife;
- roulette;
- pliers for crimping contacts;
- pliers for stripping insulation from wiring;
- construction pencil.
In addition, for the preparatory work you will need:
- hammer drill or wall chaser;
- electric drill with a crown.
Preparatory work
Preparatory work consists of several independent stages:
- preparing the base for laying the floor;
- installation of a thermostat;
- calculation of system power with subsequent development of a laying scheme;
- floor insulation.
Preparing the base
The film into which the carbon strips are sealed is thin. Any unevenness on the base of the floor can damage it. Therefore, special attention is paid to the preparation of the concrete floor or wooden subfloor. Work is carried out in the following sequence:
- the ceiling is freed from all unnecessary things: remnants of building materials, garbage;
- the old screed is knocked down with a hammer drill;
- The stove is being repaired. Particular attention is paid to cracks (microcracks) and joints. They must be sealed with repair mortar.
Final stages:
- apply 2 layers of primer;
- the surface is leveled with a small screed using a self-leveling floor or covered with plywood (OSB).
The rough wooden floor is also repaired: rotten boards are replaced, creaks are eliminated, and cracks are sealed. How to properly carry out the preparatory work and fill the screed with self-leveling mixtures can be found here.
Installing a thermostat
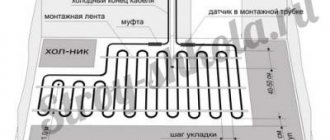
Installation of infrared heated floors under linoleum begins already at the preparatory work stage: electricity is connected and a thermostat is installed. To do this, the location of the device is first determined. There are two rules here:
- the power regulator should be as close as possible to the heating zone;
- the distance from the floor is at least 30 cm and no more than 1.5 m. It all depends on the presence of small children and pets - the thermostat should be out of their reach. There are no recommendations in this regard in SNiP. Most manufacturers indicate a height of 90 cm. Experience shows that in the absence of external factors, it is best to install at a height of 30 cm.
The place for the thermostat is drilled with a crown
The installation socket for the thermostat is cut out using a hammer drill (electric drill) with a crown.
A seat for the thermostat is cut out.
The supply wires can be routed along the wall and covered with a plastic box. It is more aesthetically pleasing to hide the electrical wiring in the wall. To do this, use a grinder or wall chaser to cut two parallel lines at a distance of 20 mm and to a depth of 2 cm. Using a hammer drill or chisel with a hammer, a channel is knocked out. Wires are laid in the prepared channel. The wall is being plastered.
The channel is cut with a wall chaser.
The groove is cut with a grinder.
The groove is deepened with a hammer drill.
The same operation is carried out to apply voltage to the IR film. A 20x20 mm groove is punched down from the thermostat.
The channel for the wiring is knocked out.
Power calculation
The power value of a film “warm floor” is calculated differently than for cable heating. Here the main parameters are:
- ratio of film area to total area of the room;
- type of heating: main or additional.
The film is not installed under furniture. First of all, why heat her bottom? Secondly, due to overheating, the sofa, wardrobe, table begin to deform. Thirdly, the film itself suffers - heat is transferred down into the floor pie, as a result of which the plastic melts and the carbon strips burn out. Therefore, a diagram of the room is drawn up with the furniture arranged, respecting the scale, which is important.
After this, the length and width of each strip of film are calculated. Here the requirements are:
- the IR heater is placed at a distance of 250-300 mm from the wall;
- There should be 50 mm between stripes.
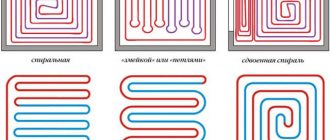
When drawing a diagram, you need to take into account some requirements and follow the installation rules:
Installation plan for infrared heated floors.
- When calculating the length of the strip, you need to take into account how much film can be cut: 200 or 250 mm. Therefore, it is difficult to meet the requirements for distance from the wall. In this case, the distance is increased;
- the temperature sensor is located inside the strip, but with the condition that the standard wiring is sufficient to reach the temperature sensor. No twists. They distort the signal;
- heating elements should be placed along the room - fewer connection points.
Upon completion of work on drawing up a plan for laying out the film and connecting it to the thermostat, the total area and area of the film are calculated. Based on the calculations, the power of the IR film is determined. There are two approaches here. Some experts recommend taking into account the type of heating: main or auxiliary. Others prefer to install a maximum capacity system. This approach does not affect energy consumption. Consumption is approximately the same. The difference is felt only when purchasing a set - the more powerful one costs more.
Table 1 shows the calculation of power for different rooms for constant heating. For additional heating, the final results should be reduced by 30-35%. Besides. It is necessary to take into account that as the film area increases, the power decreases and vice versa. The ratio is approximately this: for 2% of the area, the power changes in one direction or another by approximately 0.1 kW.
Attention: if you cannot decide on your own the power of the heating system, take the plan with you and show it to your sales manager. Most retail outlets have programs for such calculations.
Table 1. Calculation of the power of film “warm floors”.
| Floor | Room | Ratio of IR film area to room area, % | Maximum power, in kW |
| I | Living room + dining room | 60 | 3.5 |
| Hall + kitchen | 70 | 3.2 | |
| Guestbook | 64 | 1.6 | |
| II | Bedroom 1 | 62 | 1.8 |
| Bedroom 2 | 66 | 1.6 | |
| Bedroom 3 | 60 | 1.9 | |
| Hall + bathroom | 60 | 1.6 | |
| Toilet | 64 | 1.8 |
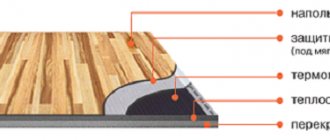
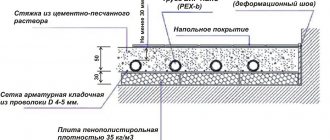
Floor insulation
To prevent heat from escaping downstairs, to neighbors or into the basement, the base of the floor is insulated.
Attention: waterproofing work under linoleum is carried out only if there is a risk of moisture entering the insulation from the basement.
To do this, you need foil insulation about 3 mm thick. You can use a cork backing without foil. The effect is the same. You need to lay the insulation on the concrete or subfloor with the foil side up. The joints are taped with metallized tape. After this, a recess is cut out for the temperature sensor.
The joints are taped with metallized tape.
A recess is cut for the temperature sensor.
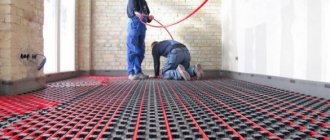
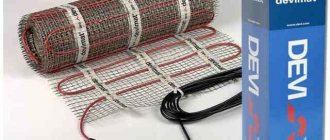
Heating mats for linoleum
TP designs of this type are used only for additional heating. The design is reminiscent of heating cable heating technology, with the addition of a protective shell. The conductor is attached to a non-metallic mesh. The top is covered with a protective layer of rubber and PVC fibers.
Heating cable mat from a 220 V mains voltage.
Heat is transferred to the floor material through the aluminum shell. Advantages
this method TP:
- easy installation that does not require skilled hands;
- simple calculation of the required amount of material;
- high heating rate of decorative material;
- automatic process control.
The downside is the relatively high price.
As with the heating cable method, the working conductor comes in two types: single- and double-core. The latter type is more often used for residential premises. Can be laid on any flat surface (including wood). For a single-core element, concrete preparation is required.
It is important that the interfloor covering is warm. That is, adjacent to another warm room. If this is a cold base of a basement, balcony, loggia, it is necessary to insulate it and prepare it for laying the TP - make a cement-sand screed. This work is easy to do with your own hands. TP made from heating mats is installed in the following sequence:
- Drill a hole in the wall of the required diameter for a junction box and a corrugated tube for leads from the system to the thermostat.
- Prepare the surface: remove dust, prime.
- Spread foil-type thermal insulation. Connect the edges with aluminum tape.
- Lay the heating system strips according to the preliminary plan.
- Make a fine in the monolithic base according to the markings. Lay a corrugation for the temperature sensor.
- Place the sensor into the corrugation. Seal the fine with mortar.
- Connect the mats to cold conductors. Lead their ends through the pipe to the junction box.
- Place waterproofing made of polyethylene film with the edges on the wall.
- Measure the resistance of the mats (instructions are included with the purchase). Check the operation of the circuit.
- Pour a cement-sand mortar screed with a thickness of at least 30 mm.
- After complete drying, lay the material.
Pouring a heating cable with concrete
If you do not immediately get a smooth surface of the screed, it can be leveled using a thin layer of self-leveling floors.
The device of the tape with a two-core conductor is made in the same way. Sometimes it is proposed to lay sheets of plywood or OSB over the heating system. This method involves rigid fastening of the flooring. When fixing with self-tapping screws, screws or dowel nails (depending on the material of the subfloor), the heating element can be damaged.
With the heating method with a two-core conductor, the connection to the external network occurs at one end of the cable. A coupling is put on the far end as a plug.
Layout diagram for a two-core heating cable
Video will help you do the job correctly and quickly.
The execution algorithm is suitable for laying any material. Installation of heating mat
Recommendations for laying linoleum
Linoleum is not laminate. You can't put it directly on film. You need a flat, solid base. To do this, you need to put a flooring made of plywood, OSB, fiberboard or flat slate on the film. You cannot attach it to the base of the floor through a film - there is a high probability of getting into live strips. Linoleum is laid on them. The technology is simple:
Attention: if the flooring has a seam, a waterproofing film made of polyethylene must be laid under the flooring. For a single piece, waterproofing is not necessary.
- a roll of linoleum for a warm floor is brought into the room and rolled out. It is cut to length and width with a margin of 10 cm (it has the unusual property of increasing in size in the cold);
- Leave it rolled out for 2-3 days - it should level out. You can speed up the process by turning on the “warm floor”;
- The floor covering is laid for further use. Experts recommend attaching it to the flooring with glue or double-sided tape. According to the editors of the StroyGuru website, the glue is more reliable - the flooring adheres to the flooring more tightly and does not heat up as much. For a felt base, “Gumilax” is suitable, for material without a backing - “Bustilat”;
Trimming linoleum near walls.
- When laying two strips, the seam at the bottom is glued with tape so that there is a tight fit, and then everything is glued. The glue is spread on both the flooring and the coating;
- Along the perimeter, the linoleum is secured with skirting boards.
Types of linoleum
Most people who are far from renovating believe that linoleum is a chemical material with a vinyl coating. But the construction market offers several groups of this material, the main of which are described below.
Choice of linoleum
Table. Types of linoleum for heated floors.
| Name of material, photo | Description |
| Relin | A rubber material consisting of synthetic rubber, bitumen and, of course, rubber. Linoleum does not react well to high temperatures, so it is rarely used in residential areas. |
| Nitrolinoleum | It is a single-layer type of linoleum, characterized by increased moisture resistance. The disadvantages of the material include its rapid flammability. This linoleum is also called colloxylin. |
| Glypthal | The material has a fabric base, due to which it has good thermal insulation qualities. But with prolonged exposure to heat, glypthal linoleum may slightly change its shape and become deformed. |
| Vinyl | One of the most popular varieties of linoleum. The material is relatively inexpensive, but when exposed to heat it can emit an unpleasant odor. |
| Marmoleum | Durable and highly resistant coating, characterized by fire resistance and durability. The chemical composition of marmoleum is exclusively natural components, which makes it safe for others. |
What are the sizes of linoleum
Among all the varieties of linoleum, relin and marmoleum are considered the most optimal. They are most often used to cover heated floors.
What types of linoleum are there?