The TIM JH-1036 pumping and mixing group has an adjustable bypass. There is a scale with a gradation from 0 to 5, but it is no longer possible to find out what these numbers mean after installing the bypass. It is difficult to understand why it is needed, because other mixing units for heated floors do not have such a device.
I had to study in great detail the operation of the bypass of the mixing unit as a result of incorrect connection of its input and output to the heating system.
After the previous installation of the TIM JH-1036 mixing unit, it was not possible to configure the bypass, since there are no instructions for setting it up, and I did not study the design before installation - do not remove it. Now, before installation, I studied and took photographs of the internal structure of the mixing unit.
Comparison of heated floors with radiators
Heat distribution near heated floors and radiators
If we compare the already familiar radiator heating system with a heated floor, then in the case of the first, hot air flows first rush upward when heated, and then only fall down. Therefore, with radiators, we quite often feel a cold floor.
The installed heated floor works on a different principle. The underfloor heating pipes first heat the screed, then the screed radiates heat evenly from bottom to top. The higher, the less intense heating.
Therefore, in terms of heat distribution, heated floors look much more advantageous. As for efficiency, both systems are the same, plus or minus.
They often like to mention that heated floors are more economical than other systems.
This is a big misconception. The task of any heating system is to compensate for heat loss in the home. And heat loss is always constant.
Therefore, resources must be spent equally. Warm floors can actually be much more economical. If you use advanced solutions for low-temperature systems.
Features of heated floors
This is a low temperature heating system.
The serving temperature usually does not exceed 45-50 degrees. The correct heated floor is not felt by your feet, since the surface temperature is only 28 degrees.
Warm floors require a height of 14 cm (minimum with a finished coating). This must be taken into account when designing a house.
The underfloor heating pipes are not leaking. Unless, of course, you deliberately buy cheap material or constantly apply high temperature and high pressure to the pipes
Temperature equalization of water heated floors
With the help of water heated floors, you can regulate the temperature of the floor surface and the air temperature in the room. In those rooms that, in addition to heated floors, also have radiators, it is better to provide the radiators with the opportunity to maintain the air temperature, and the heated floor will provide a comfortable surface temperature.
It must be remembered that the standards limit the surface temperature of heating structures, incl. for heated floors in rooms with permanent occupancy (bedroom, living room, etc.), the surface temperature should not exceed 26-29 o C. In rooms with temporary occupancy (bathroom, corridor) - no more than 35 o C. In fact, often Residents of houses violate these norms due to their ignorance or inability to use the system. In addition, flooring manufacturers also have temperature restrictions. So, if you don’t have tiles, then you should raise this issue and look at the technical documentation for the flooring.
The surface temperature of a heated floor is complexly dependent on the temperature of the coolant in the supply and return manifolds, as well as on the flow rate and specific thermal power, and, in particular, on the design of the floor and floor covering. Let us highlight the main thing: with the following calculated or actual indicators, you need to be wary of an increase in the temperature of the floor surface above normal:
- the water temperature in the supply manifold is above 45 o C;
- the calculated specific thermal power of the heated floor is more than 120 W/m2
You can select your individual underfloor heating parameters in the online underfloor heating calculation program. Enter your initial data and try experimenting with the indicators.
So, the temperature control of a water heated floor can be done manually using a thermal head or a rotary knob on the mixing valve. At the same time, remember to limit the surface temperature. It is necessary to pay attention to the fact that regulating the temperature of the coolant in the heating system as a whole using the boiler has practically no effect on the heating circuit of the floor. It is also possible to automatically regulate both the floor surface and the room temperature. For this purpose, automation is used, based on servos, air temperature sensors, floor temperature sensors and control controllers.
Calculation of a heated floor pipe
You can calculate the pipe consumption per square meter of warm water based on the installation pitch and the area of the room. The results are found using a special formula; they can be grouped into a table and used in the future.
To the calculation results, it is also necessary to add the lengths of the supply sections from the heated room to the manifold cabinet. On average, this is from 3 to 10 additional meters of pipe.
Features of laying heated floors with a snail
If underfloor heating is the only heating option, then the room is conventionally divided into 2 zones: edge and main.
The edge zone is located along street walls and window openings, where the overall heat loss is greater. If there is one cold wall, the edge zone has a rectangular shape with a side deep into the room - 1 m. In the corner room, where two street walls meet, the edge zone is made L-shaped.
In the edge zone, pipes are laid in smaller increments, approximately 10 cm.
Whereas in the main zone the laying step is usually 20 cm. In a large room, the edge and main zones are formed with two loops of pipes. For a small area, make do with one loop.
It is laid differently in different areas. It requires a certain skill and experience to masterfully lay out one loop in two different zones. Moreover, the main principle must be observed: the smaller the laying step, the greater the heat flow.
Valtec mixing unit
To choose a reliable and high-quality design and not overpay, you should pay attention to the manufacturer, the components used and the assembly.
Valtec is in great demand today. This is an Italian manufacturer that produces heat and water supply products that are maximally adapted to difficult operating conditions.
Pumping and mixing unit VALTEC COMBIMIX (VT.COMBI)
The Valtek mixing unit for underfloor heating is a standard system with temperatures reaching up to 60 °C. The maximum pressure in the heating system with a connected mixer from this company should not exceed 10 bar.
Valtec characteristics:
- combs in diameter are 25.4 mm;
- 12 attachable circuits;
- cross-section of connected pipes - ¾ inch with external thread;
- 18 cm is the length of the pump;
- efficiency 2.75 m³/hour;
- temperature setting in the region of 20-60 °C;
- outlet water heating (highest temperature) 90 °C at a pressure of 10 bar.
Do-it-yourself mixing unit for heated floors: purpose and design
If someone tells you that a heated floor mixing unit is just a distribution manifold that divides coolant flows into groups (so to speak, supplies it to different areas of the heated floor), you can safely accuse him of incompetence in this matter.
In fact, what they are talking about (distribution comb or manifold) is just part of the mixing unit, which also includes a lot of different equipment that serves not only to control the operation of the heated floor, but also to optimize this very work.
In general, this system is complex, and its structure should be understood in more detail - which is what we will do next. And let's start with the same manifold, which most novice plumbers confuse with a mixing unit for a heated floor.
A manifold or distribution comb - without it, the very existence of a pumping and mixing unit for a heated floor can be called into question. It is this element of the assembly that is fully responsible for the uniform distribution of coolant throughout all individual parts of the system.
Two such manifolds are installed in the mixing unit - one supplying and the second collecting, so the name “distribution comb” is in some way not entirely correct.
The distribution one is the one that is installed on the coolant supply to the heated floor, and the collecting one is the one that is mounted on the return pipeline.
Externally and structurally, they are similar to each other and represent a large-diameter tube, on the side of which there are threaded branches.
To make it more clear, I will say this - five, six or more tees of the same type and the same diameter twisted together. Here is your first hint on how to solve the problem of how to make a mixing unit for a heated floor circuit?
The hydraulic arrow, which, in fact, is the real mixer for a heated floor - it mixes the fresh coolant with the already “used” one, restores its temperature to its original value and again sends it to the distribution manifold, which, in turn, supplies it to each individual branch of the water-heated floor.
A hydraulic valve is installed at the very beginning of the mixing unit - it is a pipe connecting the supply and return of the heating system.
Exactly the same arrow is mounted after the boilers, in front of the distribution combs in the combustion chamber - naturally, the difference between them lies in the size and ability to drive a particular volume of coolant through itself. Three-way valve. Its purpose is to debug the process of mixing the coolant in the hydraulic arrow - it is installed at the bottom of the pipe connecting the supply and return. At the same time, it serves as a tee.
It is for this reason that, if we talk about the factory hydraulic arrow for heated floors, it is already manufactured complete with a three-way valve. By changing the position of this tap, we achieve efficient operation of the heated floor, and in particular, the effective reuse of the “waste” coolant.
Pump. You also can’t do without it - it’s what makes the coolant move quickly through all pipelines and effectively warm them up.
It is mounted on the return pipeline, between the hydraulic needle and the collecting manifold. By analogy, a thermal relay is installed on the supply, between the hydraulic needle and the distribution comb - it is only necessary if an automatic mixing unit is manufactured. If we talk about the manual control option, then you can completely abandon it.
Shut-off valves - installation of a mixing unit for a heated floor involves the use of two types of shut-off valves - these are ordinary ball valves, which are mounted before the mixing unit (their task is to cut off the entire unit from the heating system) and control valves, through which the system is debugged.
Automatic air vents - as a rule, are mounted at the end of the collectors. In the manual version, they can be replaced with conventional ball valves or Mayevsky valves.
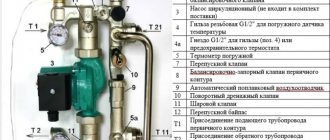
This is what the diagram of a heated floor mixing unit looks like from the outside - at least its professional version.
If we talk about making such a unit with your own hands, then, naturally, it can be simplified to the maximum. We’ll talk further about how a homemade mixing unit for heated floors works and works.
Hydraulic leveling of water heated floors
We have a water heating system, which includes water heated floors, based on a pumping and mixing unit and a conventional manifold with or without flow meters. It is a reliable, safe, comfortable and well-managed underfloor heating system. In order for it to become such in reality, and not just on advertising brochures, it needs to be configured.
For a water floor in a private house, it is better to use collectors with flow meters; in this case, it will be much easier to manage the system. If you are reading this article, but you have a similar heated floor in an apartment or house with central heating, then pay attention to the maximum operating pressure of the collector you have chosen; usually for collectors with flow meters it is 6 bar. This may not be enough for a central system.
If you have servos on the collector that are controlled automatically, then they will regulate the coolant flow as necessary. However, it will be necessary to pre-set the flow in the circuits. If you have a collector without drives (in the vast majority of cases), then this setting is simply necessary.
The coolant flow through the circuit can be calculated using the formula:
Further, in order to obtain the required calculated coolant flow through the circuit, it is necessary to multiply the specific flow rate Gsp ((l/h)/m2) by the floor area S (m2) served by this circuit.
So, the simplest way to hydraulically level a heated floor is:
- calculate the water flow through each circuit by multiplying the floor area through which this circuit passes by 8.6; thus, we obtain the flow rate in l/h;
- turn on the underfloor heating pump, set it to first speed (for an average private house);
- set the thermal head or mixing valve handle to a position of approximately 30 o C;
- make sure that water circulates freely through the branches and air is expelled;
- adjust the kennel in such a way as to achieve the flow rates obtained in step 1 on each flow meter;
These actions will provide the so-called “pre-tuning”. If everything is calculated correctly, then it will be quite enough. But in fact, during operation, underfloor heating may need to be adjusted based on the feeling of comfort. When setting up, it is necessary to understand that the circuits are hydraulically interdependent; “screwing” one can increase the flow through the other. You also need to be prepared for the fact that the boiler pump and the heated floor pump will influence each other. This is not scary, but when the boiler pump turns on, it is impossible to adjust the heated floor; you need to wait until it stops.
Homemade mixing unit for heated floors: design and assembly
Let's start by deciding on the materials that will be needed to make a homemade heated floor mixing unit. All of them can be bought separately at any construction market or store, or you can find an equivalent replacement for them, which will be much cheaper and, most importantly, will not affect the performance of the unit as a whole. Let us consider such a replacement and the manufacture of the mixing unit, or rather its parts, in more detail.
Collector. It can be made in two ways - twisted from tees with a diameter of ¾ inches or soldered from polypropylene tees of the same diameter.
In the latter case, it will cost more, since each of the branches of the comb will have to be equipped with a part such as an MRN, the cost of which is not so small. In any case, high-quality tees are a more suitable material - the main thing is to choose them correctly. In a situation with the manufacture of combs, tees with two outer and one inner ends are suitable.
They are twisted together using tow, without any additional fittings. How the mixing unit for a heated floor works photo Gidrostrelka. It can be made even without a three-way tap. It is quite possible to get by with the usual adjusting one, which is installed on heating radiators.
In addition to this, you will need two tees exactly the same as those used to make the combs, as well as a pair of connecting nipples with external and internal threads 50 mm long. Everything is assembled on tow - first, pipes (nipples) are screwed into both sides of the tap, and then one tee on each side is screwed to the nipples. Pump. Unfortunately, you won’t be able to make it yourself; you’ll have to purchase it at the store.
It is mounted in the lower part of the hydraulic arrow using detachable connections (American ones, which, as a rule, come complete with the pump). As an option, a pump can be installed instead of a hydraulic needle - you will get an excellent substitute that works no worse. At the same time, you will save on material. Heated floor contour: mixing unit photo Connect the hydraulic arrow with the combs.
Here it is also better to use detachable connections. If the pump is installed as a separate element (not instead of a hydraulic pump), then you will need to purchase an additional pipe, the length of which is equal to the length of the pump - it is installed on the supply, and the manifold is screwed to the pipe. So the option with a pump instead of a hydraulic arrow turns out to be more economical in all respects.
And then we equip the outlets of the combs with control taps, automatic air vents or, again, Mayevsky taps and, as they say, the matter is over - all that remains is to mount the mixing unit assembly for the heated floor in the proper place in a special cabinet and connect it to the heating system .
Everything is simple here - feed to feed, return to return. Naturally, the unit is connected through shut-off valves.
The heated floor is also connected to the mixing unit in the same way - one end of it to the upper comb, and the other to the lower comb. In order not to get confused later, you need to follow the layout - the return and supply of one segment of the heated floor must be connected under each other. You will also need to connect the power supply to the pump.
Basically, that's it. As you can see, assembling a mixing unit for a heated floor with your own hands is not very difficult.
The main thing is to understand the principle of its operation, study the device, and everything else, as they say, is a matter of technology.
Do you think otherwise? Then purchase a ready-made heated floor mixer assembly and spend additional money on its purchase. Alternatively, you can turn to friends who are competent in this matter.
Well, now it's time to finish the article. All the material I wanted to share has been reviewed. I hope it will be useful to you, and you will use it if you need to install a mixing unit for heated floors with your own hands. Improve your own practical skills and gain new knowledge, as they say: “It’s never too late to learn!” That's all, thank you for your attention, successful and easy repair!
Structure of a two-circuit system
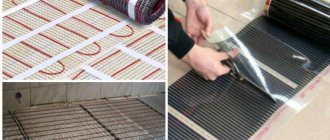
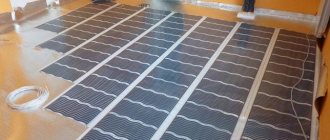
Heated floors can also be electric, but they are more often made in already used houses, when a rod mat or infrared film needs to be laid under the finishing coating. If the house is just being built, then preference is usually given to a water system, and it is installed directly into the rough concrete floor. There may be other options, but this one is the most optimal.
If the house is just being built, then preference is given to water heated floors
Choosing a heated floor
The main elements of such a heating scheme:
- water supply pipeline (main or autonomous);
- hot water boiler;
- wall-mounted heating radiators;
- pipe system for heated floors.
Equipment for heated floors
The boiler is capable of heating water to boiling water, which, as you know, is 95 degrees Celsius. The batteries can withstand this temperature without problems, but for a heated floor this is unacceptable - even considering that the concrete will absorb some of the heat. It would be impossible to walk on such a floor, and no decorative coating with the exception of ceramics would withstand such heating.
What to do if you have to take water from the general heating system, but it is too hot? This problem is solved by the mixing unit. It is here that the temperature is reduced to the desired value, and the operation of both heating circuits in a comfortable mode will become possible. Its essence is incredibly simple: the mixer simultaneously takes hot water from the boiler and cooled water from the return, and brings it to the specified temperature values.
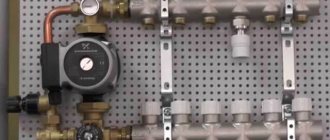
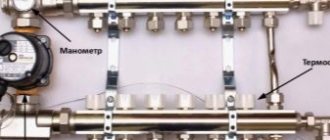
Pumping and mixing unit for heated floor assembly
Warm floor from central heating
How does it all work
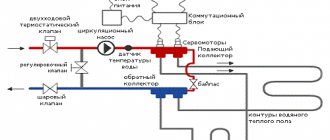
If we briefly imagine the operation of a double-circuit heating system, it will look something like this.
- The hot coolant moves from the boiler to the collector, which is our mixing unit.
- Here the water passes through a safety valve with a pressure gauge and temperature sensor, which you see in the photo below. They regulate the pressure and temperature of the water in the system.
- If it is too hot, the system is activated to supply cold water, and as soon as the required coolant temperature is reached, the damper automatically closes.
- In addition, the collector ensures the movement of water along the circuits, for which purpose there is a circulation pump in the structure of the unit. Depending on the design of the system, it can be equipped with additional elements: bypass, valves, air vent.
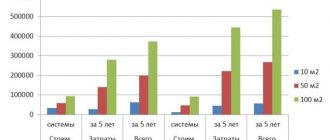
What affects the energy consumption of underfloor heating
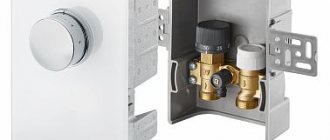
Safety valves for heated floors
Manifold mixers can be assembled from individual parts, but the easiest way is to purchase an assembled unit. The variations can be very different, but the main thing that distinguishes them is the type of safety valve used. The most commonly used options are two or three inputs.
Table. Main types of valve.
| Valve type | Distinctive features |
| Two-way | This valve has two inputs. On top there is a head with a temperature sensor, according to the readings of which the water supply to the system is regulated. The principle is simple: hot water heated by a boiler is mixed with cold water. The two-way valve reliably protects the underfloor heating circuit from overheating. It has a small bandwidth, which in principle does not allow any overload. However, this option is not suitable for areas larger than 200 m2. |
| Three-way | The three-stroke version is more versatile; it combines feeding functions with adjustment functions. In this case, hot water is not mixed with cold water, but, on the contrary, cold water is mixed with heated water. A servo drive is usually connected to the valve thermostat - a device with which the temperature in the system can be set depending on the ambient temperature. The supply of cold water is metered by a damper (fill valve) on the return pipe. Three-way valves are used in large houses with several separate circuits, as they have a high throughput. But this is also their disadvantage: at the slightest discrepancy between the volumes of hot and cooled water, the floor can overheat. Automation can solve this problem. |