The concept of a heating point
The efficiency of use and the level of heat supply to the consumer directly depends on the correct functioning of the equipment.
In fact, a heating point represents a legal boundary, which in itself presupposes equipping it with a set of control and measuring equipment. Thanks to this internal filling, determining the mutual responsibilities of the parties becomes more accessible. But before you understand this, you need to understand how thermal diagrams of thermal units function and why read them.
How to determine the diagram of a thermal unit
When determining the layout and equipment of a heating point, they rely on the technical characteristics of the local heat consumption system, the external branch of the network, the operating mode of the systems and their sources.
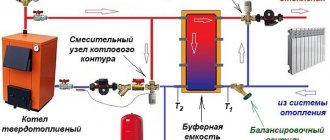
In this section, you will become familiar with the coolant flow graphs - the thermal diagram of the heating unit.
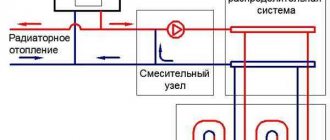
A detailed examination will allow you to understand how the connection to the common collector is made, the pressure within the network and relative to the coolant, the indicators of which directly depend on the heat consumption.
Important! If a heating unit is connected not to the collector, but to the heating network, the coolant flow of one branch inevitably affects the flow of the other.
Engineering systems
Table 1.1 - Air ducts.
| Designation | Name | Code | |
| On plans and sections | On the diagrams | ||
| Air duct, general designation | 1.1.01 | ||
| Round duct | 1.1.02 | ||
| Rectangular duct (*second number is duct height) | 1.1.03 | ||
| Ventilation duct (*second number - duct height) | 1.1.04 | ||
| Circular duct running in the visible direction | 1.1.05 | ||
| Circular duct running in an invisible direction | 1.1.06 | ||
| The air duct is rectangular, going in the visible direction | 1.1.07 | ||
| Rectangular duct going in the invisible direction | 1.1.08 | ||
| Flexible air duct | 1.1.09 | ||
| Thermally insulated air duct | 1.1.10 | ||
| Air duct with fire retardant coating EI150 - fire resistance limit | 1.1.11 | ||
| Acoustic coating outside or inside the duct | 1.1.12 | ||
Table 1.2 - Air ducts in the shaft.
| Designation | Name | Code |
| Supply, going in the visible direction | 1.2.01 | |
| Inflow, going in the invisible direction | 1.2.02 | |
| Exhaust, going in the visible direction | 1.2.03 | |
| Exhaust, going to the invisible side | 1.2.04 | |
| Recirculation, going in the visible direction | 1.2.05 | |
| Recirculating, going to the invisible side | 1.2.06 | |
| Air duct made from building structures (*second number is the height of the duct) | 1.2.07 | |
| Note - Designations are recommended for depicting air ducts in sections of ventilation shafts. | ||
Table 1.3 - Rectangular fittings.
| Designation | Name | Code | |
| On plans and sections | On the diagrams | ||
| Symmetrical transition | 1.3.01 | ||
| Transition asymmetric | 1.3.02 | ||
| Transition from rectangular to round cross-section | 1.3.03 | ||
| Bend with a central angle of 90? | 1.3.04 | ||
| Angle bend | 1.3.05 | ||
| Knee with shoulder blades | 1.4.06 | ||
| Sharp knee without shoulder blades | 1.3.07 | ||
| Flow bifurcation acute symmetrical | 1.3.08 | ||
| Smooth symmetrical flow bifurcation | 1.3.09 | ||
| Branch straight | 1.3.10 | ||
| 45° branch | 1.3.11 | ||
| Round branch | 1.3.12 | ||
| Branch conical, round | 1.3.13 | ||
| Note - Designations of shaped elements are recommended for use in installation projects. | |||
Table 1.4 - Round fittings.
| Designation | Name | Code | |
| On plans and sections | On the diagrams | ||
| Transition on round air ducts | 1.4.01 | ||
| 90° radius bend | 1.4.02 | ||
| Sectional bend with an angle of 90° | 1.4.03 | ||
| Radial bend | 1.4.04 | ||
| Sectional bend with an angle of 135? | 1.4.05 | ||
| Knee sharp with shoulder blades | 1.4.06 | ||
| Sharp knee without shoulder blades | 1.4.07 | ||
| Tee | 1.4.08 | ||
| Taper tee | 1.4.09 | ||
| Pants-shaped tee | 1.4.10 | ||
| Cross | 1.4.11 | ||
| Straight tee, aspiration | 1.4.12 | ||
| Crosspiece, aspiration | 1.4.13 | ||
| Pants-shaped tee, aspiration | 1.4.14 | ||
| Note - Designations of shaped elements are recommended for use in installation projects. | |||
Table 1.5 - Exhaust and supply devices.
| Designation | Name | Code | |
| On plans and sections | On the diagrams | ||
| Hole (grid) for air release | 1.5.01 | ||
| Hole (grid) for air intake | 1.5.02 | ||
| Four-way supply air distributor | 1.5.03 | ||
| Three-way supply air distributor | 1.5.04 | ||
| Double-sided supply air distributor | 1.5.05 | ||
| Single-sided supply air distributor | 1.5.06 | ||
| Round supply air distributor | 1.5.07 | ||
| Four-way exhaust air distributor | 1.5.08 | ||
| Three-way exhaust air distributor | 1.5.09 | ||
| Double-sided exhaust air distributor | 1.5.10 | ||
| Single-sided exhaust air distributor | 1.5.11 | ||
| Round exhaust air distributor | 1.5.12 | ||
| Horizontal air distributor, one-sided | 1.5.13 | ||
| Multi-sided air distributor | 1.5.14 | ||
| Air distributor with inclined jets | 1.5.15 | ||
| Air distribution nozzle | 1.5.16 | ||
| Multi-diffuser air distributor | 1.5.17 | ||
| Vertical perforated air distributor | 1.5.18 | ||
| Perforated ceiling air distributor | 1.5.19 | ||
| Wall grate | 1.5.20 | ||
| Transfer grid in the wall | 1.5.21 | ||
| Linear supply grille | 1.5.22 | ||
| Linear exhaust grille | 1.5.23 | ||
| External louvered grille (air intake or exhaust) | 1.5.24 | ||
| Inertial grid | 1.5.25 | ||
| Local suction | 1.5.26 | ||
Table 1.6 - Elements of ventilation systems.
| Designation | Name | Code | |
| On plans and sections | On the diagrams | ||
| Deflector | 1.6.01 | ||
| Umbrella | 1.6.02 | ||
| Ventilation damper (throttle valve) | 1.6.03 | ||
| Shiber | 1.6.04 | ||
| Check Valve | 1.6.05 | ||
| Smoke exhaust valve | 1.6.06 | ||
| Fire retardant valve | 1.6.07 | ||
| Service door | 1.6.08 | ||
| Air duct cleaning hatch | 1.6.09 | ||
| Hatch for measuring air parameters | 1.6.10 | ||
| Ventilation shaft passage unit | 1.6.11 | ||
| Flexible insert | 1.6.12 | ||
| Silencer | 1.6.13 | ||
The material uses images of symbols from the Visio Library Engineering Systems, intended for creating drawings and diagrams of heating, ventilation, gas supply, sanitary systems, power equipment, etc.
All materials ABOK 1.05-2006
- ABOK 1.05-2006 Graphic symbols in heating, ventilation, air conditioning and heating and cooling projects.
- ABOK 1.05. Appendix 1. Symbols of ventilation systems.
- ABOK 1.05. Appendix 2. Symbols of pipelines.
- ABOK 1.05. Appendix 3. Symbols of equipment.
- ABOK 1.05. Appendix 4. Symbols of equipment for purification of ventilation emissions.
- ABOK 1.05. Appendix 5. Symbols of automation elements and drives.
Analysis of the thermal unit diagram in detail
The figure shows two types of connections: a – in the case of connecting consumers directly to the collector; b – when connecting to a branch of the heating network.
The drawing reflects graphical changes in coolant flow rates when the following circumstances occur:
A – when connecting heating and water supply (hot) systems to the heat source collectors separately.
B – when connecting the same systems to an external heating network. It is interesting that the connection in this case is characterized by high pressure loss in the system.
Considering the first option, it should be noted that the total coolant flow rates increase synchronously with the flow rate for hot water supply (in modes I, II, III), while in the second, although there is an increase in the flow rate of the heating unit, along with it Heating consumption figures are automatically reduced.
Based on the described features of the thermal circuit of the thermal unit, we can conclude that as a result of the total flow rate of the coolant considered in the first option, when applied in practice, it is about 80% of the flow rate when using the second prototype of the circuit.
Axonometric diagram for water supply, sewerage or heating
After reading this article, you will learn how to correctly and quickly display sewerage, plumbing and heating systems on an axonometric diagram.
How to reflect all communication elements in a drawing
In order to cope with this task, you will need a program for creating graphic drawings, sketches and diagrams. You can open any of the arsenal of construction programs supplemented with this function, or one with which you are familiar.
Before developing an axonometry, prepare a plan of a building, apartment or other premises with communication networks.
Drawing everything out is not that difficult, especially if you have experience with engineering software. The sketch reflects all the pipes shown on the house plan. They are transferred to an electronic version of the axonometric diagram and reflected at an angle of 45 degrees.
Important! This rule does not apply to horizontal sections. The lines are left unchanged.
How to reflect structural elements in electronic form
The fastest way to build a drawing is by cloning the entire diagram. To do this, select the “Insert” command, after which the integrated image is flipped. For the function to be executed, it is given a value equal to 45 degrees (the number is written in the program).
Having prepared the basis in the electronic version, where the risers are marked on the plan, they put symbols in the form of dots. To reflect all floors in the building, a vertical line is drawn. For the purpose of better perception, the diagram shows the floor panels.
Important! Don't make the slabs too long. Take advantage of the gap.
A special feature of the axonometric sewerage diagram is the reflection of all elements of sanitary facilities: urinals, toilets, sinks, drains and other devices for carrying out hygienic procedures.
What does the diagram show?
The axonometric drawing of the sewer must show:
- Pipeline entrances inside the house.
- Wiring of the distribution system in the building (risers and branches from them to each floor).
- Shut-off and control valve elements.
- Adapter rings for pipes with different diameters at their joints.
- Discharge points from the system (tees with plugs).
- Cranes: watering and fire units.
- Sewage equipment, water metering points, control and measuring devices and other components of the sanitary and water supply lines.
What data is included in the drawing?
The inclusion of the following indicators describing the water supply system is mandatory when constructing an axonometric diagram. This information includes:
- Designation of risers (usually the leader line area).
- The floor level of each floor of the room, the boundary of the horizontal branch (at the axes of the pipeline), the height of the water collection points (marks along the risers).
- Diameters of system elements.
- Pipeline slope angles (indicating the slope indicator).
- Dimensions (length) of each of the independent sections of the pipeline, which include risers and horizontal branches, in millimeters.
- Coordinating dimensions (secondary information).
- Designation of nodes for the purpose of detailing the drawing.
In addition to a number of basic data, accompanying documentation is attached to the diagrams, including specifications for materials and equipment.
Features of sketch design
Here attention is focused on the reflection of instruments. If one element climbs onto another, and this happens in most cases, then a dotted line is drawn indicating the displacement of the plumbing element for the purpose of a better visual effect.
The axonometric diagram of the water supply system must include readings of all pipe diameters.
If the toilet bowl is not marked on the outlet, then take a diameter of 50 mm; if there is one, the minimum diameter should be 100 mm. These numbers are important to remember.
For risers, in 90% of cases, a figure of 100 mm is used. Slopes in a similar diameter will be equal to 0.02; with an indicator of 50 mm, the slope angle is set to 0.03.
If you have already applied all the elements, mark the outlets whose diameter is larger than that of the risers; the slope is taken to be 0.02.
At the last stage of drawing up the axonometry, special notes are made based on the characteristics of the site and the construction plan. Here they note the level of soil freezing, the location of the foundation, as well as other factors that influence the corrections.
Features of drawings
When drawing up an axonometric diagram, pay attention to the following points:
- Plumbing and other fixtures connected to risers and the distribution network are reflected only when the necessary diagrams are not included in the attached documentation.
- The zero mark (first floor level) is shown on the risers by drawing a thin horizontal line. In the case of detailing the project, each of the nodes of the drawing is considered separately, reflecting it on an enlarged scale.
- If necessary, symbols of shut-off and control valves, watering taps and other system elements are added to sketches of diagrams and drawings of water supply networks and sewerage systems.
Axonometric drawings of heating and ventilation branches
When working with utility networks, calculations and graphical visualization act as important components of work on a residential construction project.
In addition to the plan of the house and its facade, the package of documents required for construction is supplemented by an axonometric diagram of communications. Using it you can visually study this or that network: water supply, heating, ventilation.
The use of such drawings is especially important when arranging complex systems. Having an axonometric view of the heating project simplifies the work of installers during the process.
What to pay attention to when creating a sketch
Before reflecting the axonometric diagram of heating a room in paper or electronic form, a number of calculations are carried out. The diagram itself is compiled based on the collected data:
- heat demand values for building rooms;
- typologies of heating devices, their quantities for each room;
- basic decisions regarding the entire engineering network: the use of risers, calculation of hydraulic branches and circuits, the order of connecting elements of the heating system;
- characteristics of pipeline sections: diameters and lengths of pipe fragments, shut-off valves, thermal controllers, hydraulic regulators.
Having received the appropriate calculations, their indicators are entered into the diagram. The axonometric diagram of the heating system necessarily contains the technical characteristics of each of the network nodes (boilers and pumps used), the length and diameter of the pipes, heat consumption and information about other thermal properties of heating devices, such as radiators, convectors, registers.
When starting to work on an axonometric drawing, first of all, the main ring of coolant movement is determined - the path to the most distant element from the boiler and back.
To summarize what has been studied, we will say that axonometry is mandatory, regardless of the type of communication system for structures of any type of purpose. Having a graphical drawing in front of their eyes, installers quickly determine how much work needs to be done and what exactly the network looks like.
If a specialist understands the axonometric heating diagram, and the drawing itself is executed correctly without any errors, then during the implementation of the project it is possible to eliminate the occurrence of any difficulties associated with the installation of elements of the heating system, pipelines and other utility networks.
In order for the design, and then the installation of the water supply system, to be successful, it is necessary to correctly visualize the building itself and the communication branches inside it on a sheet or in electronic form. In this case, the graphical component of the project includes:
- general plan of the building;
- situational diagram;
- facade;
- plans for each floor;
- roof plan;
- axonometric diagrams: ventilation, heating, water supply;
- sections and other schematic diagrams.
Remember that when working with correctly designed axonometry, problems with the installation of utility networks do not arise in 99.9% of cases. That is why this stage is so important in designing a future house or high-rise building.
Source: https://FB.ru/article/330442/aksonometricheskaya-shema-dlya-vodoprovoda-kanalizatsii-ili-otopleniya
Place of the diagram in design
When designing a diagram of a thermal heating unit in a residential neighborhood, provided that the heat supply system is closed, pay special attention to the choice of the connection diagram of hot water supply heaters to the network. The selected project will determine the estimated coolant flow rates, functions and control modes, etc.
The choice of the thermal heating unit circuit is primarily determined by the established thermal regime of the network. If the network operates according to the heating schedule, then the selection of the drawing is made based on the technical and economic calculation. In this case, parallel and mixed circuits of thermal heating units are compared.
Schematic diagram as part of a house project
The construction of a private house, which we call correct, must be carried out according to the project. It doesn’t matter what kind of project it will be, ready-made with modifications or individual, the main thing is that it should be.
An integral part of the house project is the engineering part. It includes drawings relating to all engineering equipment and utility networks in and outside the house. The heating portion of the project is called “Working Drawings for Heating and Ventilation: HVAC.” A set of OB drawings consists of the following sheets (for example):
- Heating system diagram;
- Heating schemes with radiators and/or heated floors;
- Connection of manifold cabinets;
- Schematic diagram of the combustion chamber.
As you can see, the schematic diagram of the combustion chamber is included in the set of working drawings of the OV.
