Features of installing thermostats
- Possibility of installation in a frame with switches or sockets. Some models of temperature controllers may be located in a frame with sockets and switches. If this nuance is important, it is advisable to check with the seller which fittings for electrical wiring a particular regulator is compatible with.
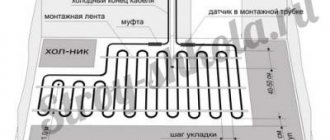
- Close location to the heated zone. The device must be installed closer to the heating area. This reduces the length of the sensor cable, which can be damaged. At what height should the floor heating thermostat be placed in this case? Ideally, it will be 30-40 cm from the floor. This placement is not as convenient as what the manufacturer recommends (90 cm), but it significantly reduces the length of the wire. If children live in the apartment, the device must be installed higher. When air sensors are used, it is worth relying on the supplier's advice regarding the height and location of the thermostat. It is advisable that the device be located close to the place where the cable routing begins. In this case, you can draw up a laying plan in advance.
- Possibility of installation in rooms with high humidity. Experts do not recommend installing thermostats in the bathroom, as there is a risk of water getting inside the device. If no other option is possible, you can opt for devices that are protected from moisture penetration. Such models have a protection class of at least IP21. The second indicator shows the presence and degree of protection of the device from water.
- Connection to the electrical panel via a separate line Sensors for a heated floor system with a power of 200-300 W can be powered from an outlet that is located nearby and protected by an RCD. For floors with high power, a separate line is required, so it is better to install devices for them closer to the electrical panel.
- Installing a temperature controller on the loggia. When you plan to install a thermostat on a loggia, you need to take into account the rated power of the device, which is indicated in the instructions. In this case, it is advisable to choose an installation location closer to the doorway, since the temperature in this place will be higher in winter. When the temperature sensor for the loggia is located indoors, it is important that it is accessible when it is necessary to replace the sensor.
- Installing the thermostat in an installation box, on a wall or in an electrical panel. Almost all thermostats require installation in a socket box. It itself can be located in the wall or installed on its surface. As a rule, external installation is used when installing the system on balconies and loggias.
At what height should the floor heating thermostat be installed and how to connect it to the system? If such questions arise, in order to be sure that the location for the temperature regulator is selected successfully, you can consult a specialist.
We seem to have cleared up the height issue, thanks for the feedback!: flower: Another question has arisen: Girls, maybe someone can point their noses (surely this has already been discussed more than once) in the topic of choosing a heated floor. Which company is better. I'm interested in the flooring so that there is a reasonable compromise between price and quality. Not the most expensive, but not the cheapest either. I apparently have problems with using the search. It only returns some general topics, but I can’t find anything about companies. Please post here a link to a topic with a discussion of companies and manufacturers of heated floors, if you are not too lazy.:flower:
Please share your experience, who has heated floors installed!:flower: How to install thermostats correctly and at what height is it more convenient to use.:flower: At the height of the sockets (electricians suggest installing them at 200 mm),
at the height of the switches 900 mm (won’t the design be knocked out of the switches and won’t we hook them accidentally)
or is it better in the middle, at 500?
The floors will be under porcelain tiles in the hallway and kitchen, in the bathroom and toilet, and on the insulated balcony. I tried to find it by searching, maybe it was already discussed where, but I didn’t find anything.
Mine are low, the electricians also advised me. Now I regret it, it’s inconvenient for me, it would be better if there were sockets
Can you clarify how low? And at what height are your sockets? Or do you mean switches, not sockets? We just have sockets 20 cm from the floor. Warm floors are definitely not much lower.
If the heat regulators do not have a built-in additional air temperature sensor, then at any height convenient for use. There are just a button + a rotary wheel - you can control them near the floor, but there are also ones with a display - judge for yourself how convenient it is to use it near the floor.
If the thermostat has an additional air temperature sensor, see the instructions for the thermostat - how to install it correctly, incl. at what altitude?
If the heat regulators do not have a built-in additional air temperature sensor, then at any height convenient for use. There are just a button + a rotary wheel - you can control them near the floor, but there are also ones with a display - judge for yourself how convenient it is to use it near the floor.
Features of installing heated floors in the bathroom
As practice shows, most often buyers prefer to install heated floors in the bathroom . How is a heated floor installed in a bathroom? What do you need to know for it to work correctly and efficiently and to please you with warmth for many years?
For advice on choosing a heated floor and calculating the cost, call
Let's answer the most frequently asked questions regarding installation and its most popular option - cable underfloor heating in the bathroom.
The most frequently asked questions are:
- Where and how to install the thermostat correctly?
- Is it possible to connect a heated floor in the bathroom and in the toilet to one thermostat?
- Actual laying area - what furniture can or cannot be stacked under?
- What indentations should be made when laying?
- When can you install a heated floor under a bathtub ?
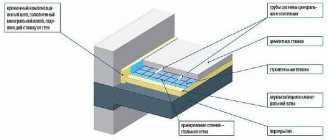
- What thermal insulation material is recommended to use?
Carefully read the instructions for the heated floor before installing it. In most cases, it contains detailed, well-illustrated step-by-step instructions that allow you to install the system yourself.
Installing a thermostat
Before installing floor heating, the first thing you need to do is choose a place to place the thermostat . The vast majority of thermostats are not recommended for installation in the bathroom, since their protection class (IP 21) does not guarantee long-term operation in wet rooms. Therefore, the priority place for it is a corridor or other dry room. In this case, the heated floor sensor, which reads the surface temperature, is located in the bathroom.
After the location for the thermostat is selected, a hole is made in the wall at the level of its intended installation. A corrugated tube is inserted into it, into which a temperature sensor will subsequently be placed.
Installation process
Step one - marking the installation location of the thermostat and cutting a recess for the sensor
The optimal height for placing the regulator is 0.5 meters. Using exactly this value, the standard sensor wire will be enough to extend into the nearest fan zone, avoiding a common mistake - installation in a cold zone.
In the case of a cable heating conductor or ready-made thin mats on a synthetic mesh, there can be only one installation location, since it is determined by the output of the power cables from the extreme point of the cable.
The location can be adjusted only at the beginning of laying out the heated floor.
Using a drill with a crown attachment, a recess is made into which the socket box is installed. It is here that the connection of the sensor cable with the regulator and, in fact, the power cable with the household network input will take place.
System health check
We install the selected sensor with a thermostat into the housing very carefully so as not to damage the components. Close the lid. Checking functionality:
- Set the minimum heating temperature. When switching to the maximum temperature of the heated floor, a click should be heard.
- On programmable heated floors with a thermostat, we set the time for turning the system on and off, and set the temperature. We monitor the implementation of the given program throughout the day.
You can turn on the underfloor heating system only after the screed has completely dried.
Infrared heated floors are most often used for local heating. Cable electric and water floors are used as the main element of the heating system. When choosing heating elements and a sensor with a thermostat, you need to take into account the parameters of the heated room and the requirements for the functionality of the system.
dekormyhome.ru
The true purpose of corrugation
The heated floor sensor, like any other electronic item, can fail. Thanks to the soft corrugated pipe and internal broach, which was emphasized at the beginning of the article, you can easily replace a faulty temperature control element.
To do this you will need:
- remove the thermostat from the socket box, having previously de-energized the room;
- disconnect the sensor itself from the terminal block and the regulator;
- pull out the mentioned one through the corrugation;
- using a broach, thread the original sensor back until it stops
After this, you need to install the regulator in place and check the correctness of the repair work. Thanks to the broach, the sensor head will reach the copper plug (its remote location) and will not get tangled at the bend between the floor and the wall.
What should you pay attention to when installing the sensor?
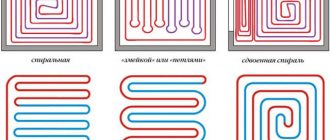
When installing any heating system, the temperature sensor must be inserted into the fan-shaped heating zone. The minimum distance of the sensor from the wall is 0.5 meters, between the second branch of heating elements or a thin heating mat. This will allow you to correctly monitor the floor temperature at this point. The readings taken from the fan zone correspond to reality as much as possible, even if we are talking about hundredths.
The location of the thermostat sensor between the first line of laying the cable heating element will lead to the recording of incorrect data and, as a result, a decrease in the service life of the heated floor. This will be triggered by overheating of the conductor or frequent on/off cycles in a minimum time period.
If we are talking about installing an intelligent thermostat with an output sensor that calculates the heating and cooling rate of the screed, ignoring the mentioned placement will disrupt the “prediction” function. It is also worth noting that a significant difference in readings between actual and detected heating can lead to an error such as a sensor break. In fact, there is nothing wrong with the sensor, it is just located in a colder zone and does not see changes in the thermal background when the screed is heated and cooled above the underfloor heating cable.
The lack of resistance information for the thermostat is fraught not only with wear and tear of the entire system, but also with the failure of the included prediction programs, which can only be eliminated by contacting a service center.
With mechanical regulators the situation is simpler. No programs or settings, only mechanical control buttons that set the desired temperature according to data from the sensor. Placing the latter in the first line or cold zone will indicate insufficient heating. The transition from a comfortable mode to increased heating will provoke not only wear and tear on the mats and cables, but also melting of the contacts in the junction box where the household network connects to the consumer itself.
How many thermostats to use
Often, clients install heated floors simultaneously in the bathhouse and toilet and wonder whether it is possible to save money and connect both systems to one thermoregulatory device and if it makes sense to do this.
Let's say frankly that this can be done, but it is not recommended, especially in cases where heated floors are placed in rooms with polarly different temperature conditions. In this situation, the sensor will record the temperature level of only one room and, based on this data, heat both the toilet and the bath. As a result, the client will inevitably face the fact that in one room the floor will be too warm, and in another - too cold. The heating temperature will depend entirely on the location of the sensor. If it is in a cool room, overheating will inevitably occur, and if it is in a hot room, underheating will occur.
Connecting two systems to a single thermostat is considered correct and completely acceptable only if approximately the same temperature regime is maintained in both rooms. However, here too there are some nuances and requirements for the location of the thermostat. It would be most correct to place it in a room with maximum heat loss and the lowest temperature near the floor surface. A special device called a pyrometer will help determine these parameters.
In addition, consumers should take note of the fact that by installing a single thermostat in two rooms, they will lose the ability to turn off heating systems separately and will not be able to independently regulate the temperature level in the rooms. This will introduce a number of inconveniences into the operation process and will entail additional electrical consumption and, as a result, an increase in the volume of utility bills.
What to do if the sensor is installed incorrectly?
In the process of rough work, it is very easy to correct the situation. It is enough to cut the groove a little further and, using an additional piece of corrugation with a diameter of 10 mm, move the sensor a little further.
Lack of sensor cable length can be corrected by moving the wall regulator lower in level or by adding a wire of the same cross-section and then insulating it.
If the work is completed and the final finishing is carried out - the tiles are laid, you must:
- remove the piece of tile under which the heated floor sensor is located;
- clear the end of the recess in which the corrugation is laid;
- remove the plug (plug) of the sensor;
- cut off the sensor from the wire;
- add the required wire length;
- seal the extended part in a new 10 mm corrugation;
- place in the added groove;
- apply tile adhesive and lay the tiles.
After such work, the shutter speed until the first switching on will be 18 days.