According to the screed technology under a heated floor, it is most often necessary to pour concrete mortar on top of the heating elements. This is necessary not only to create a level surface for the flooring, but also to protect all components. At the same time, the thickness of the fill layer will differ in different situations. Even the manufacturers themselves avoid this issue in their instructions for installing screeds under heated electric floors. It is the thickness that should be determined in the process of laying the components.
Purpose of the screed
A conventional screed is characterized by the following functions that it performs:
- Protection from external mechanical influence of heating elements and other components of a heated floor.
- Creation of a strictly horizontal surface necessary for high-quality installation of the selected flooring option.
- Uniform heat transfer from heating elements to the base of the floor.
- Load distribution on the base from furniture and household appliances.
- “Mediator” in the transfer of heat from heating elements to indoor air.
All recommendations from manufacturers for pouring screed should be followed at every stage, not forgetting about the optimal thickness of the heated floor screed. When installing a warm screed, you should take into account the nuance that such a fill will be more susceptible to thermal expansion. Therefore, it will be necessary to create all the conditions for the ability to withstand all obstacles.
Tile options for “warm floors”
Installing tiles on a warm floor
Which floor tile is warmer? There are several floor coverings that can be used in tandem with electric heating without any problems. These include:
- Ceramics. Warm ceramic floor tiles are most often used when installing heated floors. Firstly, it easily tolerates multiple cycles of cooling and heating, and secondly, it does not experience strong thermal expansion, which cannot be said about wooden coatings;
- PVC materials. Underfloor heating under PVC materials would also be a good option. This coating itself is not cold, so in the summer you will not experience discomfort when walking barefoot on the floor. It should also be noted that the price of PVC tiles is significantly lower than that of ceramics.
- Vinyl coverings. Vinyl tiles are strong enough and lightweight, so they can be used in combination with infrared heating. It practically does not change size when heated or cooled, so it is ideal for an electric heating system.
Recommendations
When carrying out work on pouring the solution for screeding a heated electric floor, you should adhere to certain recommendations that will allow you not only to efficiently lay the heated floor under the screed, but also to select the minimum thickness of the screed.
Much will depend on the power of the heating elements of the indoor heating system. The larger it is, the thicker the grout layer will have to be created:
- 80-120 W/m2 – the screed layer will be up to 20 mm.
- 100-140 W/m2 – 30-50 mm.
- 160-200 W/m2 – 60-100 mm.
Thickness of the heated floor pie
But at the same time, attention is drawn to the fact that the time during which the base of the floor will be completely heated will depend on the thickness of the filling layer. So it is not always very beneficial to create a thick layer of the prepared solution. In this case, a large amount of electricity will be spent heating the room.
Before pouring an electric heated floor, you should check several times that the heating elements are installed correctly, as well as the wiring and connection of all components. In the future, to eliminate the malfunction, you will have to dismantle the screed. All wiring and electrical appliances must be insulated. This also applies to the temperature sensor placed in the corrugated pipe.
If you position the temperature sensor correctly, then if it fails you will not have to break the tie to remove it. It will simply be removed from the corrugated pipe and replaced with a similar one. It is worth noting that the thermostat cannot be installed in a room where there is a constantly high level of humidity.
You can also fill the cable floor with an adhesive solution. But this is provided only if tiles or porcelain stoneware are used as flooring.
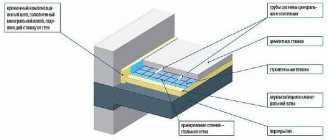
Thickness of underfloor heating layers
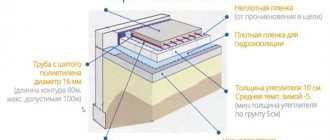
The heated floor consists of several layers. First, the screed is taken into account. It is mounted to the finishing field and tied to the base or foundation. But if the surface is insulated on the ground floor, the screed is done on the ground. The screed is a kind of pillow. Its average size is about 5 cm.
The next layer is insulation. It all depends on the chosen material. If you choose expanded polystyrene (it is the most common), its average thickness should be about 10 cm. But you can set the minimum - 5 cm. The density of the material is also taken into account. These figures are suitable if the density is about 30 kg/m3. For denser material, the thickness must be reduced.
Then comes the plastic film. Its thickness is from 1.5 to 2 cm. A mesh of rods with a thickness of 0.4 cm is made on top of it. And after creating the reinforcement, you can solve the issue with the pipeline. The diameter depends on the material of manufacture. The average pipe thickness is 1.5 cm.
Now you need to cover the pipeline. An additional 2 cm of mesh is sufficient for this. The last layer is a screed, about 5 cm thick. It is not only the base, but is also responsible for heat accumulation.
By calculating the sum of all layers, we get the height of the total floor.
Rough base
Before distributing the heating elements according to a pre-prepared pattern, you should check and prepare the base for the heated floor.
It does not always meet all the requirements; it has defects in the form of potholes and height differences throughout the room. This should be dealt with so as not to encounter poor heating efficiency of the heated floor.
After removing the old floor covering and dismantling the concrete base, you can begin leveling using a rough screed. For this, a classic sand-cement mortar is used. Further activities can be started after it has completely dried and set. Otherwise, you can forget about high quality. The thickness of the screed over an electric heated floor here is usually up to 50 mm.
The most important thing is to hide all the unevenness of the base and prepare the surface for laying heated floor heating elements.
Next, remove all unnecessary debris from the surface and, if possible, dust. A construction vacuum cleaner can help cope with the task here. A layer of thermal insulation is laid on top of the rough screed and the subsequent distribution of the underfloor heating cable or heating mat. In some cases, a do-it-yourself floor screed under a heated floor is installed on top of an infrared heated floor. True, this slightly reduces its efficiency during operation.
Laying heated floor components
In order for the underfloor heating system to function fully, before pouring the concrete screed, the mounting locations of the main sensors and components should be determined. The thermostat is installed on the wall surface and, if possible, close to an existing outlet. The distance from the floor should be at least 30 cm, since the temperature from the base will somewhat distort the transmitted information.
The temperature sensor is placed in the base of the floor, onto which the prepared solution will subsequently be poured. It is worth noting here that if the solution comes into direct contact, it may fail. To avoid this, the temperature sensor is placed in a corrugated pipe that leads from the thermostat on the wall. All open areas of the corrugation are sealed with sealant so that the solution does not get into them during pouring. It would not be superfluous to additionally install a special plug at the end of the tube at the base.
The heating elements are laid based on the drawn diagram, where the step of their installation will also be displayed. You should not deviate from the drawing, since all the little things are pre-calculated on it. After completing work with the underfloor heating components, you need to check their functionality by connecting them to the electrical network. The resistance of the cable is measured, which must correspond to the data specified in the passport for it. If the result is positive, you can proceed directly to pouring the concrete solution.
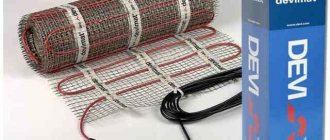
Types of thermomats
Twin-core heating plate
There are several varieties of counterfeit materials, and when purchasing, you need to know exactly which one is suitable for a particular room. If you are faced with a choice of which heating equipment to purchase - single-core or double-core, you first need to study the characteristics of each:
- single-core heating plates. In this category of substrate materials, the wires consist of a single core. The base can be metals: brass, galvanized, nichrome and others. It is due to them that resistance occurs with subsequent heating. During operation, an electromagnetic field appears, which is partially neutralized by the protective aluminum film. Used outdoors or in industrial buildings;
- twin-core heating plates. Thanks to two conductors, the heating power is higher than conventional ones. Increased power consumption due to two cables, but easier installation. The electromagnetic field is dampened by wires, radiation is minimized. Suitable for bathrooms and living rooms.
Thermomats are an excellent analogue of classic floor insulation and are ideal for water-based coatings. Installing this type of heating is a good solution that combines quality and durability. And even a person with no experience can figure out the installation.
- Related Posts
- How to make a warm floor from central heating?
- What are the characteristics of Knauf heated floors?
- How to lay heated flooring under laminate?
- What kind of substrate is needed under a laminate for a warm water floor?
- How to make a warm floor?
- What is the pipe consumption for underfloor heating per m2?
Screed device
The best option for making screeds is to use special ready-made dry mixtures for heated floors. They contain all the necessary components, including a plasticizer.
This significantly increases the quality of the finished solution. It should be distributed carefully so as not to damage the heating cable of the warm electric floor. In addition, the mixture should be distributed evenly over the entire surface.
When pouring the solution, no matter how much screed there should be above the heated floor, air pockets must not be allowed to form. This will help reduce heat transfer from the heating elements to the base.
As mentioned earlier, the optimal thickness of the screed for heated floors should be from 30 to 50 mm. There may be cases when the minimum screed thickness for electric heated floors is reduced. But then you will have to add appropriate additives (plasticizer) to the solution.
Until the concrete screed dries, you cannot start the heated floor. Otherwise, the solution will not be able to gain the necessary strength and set. After a period of 28 days, you can begin trimming the protruding elements of the damper tape and thermal insulation, as well as turn on the heated floors after the screed. The heated floor after screed is covered with the selected flooring option.
There may be cases when the area of the room is more than 20 m2 or one of the walls in the room is more than 5 meters in length. In this case, you should not only create different circuits from the heating elements, but also fill the screed in two stages. Expansion joints must be created between the contours of the heated floor so that the integrity of not only the concrete screed during operation of the heating system, but also the floor covering is maintained.
All these subtleties allow us to get an answer to the question of how to properly make a screed for a heated floor. There are no particular difficulties if you strictly follow the sequence of actions and recommendations from the manufacturers. After laying the floor covering, the air in the room will be heated to the required level.
Thanks to a heated floor, you can significantly increase the level of comfort in any room. In order for a heated screed floor to last as long as possible, you must follow all the rules associated with its installation. In addition, the optimal layer thickness must be selected. If it is too thick, then the amount of heat given off will be low, and if the coating is unreasonably thin, then in this case you will have to cope with unbearable heat.
Filling, materials for screed
Each owner decides independently what to use and how to make screeds for water heated floors. This is done taking into account the location and characteristics of the premises where the coating will be made. The following compositions can be used for filling:
Self-leveling mixtures
Dry mixes. The preparation method (how much water is needed) is indicated in the instructions. The readiness of the solution is determined by compression (should not release moisture). Strength and elasticity are imparted by the plasticizers present in such solutions. To achieve a perfectly flat surface of the heated floor screed, the heated floor screed is laid along the beacons. Reinforcement will protect the top layer from cracks and peeling. The surface is sanded with a special machine, approximately 1 hour after pouring. This process simultaneously compacts and levels the mixture. Drying takes 12 hours. After 5 days you can begin the finishing coat.
Dry mixes
The most common surface is concrete. The solution is made from cement grade no lower than M-300, sifted sand, and water. To make concrete elastic, a plasticizer and fiber are added. Next, the reinforcement frame is laid and the screed is poured. Floor finishing is possible in 1 -1.5 months. Until this moment, the concrete pad under the heated floor is dried, and a plastic film is laid over the heated floor. It promotes complete drying without rapid loss of water.
Screed made of concrete and reinforced mesh
The screed lies flat, according to pre-installed beacons. Aligned using a special rule. It is necessary to ensure that there are no voids in the thickness of the solution. When drying, do not connect heated floor elements. It is not recommended to use heat guns or hair dryers for top drying. You need to let the composition dry on its own. Otherwise, the appearance of cracks and damage to the structure of the structure cannot be ruled out.
It is not recommended to use crushed stone for preparing concrete screeds. Preparatory stage for pouring:
- Removing debris from the base.
- Waterproofing. It is carried out by treating the base of the floor with deep penetration mastics.
- Thermal insulation. The surface is covered with heat-insulating materials.
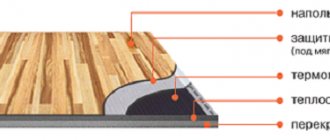
The design of the floor resembles the structure of a “layer cake”. Here, too, one preparatory layer is superimposed on another.
Design of heated floors for different coatings (click to enlarge)
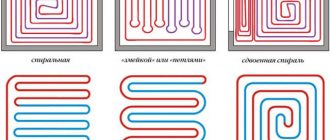
Methods for laying heated floors in a screed
In the construction industry, there are two common technologies that make it possible to form the basis for a heated floor into a screed. The classic cement-sand mixture opens the list.
We are talking about bags marked M-150. It’s easy to find it in a construction and repair supply store. When going there, it is not recommended to let your guard down.
In order for a floor covering with a water-heated floor to serve for a long time, high-quality cement should be used for the screed
Some manufacturers, wanting to give concrete greater density, add PVA glue to the cement. On the one hand, this really makes the coating wear-resistant, but, on the other hand, such an action is very controversial. The point is that a mixture interspersed with glue requires more power to deliver heat to the end user.
Simply put, such a warm floor will cause large financial expenses. In addition to the cement-sand mixture, ready-made mortar is available on the market.
It is characterized as follows:
- Easy installation;
- Resistance to extreme temperatures;
- Resistance to prolonged physical activity;
- The mixture is used only for water or electric “warm floors”.
The retail chain offers 2 types of mixtures used to form the base. Sand-cement mortar is a budget option. Depending on the manufacturer, you can find varieties with the addition of PVA.
Such products should be treated with extreme caution, because the glue reduces the thermal conductivity of the floor. If financial capabilities allow, it is better to make a choice in favor of a ready-made solution.
Choosing the thickness of the screed for electric heated floors
Before you begin installation, you need to examine the base. Various irregularities, traces of rot or mechanical damage - all this indicates the need to remove the old coating. You cannot use it, otherwise the warm floor will not last long. If there are no problems with the coating, then in this case, do-it-yourself installation is carried out using heat-insulating material.
The thickness of the screed for electric heated floors should be selected depending on the type of room and type of floor covering
This is foil with a stopper or penofol. It's impossible to say which one is better. As practice shows, laying both does not take much time.
The further procedure is as follows:
- At least 12 hours must pass from the moment the base is poured;
- After this, the base of the electric floor is fixed;
- Heating mats must be laid out in such a way that the technology recommended by the manufacturer is not violated;
- The cable should be laid in such a way that it is not pinched anywhere;
- Before starting the concrete screed, you must ensure that all elements are laid and fixed correctly.
In order for the electric floor to fully ensure a comfortable temperature regime in the room, it is necessary to analyze two interrelated indicators. First of all, we are talking about the quality of the base, and secondly, about the thickness of the coating. The installation of an electric heated floor involves the use of a soft and not very thick coating.
Warm floor surface temperature
When the heating cable is running, furniture and other interior items without legs should not be placed on the heating surface of the floor.
The maximum temperature on the floor surface is limited by physiological and medical requirements. Temperature corresponds to “heat flux density”.
Table 3
| Temperature zone | Heat flux density, Q, W/m2 | Floor surface temperature according to DIN EN 1264 |
| Constant presence of people | 100 | Temperature max ≤ 29 °C |
| At the boundaries of the room | 175 | Temperature max ≤ 35 °C |
| Bathroom | 150 | Tpol max , Tvn * + 9 °С ≤ 33 °С |
* - the temperature in the bathroom should not exceed the temperature inside the adjacent room by more than 9 ° C
Boundary zone of “warm floor”
At the boundaries of the room, for example, where there are large, increased heat losses. To compensate for heat loss, boundary zones are provided where the heating cable is laid at smaller intervals, providing a higher floor surface temperature . Border zone
can be no more than 1 m deep in the room.
Tpol
max = 35 °C
Preliminary calculation of the heating system "warm floor"
Floor covering materials limit the power of the heating system by their thermal resistance:
Table 4
| Floor covering material | Thermal resistance RλF, m2*K/W | Surface temperature Tfloor max, °С | Heat flux density, Q, W/m2 |
| ceramic tiles 5 mm | 0,00 | 35 | 175 |
| parquet 10 mm (laminate) | 0,05 | 31 | 125 |
| carpet 6 mm, parquet 20 mm | 0,10 | 29 | 100 |
| carpet 11 mm | 0,15 | 27 | 75 |
- The best solution for underfloor heating systems is ceramic tiles. It is not afraid of moisture and conducts heat well from the heating cable into the room.
- Before using laminate or carpet, make sure that the manufacturer allows them to be used in underfloor heating systems.
- A thick carpet has a high thermal resistance (> 0.1 m2*K/W), therefore it is not recommended for underfloor heating systems.
Heat flux density is the amount of heat that one square meter supplies to a room. When designing a “warm floor”, it is important to compensate for heat loss through the overlap and the drop in power of the heating cable at reduced voltage.
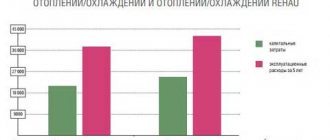
Schedule 1
As can be seen from the graph, to maintain a room temperature of 20 °C, with the floor surface heated to 29 °C, the heat flux density must be 100 W/m2.
Taking into account heat loss through the floor covering and a network voltage of 220 V, not 230 volts, the power of the heating cable should be:
P fact = P nom x 1.15 x 230 2 /220 2
= 1.25 P nom
Power of "warm floor" in the room
Graph 1 clearly shows that if there is thermal insulation of the ceiling (see Table 2), the power of the heating cable on the heated surface of the main rooms, such as the corridor, kitchen, hallway, living room, etc., should be:
125…130 W/m2
Power of "warm floor" in the bathroom
The floor temperature in it should be 29...33 °C, no more. The average is 31 °C. The wide band in graph 1 is the power that will ensure a comfortable floor temperature in the bathroom, and therefore the power of the heating cable should be:
150…165 W/m2
The power of heating mats for underfloor heating from most manufacturers is in this range.
Power of "warm floor" at the boundaries of the room
At the front door, near the glazing from ceiling to floor, there is always increased heat loss. To compensate for them, the heating cable laid in this part of the room must provide a high temperature, and for this it must have a higher than usual power density:
180…200 W/m2
As can be seen from graph 1, to achieve the maximum allowed surface temperature, the power of one square meter of floor should be 220 W/m2. This figure is correct from the point of view of thermophysical calculation, but exceeds the maximum permitted by the current standard in Ukraine for the use of heating cables for “warm floors”.
Should I install 200 W/m2 or 220 W/m2 in the area near the boundaries of the room? Everyone must make this decision on their own.
Warm floor power for additional heating
When the heating cable acts as an additional source of heating, it is logical to assume that the ceiling is thermally insulated and meets the requirements of DIN EN 1264. In this case, the power of the heating cable can be:
80…100 W/m2
and this value will be enough to maintain a floor temperature of 26...27 ° C, which is recommended for such coverings as parquet, laminate or carpet.
How to screed under a heated floor with your own hands
Builders without sufficient experience would do well to remind them that screeds for electric heated floors require the presence of small holes. They must be done through every square meter of area. This explains the lack of excess strength of the structure. These holes will improve the process of heat release without compromising the performance of the structure as a whole.
When screeding under a heated floor, you should use a level
In order for the floor to warm up really quickly, and electrical energy consumption to be within reasonable limits, you should pay attention to the recommendations below:
- A strip 12 cm wide is left along the entire perimeter of the installation. Thanks to this, the concrete screed does not deform over time. This requirement is mandatory if we are talking about a small apartment
- Before laying ready-made insulation for a water or electric heated floor on a concrete “pad,” you should carefully study the sound insulation characteristics. If this indicator is at its maximum level, then a decrease in the volume of heat generated may be observed.
- It would be a good idea to pay attention to the characteristics of concrete. The correct composition has a mark indicating the possibility of working with constant heat sources.
The efficiency of a heated floor depends on how freely the infrared ray penetrates. The thicker the cake, the less heat the room receives. Special small-diameter holes will help reduce the likelihood of such a development of events.
Electric screed pitfalls
Regardless of the manufacturer, the mixture should provide a coating thickness within 3-6 cm. It is necessary to build on the minimum and maximum temperature levels outside the window.
In addition, you should pay close attention to the process of filling the floor. Even a slight increase in the thickness of the concrete layer in one area will lead to uneven heat distribution.
It is possible to use thinner screeds, but in this case a plasticizer must be added.
Before you begin installing an electric heated floor, you should watch the training video and get acquainted with the advice of experts
After this, you can safely proceed to installation:
- The insulation is mounted on top of the rough screed;
- The substrate is fixed using mounting tape;
- The metal mesh is being installed;
- The basis for further work is marked;
- Fixation of cables and auxiliary pipes;
- Adding a damper tape to the grille will help reduce the likelihood of linear stretching;
- All parts are cleaned throughout the entire area;
- Connecting the coolant source;
- The final screed is being performed.