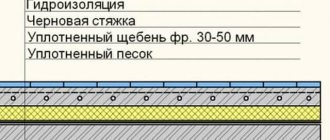
Materials for repairing leaks
The selection of materials for repairing the damaged area is carried out depending on the location of the leak and the temperature of the coolant. All products must withstand both physical and temperature stress. The following materials are used for repairs:
- rubber elastic bandage - used to seal curved areas or fitting locations. The bandage itself is not able to withstand high water pressure in the pipes, so after screwing it on, it is necessary to screw the reinforcement on top or tighten the clamp;
- repair tape - suitable for sealing pipes, withstands pressure up to 35 atmospheres, temperature range from -70 to +370 degrees. The service life of the material is 50 years;
- clamps are metal clamps that can withstand pressures of up to 70 atmospheres and temperatures of more than 100 degrees. The clamps are designed for standard pipe diameters and are used only on straight sections of the pipeline;
- two-component compositions - epoxy resin or cold welding. Good for eliminating leaks in curved areas or in hard-to-reach places. Epoxy resin is best used in combination with binding materials (cloth, bandage, etc.);
- light-curing plastic - a kit that includes liquid plastic and an ultraviolet lamp. Under its radiation, the material polymerizes and hardens. Operates in the temperature range -40 – +150 degrees.
All these materials are suitable for major repairs of depressurization. If there is nothing suitable at hand, then wooden choppers, cement coating, and various adhesive materials are suitable as temporary devices.
Where do leaks come from in the heating system?
The most common cause of leaks in metal pipes is corrosion. Steel, even treated with special coatings, rusts. Only the speed of the process differs. It depends on the operating conditions of each specific system.
Metal is affected by temperature changes, moisture, and water hammer. Impurities in the coolant may contain aggressive chemicals and abrasives that accelerate corrosion. The places where system elements rust most quickly begin to leak. As a rule, these are connections, joints, seams.
Polymer materials do not rust, but this does not mean that they do not leak. Sooner or later, metal-plastic pipes may leak. Most often this happens if they are chosen incorrectly. Some home owners save money and buy cold water pipes. This is a big mistake, because... leads to deformations and breakthroughs in the system.
Homeowners who choose low-quality products for heating often suffer. Cheap polymer pipes swell, burst, and leak. If this happens, you have to replace the damaged sections. Imaginary savings result in additional costs of money, effort and nerves.
Metal-plastic pipes, which are specially designed for heating systems, are least at risk of leaks. They are designed to withstand high coolant temperatures, do not deform and can last for several decades.
Breakdown of water heated floor. How to repair?
Recently, warm floors have become widespread. And there are many reasons for this. Water heated floor systems have undeniable advantages over other types of heating. This self-regulating built-in heating system will provide increased comfort and convenience, hygiene (due to the absence of dust circulation) and a long service life when installed correctly. But imagine such an unpleasant situation that sooner or later you may encounter during repairs: a pipe for a water-heated floor has been broken. Simply put, you have a breakdown in your water heated floor pipe. This can happen both in your own home and on site. Most often this happens due to inconsistency during work or carelessness of the owners of heated floors themselves. In such situations, it is necessary to urgently begin repairing the system to avoid unnecessary financial costs.
How to repair damage?
- First, completely shut off the water supply to the water heated floor system.
- Then you should carefully remove the damaged tile (or other covering). But before that, we free it from the grout in the seams, otherwise the adjacent slabs may burst, since they fit tightly to each other. This can be done using a scraper or a simple knife. If the mosaic is also damaged, then its individual broken chips can be easily replaced with new ones.
- After preparation (removing the mosaic and removing the seams), when the free space becomes enough to insert a chisel, we work with the tool. We try to carefully pry off the damaged tile.
- We clear the area around the pipe, freeing access to the damaged area. To prevent dirt from getting into the pipeline, wrap the ends of the pipes with insulation.
- Next, we cut the pipe with an emery cloth, or you can also use special metal scissors or a knife.
- We thoroughly rinse the pipes from the inside so that no dirt gets in.
- We unfold the ends of the pipe using a special reamer. This must be done, otherwise the clutch will stick. The reamer helps to align the hole we are working with.
- Now we put the press coupling on the pipe (the pipe must be clean).
- We take hand press pliers for pipes and clamp the coupling. We hold the stainless steel in this position for several minutes, since it is a very elastic metal that needs time to maintain its shape.
- In order to check for leaks, each pipe with a coupling screwed onto it is subjected to an internal hydraulic pressure test.
- Now you should wrap the coupling with polyethylene so that the metal does not come into contact with the acidic environment of the solution, otherwise it will simply corrode over time. Therefore, it is necessary to prevent the accumulation of static electricity and corrosion and reduce the corrosiveness of water. We wrap the pipe two or three times.
After finishing the work, you need to substitute a ruler and measure the distance from the walls to the coupling, so that later you will know exactly where it is. After all, it may happen that water will ooze out of the coupling, and you will have to open this part of the pipe again for work.
You can also cut out the damaged section of the pipe, leaving large free ends, on which we put on rubber gloves (dirt should not get inside the pipeline). We put press couplings on the ends and connect them to a new piece of pipe, which is placed in place of the old damaged section. We insert the end of the prepared piece of pipe and press it in (if necessary, cut off the excess from the other end and do the same as with the first end). We check the system under cold water pressure, tightness and especially the fittings. If there is a leak, then tighten the collet connection.
To avoid such an unpleasant situation, agree with the companies on the location of passages and door partitions, take more photographs and provide correct measurements so that workers do not accidentally break through the pipes of a warm water floor. This way, the team will understand how and what they will have to work with.
How to find a water leak underground or in a screed
If pipes leak underground, in walls or in a heated floor circuit, it is very difficult to do without the help of specialists. To detect such breakthroughs, the following instruments are used:
Thermal imagers. The temperature of the surface under which the heating system is hidden is high enough to use a thermal imager. If the pipes are shallow, then using this device will be the easiest way to find the leak. Problems can only arise if the pipes are buried deep or the coolant temperature is low.
Moisture meters. This is a less effective way to find leaks than using thermal imagers, but a moisture meter can still be useful in identifying leaking pipes in walls or heated floors. It is not used to search for underground communications.
Acoustic devices. Sometimes a leak can be detected using a special device that detects sounds. In its design it resembles a phonendoscope. However, it is not always beneficial.
Neptune system - instant leak detection
There are special systems that instantly determine the location of leaks in heating and water supply systems. Installing them will require you to spend time and money, but the costs are more than worth it: thanks to such devices, you can avoid problems in the event of serious accidents. The most popular is the domestic Neptune system. It is cheaper than imported analogues and has proven itself to be excellent.
“Neptune” not only instantly finds a leak, but also blocks the water supply. The system consists of a control unit, sensors and valves. It is fully automated, and after installation the owner of the premises will no longer have to worry about breakouts. As soon as the sensor sends a signal about a leak to the main unit, the valves are activated and shut off the water. Then the owner can deal with the problem without thinking about flooding his neighbors or his own home.
How to find a leak in a heated floor circuit yourself
A leak in a heated floor can be a real problem. If you can easily remove the coating, it makes the problem much easier. Difficulties arise if the contour is located under the screed. Sometimes the breakout site reveals a wet spot on the floor, but this only happens in cases of serious damage. When the pipe is just leaking a little, it is more difficult to find the problem. Let's consider how to act in such a situation.
You can try to find the leak yourself, but first you will have to determine where the pipes are located. To do this, turn on the heated floor to maximum heating, and the screed above it is generously moistened with water. Above the coils of the circuit, moisture evaporates most quickly. This will become visible in the lighter, drier areas of the floor.
The lightened areas are outlined with a pencil, while simultaneously monitoring how quickly they dry. Where the wet spot remains the longest is where you should look for a pipe break. This method does not always work 100%. It necessarily shows the location of the pipes, but the faulty section is visible if the leak is strong. To find and eliminate the leak, you will have to break the screed above the heated floor.
Repairing electric heated floors
Before repairing the electrical underfloor heating system, it is necessary to understand the causes of the malfunction. There are three problem areas in electric heating:
- a heating element;
- thermostat;
- temperature sensor.
Finding out the cause of the malfunction
The first thing to do in the event of a malfunction is to determine which structural part is the cause. Usually, difficulties do not arise if repair work has been carried out before. In this case, the heating element is most often damaged during the use of a drill or saw.
During repairs, the underfloor heating cable was damaged by an electric saw.
When the cause of the malfunction is unclear, the supply voltage should be measured. The operating voltage is indicated in technical documents. The measurement result should not deviate from what is given in the instructions by more than 5%. Pay attention to the power indicator. If the light does not light, check the voltage at the terminals. Its absence may indicate loose contacts on the thermostat, a malfunction of the thermostat or its sensor. Check the remote temperature sensor. Having disconnected it from the thermostat, measure the resistance. It should be within the range of 5-30 kOhm. The most accurate reading is indicated in the instructions.
Attention! When checking thermostats, it is necessary to disconnect the heating cable from them.
If no faults are found in the sensor and thermostat, the cause of the lack of heat should be sought in the heating element. To do this, the resistance of the cable and insulation is measured and checked against the indicators specified in the equipment data sheet. Reduced insulation resistance indicates a break in the heating cable. Special equipment will help indicate the exact location of the defect.
Reason: sensor or thermostat
If the sensor is faulty, it must be replaced. After removing the old equipment from the corrugated tube, mark its location so that the new sensor can be installed as well. There are cases of technology violation, and the equipment is installed in the screed without the use of a tube. Then the old equipment can be replaced with an air temperature sensor. It is attached under the thermostat. A thermostat that has become unusable should also be replaced with a new one.
This is what the sensor looks like, which is usually located inside a corrugated tube
For information on how to properly connect an electric heated floor to a thermostat, read the article:. Instruction on electrical work and example of installation.
The heating element has failed
After finding the location of the defective cable, they begin to replace it. Dismantle the coating at the repair site. Open the screed. Broken or burnt out wires are cleaned and connected using sleeves of suitable diameter, which are then crimped with press pliers.
Repaired electric underfloor heating cable - a heat-shrink sleeve is attached to the connection point, which is heated with a hairdryer and allowed to cool. As it cools, the coupling contracts and firmly seals the joint. The top of the repair area is filled with cement
Carbon heated floors are an innovative option for heating rooms and open spaces. More information about what it is, the design of the system and an example of installation can be found here:.
Leak what needs to be done immediately
What to do immediately after discovering a leak in the heating system depends on two factors: the type of home and the type of leak itself. If the heating leaks in a private house, the owner can fix even a serious breakdown himself. But in an apartment you have to act more carefully and efficiently. Firstly, you can flood your neighbors below. Secondly, you have to turn off the heating riser, which means that all apartments will cool down.
If the leak is small (the pipe or radiator is only slightly wet), you can try to eliminate it yourself using available means. If the flow is strong, you must immediately shut off the coolant supply and call an emergency team. Before turning off the heating, you need to throw a blanket over the radiator or pipe so that no one gets burned from the hot water.
Some apartments have special valves or taps installed that can be used to shut off the coolant supply. However, most often such cranes are installed on the entire entrance and located in the basements. You need to go down there and shut off the riser on the main pipe. After this, you should immediately begin to eliminate the leak.
Causes of leaks
Among the reasons why a coolant leak occurs (any kind, not just water), there are three main ones:
1Corrosion; 2 Violations in system installation technology; 3Illiterate operation.
Metal corrosion is caused by two types of chemical reactions: oxidation under the influence of oxygen and an electrochemical reaction that occurs when metals combine with different numbers of negative and positive ions in the atomic structure of the substance.
Technological violations during installation of the system that lead to coolant leakage include, for example, the use of electrodes of the wrong brand and the occurrence of local foci of electrochemical corrosion at welding seams. The most sensitive to violations in installation technology are metal-plastic pipes connected with threaded fittings. Such a leak is practically irreparable and requires a complete replacement of the pipeline section along with the fitting.
Incorrect work and selection of materials
Illiterate operation of the heating system also leads to water leaks from pipes. For example, boiling of the coolant and the accompanying hydrodynamic shock lead to damage to sealing gaskets and even destruction of threaded connections. If you decide to change the type of coolant, replacing water with antifreeze, then you need to be prepared for the threaded connections to leak. This is especially true for those devices that were installed twenty years ago and tow, oil paint, rubber and other inexpensive auxiliary materials were used to seal them.
Excessive pressure in the system also leads to water leakage from pipes. It does not affect the efficiency of its operation in any way and even harms it, leading to water boiling at temperatures below 100 °C. Pressure is necessary to pump coolant into the upper tiers of multi-story buildings or to activate sluggish thermal convection in single-pipe systems with bottom wiring. In one-story houses it is better to use circulation pumps with a working pressure of no more than 1.5 atmospheres.
Metal-plastic pipes, which have become popular recently, are very sensitive to operating conditions. They cannot withstand sudden temperature changes, overheating and water hammer. Their structure delaminates, as a result of which the pipes lose strength, cracks and fistulas appear in them.
Causes of malfunctions
As a rule, the fact that something has happened to the heating built into the floor becomes noticeable quite quickly by disruption of the functionality of the system, a decrease in its efficiency and complete failure.
Among the most typical breakdowns of a warm water floor are the following:
- damage to pipes filled with screed - fraught with dampening of the room, the appearance of fungus and mold, as well as flooding of the underlying premises;
- failure of one or more heating circuits;
- airiness of the system - in this case, specific knowledge and tools are required, or contact a specialist;
- failure of the circulation pump;
- faulty wiring, socket;
- a sharp decrease in heating intensity due to cluttering the floor with furniture.
In the case of water-heated floors, it is necessary to think in advance about the interior and its furnishings, in particular, the arrangement of furniture. The heated surface should be open as much as possible.
Fortunately, in most cases it is possible to repair a heated water floor yourself.
How to eliminate existing damage?
Sometimes, when carrying out repair work indoors, when working with an angle grinder or a hammer drill, the integrity of the pipe is compromised.
The first thing to do is turn off the water supply and turn off the system.
Next, access to the damaged area is cleared: part of the floor covering is lifted and part of the screed is removed.
At the next stage, the damaged area is cut out, and the edges of the pipe are sealed with plugs or polyethylene to prevent dust, dirt and debris from getting into the system.
Depending on the type and diameter of the pipes used, the required length is selected:
- If metal-plastic pipes are used, you will need a special soldering iron for metal-plastic.
- If the pipes are flexible, then a new identical section is attached and fixed using a crimp wrench using the crimping method.
It is impossible to immediately remove the damaged element from the pipe until the water is turned off. It will serve as a plug to contain the leak. In addition, it is not recommended to use threaded fittings, since threaded connections are extremely likely to re-leak in the future.
After replacing the damaged area, it is necessary to restore the screed, wait for it to dry, and re-lay the floor covering.
The situation is more complicated with hidden leaks, signs of which may include wet spots on the floor surface, wet seams, as well as a drop in pressure in the system and a decrease in its efficiency.
You can detect a hidden leak before weeping spots form using a thermal imager, on which the location of the heated coolant leak will glow with a bright light spot.
The question of how to repair a water-heated floor also arises when a problem such as a broken circuit occurs. First of all, attention must be paid to the distribution panel and check the position of the valves on the manifold at the point where the heating circuits are connected.
Among the possible reasons for the failure of a water heated floor may be a malfunction of the circulation pump. It is necessary to check the voltage supply to it, and also whether the device is clogged with salt deposits.
Sometimes, in order to start the pump, it is enough to remove it and use a screwdriver to try turning the impeller several times.
If the rotor begins to rotate well, most likely the pump will work after being installed back into the system.
Another reason for a sharp decrease in the efficiency of heating using water heated floors may be airiness of the system.
To check and bleed air in a warm water floor, you need to use special equipment. In addition, in this case, it is better to seek help from a specialist.
Do-it-yourself water heated floor repair
Repair of a water heated floor, due to its reliability and concealment from external mechanical influences, is not often required. This is rather an exception to the rule. However, if a problem is discovered, then under no circumstances should you panic. The primary measure will be to disconnect the system from power and stop the water supply. It is also advisable to always have a diagram of the location of the contours on your hands.
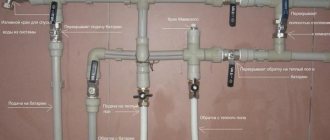
How to find a water leak in a heating system
If the supply or return lines from classical traditional heating pipes or heating devices of heat exchangers (batteries) have leaked, then immediately finding a water leak in the heating system and identifying the location of the leak is not difficult. External visual control will help you do this quickly. It is much more difficult to do this in a heating system in the form of heated floors or heated walls.
- Reasonable prices with good quality
- Same day departure
- We work all over Russia
- Full work cycle from searching and locating a leak to turnkey restoration and construction work
- Application of new technologies and equipment
- More than 10 years of professional experience
A powerful stream of hot coolant gushing out of the floor will cause quite a lot of trouble, but it is easy and quick to identify. Much more unpleasant is a small leak in a wall or heated floor, closed with a concrete screed. If good protection from the negative effects of moisture in the form of a “trough” has been created under the screed, then until it is filled with water, you will not know about it. The “man-made lake” of warm water in your floor will eventually overflow. The water will find a gap and begin to flow out little by little. As a result, the ceiling or wall under the heated floor on the lower floor will freeze, and this process will not stop until mold appears and the building structures gradually collapse from the corrosive action of water, enhanced by heat.
There is a way to detect the presence of a leak in a heating system with underfloor heating. In most cases, a device for determining the pressure value is installed on the heating boiler in such a system, measuring the pressure. And if, when the floor or wall is heated, the pressure according to the readings of the device for determining the pressure value drops, then a small leak is found.
Attention! Important! If the expansion tank of the heating system is not sealed, then pressure may drop through it. It can also fall through air vents, i.e.
automated Mayevsky cranes
e. automated Mayevsky cranes.
It is necessary to check all open parts of pipes and joints. But with fairly hot water, a puddle of water that has leaked out at the joint and appears on the floor can quickly evaporate, and you will not notice the result.
Devices for finding leaks in floors and walls
A few of these devices:
- Thermal imager. It detects a temperature rise of a couple of degrees. But:
- the water may be a little warm;
- the leak site may be hidden by a thick layer of concrete;
- The location may be inaccessible to the device.
- Surface moisture meter - allows you to measure the increased humidity of the wall plane.
The method gives little accuracy and requires a lot of time. It is better to duplicate it with a thermal imager showing a large problematic area, and then look for it with a moisture meter.
Sound device, analogue of a hospital phonendoscope. Allows you to hear the sounds of a “trickle” flowing in the wall and find a leak.
Our company can remove almost all problems associated with leaks in heating systems, both in a private home and in Moscow companies.
We provide the following types of services:
- searching for leaks and localizing these places;
- we find the location of hidden pipes of the water metering unit and heat supply;
- We check the condition of pipelines;
- We inspect the premises and find places of heat loss using a thermal imager;
- we localize and completely eliminate leaks in pipes with hot and cold water;
- We can find places where thermal insulation is broken, and much more.
In case of problems, call our professionals at any time. Departure of professionals in Moscow occurs free of charge and quickly on the day of contact.
Possible causes of failure
The operating principle of a warm electric floor is not much different from other types of electrical appliances. The current hitting the heating element heats it up, which gives off its heat to the screed or floor covering, thereby warming the air in the room.
The passage of current to the heating system is carried out through a thermostat, the main function of which is to turn the floor on and off, and to regulate the strength of its heating. As soon as it reaches the set temperature, the thermostat turns off, which also happens when the coating is overheated.
What can cause weak floor heating or a complete lack of heat?
Typically, the most common culprits are:
- The thermostat, so you need to start checking with it. To verify that it is faulty, you should dismantle the device, first turning off the light, and check it with a multimeter.
- If the floor is cable, then the cause of the breakdown may be its breakage. This happens either during installation or by some mechanical influence, for example, with a drill during repairs. The cable is checked by measuring its resistance and insulation. If the data exceeds the data sheet readings by more than 5%, it means it is damaged or there is a break in it. In an infrared system, rapid deterioration of the film is possible due to insufficiently dense coating. If, for example, thin linoleum was laid, then even a woman’s heel can push through the film floor.
- The temperature sensor can also cause a malfunction. If the base does not warm up to full capacity, then it simply does not turn off and the floor works non-stop around the clock, which leads to high energy costs. On the other hand, if the temperature sensor is too close to the heating elements, it will quickly heat up and turn off, and the floor will not reach the desired temperature.
Whatever the cause of the breakdown, you can repair an electric heated floor yourself, if you have the necessary tools.
Read below on how to repair an electric heated floor.
Fixing leaks in the heating system yourself
If the leak is severe, turn off the heating supply to the riser. In the event of a minor malfunction (if the water barely drips), you can immediately begin to eliminate it. Let's look at how best to repair the heating system.
Option #1: when the pipe is leaking
If a section of a steel pipe without a thread leaks, then the problem is a poor-quality weld. A clamp will be needed to repair the damage. You can buy it at a hardware store or make it yourself from a metal strip. A gasket or a piece of a bicycle tube is used as a seal.
The pipe is cleaned of paint deposits, a thick rubber gasket is placed on top, then a clamp. Bolts are provided to secure the clamp. They are tightened as tightly as possible. Sometimes the damage is additionally treated with sealant. This is a great way to permanently seal a hole in a pipe. There will be no more leaks here.
Option #2: leakage under the locknut
If the locknut is initially secured correctly, a leak may occur as a result of mechanical damage or corrosion. You need to shut off the riser and drain the water. After this, the nut is unscrewed, sealed with flax, paint or a special compound and tightened again. Plumbing flax and other sealants are wound clockwise.
When the work is completed, you need to open the riser valve again and check the tightness of the connection. If water still leaks out, repeat the procedure again, adding 5-6 new threads on the pipe.
Option #3: if the radiator is leaking
The radiator plate or the joint between sections may leak. In the first case, it is better to immediately replace the damaged element. If this is not possible, then a small leak can be dealt with using cold welding. It can be bought at any hardware store. Instructions for use should be on the packaging.
To repair the radiator, close the riser, clean, degrease the damaged area, and then apply a sealing compound to the hole itself and the area around it. The weld should close approximately 3-4 cm of the pipe around the fistula. The composition hardens quickly. After complete drying, you can start heating.
If there is a leak between the sections, then the radiator is dismantled and the nipple connection is tightened tightly. When securing the nipple, you need to use maximum effort. It is almost impossible to break, so there is no need to be afraid. Upon completion of the work, the radiator is installed in its old place and the coolant supply is turned on.
What areas and elements can leak?
Leaks are most common in metal pipes. Elements that may be subject to destruction are the following:
- joints of pipes, adapters and seams;
- solid pipe;
- radiator;
- under the locknut;
- in the heated floor circuit;
- space between battery sections.
Leaks in the heating system often occur in radiators
Most often, cheap polymer pipes are susceptible to integrity damage. They break, leak, swell. Metal-plastic pipes are also susceptible to leaks if they were incorrectly selected. There are special products for heating systems. If pipes for cold water are installed in it, then under the influence of high temperatures they become deformed and burst.
In what situations should you call a specialist?
If the damaged section of the pipe in the heating system can be repaired yourself, then it is better to call specialists to repair some faults. For example, hidden leaks are sometimes possible. Wet spots form on the surface, the seams get wet, and the pressure in the heating circuit drops.
It is impossible to determine the cause and location of a hidden leak on your own. This requires a thermal imager. On it, the location of a leak of a well-heated coolant will be determined by a bright light spot.
also difficult to repair a warm water floor if the circuit is not working . Then attention turns to the distribution panel, the position of the valves on the manifold and the connection points of the heating circuits.
If heated floors have sharply reduced their efficiency, the reason is airing of the system. This fault is also difficult to repair - you need special equipment and the help of a specialist.
Important
If you have a circuit layout diagram on hand, heating repairs will be greatly simplified.
If the system under the tile fails, there is no need to panic. Some problems can be fixed alone, but to solve certain problems you need the help of specialists.
This heating system is easy to repair: in almost all cases of malfunction, the floors can be easily repaired. The main thing is that in case of any breakdowns, you must immediately turn off the power and stop the water supply.
What elements can leak
There are several ways to fix leaks. The choice of the correct methods depends on the type of system element in which the leak occurred. It could be:
One piece pipe. Here the holes are tightened with clamps, self-tapping screws, sealed with special compounds or cemented. If the pipe is plastic, it is best to replace the entire section. If this is not possible, use artisanal welding.
Connection points. There are many different connections in the heating system - places for attaching pipes, adapters, etc. Leaks occur either due to loose fasteners or due to corrosion. It is easier to fasten polymer parts, but with steel and cast iron it is more difficult: you will have to apply force or use cold welding.
Between battery sections. The reason is still the same - leakage. Sometimes it leaks due to mechanical damage. If water seeps between sections, the radiator is removed and the connections are tightened.
On the radiator plate. In this case, it is advisable to immediately change the radiator, because The most common cause of breakdowns is thin walls and low-quality material from which the heating device is made. If it is not possible to replace it immediately, then cold welding will save you, but this is only a temporary measure. New troubles may arise next season.
Causes of leakage
It is important not only to detect a coolant leak in the heating system, but also to understand why it occurred. Situations in which the pressure gauge on the boiler may indicate low pressure are as follows:
- violation of the tightness of connections as a result of corrosion of pipes, wear of gaskets or loosening of threaded connections;
- thermal expansion and contraction of fittings. When the coolant reaches a certain temperature, the metal parts expand, but as soon as the water cools, the metal of the fittings narrows and begins to let liquid through;
- changing the coolant in the pipes. If water was first used and then you decided to pour antifreeze into the system, the seals may expand and then dry out;
- excess pressure in the heating system due to the expansion tank being too small. This can lead to cracks in the pipes.
In addition, leakage occurs as a result of improper installation or operation. This is especially true for metal-plastic lines, which are more sensitive to any violations of installation technology.
If you break through a heated floor
Hello dear homemade people.
What to do if you have broken through a water-heated floor, and what to do if a working heated floor made of metal-plastic has been broken, and below it there are floors with living quarters?
The situation is extremely unpleasant, and in order not to be caught off guard, you need to be prepared for it. We’ll deal with this right away, and then we’ll find out how to eliminate this trouble.
So, before you rest the drill against the covering, under which the water-heated floor is laid, and press the key of the puncher, you must have complete confidence that in your pocket there is a cap, exactly the diameter of the drill, with a slightly pointed end, and a piece thin, dense matter with which this cap can be compacted.
Of course, if there is nothing to flood below, then you don’t have to be bothered by this, and just go and block the highway, if something happens, but we will proceed from the worst-case scenario.
That is: a peaceful family lives on the floor below, and they never dream that their snow-white ceiling may be flooded with streams of hot, dirty water.
To really prevent this from happening, the first thing you need to do after you notice that the drill has begun to splash water is to take it out, and immediately cover the hole with a piece of cloth (cover, not plug), and drive the cap into it until it stops .
It must fit into the hole punched in the pipe, together with the sealing material, not break (be hard), and not pierce the pipe through again (not be so sharp).
This, of course, will not stop the leak, but it will reduce the pressure so much that you can go and turn off the water supply, without fear that while you are walking, enough water will flow from the hole that will be enough for you and your neighbors.
One more clarification: the warm floor is located in the screed at a depth of several centimeters, therefore, in order for the cap to reach the pipe, and even with the material, and not get stuck in the screed, it is necessary to carefully adjust its diameter.
If you work alone, then it is advisable to provide something to secure it with during the time you are away to turn off the main line. Still, in high-rise buildings, the pressure in the system is about 4 atmospheres, it can simply knock you out.
Okay, the highway is blocked, we can start repairing the damage.
The first step is to clear the breakdown site. We remove the tie in this place so that the pipe is freed 30 centimeters in each direction from the hole.
Unfortunately, I did not click the process at the very beginning, but from this picture it will be clear how much tie to remove.
You need to remove the screed very carefully, using a chisel and hammer. Under no circumstances should you try to do this with a hammer drill. You won’t even notice how you’ll make new holes in them.
To connect metal-plastic pipes in places that will not be accessible later, a press fitting is used, and it is installed using press pliers. There is nothing else.
It is strictly forbidden to install a threaded fitting in such places. The fact is that it flows, and it flows rather meanly.
At first there is no leak, and there is no leak until the heating season ends and the heating is turned off. As soon as the pipes cool down, the screw fittings begin to leak. Not all of them, of course, but one is enough.
Press pliers, of course, are not a tool that everyone has, but you can find them. You can buy them, they cost 5,500 rubles, and you can rent them.
Now a few nuances about connecting the pipe (I think I forgot to say that it needs to be cut close on both sides of the hole.) press fittings.
The first thing you need to check is whether the pipe is long enough for both ends to be connected to fit into the fitting all the way. You don’t need to insert them into it for this, just bring them together and see what kind of gap there is between them.
If the gap is too large, then free the pipe from the screed until it tightens.
After this, we carefully unfold the ends of the pipe using a special reamer.
Now, it would seem, you can insert the fitting, but inserting it dry is often simply impossible. Imported ones are still inserted, but our RVK or RST either fly in effortlessly or not at all.
Therefore, you need to insert them only with soap. And apply foam without sparing. But there are some specimens that, even when soaped, do not fit.
After some research, I found out that in such cases, all the foam is collected by the first rubber band (apparently its thickness is a little thicker), and the already dry pipe does not pass through the second.
In this case, you can do the following: pull off the crimp sleeve, generously apply foam to both elastic bands, and insert the sleeve into place (it can be removed and installed with force).
Then we insert the pipe and crimp the press with pliers. Please note that the red frame has small windows. The pipe is considered fully inserted when its edge appears in this window, after which it can be crimped with pliers.
The second end is done in exactly the same way. The entire pipe is connected, the screed can be repaired.
I wish you success in your work.
Section Construction >>>Subsection Heating>>>
Come on, what else is interesting?
Leningrad heating scheme Welding polypropylene pipes How to wind flax How to add a radiator section How to make a water heated floor Heating a house with heated floors How to make a warm floor in a bathhouse Heating in the walls How to make a fireplace for a sauna
Finding and eliminating coolant leaks
It’s easy to find where water is leaking from puddles on the floor. But if you have inadvertently brought things to this point, then you can consider yourself to be on the verge of a local communal disaster
Therefore, you need to pay attention to the details - the appearance of rusty streaks in the places of threaded connections, swelling on the surface of metal-plastic pipes, their loss of shape and strength. If the heating pipes are laid deep in the walls or a “warm floor” system in a concrete screed is installed on a separate circuit, then leaks can only be found using special instruments
A weak (drip) leak can be eliminated without draining the water and without stopping the heating of the house. Elimination of flows of different intensity is possible only on dry and cooled pipes. Therefore, it would be useful to install bypass lines (bypasses), divide the system into several circuits and independent sections using installed ball valves.
Repair of metal pipes and their connections
Even metal pipes that are heavily damaged by corrosion have a high residual strength, so during repairs, significant compressive forces can be applied to them and clamps tightened with bolts can be used. For their urgent repairs you may need:
- Heat-resistant (red) silicone sealant;
- Rubber elastic bandage (sold in pharmacies);
- Two-component epoxy compounds with metal filler (cold welding);
- Metal clamps, tightened with bolts;
- Thin fiberglass or old women's tights.
If there is a slight leak in the threaded connections, it is enough to unscrew the lock nut (if there is one) a quarter turn to create a gap of 0.5 mm. Silicone sealant is squeezed into it and distributed evenly over the entire circumference. After 30 seconds, when the sealant begins to polymerize, the nut is tightened.
If there is no lock nut, then you need to clean the joint from old paint, scale, rust and degrease it. In case of a weak leak, you need to knead a piece of “cold welding”, as described in the instructions for it, and distribute it evenly over the entire circumference of the joint, especially carefully coating the edges of the joints. For larger flows, you can apply silicone sealant or a two-component metal-filled compound to the joint and press it with fiberglass tape or a piece of women's tights.
A crack or fistula in a pipe can be wrapped with a rubber elastic bandage, covering half of the previous one with each subsequent turn. The length of the winding should be twice as long as the damaged area. You need to make 2-3 layers of winding and secure it with clamps. A good result is obtained by wrapping it with a hemostatic tourniquet from a car first aid kit, which can be secured with a standard latch. A crack in a pipe can also be repaired using an epoxy compound in combination with a reinforcing material - elastane or fiberglass. But in this case you will have to strip down to the metal and degrease the entire area on which the bandage will be applied.
↑ Why doesn't the electric floor heat?
Electric flooring is a wonderful heating option that is being preferred by more and more consumers. But what if the floor does not heat well or does not heat at all? First, you need to understand the root causes that can cause problems.
The reasons for the unfair operation of the system most often are as follows:
↑ Incorrect installation
Often the thermostat turns off when the floor heats up weakly. This may be due to incorrect installation of the sensor: it is installed too close to the heating cable or simply lies on it.
Unprofessional installation of the sensor is one of the reasons for the lack of heating
If an installation error is excluded, you need to pay attention to the surface temperature - whether it corresponds to the desired one or not. An IR thermometer will tell you about this. It often happens that the heating indicator is on, but the floor remains cold - check the reliability of the wire connections.
↑ Poor thermal insulation, wrong choice of cable
A common consequence of poor heating is an illiterate choice of heating cable power or lack of thermal insulation.
The presence of thermal insulation is an important criterion for the performance of a heated floor.
How to objectively assess floor temperature? After heating (on average it takes 30 minutes), the temperature of the temperature sensor should be equal to the values set on the thermostat. When the set temperature is reached, the power should turn off, which will be indicated by the extinguished light.
↑ Mechanical damage to the cable
The cable can be damaged during finishing work - arranging a screed or laying tiles. How to identify a malfunction? The cable is disconnected from the thermostat and the resistance between the wires is measured.
It is important! The resistance must correspond to the data specified in the passport of the electric heated floor.
Pay special attention to the resistance between the braid and the heating core, which should be 1 Ohm or higher.
↑ Failure of the thermostat
Is the integrity of the heating cable in doubt? This means that it’s the turn of the thermostat - we check the correct installation and serviceability of the device. The terminals connecting the thermostat and the cable must be tightly tightened. The voltage at the terminals must be equal to the power supply when the device is turned on.
Check the connections
It would be a good idea to check the resistance of the floor temperature indicator (if there is one) - all the necessary numbers can be easily found in the passport.
↑ Low voltage
In some homes, the voltage supplied to the underfloor heating system is significantly lower than that for which the floor is designed. Moreover, when the voltage drops, the power is halved. This point must be taken into account when choosing a cable, giving preference to samples that guarantee a large power reserve in the current situation.