Is it possible to have water floors in the bathroom?
Installing a water floor in a bathroom is a personal matter only in the case of a private home. According to the Housing Code, any independent change in the design of the heating system is illegal.
Complaints from neighbors about a decrease in heating intensity are grounds for initiating a lawsuit, which will result in an administrative penalty and an order to eliminate the changes within a short time.
Based on this, the legality of installing water-heated floors in an apartment building is questionable at best. The Housing Code allows you to change the design and layout of the heating system, but only after obtaining the necessary permits and coordination with the relevant authorities. In any case, registration should begin with a visit to the housing and communal services department.
Connecting a warm heated floor in a bathroom from a heated towel rail is one of the most commonly used solutions for heating a bathroom in a high-rise building. At the same time, it is extremely important to ensure that the heating temperature of your neighbors does not drop. A two-way valve can be used for this.
Construction of a water system
Making a warm water floor in a bathroom with your own hands is a more difficult task, but why not try to cope with it... We have to assemble a structure from pipes and connect them to a source of hot water.
Metal-plastic and polyethylene pipes are suitable for the pipeline. Both materials have flexibility and low hydraulic resistance.
Thorough theoretical preparation
One heating circuit can cover an area of up to 20 square meters. meters, which is enough for a bathroom, but if the floor is planned to be divided into autonomous zones, then water must be supplied to them through a distribution manifold.
Assembling the manifold consists of connecting all its sections with a pump and mixer, installing thermometers, taps, and air vents. After this, the assembled distributor can be mounted on the wall and pipes can be connected to it
The collector must have flow regulators. With the same water supply to circuits of different lengths, they will heat unevenly. A longer circuit will heat up worse. Moreover, the flow of water in it may even stop due to strong resistance. To eliminate these troubles, flow regulators in the manifold are used.
A mixer is also a necessary thing. The maximum heating temperature in the floors is 50°C; water is supplied to the heating radiators at higher temperatures. If you drain water from the general heating system into the floor, then it must be diluted with cold water to the desired temperature, which is what the mixer does
A number of strict conditions in order to proceed with installation:
- The presence of a closed-type heating system using a circulation pump.
- A double-circuit boiler must have a power reserve.
- All work is carried out with the heating system completely turned off.
The pipes must be freed from coolant.
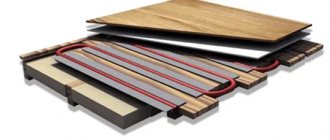
In the thickness of a warm floor, one can distinguish the obligatory functional layers:
- base;
- hydro- and thermal insulation;
- pipeline made of durable pipes;
- concrete screed or gypsum fiber;
- decorative floor covering.
In wooden houses, you can also make a water floor, but you should worry about reliable waterproofing. It needs to be done in several layers, this is the only way the wooden base of the floor will last for many years without repair.
Step-by-step guide for installing a water floor
The construction of a water system is a cycle that includes standard types of work.
Stage 1. Clean the floor and, if necessary, remove the old covering.
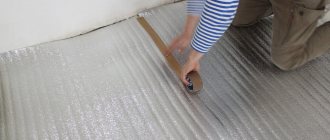
Stage 2. Waterproofing the floor. We lay a waterproofing film on the floor. Preferably in one piece, but if there are several strips, then they should be laid overlapping and the seams should be joined with a blowtorch. The waterproofing material should also cover the surface of the walls (up to 10 cm upward).
Stage 3. Fill the rough screed with a mixture of expanded clay and cement (3-5 cm thick). Dry thoroughly (up to a week), sprinkling the surface with water in the first days to prevent cracks.
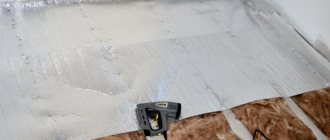
Stage 4. We insulate the surface with foam plastic, polystyrene or other similar material. We spread polyurethane with a foil reflective coating on top. We seal the joints with tape. Now the heat from the pipes will be directed only towards the room.
Stage 5. Lay the pipes. We bend them according to the developed diagram, maintain 15-20 cm between the pipes. We fasten the resulting curved structure. We connect the water supply pipe to the flow distribution manifold.
Laying pipes in a “snake” pattern is the most common. An alternative is snail laying. The first option is easier to install, but provides uneven heating. In the second option, the heating is generally more uniform, but there may be cold areas of the floor, since the return turns lie between the supply turns
Stage 6. Turn on the coolant supply and check for water leaks in the system.
Stage 7. We make the second screed with the same solution as the rough one. If unevenness of up to 5 mm was allowed in the rough screed, now we pre-install beacon slats to perfectly level the surface.
One of the purposes of underfloor heating screed is heat accumulation. With a thick screed near a water floor, heat accumulation is higher
The finishing layer of screed takes 5-7 days to dry - the same as the rough layer. After complete drying, you can begin finishing the floor and laying floor tiles.
Warm water floor
The most economical, effective and safe option for creating autonomous heating is considered to be a heated water floor in a bathroom, which is a system placed in a screed and consisting of tubes (metal-plastic or plastic) through which the hot coolant moves.
Control over the temperature regime is carried out thanks to the presence of a device such as a thermostat. The coolant is circulated using special pumps included in the system.
There are two pipes in the manifold cabinet, one of which (supply) is filled with warm water supplied from the heating source to the heating system. The functional purpose of the other pipe (return) is to collect the cooling coolant and supply it back to the heating device.
Typically, consumers use a gas boiler for this purpose, in which the liquid becomes hot and is then transported again into the supply pipe. As already mentioned, the pressure in the system, and therefore the continuous movement of the coolant, is ensured by a special pump.
A heated water floor in a bathroom has a number of significant advantages when compared with an electric heating system:
- electricity is saved, the price of which tends to increase;
- there is no electromagnetic field and, accordingly, radiation.
The main disadvantages of a water floor are its complex installation and connection specifics. The fact is that in a private household or in an apartment where individual heating is installed, problems with connecting to a source of hot coolant should not arise.
But as for apartments with centralized hot water supply, in houses built a long time ago it is forbidden to connect a water floor to the heating structure. In addition, the bathrooms of such buildings do not provide heating. Connection is only permissible to a hot water pipe. But such actions are related to redevelopment, and for this you need to obtain permission from the relevant authorities. But, let’s face it, they still make underfloor heating from heating in the apartment, and many manage to do it quite well.
Installation of heated floor systems
There are water and electrical systems. In the first, heating is carried out using a pipeline laid under the floor covering. The coolant circulates in the pipes. In electrical systems, heating operates using heating elements: cables, films, mats, rods.
All designs have their own advantages and disadvantages, differ in price and installation complexity. So, in the bathroom in an apartment it is better to install an electric heated floor, but for a private house you can choose any type of system.
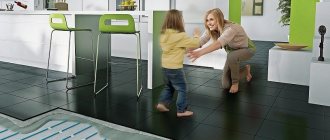
An underfloor heating system helps solve one of the most important problems - dampness in the bathroom, which leads to the proliferation of pathogenic fungi and mold. These microorganisms can cause some serious diseases, in particular asthma
Option #1 – water heating
Water-heated floors are more suitable for a private home than for an apartment in a high-rise building. This is due to the fact that underfloor heating is usually connected to a central heating system, which is quite difficult to implement in an apartment. Another nuance: in the event of a serious pipe break, you can flood your neighbors below. In a private home, all these problems do not occur.
The heating system consists of a coolant mixing unit and pipes laid in a screed under the floor. Most often, home owners choose pipes made of metal-plastic or cross-linked polyethylene. These products are reliable, flexible, and have good performance characteristics. The coolant mixing unit is a complex system that includes a pump, mixer, and manifold.
The advantages of water floors include the following properties:
- Economical. This is the cheapest option for underfloor heating to operate.
- Versatility. The water floor can be laid under any finishing surface - under tiles, laminate, linoleum.
- Autonomy. The underfloor heating circuit operates separately from the central heating. If necessary, it can be used autonomously, which is very convenient in the off-season.
- Relatively simple installation. Installing a water heated floor in a bathroom is not difficult if you have the skills to use tools.
When connecting a water heated floor, a manifold cabinet is installed. It is necessary for the convenience of placing the automation and connecting the pipeline to it
To simplify installation, the loops of a water-heated floor can be secured using a stapler. How this is done in practice is shown in the video below:
Option #2 – cable floor
The design of the cable heating system consists of a thermostat, cable, and temperature sensor. When choosing components, pay special attention to the cable. The following indicators are important: power, type (single- or double-core), release form (coil, mats), reputation of the manufacturer.
A cable laid on a fiberglass mesh in the form of mats is more convenient to install. Thermal mats can be cut and thus change the configuration of the system. This is very convenient, because... the structures can be used to heat rooms of any size. The only caveat: you must not violate the integrity of the cable itself.
To operate a heated floor, thermostats are required that will control the degree of heating of the cable. It is best to choose programmable models. They are reliable, convenient, and provided that there is a two-tariff system for paying for electricity, they will also help to significantly save money.
To make it easier for you to install a heated floor in your bathroom with your own hands, we suggest that you familiarize yourself with the recommendations of experts:
Advantages of electric underfloor heating:
- Safety. The systems are reliable. Even if water gets on the heating cable, nothing bad will happen.
- Versatility. The heating cable is laid in a screed, so the floor level rises slightly. This allows it to be used in rooms with any ceiling height.
- Durability. The service life of electrical systems exceeds the service life of water systems.
The specific heat release of a heating cable for a heated floor can be 17 W/m-21 W/m. These are optimal indicators; you should not look for more powerful products, because... they may be unsafe to use
Option #3 – infrared film floors
In recent years, infrared underfloor heating systems have gained particular popularity. Either rods or carbon-based film are used as heaters. The power source is the electrical network to which the heating element is connected through a thermostat.
Infrared heating film is universal. It can be installed under any type of coating. If you wish, you can even make a mobile floor heater yourself by attaching it to the carpet.
Infrared film is easy to install, but before starting work you should carefully test the functionality of the heating elements. To lay tiles over the film, special adhesives are used.
Infrared film is absolutely safe, environmentally friendly, durable, and reliable. One of the main advantages: if any section of the heated floor is damaged, the remaining zones will work as before
Option #4 – carbon rods
The carbon rod floor is called “smart” due to its increased environmental and fire safety and self-regulation system. The heating elements are connected to each other in the form of mats. The temperature is controlled by thermostats and sensors.
The main advantage of a carbon floor is that it does not overheat and is not afraid of pressure. Thanks to this unique property, it can be mounted even under furniture and heavy objects.
Carbon mats are laid directly into the screed or tile adhesive. Any finishing coating can be installed on top of the heated floor, including natural and artificial stone.
Carbon mats are durable. They can last up to 50 years. Since the rods are connected in parallel, the failure of one or more elements does not interfere with the operation of the remaining heaters
How to connect a heated floor?
Warm floors from hot water in an apartment are a heating system that uses the lowest water temperature. It consists of a network of pipes that run through the roof of the house, which will circulate hot water, thereby increasing the level of floor heating and warming the house.
Hot floor heating is one of the best heating methods on the market, but there are some considerations to take into account:
- Underfloor heating requires a medium to high initial investment compared to other heating systems (such as radiators), but the return on investment is short-term.
- Its height is 10-12 cm, so warm floors cannot be installed in some rooms. To do this, it is necessary to conduct a preliminary study on its adaptation, both for new construction and for reconstruction.
- Hot water underfloor heating is a fairly limited system in terms of the power it can offer.
How to adjust a heated floor
After installation of the flooring is completed, it is time to properly configure its parameters. What should I pay attention to when adjusting the temperature of underfloor heating?
The adjustment of the heated floor is taken into account during its installation. The installation must be adjusted in such a way that each heating circuit receives a flow of water at a certain flow rate, determined by the required heating output. This is achieved by equalizing the hydraulic resistance in individual water circuits using valves. Accuracy and ease of adjustment are ensured using flow meters (rotameters). With underfloor heating, both the floor temperature (so that it does not exceed the permissible value) and the air temperature (to ensure comfort for people in the rooms) must be regulated.
Limiting the temperature of the heated floor is achieved by maintaining the interval between the pipes and the water supply to the system no higher than 55°C. This is achieved by appropriately setting the heat source regulator - then the entire heating system is supplied with water with such heating. This is a good solution if you have underfloor heating throughout the house.
How to turn off the hot floor? The floor is easy to turn off using the thermostat. If the floor does not turn off, then there is a breakdown somewhere. When using hydronic heating in only one or two small rooms, such as bathrooms, it is not recommended to use a complex system to reduce the temperature of the water flowing through them. Some installers connect them in series with the radiator - the water that has already cooled in the floor gets under it. Such a simple solution does not allow independent control of the temperature of the radiator and the floor.
Therefore, it is better to connect radiators and underfloor heating in parallel and use a valve that limits the temperature of the water returned from the system. It closes the flow when its temperature exceeds the set value. Then the water cools and the valve opens. So, despite the supply of hot water, the floor temperature can be maintained at an acceptable level.
In the case of underfloor heating, it is more important to have a slightly more advanced control system than a simple thermostat, since with the help of a suitable controller it will be possible to set it in such a way as to anticipate cold conditions and provide the necessary comfort at any time of the day. It is recommended that connections be made by an electrician or installer. The thermostat is installed in each room at a minimum height of 160 cm and the ambient temperature is marked not higher than 26 or 28 ºC.
Infrared heated floors
A type of low-temperature floor heating systems with low power are products with carbon heating elements that are fixed to a polymer base. Manufactured in the form of:
- strips of graphite-containing composite paste, which are applied at intervals of 5-10 mm between two layers of polymer film. The total thickness of the product does not exceed 0.5 mm;
- thin semi-rigid rods, which are secured with a “ladder” between two flexible wires.
Accordingly, the finished kits are called film (infrared) and rod heated floors. Since they use a parallel type of connection of elements, the systems will continue to operate even if individual segments fail.
Here are step-by-step instructions for installing a film ETP.
Drawing up a drawing
You need to start by drawing up a layout diagram for the IR film, taking into account the bypass of stationary objects in order to prevent overheating.
The power is selected independently, taking into account the conditions specified above in Chapter 3. For example, it is assumed that Electrolux Thermo Slim is installed with a declared power of 165 W. The planned level of heat transfer based on manufacturers' recommendations for buildings in central Russia is 140 W/m². For a bathroom with a usable area (free of stationary objects) of 5.5 m², the heat requirement is 140 * 5.5 = 770 W. Accordingly, the film floor will require 770 / 165 = 4.7 m², optimally – exactly 5 m².
Preparing the base
The rough screed must be strong, smooth, monolithic and dry. The surface must be cleaned of dust, dirt, oil, bitumen and other contaminants. Next, the thermal insulation is laid with the reflective side up.
Flooring film
Heating strips are cut to predetermined sizes and fixed to the base with tape in accordance with the diagram. You cannot lay the film overlapping, this will lead to excessive heating and failure of the segments. The best option is end-to-end. The interval to stationary objects or walls is up to 10 cm.
Connection
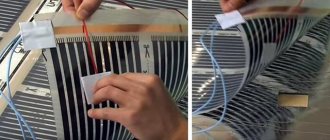
Using the clamps included in the kit, the copper conductors of the ETP are connected to the wires. Some manufacturers recommend creating contacts by soldering. In any case, you must strictly follow the attached instructions.
After connection, the unused ends are insulated, as well as all sections of the connection.
Temperature sensor and thermostat
A channel is cut in the wall and floor into which the temperature sensor wire is laid. IR film is laid on top. The thermostat is connected to the sensor, film floor and power supply in accordance with the manufacturer’s instructions.
Functionality check
The heating film is activated for 15–20 minutes, the functionality of each segment is tested. After the heated floor has cooled, some manufacturers recommend gluing the carbon strips to the base using acrylic heat-resistant glue.
Since ETP has a smooth surface, to improve adhesion the film should be treated with Betonkontakt primer. After drying, tile adhesive is carefully applied to the floor and tiles or porcelain tiles are laid . After 3-14 days, the system is re-checked.
Unlike film flooring, rod ETP is not afraid of overheating and can be successfully installed under any stationary objects, including bathroom furniture, plumbing equipment, etc.
The installation technology is simple and includes the following points:
- Planning the work process and drawing up a layout diagram.
- Determining the installation location of the thermostat and cutting channels for laying the temperature sensor and connecting cables.
- Preparing the base: creating a clean, smooth, monolithic floor.
- Installation of thermal insulation material under heating elements.
- Layout of the rod ETP from the point of installation of the thermostat with subsequent fixation of the elements using tape.
- Connection and insulation of mats in accordance with the manufacturer's instructions.
- Connecting the thermostat and sensor into a single complex with an ETP.
- System performance testing.
- Pouring screed under laminate, vinyl tiles or applying tile adhesive and then laying tiles.
We suggest watching the video below for a more detailed process of installing a rod-heated floor.
Operating principle of heated floors
In order to have an idea of how a warm water floor in a bathroom works, let’s look at a simple everyday situation. After laying the pipeline, the contour is filled with a new concrete screed or a stacked deck or wooden structure is installed. Two pipes, supply and discharge (return) are connected directly to the collector. The heating temperature is controlled using a thermostat.
Boiler water heated to a temperature of 35-450 or water from a centralized hot water supply system, only at a much higher temperature, enters the supply pipe. Through the return pipe, the cooled coolant flows back into the boiler or returns to the domestic hot water system.
Note: if you have a large bathroom, connecting a heated floor to a centralized hot water system can negatively affect the quality of water heating. Not only the residents of your apartment will suffer from this, but also your housemates. It is officially prohibited to connect the water circuit of a heated floor to a centralized heating system. To connect to the hot water system, you will need to obtain permission from regulatory authorities.
Such difficulties often become an obstacle to installing a water-heated floor in a bathroom in a city apartment. The way out of this situation is to install an electric heating element, the installation of which will take less time and will have virtually no effect on the functionality of the main house systems and communications. Usually in private houses the bathroom is located near the boiler equipment, so there is no need to spend money on laying additional pipes. The entire home heating system can be designed taking into account the subsequent connection of an additional heating circuit, both in terms of hydraulic load and in terms of the operation of the heating device.
When it comes to connecting a heated floor to an autonomous heating device, the heating circuit is equipped with a circulation pump. If installation is carried out to a central hot water supply, a pump is not required. The diagram shows the connection of a heated floor to a heated towel rail.
Accessories for heated floors under tiles
The bathroom floor heating system includes only a few components:
- A heating element.
- Thermostat that controls the system.
- Thermal sensor - monitors the floor temperature and turns off the heater to prevent overheating.
- Wires for connecting all components into a single circuit.
There are two types of heating elements:
- resistive cables;
- infrared films (thin polymer base with graphite tracks applied to it).
The second option - IR film - cannot be used in the bathroom and other wet rooms: in the event of a breakdown of the insulation and getting wet, the heater closes on itself, so that if the user is struck by an electric current, the RCD does not trip. These heaters are intended for use in dry rooms only.
Resistive cables come in two types:
Unregulated or regular
It is simply a long wire of metal with high electrical resistance, enclosed in an insulating sheath.
It is cheap, but has an important drawback: with limited heat removal (for example, a piece of furniture or something else is placed on the floor) it can burn out.
Repairing the cable is difficult - you will have to knock down the floor covering and screed.
Cables of this type are available in two versions:
- single-core;
- two-core.
A two-core cable consists of the same wire, but only folded in half. Thus, it is connected only on one side and the route can be laid as you please.
A single-core cable must be connected from both sides, so the route must be closed, that is, both ends of the cable must be adjacent after laying the circuit.
Block 1
Self-regulating
These are resistive cables, so to speak, of a new generation. The resistive, that is, heating core is made of a polymer with semiconducting properties, and on both sides of it there are ordinary copper wires, that is, conductive. Current flows from one copper strand to another through the polymer along its entire length, causing it to heat up.
The peculiarity of the semiconductor polymer used is that when the temperature rises above the specified value, its resistance increases sharply, that is, the electrical circuit in this area actually opens. Thus, cable burnout is impossible in principle. At the same time, other areas remain operational.
Resistive and self-regulating cable
Having this advantage, a self-regulating cable is certainly more preferable than a regular one, but you need to be prepared for the fact that it costs much more.
Components for heated floors can be purchased individually or as a set. In the first case, the components need to be selected correctly, because the amount of current flowing through the thermostat depends on the resistance of the resistive cable. In the kit, everything is already selected, so the likelihood of error is reduced to zero.
In order for the resistive cable to heat the floor correctly, it must be laid with the correct spacing. Otherwise, either overheating (with a small step) or “thermal zebra” (with a larger step) is possible.
To avoid mistakes, it is better for the user to purchase a so-called thermomat as a heating element. This is the same cable, only already laid and attached to a fiberglass sheet. When installing the mat, you just need to lay it out without worrying about anything.
How to install heated floors in the bathroom?
If you want to install the system yourself, then first you can familiarize yourself with the installation technology and start working on your own.
Essentially, an electric floor heating system is a separate element from the main floor that is installed before or during the flooring.
This system consists of heating cables or mats that are installed on a concrete pad and then firmly attached to the old base.
The mats are made of fabric with heating parts woven into it, firmly protected and insulated from moisture. To connect to the power grid, free communications 4 meters long are connected to each mat from the beginning and end.
The system is powered from a network with a voltage of 220V. Using a built-in sensor, the temperature of the heated floor in the bathroom is measured, and the required heating is installed using an electronic thermostat.
Preparing for installation of heated floors
First of all, you need to decide how to insulate the floors in the bathroom. Depending on the choice of heating system, a plan and project are drawn up. The diagram shows the place where the sensor and thermostat will be mounted and the heating element connected.
In this case, one should take into account the inadvisability of heating the floor under the bathtub and in the washbasin area. Thanks to the diagram, you can easily calculate the amount of materials.
Step 1. Installing the thermostat
It is advisable to start installing a heated floor in the bathroom by installing a thermostat (thermostat). This is the most important part of the system, which serves to automatically control the degree of heating of the heated floor.
The bathroom thermostat kit includes a floor temperature sensor. This device transmits temperature data to the thermostat, which in turn controls that the heated floor in the bathroom is heated only to a certain temperature. Once this happens, the thermostat turns off the system and turns it back on only when the floor has cooled down.
The thermostat is usually installed in the same room where the heated floor is installed. However, it is not recommended to do this in wet rooms (including bathrooms) due to possible automation failure. Therefore, the best option is to install a floor temperature sensor in the bathroom, and a thermostat in the adjacent room.
First, you need to knock out a small recess in the wall for mounting the thermostat installation box. This is done at a height of 50-100 cm from the floor surface. After this, two vertical grooves are cut from the resulting recess to the floor using a grinder or a chisel with a hammer. After laying the cable and installing the sensor, two tubes are placed in the resulting grooves, one of which is fed with power wires, and the other with sensor wires.
The thermostat is mounted in a recess knocked out in the wall in the same way as a regular switch
Step 2. Preparing the subfloor
Since no “dirty” work is expected after knocking out the grooves, the time has come to clean the base of the floor from debris and construction dust. The floor must be level, without visible differences in height. If necessary, the floor is leveled with cement screed or self-leveling mixture.
After the floor is leveled, its surface is primed and the primer is allowed to dry.
Step 3. Laying thermal insulation
A mandatory step in installing heated floors is thermal insulation. It is necessary if you do not want to waste the energy of the heated floor on heating the underlying premises: a neighbor’s apartment or basement. In this case, your system will wear out, and the lion's share of energy will go down the drain, taking away significant amounts from your budget.
Therefore, any heat-insulating material with a thickness of at least 20 mm is laid on the subfloor. This can be expanded polystyrene, penofol, penoplex, polystyrene foam, foil polyethylene foam, cork, etc.
Step 4. Laying the heating cable
Cable laying begins from the place where the power wires are connected to the thermostat. Steel mounting tape is attached to the thermal insulation in 0.5 m increments. The heating cable is laid on top, usually in a zigzag pattern, and secured to the floor with mounting tape tabs.
Installation of electric cable floor
Each system has its own installation features, and before starting work you should read the detailed installation instructions for a specific type of heated floor. It is also necessary to carefully read the technical documentation and manufacturer’s recommendations.
Let's look at the specifics of installing a heated floor in a bathroom using the example of laying a heating cable.
Heated floors from Devi, Thermo, Electrolux, and Teplolux are especially popular on the market, but this does not mean that systems from other manufacturers are worse. You can always find a suitable option in terms of price-quality ratio
Step #1: Preparing the Kit
To install a cable heated floor, you will need the following components:
- single or double-core heating cable;
- thermostat;
- temperature sensor;
- plastic corrugated tube for laying the temperature sensor;
- mounting tape;
- thermal insulation material.
You can assemble a kit for heated floors yourself, or you can buy a ready-made one - with a cable, thermostat, and sensor. In this case, you will only have to purchase additional insulation separately (foil penofol, penoplex or other similar heat insulator will do).
The cost of the finished kit depends on the power of the system, brand, and region in which the purchase is made. On average 1 sq.m. heated floors cost 1,500 rubles, but it is better to check prices at the time of purchase
Step #2: installing the thermostat
The element that should be installed first is the thermostat. When assembling the system, it will be connected to the temperature sensor. The devices work together: when the floor heats to the desired temperature, the sensor sends a signal to the thermostat, and it turns off the heating until the temperature drops to a predetermined minimum, after which it turns it on.
To install the thermostat, it is necessary to make a recess in the wall at a height of 0.5-1 m to the size of the box. Two furrows are dug from it to the floor, in which corrugated plastic tubes will be placed - with a temperature sensor wire and a power cable.
It is most convenient to install thermostats in the same rooms where heated floors are installed. However, there is steam and high humidity in the bathroom, so it is better to move the thermostat to an adjacent room to avoid malfunctions
Step #3: preparing the base
The floor is cleared of debris, dusted, and leveled using a screed. It is necessary to achieve a smooth and even surface, to remove differences, otherwise the risk of damage to the heating system during its operation increases.
When the main work on preparing the base is completed, you should wait until the mixture dries completely. After this, the floor is carefully primed to strengthen the surface. The next stage of work begins when the primer has dried.
A layer of thermal insulation is laid on the prepared surface. It is needed to prevent heat loss. The cable heats the environment equally from all sides. Heat goes both up and down. This means that the warm floor heats not only the bathroom, but also the floor slabs, neighbors, or even the basement.
As a result, the apartment owner overpays for electricity, because... The heating system operates in enhanced mode, and receives a minimum of heat. Solving this problem is not difficult: just choose a good insulation with a thickness of at least 20 mm and lay it with the foil side up.
The primer is selected depending on the type of base surface. If it has a dense structure, it is enough to buy a standard mixture. And for a porous surface it is better to choose a deep penetration primer and apply it in 2-3 layers
Step #4: Cable Laying
The cable begins to be laid from the area where the wire will be connected to the thermostat. It is mounted on a special steel tape, which is attached to thermal insulation (step – 50 cm). The mounting tape has fasteners-petals for easy fixation of the heating cable.
When laying the cable, you need to ensure that the distance to the wall is at least 10 cm, and there is at least 6 cm between turns (the pitch can be up to 20 cm). The cable is laid as far as possible from radiators and pipes. Distance – from 20 cm.
Damage to the heating cable must not be allowed, so it is placed so that the bending radius of the coil is at least 5-6 wire diameters. Cable lines must not intersect each other
Step #5: Install the Thermal Sensor
To install the temperature sensor, you will need a corrugated tube. The sensor is inserted into it, a plug is inserted to prevent construction mixtures from getting into the cavity of the tube, and it is installed in the middle between the turns of the cable.
The temperature sensor leads are connected to the thermostat by placing the wires in pre-prepared grooves. After this, the grooves in the wall can be carefully plastered or puttied.
The system is ready for testing. It must be checked before pouring the screed to ensure the functionality of all elements. The cable resistance can be checked using a tester. If everything is in order, proceed to arranging the screed.
The parameters of the heating cable are checked at least twice. The first time this is done immediately after purchase, and the second time after installation. The indicators are checked against the characteristics in the technical documentation. Deviations are unacceptable
Installation of a water heated floor
Installation work is carried out in stages:
- First of all, before making a warm water floor in the bathroom, you need to dismantle the old covering and remove the screed to the base. Since you will be working in a dusty environment, you should take care of respiratory protection.
- Then the rough base must be leveled as much as possible using self-leveling mixtures or cement screed if the height of cracks and other defects exceeds 10 millimeters.
- Then the location of the collector and other system control elements is determined. They must be freely accessible. Usually the cabinet is placed at a low height from the floor. Pipes coming from the heating boiler are inserted into it and shut-off valves are installed. A collector in the form of a tube and the branches from it are connected to these elements, and then a pipeline for hot coolant is connected to them.
- Rolled waterproofing material is laid on the surface of the base. Its sheets are laid out overlapping, paying special attention to the tightness of the joints. A special tape is used for this. We should not forget about the need to make a 10-centimeter overlap on the surface of the walls.
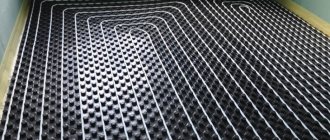
- A thermal insulation layer is installed from technical cork, mineral wool, special mats, or expanded clay is poured. If the room is located on the ground floor, the thickness of the thermal insulation should be at least 10 centimeters. When the bathroom is located above a heated living space, a 5-centimeter layer will be sufficient.
- A reinforcement mesh or a special frame is mounted on top of the insulation. Pipes with water are placed on them. Experts recommend starting from the far corner. In most cases, a 25-50 cm distance between pipes is maintained. They are laid in a spiral or snake. You need to know that when installing heated floors in a bathroom with your own hands, the gap between the wall and the outer pipes should not exceed 8 centimeters.
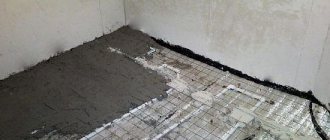
- The supply and return pipes are connected to certain manifold valves. Start checking the system for functionality. For this purpose, supply heated water and look for leaks. The coolant supply is turned off.
- Before proceeding to the final stage, it is necessary for the floor to cool completely. Then another layer of screed is poured, not forgetting to control the horizontalness of the coating. The height should be 3-7 centimeters. After the base has dried, the heated floor in the bathroom under tiles or other covering is ready. It is allowed to operate the heating system no earlier than after a month - otherwise voids will appear in the screed or it will crack.
Materials and equipment
So, you already have a working boiler with a circulation pump, to which you can connect a heated floor. To install heating in the bathroom, you will need:
- Pipes. Special, for water heated floors (not “ordinary” ones, which are used for the installation of sewerage and water supply systems). For self-installation, it is more convenient to use more affordable metal-plastic than expensive cross-linked polyethylene. Such a pipe is easier to bend and hold in a bent form, but in the bathroom you will have to make a lot of sharp bends. The amount of pipe is approximately 5–7 m per square meter of room. Don’t forget that you don’t need to install heated floors under the bathtub and/or shower stall, so their area can be immediately subtracted.
- Collector (comb) for heated floors. It can be purchased assembled or assembled from individual components. With a bathroom area of up to 5 sq. Many home craftsmen manage to do without a collector. In this case, conventional shut-off valves with a thermostat are used instead. But this solution should only be considered if you have a good boiler with a powerful pump. A “weak” heating system will not be able to provide sufficiently intense circulation in the pipes in the floor.
- Shield (cabinet) for the collector. It must be installed in the bathroom, in a place convenient for access. Therefore, immediately pay attention to the size, general appearance and quality of the cabinet finish. You won't be able to hide it later. A more elegant option is to install the collector in a niche in the wall and close it with a door. But this is much more difficult to implement.
- Reinforcing mesh and fasteners for securing pipes (plastic clamps).
- Materials for pouring screed. Choose a mixture that is designed for use with heated floors. An ordinary screed without a plasticizer will not withstand constant heating and will soon simply crumble.
- The backing is foil polystyrene, polyethylene or polypropylene. There are many similar materials that differ markedly in price and properties, so their choice is a completely separate topic. Let's just say that you can take a substrate with protrusions (“bobs”), between which pipes can be easily secured. It costs much more than “flat” materials, but it is easier to work with. You cannot save too much on the substrate - it must be quite dense (at least 35 kg/m3) and thick (from 30 mm). Soft foam plastic will not provide the necessary strength, and too thin insulation will transmit some of the heat to the lower floor.
- Waterproofing materials (roll or coating). Despite the fact that any substrate is equipped with a waterproof layer, general waterproofing of the bathroom cannot be abandoned. And although waterproofing work is not formally included in the concept of installing heated floors, they will have to be performed at the surface preparation stage. When removing the old screed, the existing waterproofing will most likely be damaged.
- Damper tape.
- Aluminum tape for gluing seams between individual backing plates.
Electric heated floors in a layer of tile adhesive
If you are planning to install an electric heated floor in the bathroom under the tiles without changing the screed, then a regular heating cable will not suit you. But this does not make the choice of possible options smaller, it even expands.
Heating mats for heated floors
First of all, let's look at heating mats. Their operating principle is based on the use of the same heating cable, only with a smaller diameter. Moreover, the cable itself is already fixed with the appropriate pitch in a fiberglass mesh.
Heating mats based on heating cable
So:
- Heating mats can be of two types with single-core and double-core cable. The difference between them is the same as between their regular counterparts. But single-core heating mats are becoming less and less common.
- A huge advantage of heating mats is their significant simplification of installation. After all, the cable in the mesh is already fixed and if you need heating of a straight line, for example, a corridor, then you just need to unwind the mat. If the heating mat needs to be bent, then simply by cutting the fiberglass mesh in the required place you can give it the required shape.
- Another advantage is the smaller diameter of the cable , which allows you to mount the heating mat directly into the layer of tile adhesive. It should be remembered that due to its smaller diameter, such a cable overheats faster and is more demanding on bending conditions.
Amorphous metal tape for heated floors
A rather interesting option is to use an amorphous metal tape. The principle of operation of such heated floors is based on the use of a special metal, which obtains its unique properties as a result of rapid freezing from a molten state. In appearance, such a warm floor resembles an ordinary mesh.
Amorphous metal strip for tiles
- The main advantage of a heated floor based on an amorphous metal strip is its thickness. It does not exceed 25 microns. This allows it to be used in combination with any surface.
- Another significant factor in favor of amorphous metal tape is its energy efficiency. According to manufacturers, it is 2 to 4 times higher than that of a heating cable. In this case, electromagnetic radiation corresponds to the natural background.
Note! Due to its mesh structure, such a warm floor warms up more evenly. In this case, heating occurs faster than with a heating cable.
- But amorphous metal tape also has disadvantages. First of all, this is the maximum temperature. Which cannot exceed 40 - 45⁰С. This is due to the structure of the metal, which at higher temperatures loses its unique properties. But here you should remember that you don’t need a higher floor temperature.
- Well, another important disadvantage is that after installation, this type of heated floor is practically not subject to repair - only replacement. But installing an amorphous metal strip with your own hands is a pleasure. To do this, simply unwind the mat.
Infrared heated floor
One of the most popular at the moment is the so-called infrared heated floor. In general, its correct name is film. It can be of two types - carbon and bimetallic.
Only a carbon film heated floor can be installed under the tiles, sometimes it is also called graphite. Its operating principle is based on the parallel connection of carbon heat elements.
The photo shows one of the ways to install a heated film floor under tiles
So:
- The main advantage of this type of heated floor is its ease of installation. You just need to unwind the fabric and connect it. At the same time, a film heated floor warms up the surface quickly and evenly, and its energy consumption is relatively low.
- But installing an electric heated floor for a film-type bathroom yourself will not be so easy. The fact is that this type of coating has a continuous structure. As a result of this, the tiles laid on top of such a warm floor will not have any connection with the screed. As a result, there is a high probability of peeling.
- In order to exclude such a development of events, reinforcing mesh is used, sheets of plasterboard are laid on top of warm floors, and much more. But this, firstly, raises the floor level, and secondly, the use of plasterboard, which has low thermal conductivity, significantly reduces the efficiency of heated floors.
Note! There are rod infrared heated floors. They are made of individual carbon elements connected by conductors. Outwardly, it is very reminiscent of a rope ladder. Such warm floors do not require special installation conditions.
Rod carbon heated floor
- But film heated floors have quite a few advantages. First of all, this is its high maintainability. After all, by lifting the floor covering you can easily replace the damaged area. At the same time, damage to a single area does not disable the entire heated floor, which is natural for most other types of heated floors.
Installation of film UV floor
If you have doubts whether you need a heated floor in a water or electric bathroom, you can consider an innovative option for heating the floor surface - film.
The work associated with the installation of infrared heated floors is similar to that performed when laying cables. The difference lies in the spreading of the film sheets parallel to each other. There is one important advantage of a UV floor - it can be used without pouring a screed directly under the floor covering, which could be, for example, ceramic tiles. The film is embedded in the tile adhesive solution.
There is another way to install a UV floor - dry using a special protective film material. Only then the finishing coating is laid.
Simple installation and simple operation make electric heating for the bathroom floor the best solution.
- Parquet
- Laminate
- Linoleum
- Skirting boards and thresholds
- Installation and repair
- Wooden
- Other materials
- Warm floor
- Leveling and screed
- Tile
- Finishing and decor
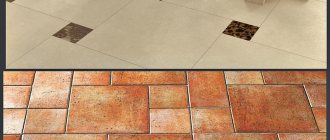
Which heated floor to choose for bathroom tiles?
This room has special specifics, so not all types of equipment can be used here. Experts recommend choosing one of these systems:
- Cable.
- Heating mats.
- Infrared.
Each variety has its own characteristics.
Cable heated floor. This equipment appears in the form of a heating cable, thermostat and temperature sensor. Among its advantages, it is worth highlighting its relatively low cost with sufficient efficiency. However, heating regulation is very problematic.
The installation of this system deserves special attention. After all, the cable installation should be carried out under the screed, and not under the tiles. First, you should clear the base and place a layer of thermal insulation on its surface. Then, the cable is laid and fixed, a thermostat and a temperature sensor are installed. After testing the system, a floor screed is made, with a thickness of 3 to 10 cm. Only after the solution has dried can the tiles or tiles be laid. Installation will take several days.
Heating mats. This is a simplified version of cable underfloor heating. Here the heating element is already fixed to a special mesh. The placement of such equipment is relatively simple, since it does not require the creation of a floor screed. Installation of mats is carried out under tiles or tiles. However, do not forget about preventing overheating. Usually, for this, a layer of tile adhesive 5-8 mm thick is laid on the mats themselves. Installation is completed in just a few hours.
Infrared heated floor. This system is the most popular. After all, in addition to heating, you receive light exposure to useful infrared radiation. In medicine, it is actively used for lifting and in procedures aimed at rejuvenating and healing the body. The fire safety and reliable insulation of the heating film are also captivating. Such equipment has a high level of safety when used in rooms with high humidity.
Installation of IR systems is similar to the procedure for installing heating mats. But under the film itself you should put a layer of insulating material. Then, we place the heating elements, connect the thermostat and test the operation of all components. After this, you can apply adhesive under the tiles in a layer of 10–15 mm and begin installing the tiles. Installation only takes a few hours.
As you can see, the optimal solution for organizing a heated floor in the bathroom are heating mats and infrared systems. They are simple and extremely safe.
Pros of heated floors in the bathroom
Walking barefoot after a shower on the cold surface of the tiles in the bathroom is unpleasant, especially in the cold season. For this reason, installing an underfloor heating system is a good solution for every property owner.
Installing heated floors in the bathroom can be called a modern solution.
A heated floor surface allows for uniform movement of warm air masses throughout the room, and in addition, the coating will always be dry. Drops of water that fall on the floor will dry almost instantly. Indoors, even in the most humid areas, there will be no conditions for the growth of mold and mildew.
Installing heated floors in the bathroom will allow:
- maintain a comfortable microclimate in it;
- remove excess moisture that appears after family members take the procedures;
- dry the moist air from wet things on the heated towel rail.
In residential buildings, two types of floor heating systems can be installed for rooms where there is high air humidity - water and electric.
Preparing the rough surface
Before starting renovations in the bathroom, you need to completely clear the floor space: the plumbing is dismantled and removed. All layers of the old coating are dismantled. Not only tiles (or other finishing), but also old concrete screed. This is done with a hammer drill (the process is complex, dusty, but necessary). Why you can’t leave the old screed:
- The floor level will rise and the layer will be too thick.
- You need to do the waterproofing yourself to be sure of its quality.
- It is necessary to check the quality of the concrete floor.
And it is unknown how old materials have exhausted their service life and how long they will last.
Next steps:
- After cleaning, the quality of the concrete slab is assessed. If there are cracks, chips, crevices, drilled holes, everything needs to be repaired with a repair compound (polymer-sand or cement).
- Now the surface is treated with impregnation against mold and mildew (it is better to use a primer recommended by the waterproofing manufacturer - look at the packaging).
- Before moving on to waterproofing, you need to let the primed surface dry thoroughly.
Particular attention should be paid to horizontality. Unevenness and slopes will lead to uneven distribution of warm water in the tubes. If you get small bumps, the floor can be sanded. If the differences are significant, self-leveling liquid mixtures are used.
Flaws
Like any installed system in the house, it has its drawbacks:
- The cost of the system for the buyer will not be a small amount. But it will be justified after the first uses, because you simply won’t want to leave a comfortably furnished bathtub.
- Not all floor coverings that you would like to use in your bathroom can be used as flooring. The most practical would be ceramic tiles and self-leveling flooring. It is rational to install a wooden floor only if there is good ventilation in the bathroom, otherwise such flooring will soon have to be replaced.
- Electric floor heating requires electricity. Therefore, before installing any type of heated floor, you need to calculate all the pros and cons and choose which one is better, otherwise the floor simply will not be useful, because it will be very expensive to use.
This is what a heated floor looks like in cross section
Installation of heated floors, electric or water, which is better, has to be chosen only by the owner of the house or apartment. The cost of any system will not be cheap, but it will require significantly less costs when installing the floor yourself. If the electric one can be turned on even in the summer, then water floor heating will only work with the start of the individual heating system. The system sensor shows the temperature no higher than 40 degrees, but the heating can be changed using a thermostat.
Adviсe
If you are installing a heated floor with your own hands, then you will need advice on choosing individual elements of the system
If you are installing a heated floor with your own hands, then you will need tips on choosing individual elements of the system:
- All water floor heating designs differ in power. It, in turn, depends on the diameter of the selected pipes and installation features. The calculation of the required power of a water floor is made taking into account the size of the bathroom, its location in the house, as well as taking into account the type of future floor covering. To perform the correct calculation, it is better to contact specialists.
- When choosing a collector, circulation pump or heating boiler, it is worth remembering that they may also differ in their technical characteristics. For example, there are collectors with or without functions that allow you to regulate coolant circulation. Usually the first collector option is more expensive. If you are not going to regulate the degree of floor heating, then you should not overpay and you can buy a cheaper unit without this function.
Video on how to make heated floors in the bathroom with your own hands: