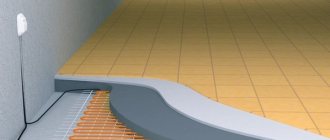
A warm water floor is an excellent additional option for heating an apartment, and in a private house this system is often the main and only source of heating. The efficiency and duration of operation of the device depends not only on the correct installation, but also on how the heated floor was poured.
The screed plays a large role in this design; it is responsible for protecting the circuit from mechanical damage, and for the correct distribution and exchange of heat. Therefore, when pouring a heated floor, you need to follow a number of rules, which we will discuss in detail in the article.
How to fill a heated floor
How to properly fill a water-heated floor - there are three methods that can be used. All of them are simple in technology, their process is similar, although each method has its own characteristics.
| Floor filling method | Description | pros | Minuses |
| Concrete | A common option is a cement-sand composition. To give greater strength to the floor structure, sand is replaced with filler. It prevents the base from crumbling when heated. In addition, when using filler, the thickness of the mortar layer decreases from 50 to 30 mm. | Strength, durability and uniform heating of the floor surface. | Significant floor weight and long curing period. |
| Semi-dry composition | The main difference is that it contains less water than in the first composition. Mandatory presence of polymer additives and fiber fibers. | Increased strength of the floor, dries much faster, has less shrinkage and the resulting surface from this composition is practically not subject to cracking. | Less plastic, this may cause voids. After drying, the resulting base should be protected from water. |
| Self-leveling mixtures | The composition resembles a cement-sand mixture. It can be used to make both a rough base for the floor and a finishing coating. But for screeding a warm water floor, only a coarse leveler is suitable. It comes with different bases: gypsum and cement. Both types can be used to fill heated floors. | It has the greatest plasticity, hardens quickly, and does not require careful leveling, as it spreads under its own weight. | High price. |
Filling the screed
After completing all the preparatory work, we proceed directly to pouring the concrete screed.
Selecting a potting mixture
Since you should fill the floor with your own hands in compliance with building regulations, you should initially decide on the choice of material. The features of all further work will depend on this.
The following materials can be used to construct a concrete screed:
- ready-made dry mixtures of sand concrete;
- prepare the cement mortar yourself;
- use self-leveling self-leveling floors.
Each of these options has its own advantages.
Ready mixes
Ready-made dry mixes can be purchased at most construction supermarkets. Among their advantages are a balanced and pre-selected composition, which includes:
- coarse sand with a diameter of up to 2 – 3 mm;
- Portland cement grade M-300 or M-400;
- additional improving additives (plasticizers, etc.).
This frees you from the need to independently select and dose the components of the concrete solution.
Self-leveling floors
They are one of the varieties of ready-made mixtures. Their main difference from other concentrates is their ability to self-level after pouring.
This is achieved due to the presence of special polymer additives in their composition, which give the finished solution increased plasticity and fluidity. As a result, after applying them to the base, self-leveling floors spread over its entire surface in an even layer.
Typically, self-leveling floors are poured in a layer of 5–10 mm. For more serious differences in base values, it is not advisable to use them due to their high cost.
Temperature gaps
The main reason why cracks appear on a concrete screed is the incorrect location of expansion gaps.
According to the instructions, when installing a screed heated floor in rooms with a complex layout or having a large area, it is correct to divide the room into zones before pouring the concrete. The demarcation needs to be done with a damper tape, 5-10 cm thick, and the entire area along the walls is laid with it.
The damper tape helps protect the heating system from damage, because during the heating process the structural elements expand. If you do not install the damper tape, the concrete floor screed will quickly crack.
There are several points by observing which you can correctly arrange expansion joints:
- Each zone that is fenced with tape should be no more than 30 m2, and the sides should be no more than 8 meters long.
- If the room has a complex layout, it is divided into square or rectangular zones.
- In some conditions, it is possible to make divisions at 1/3 of the depth of the solution.
- After the floor screed has hardened, the seams are sealed.
How is a rough foundation made?
Before laying the concrete surface, it is necessary to carry out preparatory work. The base is leveled with a sand cushion 10 cm thick. The sand is thoroughly compacted. Crushed stone or expanded clay is laid on it: the surface thickness is 8-10 cm.
- The base is covered with plastic film or bitumen insulation. The material is placed on the walls to a height of 20 cm, the tapes are overlapped. All edges are reinforced with tape.
- A damper tape is reinforced along the lower perimeter of the wall.
- Next, insulation is used. It is easier to lay polystyrene boards. They are easy to adjust around the perimeter by cutting with a mounting knife. The slabs fit tightly together and do not require additional reinforcement.
- The insulation is covered with a layer of concrete. To strengthen the screed, a reinforced mesh is pre-laid. Covering depth 15 cm.
For a heated floor on a concrete base, it is necessary to form a flat surface, so beacons are installed on the floor. They are made from metal plates or wooden boards. Select boards of a certain width according to the depth of the screed.
They are installed over the entire floor area in increments of 50 cm. The beacons must be at right angles to the floor. Perform a wet screed. Further work can be continued after the surface has completely dried.
We recommend: How to choose a boiler for underfloor heating?
To ensure that the concrete coating dries evenly, it is covered with polyethylene and protected from sunlight. After 7 days, the film is removed. The screed will dry completely after 28 days.
Waterproofing materials, a reflective screen, and devices for fastening water circuit pipes are laid on the surface. Carry out installation and testing of the heating system. If the result is positive, a clean concrete surface is laid on the highway.
Preparatory work
Before pouring the screed onto a warm water floor, some preparatory work is required:
- level and clean the base;
- install a heating system.
When installing a heated floor, you need to fill it after installing the entire “pie”; it is important to lay all its layers correctly.
The sequence of laying layers in the “pie” of a warm water floor is as follows:
- Rough screed - it is cleaned and leveled.
- Waterproofing - a polyethylene film with a thickness of 200 - 250 microns is placed.
- Thermal insulation - foamed polyethylene with foil coating is installed.
- Reinforcing mesh - it is necessary to give strength to the structure. In addition, pipes can be attached to it if the polystyrene foam base with bosses does not fit.
- Heating circuit (metal-plastic or polypropylene pipes with a cross-section of 20 mm) - it is fixed either to the mesh with special fasteners, or is laid on polystyrene plates between the bosses.
- Reinforcing mesh - it can be laid on top of the heating system, if desired, to give greater strength to the structure.
Before filling, it is necessary to connect the system to the collector, check it for leaks and how it heats .
After which, a beacon is installed, which helps to obtain a level base from the concrete composition.
Screed material
To perform rough and finishing screeds, it is recommended to use concrete mortar grade 150. It must be reinforced with gravel: fraction 20 mm. In order to prepare concrete, use 1 part of cement, 4 parts of crushed stone, 3.5 parts of sand, 0.7 parts of water. To ensure that the coating is durable and does not crack under the influence of a warm floor, a reinforced mesh with a cell of 10*10 cm is used.
To make the finishing surface, which is located above the water main pipes, a special mixture for heated floors is used: “Knauf cement screed light”, “Vetonit maxit”, “Ceresit CN72”. Add water to the mixture according to the norm and mix using a mixer.
The concrete floor performs not only a protective function for the heating circuit. It should heat up quickly and have good thermal conductivity. In order to achieve certain characteristics of concrete for a warm water floor, fillers are added to it:
- plasticizers; improve thermal conductivity, elasticity and strength; use mixtures “Rehau”, “Uponor Multi”, “PL 10460”;
- polypropylene fiber; increases the strength of the coating; in appearance it looks like cotton wool; fiber is introduced into the concrete solution; There should be 1 kg of fiber per 1 m2; they use fiber from the following, “POLIARM”, “AliStroy”;
- fiber can be made from steel filings or basalt.
We recommend: How to choose a material for a warm water floor?
The finishing surface must be even. It is carried out using mixtures for heated floors. If it is not possible to purchase special mixtures, then use a concrete solution, but choose crushed stone of a small fraction, 10 mm. For the strength of the coating, a reinforced mesh is installed. The liquid circuit is attached to it.
A smooth surface is obtained by using a semi-dry mixture. The material dries quickly, does not sag, and does not deform. When using fiber fiber, the coating is durable, resistant to temperature changes and mechanical stress. The disadvantages of semi-dry screed include reduced moisture resistance. The material absorbs moisture well. In emergency situations in a liquid floor system, the coating may swell and crack.
Tools and materials we need to lay heated floors
Before installing and pouring a heated floor, you need to prepare tools and purchase building materials that will be needed for the work.
The main tools that will be required during the installation process:
- a level, preferably a laser one, to check the evenness of the poured floor;
- screwdriver - used for installing beacons;
- a hammer drill with a nozzle for mixing concrete or a construction mixer;
- capacity 100 liters - the solution will be mixed in it;
- slats and rule - for leveling;
- vacuum cleaner and broom - to clean the base.
We will also need to purchase the following building material:
- damper tape - for arranging thermal seams;
- insulation material - used for installing a heat-insulating layer;
- polyethylene film - for waterproofing;
- material for making the composition for pouring (sand, cement, plasticizers, fiber) or ready-made mixture;
- reinforcing mesh;
- beacons;
- fasteners - to secure the circuit to the reinforcement;
- pipes made of polyethylene or metal-plastic;
- polystyrene slabs with bosses - if pipes will be laid on them.
You also need to remember about personal safety. For this you will need: rubber boots, they will protect your feet from cement dust, and knee pads, which protect your knees from injury when pouring the floor.
What do you need to know before you start?
Reinforcing mesh is necessary for attaching underfloor heating pipes.
Before you start filling, you need to learn about the basic nuances and rules of this work. By following simple recommendations, the work will go faster, and the quality of the finished fill will be at the highest level.
The most significant difference between a heated water floor fill and a simple screed is the mandatory presence of expansion joints. In rooms up to 10-12 m², these seams are made along the enclosing structures. To do this, a shock-absorbing strip is laid along the bottom of the wall. In the future, it allows you to compensate for the expansion of the fill under the influence of high temperature.
Related article: How to make a bath mat with your own hands?
If the area of the room exceeds 10-12 m², then additional seams are created. In addition to the compensating function, the damper tape provides thermal insulation from the walls, because it has a heat-repellent foil coating.
The main stages of installation will be discussed below. However, in addition to the basic techniques, you need to know auxiliary, but no less important, points. So, before you start pouring a heated floor, be sure to check the hydraulic density and correct operation of the system pipelines. If you fill without first correcting the existing defects, then after a certain time they will clearly manifest themselves, and you will have to get rid of the old fill and do everything again.
It is imperative to lay heat-reflecting material under the pipe system, which will reduce heat loss from a room with a heated floor.
Recommended thickness of floor screed
The height of a correctly poured screed is the same size around the entire perimeter. The efficiency of the heating device and the uniform heating of the floor depend on it. We suggest finding out the optimal, minimum and maximum thickness of the screed for a water heated floor.
Therefore, it is correct to fill a warm water floor with concrete only on a flat rough base.
The height of the screed is determined by the specifics of the room, in apartments - from 5 to 8 cm, in industrial facilities - 10 cm. At the same time, the layer under the contour is at least 1 cm, and above the pipes 3 cm.
In addition, the following points influence the correct determination of thickness:
- when using a conventional cement-sand composition, the minimum thickness above the heating system is 5 cm;
- if the filling is made with plasticizers, its thickness above the heating element can be less than 5 cm, but not less than 3;
- when installing a structure using reinforcing mesh, a thickness of 2 - 2.5 cm is acceptable, without it - at least 3 cm.
For your information! One of the functions of the screed is heat accumulation. Therefore, if there is a thin layer, the floor will cool faster, and the coolant will be heated more often. In this regard, the optimal thickness is considered to be 7 - 8 cm.
Preparing a solution for screeding a heated floor with your own hands
The components of the wet screed for the heated floor system are mixed in a concrete mixer. To improve the strength of the resulting coating, polymer fiber can be added during preparation. With manual mixing, fibers are introduced into the still dry mixture, and with automatic mixing - at any stage.
- To obtain wear-resistant floors, it is necessary to use cement of the strongest grades - M400 or M500.
- Sand should be used in coarse-grained varieties (about 0.8 mm), since it gives the screed greater resistance to cracking compared to fine-grained varieties.
- Water is added in portions so that the consistency of the resulting solution is not too liquid.
Semi-dry mixtures for underfloor heating screed are usually available in ready-made form or requiring the addition of water. Preparation of such solutions manually is not practiced due to the low availability of individual components.
The exception is specially developed plasticizers added to the solution during mixing. The dosage of the plasticizer and methods of using ready-made mixtures are indicated by the manufacturer on the packaging.
A specialist will tell you how to make a heated floor screed in the video below:
Technology for laying screed on a heated floor system
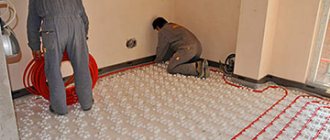
To begin work, you should divide the prepared base into fields of 40 square meters. m. The number of fields depends on the area of the room and its geometric shape. The dividing lines of the fields will show where the seams should lie, which will compensate for temperature changes. They should be filled with elastic materials so that during heating of water in the system they do not crack due to expansion or temperature changes. The outlet and supply loops of the heating water system pass along these same seams. To prevent the tubes from being accidentally damaged, they are protected with corrugated pipes and special metal sleeves.
Do-it-yourself water floor in the bathroom, preparation for screeding
The next step in installing the system is the placement of the heating circuit. It is important to remember that according to technical standards, it is recommended to lay the pipeline every 10 cm along the walls, and not in the center of the room. Near door and window openings, the step can be increased to 12 cm. Hinges whose length exceeds 100 m are not recommended.
Related article: Odorless paint for interior doors: what to choose?
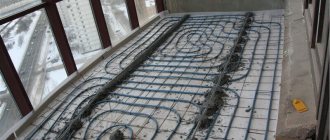
The circuit can be mounted either in parallel or in a spiral pattern. Parallel installation requires the pipe line to be positioned in the form of a snake. You should know that in the area where this snake begins, the temperature will be the highest. This installation method is best suited for small rooms. The spiral arrangement of the circuit heats the entire room equally, since the heating and return pipe systems alternate with each other. In large rooms it is better to install heated floors using the spiral method.
The collector is mounted on the wall closer to the floor surface and placed in a mounting cabinet. Inside this cabinet, the main heat source is connected to the heating pipes. The hot water pipe and the return pipeline, to which the manifold will subsequently be connected, are also installed in the cabinet. A circulation pump is also mounted there, ensuring continuous movement of warm water throughout the entire volume of the circuit.
Screed under water heated floor in the bathroom
Each pipeline must be equipped with a shut-off valve designed to disconnect the underfloor heating system from the general heating system. The manifold is connected to one of these valves.
At the next stage of arranging a water floor, it is necessary to waterproof all surfaces. To do this, use ordinary plastic film or aluminum foil. If you plan to purchase special foam plastic for thermal insulation, on one side of which an aluminum film is attached, then additional waterproofing will not be needed.
Before you think about what and how to properly fill a warm water floor, you should lay a layer of thermal insulation throughout the room. To do this, a welt tape is attached along each wall, the purpose of which is to compensate for expansion under the influence of temperature. After the thermal insulation is laid, fiberglass or reinforcing mesh is attached on top of it (a metal mesh with 10x10 cm cells, made of wire with a section thickness of 3 mm, is best suited). Mounting strips and plastic tubes are attached on top of the reinforcement layer.
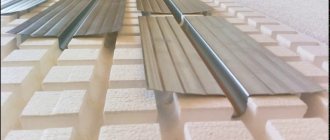
A mounting strip is a set of special strips with plastic grooves. Pipes are placed in these grooves, which should then be securely fixed. Any elastic material is placed into the expansion joints along the breakdown lines. After this, the heating system will need to be pressure tested, and then work with concrete can begin.
Water is poured into the system, after which it must remain under operating pressure for a day. If during this time the pressure does not change in any way, then this will be considered a sign of normal operation of the system.
Related article: Tambour doors to the landing: from selection to installation
Screed for a “warm water floor” system
The penultimate stage of work is pouring the system with concrete. The water pipeline passes through the entire room and heats the entire volume of the circuit. The thickness of the heated floor should not exceed 7 cm. For the solution, experts recommend using concrete of a grade no lower than M300. It is important to remember that before filling, the system must be filled with water and brought into working condition.
It is necessary to fill the heated floor with sand-cement mortar at average room temperature. Experienced craftsmen advise, when pouring, to pierce the newly laid out solution with a metal rod: in this way it is easiest to avoid the appearance of voids filled with air.
Screed care rules
Due to improper care, defects often form on the screed soon after pouring. During the first decade, the screed must be watered 2-3 times a day. The cement solution can only reach its basic strength after a month, and water is used to slightly speed up its hardening. You can allow the screed to dry naturally only after the cement has become strong enough. After three days, you can remove the remaining beacons, and the recesses left from them can be rubbed with freshly diluted solution.
It will be possible to turn on the heating system no earlier than in a month: during this time the screed should be completely dry and the solution should completely harden. To prevent the screed from cracking, it is recommended to increase the temperature in the system gradually.
After turning on the system, you can begin laying the tiles directly. It is very important to wait until the concrete is completely dry before you begin laying tiles. On average, complete drying of the concrete screed can be achieved within a month after pouring. To attach tiles to a finished heated floor, it is enough to apply a special adhesive to it.
Do-it-yourself water floor in the bathroom, preparation for screeding
DIY installation of water floors in the bathtub
Scheme for laying a water floor in a bathtub from A to Z
Screed for a “warm water floor” system
Underfloor heating system under screed
Screed under water heated floor in the bathroom
Types of screeds
The most commonly used is the so-called wet screed. It involves the use of cement-sand mortar and its subsequent drying. If there are problems with electrical wiring in the room or there is a need to urgently complete repairs, use a dry screed. In this case, sand and cement are simply compacted into the surface, and the very next day they are sealed with tiles. There is also a semi-dry screed. This is a kind of compromise between the previous two types.
Wet and semi-dry screeds are considered the most effective when installing a built-in heating system
