Stable and constant water supply is one of the main conditions for comfortable living in the house. However, the centralized water supply system often works intermittently, which leads to a significant decrease in pressure in the water supply or to interruptions in the water supply. This creates certain inconveniences. A storage tank will help solve the problem. This is a device for backup water supply, which will allow you to maintain the necessary supply of water and ensure its supply in the event of insufficient pressure in the water supply or when its operation completely stops.
In addition, storage tanks are installed in houses with autonomous water supply. In this case, a reserve capacity is needed to create a reserve so that water consistently flows into the tap even with low productivity of the well or well. Additionally, an expansion tank for water supply will help maintain the supply of liquid during power outages at home when the pumping station is turned off.
To take advantage of the stable water supply that such devices provide, the home owner must know how to select and connect a storage tank.
Types of equipment
They are classified according to several distinctive features. Depending on the material, they can be plastic or metal.
Plastic models are made from the following polymers:
- polyvinyl chloride;
- polypropylene;
- cross-linked polyethylene.
Storage metal tanks are made from stainless or carbon galvanized steel. Carbon steel models have a polymer coating to protect against corrosion. The inner surface can be protected with a ceramic coating.
The shape of the storage tank is cylindrical, round, or rectangular. In addition, models of other shapes are produced. For example, cone-shaped - can be used in conditions where it is necessary to ensure rapid and complete drainage of liquid.
An important classification feature is volume. There are small volume models with a capacity of up to 50 liters. They are used to create a small supply of water and ensure its supply during short-term interruptions in the water supply. Such models are suitable for a house or apartment inhabited by 2-3 people, and can be used for a summer residence. Large capacity capacity is up to 500 liters or more. Models of this type are capable of providing the house with water even during fairly long interruptions in the water supply.
Depending on the design, storage tanks for water supply come in open and closed designs. Open design models are tanks with a neck through which it is filled with water. Water is distributed through a pipe of a closed design - this is a membrane-type hydraulic accumulator. This is a device that automatically maintains pressure in the internal water supply. Such models, for example, Stout expansion tanks, can be used not only in water supply networks, but also in closed systems, including for autonomous heating.
Tank overview
If you are looking for such a plastic tank for installation in a private house or on a summer cottage, we can recommend you the Elgad CV 500D model. This tank is made of high-quality plastic, has a volume of 500 liters and is intended for storing clean drinking water and diesel fuel. This cylindrical container has a screw cap and has excellent resistance to aggressive substances. This product does not change the physical properties of the liquid stored in it. This is achieved through the use of environmentally friendly food grade plastic. You just need to take into account the fact that such tanks are not designed to work under high pressure. The operating range is from - 40 to + 50 degrees.
Plastic water tanks of the AQUATEK ATP 1000 model are equipped with a special float, which makes it easy to control the water level in the tank. The tank has a rectangular shape and is perfect for indoor installation. They are made of high-strength polyethylene, which ensures rigidity and resistance to stress. This tank has a volume of 1000 liters and is intended for floor installation indoors.
If you need to purchase a high-quality water storage tank at an affordable price, we recommend contacting ALFATEP. Our company’s specialists will offer you various types of such storage tanks, give you the necessary guarantees and advise you on the choice. We will also be able to carry out all installation work and train homeowners in the correct operation of such expansion tanks for water. You just need to make a phone call.
Principle of operation
The principle of operation depends on its design type.
The simplest models are open-type containers. Such a tank is simply filled with water, after which water is withdrawn as needed. The tank can be installed with a top or bottom connection. In the first case, the container is mounted above the water intake points - on the top floor or in the attic of the house. Water is supplied from the tank under the influence of gravity, therefore, the greater the height difference between the reserve tank and the tap, the greater the liquid pressure.
Also, open-type equipment can be installed with a bottom connection. In this case, the tank is installed below or at the level of the water intake point. Water is supplied from the tank by a pump.
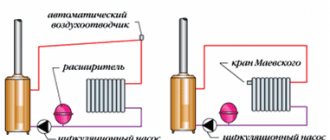
The membrane type is more complex. This is a sealed metal container, the internal volume of which is divided into two compartments by an elastic membrane. One of the compartments is designed to be filled with water, the second contains air. When connected to the water supply or the autonomous water supply pump is turned on, the tank is filled with water. As the liquid is filled, it presses on the membrane, the volume of the air compartment gradually decreases, and the air pressure in it increases. When the air pressure on the membrane and the pressure in the water supply are compared, an equilibrium state is reached and it stops filling with water. When the pressure in the water supply drops, the air compresses the membrane. As a result, water is displaced by the membrane from the tank and supplied under pressure to the water intake points. When normal pressure in the water supply network is restored, water flows back into the tank until the internal pressure reaches an equilibrium value.
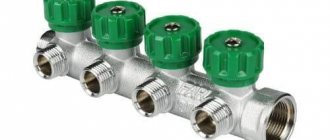
Methods for connecting storage tanks
The tank can be connected to the system in two different ways: by placing it at a high elevation or at or below ground level.
Top position
This scheme of supplying water to a house from a storage tank is practiced mainly in cases where there are no appliances in the house that require good pressure, and the residents’ need for water is minimal - to wash, wash dishes, etc.
And also with frequent power outages. Because water from a tank installed on the roof, attic or overpass flows to consumers by gravity, and such a system does not depend on the presence of voltage in the network.
Such pressure in the system will be insufficient to operate the washing machine, and even taking a shower will be problematic. You can increase it by connecting a booster pump at the outlet of the tank. The advantage of this installation is its simplicity and ease of maintenance of the tank.
However, do not forget about the disadvantages:
- The storage tank takes up a lot of space, taking away useful space from the house;
- If you install it in the attic or outside on a special overpass, then you can use water only in the warm season. Or you need to properly insulate and heat both the tank itself and the pipes going to and from it;
- If the installation instructions were not followed or the system itself has worn out over time, leaks are possible, which can cause a lot of trouble.
As you can see, each homeowner solves these problems differently depending on the needs of the family.
- To prevent the water from freezing, the tank is installed on a heated second floor or attic, sacrificing space.
- Or they use electric heating of a container in the attic. And they pay extra for electricity.
- Or they simply place it on the cabinet, being content with the minimum pressure in the system.
Bottom position
This is a more common and effective method of placement for houses with permanent residence and all the amenities familiar to a city dweller. Such a water supply system with a storage tank must be equipped with an additional pump or pumping station. Without them, the water itself will not flow to consumers, but with it you can get any necessary pressure.
There are also several options for lower placement:
- Ground - when the container is used only in the summer and does not need insulation;
- Underground - the tank is buried in the ground, and only the neck is brought to the surface, providing access to it for repair and maintenance;
House water supply - storage tank underground
Basement - when the house has a heated basement or technical room.
The last option is the most convenient, since the container does not need to be insulated, it is always accessible and does not take up useful space.
The second most popular is the underground option. It also allows you not to use the space of the house, but in this case cleaning and repairs will be fraught with certain difficulties. And the upper part, located above the freezing level, will also have to be insulated.
In addition, not every container can be buried in the ground. It must be durable, with thick walls, stiffeners or metal formwork. Otherwise, you need to build a hard shell for it.
Installation of the tank in a caisson made of waterproof slabs
Design features
The design of the storage tank does not depend on the installation location. There are only a few nuances.
The container is equipped with the following structural elements:
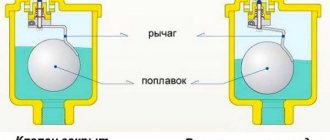
Float valve. It prevents it from overflowing and turns on the pump when the water level reaches the minimum level.
Float switch
- Overflow pipe in case of failure of the float switch. It is located at the top of the tank and connects to the sewer.
- Drainage pipe at the bottom. Designed to remove sediment. They are equipped with storage tanks for water supply located at the top or in the basement of the house. Underground tanks are cleaned through the top hatch.
This photo shows both pipes connected to the sewer system
- The filter located at the inlet will retain some of the suspended particles. It can also be installed at the exit, equipped with a finer mesh.
- Ventilation pipe or breathing valve. If you do not install them in the tank lid, when draining the water, its walls may collapse under the influence of atmospheric pressure.
Cover with breather valve
Features of choice
The choice depends on the volume, possibilities of its placement, required functions, and the owner’s budget.
If the house has several floors or there is an attic with enough space to accommodate a tank of the required volume, then you can install an open-type tank with a top connection. It will cost less than a hydraulic accumulator and will not require additional pumping equipment for water distribution. However, to create sufficient pressure for comfortable use, you need to raise the tank to a considerable height. To increase the pressure by 1 bar, you need to raise the container to a height of 10 meters. When placed in the attic, equipment will need to be insulated. If it is impossible to install the storage tank at a sufficient height, use a lower connection. The tank is usually located in a utility room or basement. A pump is installed to supply water to consumers.
Membrane-type expansion tanks are more expensive compared to open-design models. However, this equipment automatically regulates the pressure and pressure of water in the system. The installation height does not matter, no connection of pumping equipment is required.
The volume of the storage tank is selected based on the number of people living in the house. One person requires an average of 30-50 liters per day. When choosing by volume, the nature of the operation of the central or autonomous water supply is taken into account. If sufficiently long interruptions are possible, it is recommended to provide a reserve of 2-3 days.
Connection diagram and installation of a pumping station for a home
Today, for a comfortable stay in a country house, it is necessary to organize an uninterrupted water supply, because in addition to ordinary water taps, cottages use household appliances that require automatic water supply. To ensure autonomous, uninterrupted water supply to a private home, it is not enough to dig a well or install a borehole. To pump water from the depths of a hydraulic structure and supply it to the house, you need to buy and install a pumping unit. It is better to use a fully automated pumping station. If you install such equipment yourself, then you will need a connection diagram for the pumping station. And the video offered at the end of the article will help you correctly assemble and install such an installation.
Installation and connection to the water supply
The container is installed on a site with sufficient load-bearing capacity. The base must be designed for a load exceeding the weight of a full tank by at least 1.5 times. If necessary, prepare a concrete base that is structurally connected to the foundation of the house, or a metal frame made of profiled pipe.
Connection in houses with a centralized water supply system
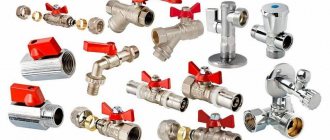
The storage tank is connected through a check valve, which prevents water from flowing into the pipeline when the centralized water supply is turned off.
A container with a top connection is mounted at a sufficient height. The upper pipe of the tank is connected to the water supply network. The outlet fitting is connected through a shut-off valve to the in-house wiring. A safety pipe must also be provided, which is located slightly below the inlet. It is necessary to discharge excess water when the storage tank overflows. From this pipe there is provision for drainage into the sewer system. The filling of the tank is controlled using a float valve.
Installation of a tank with a bottom connection differs from the described option in that a pump is installed at the outlet of the tank to raise water. The pump is connected via a pressure switch, which allows it to be turned on automatically if necessary.
Installing a diaphragm accumulator is the easiest. It is connected to the water supply through a valve with one pipe. The second pipe goes to the in-house wiring. Before turning on, you need to adjust the pressure level in the air compartment. It must correspond to the normal pressure in the water supply, taking into account fluctuations.
Preparatory work
A polymer mesh and a check valve are attached to the end of the pipe
Before implementing one of the connection schemes, appropriate preparation of the area is necessary. To achieve this, the following work is carried out:
- Digging trenches to lay a pipeline below the freezing point of the soil. Typically a slight slope is made towards the source to allow the equipment to operate more efficiently.
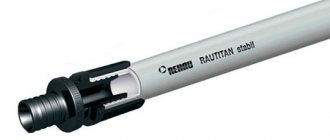
- After the preparation of the trench is completed, a polyethylene pipe with a diameter of 3.2 cm is laid from the well or well and connected to the pumping equipment. A polymer mesh and a check valve are attached to the end of the pipe. If you do the installation yourself, then in order to do everything correctly, it is better to buy a pipe with a valve and filter mesh already installed.
Advice: if the pipeline is installed above the freezing point, then it is necessary to insulate it. An electric heating cable laid nearby will help to additionally heat the pipes.
Connection for autonomous water supply
In the case of autonomous water supply, installation with a top connection is carried out according to the principle of a water tower. The tank is mounted at a sufficient height. Water is supplied from a pump from a well or well directly into a storage tank, from where it is distributed to consumers. If the pump fails, liquid is supplied to the system from the tank. The bottom connection is rarely used in autonomous systems, since it does not save during power outages.
A membrane accumulator is the most convenient type of storage tank for autonomous water supply, since it does not need to be placed at a height.
Single-pipe connection diagram
Installation of input and output lines
The distant connection of the pumping station is carried out in the following sequence:
The second end of the pipeline with a mesh and a check valve is attached to the inlet pipe of the pump unit. The pipe section is selected according to the diameter of the pipe. To avoid leaks and air leaks, all connections are carefully sealed. Otherwise, interruptions in the operation of the pumping equipment may occur or the water will flow in jerks. The photo below shows a diagram of connecting pumping equipment. To connect, we use a combined coupling made at an angle of 90 degrees and an American tap.
When the installation of the input main for the water supply of a country house is completed, we similarly connect the output main
- When the installation of the input main for the water supply of a country house is completed, we connect the output main in the same way.
- Before starting the installation for the first time with your own hands, you need to pour water into the pumping equipment through a special hole.
Connection to water supply
To correctly connect the water supply unit to the water supply with your own hands, you must use special connecting elements called fittings. To securely fasten the pipeline to the inlet and outlet openings, a special connecting piece is attached. The pumping station is connected to the water supply system using a special insert or tee.
For high-quality water purification, in addition to the coarse filter, which is mounted at the entrance of the pipeline to the pumping station, a deep purification filter is installed at the entrance to the internal water supply system of the house. Only after this can a test run of the equipment be performed.