What is a warm window sill and how to make it with your own hands?
A warm windowsill is the dream of every romantic. You can dream while looking out the window and enjoy the comfort. Are you sure that equipping a warm window sill at home is a difficult task that only professionals can do? We hasten to disabuse everyone of this. If you have at least a little experience in construction and knowledge of which side to approach the tools from, this is something everyone can do. This article describes in detail how to make and equip an insulated window sill yourself without much effort.
What it is?
For our climate zone, where cold weather lasts for six months and strong winds are frequent guests, the technology for making a warm window sill is quite in demand. They can be installed during the construction of new houses or during the renovation of old buildings.
Reasons for installing a warm window sill:
- The need for additional heating . This issue becomes relevant in the off-season for residents of city apartments, when central heating is turned off and weather conditions may change for the worse.
- Concern for house flowers . Owners of mini-greenhouses often complain about the death of flowers in winter. The reason is non-compliance with the temperature regime, and this does not always depend on the owner of the apartment. It is not always possible to move pots from the window to another place. In addition to the temperature range, plants must receive enough light.
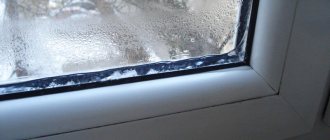
- The appearance of condensation or ice crust on the windows. Windows begin to “cry” or ice appears on them in cases where there is high humidity in the rooms due to temperature changes. This problem occurs in residential apartments, offices, warehouses and other premises. For example, in restaurants and banquet halls, where comfortable conditions must be created for visitors. Wooden furniture reacts negatively to temperature changes and high humidity.
If you feel that there is a draft coming from the window opening, the glass becomes covered with condensation in autumn and spring, and frosty patterns in winter, it’s time to think about insulation. The insulation had clearly worn out, sagged and began to let in cold air.
Water on a cold plastic window sill
In the absence of central heating, condensation often accumulates on the windows. It appears when the room is insufficiently heated and ventilation is poorly thought out. Droplets of moisture on a cold windowsill near a plastic window can more often be seen at night, because at night the temperature is lower.
To get rid of condensation, you need to ensure good air circulation and heating. It is more effective to make forced ventilation. But the natural one is also suitable if you open the window slightly at night. Install heating radiators under each window and moisture will not accumulate on the windowsill.
Call
Order windows at a profit! Until the end of the week, 30% discount on windows and balconies!
I want a discount
Advantages and disadvantages
Advantages of an electric window sill:
- Installation requires experience with electrical systems. If the master can make the electrical circuit himself, he can handle everything else.
- Organization of screeds for window sills.
- The amount of energy consumed by the system is minimal.
- Operational safety.
- A healthy microclimate is maintained in the home.
- The “bridges” of cold are completely closed.
- The windows are heated around the perimeter.
Flaws:
- If the diagram is not drawn up correctly, the system will not work. You will have to call a specialist, which will incur additional costs.
- Electromagnetic radiation remains an issue. It scares some people, others claim that humanity has been living side by side with electrical appliances for a long time, but there is nothing scary about it.
Advantages of a warm film window sill:
- This technology does not require large expenditures.
- There is nothing difficult about the work. You don’t need any special skills or knowledge to make it yourself.
- The film can be laid along the entire length of the window sill, in a separate part or along the edge (for maximum heating, cover 70% of the space with film, if the need for heat is minimal - 40% is enough).
- Even less electricity is wasted than when using an electrical circuit.
- Condensation does not form on the windows.
- The system is safe.
- Spreading throughout the house, the heat constantly dries the walls, and this helps prevent the appearance of fungus and mold on them.
Flaws:
Small electromagnetic field.
Advantages of a warm water window sill:
- The water window sill is fireproof.
- It does not require energy costs, since it is connected to the central water supply (in a private house - to a working heating system).
- The system is environmentally friendly.
- There is no electromagnetic radiation.
- Heat in the form of radiation is felt more comfortable than the operation of a radiator.
- There is no formation of ice, condensation, mold or mildew.
- The heating temperature is low (up to 50 degrees).
Flaws:
- The need to make a screed under the system.
- The problems with the mini-water system have not been canceled. If leaks form, you will have to disassemble the window sill to find the damaged area.
- Installing water window sills in an apartment will be more affordable at a price, but equipping a large house will cost a pretty penny:
- firstly, the water supply system will be more complex;
- secondly, windows in distant rooms will warm up worse (because when heat passes through the thermal contours of the window sills, some of it will be lost).
How to do it?
Procedure:
- Purchase the necessary materials, including glue and sealant.
- Level the surface on which you will attach the block. The solution will help cope with unevenness: apply it in a thin layer. For a brick wall you will need to make a concrete screed, and high-quality insulation will not hurt.
- Prepare your materials. The standard length of blocks is 1.2 meters. If the window openings are large, prepare several profiles and cut them with a knife, leaving gaps for sealing.
- Select places for the blocks: place them on the surface, mark control points with a pencil (glue will be applied to them). If you need to join several blocks, act very carefully so that you do not get uneven joints, otherwise the window block will not be able to stand firmly and evenly on this surface.
- Coat the blocks with sealant and the wall with glue. The layer of glue should be located as close as possible to the edge of the wall; it should be applied in even strips with intervals of 3-4 centimeters between them. Fill the grooves on the bottom of the blocks with glue too. Move the product to the wall and press it, make sure (using the marks) that they are in the right place.
Excess sealant that has protruded between the wall and the block must be removed before the substance dries. Press down the structure and check it with a level. Do the same with the rest of the details.
- Any gaps that arise are filled with the same sealant, and the joints are filled with sealant and glue. If you leave the gaps as they are, the wind will blow in from the street. Do not forget to press the parts and hold for a while.
- At the point where the system connects to the window frame, apply sealing tape to seal it. Apply sealant to the top.
- Install the window frame, but only after you are sure that the unit has been positioned correctly and level.
Electric
- A finished heated window sill is a PVC product that already has temperature sensors and electrical cables built into it. This is a very convenient, but expensive option. You will have to buy a step-down transformer.
- You can install an electric two-wire heating cable into the window sill, and put a covering on top (any kind - even porcelain tiles, artificial stone, ceramic tiles). Significant disadvantages: firstly, the cable consumes a lot of electricity;
- secondly, installation is expensive and requires the use of special equipment.
Related article: Concrete window sills
Water
- The effect will be best if you make a warm window sill together with a warm floor.
- Choose metal-plastic pipes (thickness D16–20), but it’s better not to buy pierced polyethylene.
- When planning the circuit, keep in mind: it should be continuous, without connections, and the return should be located parallel to the supply and next to it.
- It is advisable to install an additional circuit under the stone window sill.
- The depth of the laying is such that the layer of plaster above the pipe is at least 3 cm. Then the plaster in the place where the pipe is located will not crack.
- A reflector - penofol (thickness - 5 mm) can be attached to the entire area under the window sill using dowel nails. It will give the room more warmth.
There are several ways to insulate a window sill - choose the most convenient one at your discretion. It all depends on the material of the wall, the depth of its installation, the type of window and the initial surface treatment. Go for it - and you will succeed!
Installation
Warm window sill slabs are an expensive pleasure, unless they are made by hand.
The easiest way is the method of installing “warm” floors, but you will need to create a window sill. There are several technologies. We are not talking about a heat source here. The essence of the question is this: will the window sill itself act as a heater, or will a base be installed underneath it.
A simple solution is to equip the load-bearing base with a heater, and form 1-2 convection grilles in the window sill. A more complex and labor-intensive, but no less effective (and maybe more) design is a concrete block with heating elements (heating elements or water pipes).
Preparation of materials and tools
To install the heating device, you may need the following tools and materials:
- grinder (angle grinder) with a set;
- hammer drill and various attachments (chipper, mixer);
- welded metal mesh;
- foil isolon;
- adhesive solution (tile adhesive or the like);
- cement with sand (for a monolithic concrete window sill);
- copper tube (for water coolant);
- heating elements (for electrical devices);
- materials for creating molding formwork, etc.
Step by step process
Let's consider two main methods of installing heating. Let's start by arranging the base on which the window sill with convection grilles will be attached.
Water coolant
Approximate installation
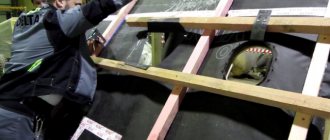
- Before installing the heating, the base should be prepared. To do this, use a hammer drill to deepen it by 5-6 cm.
- Formwork is formed from the side of the room with a height of 2-3 cm: two slopes, the bottom of the window block and a wooden board make up a container, which will later be filled with screed.
- Foil-coated isolon is placed in it with the foil facing up.
- A screed about 1 cm thick is poured.
- Foil is placed on it, on which heating elements (electric or water) are placed. They must be fixed in any convenient way (glue, screws, etc.), the main thing is not to damage them.
- Everything is filled with cement mortar.
After the solution has hardened, the window sill is attached to the resulting base. Products with high thermal insulation properties, for example, polyurethane foam, cannot be used as a binder.
The resulting device is connected to a heat source. If water is used as a coolant, the heater must be equipped with shut-off valves and a Mayevsky valve. When installing an electrical system, you need a step-down transformer, a control unit and a protection system.
Video about another installation option:
Approximate order of work
The simplest design solution is to form a concrete slab with heating elements or water pipes placed inside.
Heater from scratch
- A form is being prepared for pouring a concrete slab. A plywood sheet of suitable shape is selected in accordance with the required dimensions. It is better to choose high-quality plywood with a smooth surface. This will avoid the finishing putty step. Sidewalls sufficient to pour a layer of concrete of the required thickness are attached to it.
- In the resulting form, a small-diameter copper water pipe or electric heating wire is laid at a distance of at least 1 cm from the plywood. You can attach these elements in any convenient way. For pipes, fastening for polypropylene tubes is used.
- A metal welded reinforcing mesh is placed on top of the heating elements. You can attach it to a binding wire or plastic ties.
- The pipes must be equipped with a Mayevsky tap and other fittings.
- A concrete solution is prepared for pouring: the ratio of materials is maintained in accordance with the brand of Portland cement.
- Concrete hardens within one day, and gains strength after 2 days.
- The rough window sill is ready, we move on to finishing it. The corners are rounded with a sanding machine. If necessary, when there are defects on the front side, the surface should be puttied.
- It is coated with paint and installed in place.
- Connect to power supply or heating
Heated window sills
This topic has 48 replies, 19 participants, last updated by Sergey Fyd 21 Dec'18 at 07:49.
Good day! In my newly built house, I plan to heat the first floor with water-heated floors, without radiators. There is a fear that condensation will appear on the windows. The idea arose to install electric heating under the window sills so that the flow of heat would prevent the appearance of moisture on the windows. Does anyone have experience using such a system, or something similar.
- Robin
There is such a system:
But the toad is strangling money to pay for electricity, and I have as many as 16 windows)
In my opinion, fears about condensation on windows are exaggerated. And even if such condensation appears, it should be treated not therapeutically (window sills) but surgically (ventilation). For you yourself live in dampness, the windows - God be with them.
Therefore, I consider warm window sills “a waste of money”
I have one window made like this, to which the kitchen countertop will be adjacent. That is, there is no point in installing a radiator there, so I decided to get out of the situation this way.
It is planned to tile the window sill on top.
Something similar is a radiator. There are examples.
Baba Gulya
Does it work all the time? At what outside temperature does condensation begin to form?
Something similar is a radiator. There are examples.
I just want to get by with a warm floor, but heating the window sill could work instead of a radiator. To save electricity, you can only turn it on in cold weather.
...decided to get out of the situation in this way.
It is planned to tile the window sill on top.
This system has already been launched, is there any risk of airing the pipe in the window sill?
This system has already been launched, is there any risk of airing the pipe in the window sill?
This is the second year already. Ugh three times, I don’t see any airing.
- Timiryazevo
I also want to do this, only with the help of a self-regulating heating cable. It turns out that the length of the cable for the window is 4 m, if you take 40 watts. then it will be 160 watts. for every window. I'm thinking of putting a cable, a small tie on top and a window sill. But is it enough to heat through a plastic window sill?
That’s what I’m talking about, I need feedback from people who use such a system.
- Timiryazevo
I have three meters of cable like this, only 30W, I need to find a piece of the window sill and conduct an experiment.)
So, ideally, pour the cable into a screed and cover it with a window sill, is this possible? or just cover it with a window sill? I'll ask if anyone has one!
- Timiryazevo
I found a solution on the Internet: they stuck the cable into the voids in the window sill and filled it there with a liquid solution, and then installed the window sill in place. I need to try to do this, I’m looking for a piece of the window sill)
- Bogashevo
A self-regulating cable has one drawback - a short circuit. I have a heated water pipe. A large pipe made of energyflex, or as it is called, in short, insulation. There is a plastic pipe with water running through it. A piece of cable was inserted into it, the end of which was insulated with sealant and electrical tape. It stood well for two winters, and spent the fall at the insulated end. I trimmed a couple of centimeters and insulated it with electrical tape. It's worth the winter.
What am I talking about - if it shortens in the solution, then you will have to change the window sill with all the ensuing consequences.
- Moscow
What am I talking about - if it shortens in the solution, then you will have to change the window sill with all the ensuing consequences.
bring the end under the end cap of the window sill)
I have one window made like this, to which the kitchen countertop will be adjacent. That is, there is no point in installing a radiator there, so I decided to get out of the situation this way.
It is planned to tile the window sill on top.
I want to implement a couple of windows like yours, could you tell me in more detail how you did it, preferably with a photo, and a photo of the final result.
I see the thinness of the heat-insulating layer in the photo.
What about the flowers? they will bend on your warm windowsill.
- Rainbow
Window and door slopes also need to be insulated.
- village of Dzerzhinskoye
On the topic of non-standard use of the heating system, I have a question, or rather, I would even like to hear your opinion and any thoughts.
There is a house-street door. Without vestibule, etc. The door is “good” with thermal breaks in the frame and door leaf. In general, I am completely satisfied, we survived the first frosts of -40 perfectly, naturally there is sweating in the box, initially the whole box was sweaty, in the morning even puddles formed near the threshold, now the humidity in the room has leveled out, and only the bottom of the box about 40 centimeters sweats.
In general, everyone understood the essence, many have encountered this, the joint is sweating. Someone installs a second door, makes a vestibule, or installs a heating cable. There is no desire to install vestibules or doors. I don't want a heating cable either.
And here is the question itself. There is a radiator heating system with a gas boiler. The system is still well accessible, I can freely crash into any point. There is a desire to make a hinge from 16mm copper or even 12 or 10mm copper, fasten it to the door frame from the inside, the whole thing will be covered with a casing, and connect to the heating system through a balancing valve.
Interested in opinions and any thoughts on this topic.
- Kaftanchikovo
It seems to me easier to make a warm floor in front of the door, under the rug.
Related article: Rain knocks on the windowsill, what to do
The flow of warm air will create a “draft” and cut off cold and dry air from humid and warm air, plus it will heat the door, and it will be convenient to dry shoes there.
PS Well, or a felt curtain in front of the door.
PPS at a low coolant temperature (and in a gas boiler it is unlikely to be more than +70) and low coolant speed - there is a possibility of the circuit freezing in severe frosts. Those. Electricity is better anyway.
- village of Dzerzhinskoye
In terms of simplicity, the option of making a loop around the box is really easier for me than cutting the floor. The door casing has not yet been installed. And the heating system works with coolant up to +80 on the supply.
“Warm window sill”: how does it help get rid of drafts and condensation on the windows?
It would seem that the window frame and double-glazed windows are installed flawlessly, the seal is of high quality, the joints are securely sealed, but in the window area you still feel a cold “blow” and the glass becomes covered with condensation. What is the reason?
And the reason lies in the window sill, which becomes a conductor of cold into the room. However, competent developers, learned from the experience of others, are aware of this problem and take appropriate measures in advance.
To heat window sills in private houses, taps are made from the water heating system with a pipe laid over the wall under the window; — they stretch the electrical cable here; — install a heating film (including along slopes), used in infrared heated floors.
An in-floor convector is built into the window sill
There are also options such as installing a perforated window sill so that the air from the radiator can freely rise to the glass; embedding an in-floor electric convector into it, creating a thermal curtain near the window; or even point integration of heating sleeves into the window sill.
It must be said that water heating is tied to the operation of the heating system, while electric heating depends on the stability of the energy supply, requires sufficient allocated power and increases overall operating costs. A ready-made ceramic or PVC window sill with a built-in cable is not cheap in itself, and the low-voltage IR system, being the most economical in terms of energy consumption, needs to be equipped with a step-down transformer or converter. In a word, although with varying degrees of costs, the problem is solved one way or another. However, today you can deal with it in a much simpler, more effective and financially less burdensome way.
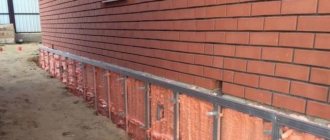
Warm window sill on a polystyrene cushion
The essence of the technology is to seal the joint between the window sill and the partition on which it rests - this is the weakest point in the sealed window contour, becoming an area for cold air to penetrate into the house and heat to leak out of it. Moreover, even heating the window sill is not able to prevent air from blowing under it.
This solution is based on a special block of polystyrene foam, which serves as a kind of pillow for the window sill. It forms a strong, load-resistant, stable base, which also provides high-quality hydro- and thermal insulation of all joints in the area of the window slab from inside the room and from the ebb - from the outside. Plus, installing such a cushion eliminates the need to level the window structure using wedges during installation.
The blocks are made from extruded polystyrene foam XPS (or its cheaper variety EPS) in the form of profiled products with a standard length of 1200 mm. The material is safe, has high heat-insulating properties and is not destroyed by water, is not susceptible to rotting and other biological damage. In addition, it does not put pressure on the load-bearing support, is easily cut with a regular knife and lasts for decades. At the top of the blocks - in the area adjacent to the window structure - an expanding sealing tape is laid, which ensures complete tightness of the connection.
Expanded polystyrene blocks-pillows are “compatible” with windows made of any materials (wood, PVC, aluminum), however, each type is designed for use with certain profile systems, and this circumstance is important to take into account when choosing products
Installation
Installation of pillow blocks is simple, but requires special care, since any carelessly made joints here will negate the idea itself. First, you need to level the upper plane of the wall with plaster (or screed if the wall is brick), be sure to check the horizontal level, and then apply a layer of water- and frost-resistant insulation to the surface. Next, the pillow is cut to size (as a rule, it has to be spliced together from several elements of a polystyrene profile), tried on, and appropriate markings are made on the base. In this case, small gaps must be left along the edges of the opening for subsequent filling with sealant.
When working with expanded polystyrene, you should use specialized compounds that do not contain components that destroy this material (toluene, acetone, etc.) and are designed to fix it to a specific type of base
A special polystyrene foam adhesive is applied to the wall surface along the outline line of the block and into the grooves on the back side of the block itself, put it in place and pressed well. If the pillow is prefabricated, after installing all the elements, the joints between them are carefully sealed with the same compound, making sure that the seams are absolutely even, otherwise the frame will not fit tightly on them, and this is already a flaw in the sealing contour. Excess glue should be removed immediately before it has time to harden.
Finally, the gaps between the side walls of the opening and the finished block must be carefully foamed and, after making sure that it is installed correctly and evenly, you can begin installing the window frame, window sill and ebb.
The “warm window sill” technology based on polystyrene profiles produced by illbruck and Klinar is already used by many window companies operating in our market. When preparing to order a window, ask whether the company you choose offers such an insulation system
Warm window sill. Kinds
When a customer says that he would like to see warm window sills in the design of his house, the architect always finds out exactly what system he has in mind. After all, “warm window sills” are often called both warm electric window sills, inside of which heating elements are installed, and a warm water window sill, heated with constantly circulating hot water. Both of these innovative systems, as well as an infrared warm window sill with heating film, are an ideal way out of the situation if for some reason it is impossible to install heated floors or warm baseboards in the room. They can quickly heat a room to the desired temperature, they can be controlled using a remote control, and even via SMS message if you want to turn on the heating while away from home.
Warm electric window sills create a fairly significant load on the electrical wiring in the house, so before installing such systems you need to make sure that the wiring can withstand their frequent use. In order to install a warm water window sill, you need to create a whole web of copper pipes, the beginning of which cuts into the central heating system. An infrared warm window sill with a heating film also uses a certain amount of energy. All three of these options are unprofitable in an economic sense, since their operation will be accompanied by hefty utility bills.
The fourth type of warm window sills, the installation of which will be discussed further, is the patented “Warm Window Sill” system. Its essence is to install a window structure that will be absolutely airtight and due to this, the heat that is inside the house will not get outside, and the cold and wind will not have the opportunity to get inside. When this system hit the market, its popularity immediately became enormous. Today, almost all construction companies use it and recommend it to their clients as the most financially profitable type of warm window sills.
Everyone knows that most often the cold enters the room precisely because of improper installation of windows. There is always a draft under the window sills; the areas of the wall under them are most often exposed to dampness. Even warm electric window sills and a warm water window sill are not able to stop the flow of cold air that seeps between them and the surface of the wall on which they are installed.
Thus, a lot of heat, and with it your money, goes to heating the street. Thanks to the innovative “Warm Window Sill” system, this problem is now completely solvable. If you use it for all the windows in your home, its thermal efficiency will rise by several points at once.