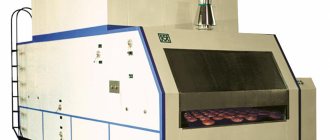
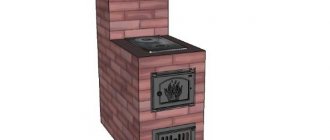
Why is it needed?
The heating panel is a heat exchanger attached to the stove, made of brick. It is sometimes called the riser or furnace casing. Passing through it, hot flue gases heat the walls, which retain heat for a long time and transfer it to the surrounding air. The heat shield for a metal furnace increases the efficiency of the furnace and has the following advantages:
- Heats up the house much faster.
- Easy to do yourself.
- Allows the stove to store heat for a long time.
Manufacturing a heating shield for a metal stove allows its parameters to be brought closer to those of a brick stove. This design maintains the temperature required for high-quality heating of the room for a long time and allows saving fuel consumption. Its construction is the best option, combining the advantages of a metal stove and a brick stove.
Heating shield - introduction
To make the description of the heating panel more understandable, let’s imagine a couple of common situations. For example, you bought and installed a beautiful metal stove - a fireplace - in your home. Option two: you use a hob made of brick. In both cases, it is noticeable from the heating of the chimney that the lion's share of the heat from burning wood literally flies out into the chimney. So, heating panels are designed to retain this heat and direct it to heat the house.
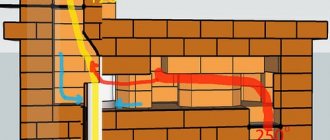
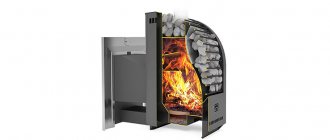
In fact, a brick shield is a kind of gas-air heat exchanger that can be attached to a furnace of any design. It is considered gas-air because it takes heat from the flue gases, heats itself up, and then transfers it to the air in the room. Externally, the structure resembles part of a straight or angular thick wall made of brick. Inside this wall there are vertical and horizontal channels through which combustion products move from the firebox of the stove or fireplace. The natural draft of the chimney encourages them to move.
Passing all the way through the passages inside the shield, the flue gases inevitably cool down, giving off heat to the brick walls. And if their initial temperature could reach 300 °C, then at the exit to the vertical chimney channel it will be approximately 150 °C. In addition, the heated body of the shield has considerable heat capacity and cools down for a long time after the stove goes out, continuing to release heat into the room.
So, a heating panel for a metal stove or hob is a brick extension designed to increase the efficiency of using the thermal energy released when burning wood and coal.
What devices is the shield used for?
The two most common situations are:
- Purchase of a metal stove, which is also a fireplace.
- Using a brick cooker.
Also, a brick panel is in demand among residents of country houses in which Swedish Zhirnov stoves are installed. Outwardly, they resemble a fireplace, but structurally they consist of a firebox and a hob: most of the heat is spent on heating, a small part - on cooking.
Fehringer ovens are also in most cases equipped with a brick wall, which increases their productivity.
If the heating panel for a metal stove or brick stove is not used, then the heat obtained from the combustion of fuel literally flies out into the chimney. And if it is present, the heat is retained, which allows you to warm the room.
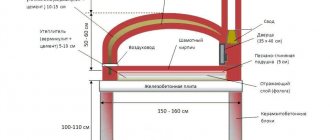
Stove with panel for space heating
The heat shield, which looks like a thick brick wall, can be compared to a gas-air heat exchanger, which is attached to any furnace in order to increase its operating efficiency. Gas flows, under the influence of chimney draft, move through vertical and horizontal channels inside the wall.
The operating principle of this device is based on heat extraction from flue gases. As a result, the brick structure heats itself and then heats the air in the room. Due to the heat capacity of the material, the wall cools down for a long time and continues to give off heat after the fuel burns out.
As a rule, the shield is not equipped with its own combustion chamber, playing the role of only an additional element. But sometimes the design provides for the presence of a firebox.
General purpose of the heating panel
Before talking about how the heating panel should be laid, it is necessary to describe in more detail where this element is used. As you know, one of the main advantages of standard cooking stoves and potbelly stoves made of steel and cast iron is their small and convenient size (for more details: “Do-it-yourself potbelly stove - manufacturing options”). However, there is also a negative side to this: the working surface is very small, which is quite inconvenient. Moreover, it is also important to remember the operating temperature of these devices, which is usually very high (at least 300 °C). Due to the large value of this parameter, there is a serious risk of fire, so the need for careful insulation of the chimney pipe is extremely urgent. And if this procedure is carried out incorrectly, then heat will be lost in large volumes, which will certainly affect the efficiency of the equipment. In order to solve the problem of heat loss, you can use one of the two most effective methods:
- Direct the heat energy produced during the combustion process to heat the heat exchange element. In practice, this method is implemented, as a rule, by installing a water heating system, where the coolant can circulate either naturally or using a pump. But, using this method, you should carefully monitor the temperature, since if the water freezes, the heating circuit pipes will simply rupture and the entire system will become unusable.
- To avoid this, you can use the following method: build an element such as a stove with a heating shield. In this case, combustion products will pass through a chimney built into a brick wall, and heat loss will be significantly reduced (pro
Conclusion
The role played by the brick shield is very important. This device allows you to increase the efficiency of stove heating when operating stoves of various types:
- iron stove-fireplace;
- stone oven;
- a simple potbelly stove, the efficiency of which usually does not exceed 30-40%.
When using a brick wall with air ducts inside, you have the opportunity to reduce wood consumption several times, ensuring proper heating in the room.
If for various reasons you were interested in the nuances of the stove business, then you probably came across such a concept as a brick heating panel. It is not always possible to understand from the name what kind of building it is and what purpose it is intended for. You can find answers to these and other questions in this article; the varieties of such brick structures will also be described here. For those who want to lay them out with their own hands, we will present some diagrams of heating panels and give a number of useful recommendations for their construction.
Types and designs of shields
According to the internal structure, these structures are of 2 types:
- channel: in the body of the shield there is a developed network of gas ducts, which consists of several vertical channels connected to each other. Before exiting, the gases make a tortuous path along these passages, intensely giving off heat;
- bell-shaped: such a shield for a cast-iron stove or stove has one or two chambers with horizontal arches, where hot gases are retained until they cool down. Only after this can they enter the vertical channel and go down the chimney.
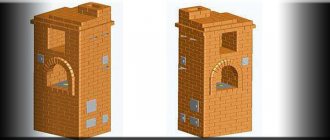
Duct-type heaters are structurally simpler, and therefore easier to fold. Bell shields are more efficient in terms of heat removal, but their design is much more complicated. It is not recommended for beginners to undertake their construction; the hand of a master is needed here. For independent construction, we present you with drawings and sections of a simple duct-type heating panel with three vertical gas ducts:
In order for our heating and cooking stove to be used in the summer for cooking, the design provides for switching the smoke circulation to the summer mode. The transition is carried out using three valves built into the gas ducts. In addition, in the upper part of the structure there is an exhaust ventilation shaft to organize air exchange in the room. To avoid the draft tipping over in strong winds, a grate with a check valve is installed at the shaft exit.
The following diagram shown below shows a metal cooktop with a bell-type heating hood. As you can see, here the gases, after leaving the furnace firebox, enter a chamber with a vault, from which 2 channels lead.
Since the only way to move from the chamber is downward, high-temperature combustion products are retained under the roof until they cool down. Then they become heavier and, according to the law of convection, leave the chamber space. In this case, to increase efficiency, the furnace with a heating shield is equipped with tubular heaters located inside the flues.
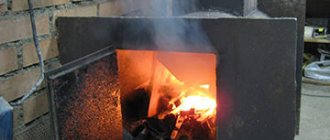
Note. As a rule, heating panels are designed as simple heat exchangers and do not have their own combustion chamber. But there are also structures whose design provides for the installation of a small firebox, as can be seen in the photo:
Firebox, shield and chimney
The main differences from a solid fuel stove are a more powerful firebox and the absence of a pass (smoke tooth) in the firebox. The tooth traps hot gases under the hob, which in a summer stove allows you to reduce fuel consumption for cooking. In the rough it is not needed, because excess heat will be used for heating.
A rough stove should have a more powerful firebox because the shield provides additional resistance to the flow of flue gases. A chimney with increased draft will not help here: the gases in the shield will immediately expand and cool. Their thermal energy will turn into mechanical energy, which will successfully fly out into the chimney. Figuratively speaking, a firebox with a chimney in a stove with a shield operates on the push-pull principle, and “push” here is a firebox of greater power. This explains the special requirements for the firebox and stove fittings, see below.
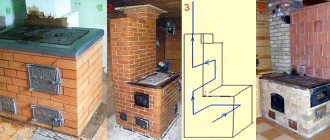
Depending on the purpose of rough heating shields, they are made of different types. Diagrams of heating panels for furnaces are shown in Fig. below; The fuel part is shown conditionally everywhere.
Schemes of heating panels for stoves
- Sequential stroke with short vertical channels. The least material-intensive and easiest to build. The resistance to gas flow is greatest. The compactness and thermal efficiency of the stove are average. The most commonly used scheme;
- Sequential stroke with horizontal channels. The dimensions and weight of the oven are the same as before. case, but building a shield with horizontal channels is much more difficult. Gas flow resistance approx. 1.5 times less. As a result, the thermal efficiency of the furnace is higher. It is possible to install a bed, i.e. the upper channel does not heat up much;
- Sequential stroke with long vertical channels. Thermal efficiency is the same as that of a shield with horizontal channels, the technological complexity is the same as that of a shield with short vertical channels. It occupies the smallest area, but requires a lot of materials and a good foundation (see below) due to the high specific pressure on the support. The best option for a home heating stove for 2-3 rooms, see below;
- Parallel move. Highest thermal efficiency, lowest weight per unit of thermal power. The occupied area and technological complexity are the greatest. Can be used with a reduced power firebox. Optimal for adding to an existing slab without altering it.
Note: there are also series-parallel or chessboard shields. The most complex, but also the lightest, have the least resistance to the flow of gases. The only possible option for roughing in a house with a heated attic, see below.
Classification
Thermal shields are divided according to several features:
- Wall thickness;
- Design or installation features;
- Configurations
Each of the above features divides the design into several more types. For example, the thickness of the walls can be either half a brick or a quarter. The first method is perfect for those who want to work with the stove for a long time and not be afraid of fire during prolonged use. In structures with thin quarter-brick walls, the main feature is that they cool much faster.
It is important! Creating this type of heating panel requires caution, compliance with fire prevention rules, and, most importantly, additional costs for a metal casing and a waterproofing system for the foundation.
Design and installation features also have their own divisions. There are two main types of structures: bell and channel types. In the first case, one or two surfaces are combined according to the cap principle using channels. The operating principle of this design is simple. The hot air will remain in the upper part of the structure until it begins to cool. After the air in the hood cools, other hot air will take its place.
Don't miss: How not to make a mistake when choosing a heating collector
Bell-type structures are characterized by low flammability
The channel type is simpler than the bell type. This case implies the same diameter in the pipe and the presence of jumpers in certain places of the structure, which allow you to regulate the heating or cooling of the surface.
The configuration of the shield is divided into straight and angular. Each configuration has its own advantages and disadvantages that affect the functionality of the shield. However, it has been noted that the corner design is used much less frequently than the straight type. This may be due to the fact that the corner structure is more difficult to construct. At the same time, it can save space, which will be an excellent solution if the room in which the shield is located is small.
Classification of heating and cooking stoves
Furnaces of this type are divided by material. They come in both brick and metal. In addition, there is their classification according to the method of application:
- stationary structures - they are built or placed at the place of use once and for all without the possibility of changing location;
- transportable stoves – can be transported by means of transport in a non-disassembled form;
- mobile structures - have a compact size and can be collapsible. Available for transportation in the luggage compartment, and even in bags. They can work without special equipment.
The cooking surface plays an important role in the functions of the stove. On the one hand, it must be designed so that heat loss is minimal, but, on the other hand, it must heat the dishes as much as possible
The best option for constructing the surface is cast iron. A solid stove will be used to heat food, and cooking and frying will be done on a burner with removable inserts.
Advantages
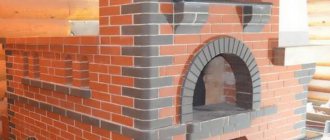
Despite the fact that the modern world involves the use of high-tech devices and buildings, a simple heating panel does not lose its popularity. According to the basic principle, not only stoves are built in private homes, but also fireplaces are created, which are both a heating and a decorative element of the home.
It is important! By choosing the right type of heat shield, you can profitably save time and money that would have been spent on creating a full-fledged classic stove. In this case, it is important to take into account the size of the room, surface requirements, expected duration of use, etc.
The masonry of a simple shield is much lighter than stove masonry; in addition, in some cases, the structure warms the room much better and retains heat for a long period of time.
In addition to the above positive aspects, there is one more, no less important. The compactness of the shield provides great opportunities in large and small rooms. If installed correctly, you won't have to worry about any problems that might arise with the stove. The designs are mostly simple and will be understandable even to beginners in this matter. The main thing is to choose high-quality materials and carefully study the instructions.
The compact shield will fit perfectly into the interior of any room
You can even cook on such a surface later, since it is possible to equip the cast-iron surface with special burners. There are many more advantages than disadvantages, and an equally important aspect of the issue is the ease of self-distribution. You can make such a design yourself, the main thing is not to try to do it yourself, since any mistake can cause significant harm in the future.
Requirements for the arrangement of shields
It is important to remember the strength of the foundation and its high-quality waterproofing (for example, with a layer of roofing felt). This will prevent moisture from getting on the shield.
It is also necessary to strictly take into account all fire safety requirements.
To prevent the formation of excessive condensed moisture and reduce draft, it is necessary to control the maximum temperature of the exhaust smoke, which should be no more than 120 degrees.
Features of materials
It is better to build the chimney wall from smooth and chip-free brick. All joints between rows, all seams must be properly and evenly sealed with mortar. The solution that has fallen down the unit should be removed from there through special openings to clean the oven.
The ideal size for laying the shield is considered to be half a brick in size, which prevents it from cooling quickly.
To build the shield, it is permissible to use ordinary brick. The only condition is that it should not be hollow. It is better to seal the seams between layers of brick not with cement mortar, which is not adapted to the influence of high temperatures, but with a clay mass.
A correctly folded heating shield increases the efficiency of the stove from 30% to approximately 65%.
Features of the order of the brick shield
When installing the heating panel, the installation must be done with your own hands, subject to the following standards:
- The optimal solution would be to lay bricks in half size. If the brick heating panel is arranged in quarters, the unit will cool down faster than necessary. Moreover, such weak structures require mandatory equipping with a layer of metal that can prevent the element from catching fire;
- the maximum temperature that the combustion products must have at the outlet is 100 – 120 °C. If this parameter is lower, this is fraught with a significant decrease in thrust and the appearance of a large layer of condensate;
- the design of the heating panel includes valves, with the help of which it is possible to control the loss of heat, which is especially important in the cold season, when warm air quickly leaves the room;
- a brick heating panel is made of standard brick, the main thing is that the material is not hollow, since the thermal insulation achieved by installing bricks with voids is not required in this case;
- the solution used for ordering should only be clay, since the traditional cement-based mixture does not tolerate high temperatures;
- In order to prevent moisture from getting into the shield, it needs to be insulated with waterproofing material in the area of the foundation. For these purposes, it is quite possible to use ordinary roofing felt.
Recommendations for masonry
For laying the shield, only medium-fat clay with admixtures of sand is used
To fold a brick panel for a metal stove in a bathhouse or house, you need to follow the recommendations:
- The solution should only be clay-based. Cement cannot be used.
- During laying, you must immediately remove any remaining mixture from the inside of the structure.
- Construction must begin with the installation of the foundation. It must be separate, not connected to the foundation of the house. First, the brick is laid dry to check the horizontal position. After checking all the parameters, the foundation is secured with mortar.
- To limit the draft of smoke, you need to install a gate valve at the top of the structure.
The first two rows are laid out blank, there are no smoke channels in them. This is necessary in accordance with fire safety requirements.
Order
Doors should be installed on the brick panel for cleaning the channels from soot
The order of the bell-type heating shield is as follows:
- Rows from the first to the third are laid out in the standard way. In the third row, it is necessary to leave an empty space in which the fire door will be installed.
- On the fourth and fifth rows, a vent and a door for cleaning are mounted, and two plugs are installed here.
- In the sixth row, they begin to gradually reduce the number of channels, and a heating tank is installed.
- The seventh row is intended for mounting the grille. In order for it to be securely fixed, you need to cut off all the bricks that may interfere. The channel is closed to allow two further branches to be made.
- The eighth row is designed for installing two doors.
- On the ninth and tenth, a steel strip tab is placed.
- The next stage is the execution of door overlaps. On top they should be lubricated with a clay solution.
- A cast iron stove is installed on the twelfth row.
- On the sixteenth tier, you need to cut off the bricks in the area of the right corner, and on the nineteenth, a valve is installed.
- The twenty-second row is reserved for mounting the shield and samovar.
- To expand on the thirty-first row, the bricks are cut together, and at the next stage a ventilation grill is installed.
The order in all cases is individual, but is based on the same principles.
How to make a heating shield for a metal stove with your own hands
Today, stores offer a huge selection of all kinds of heat-storage structures, but making a shield with your own hands is not at all difficult.
To build a shield with our own hands, we will need the following tools::
The following materials will be needed:
- refractory bricks (the quantity must be selected in accordance with the size of the heating shield you want);
- clay;
- sand;
- waterproofing roofing felt;
- special cleaning doors;
- grate for ventilation;
- several smoke bridges.
Installation safety rules
A wooden wall needs an additional layer of brick to prevent ignition.
The laying of panels for a metal stove is subject to increased fire safety requirements. The shield must be laid out on a separate foundation. It is pre-waterproofed.
To eliminate the risk of fire, the first two rows are made blind - they do not have holes for smoke ducts.
Before installing the structure, you need to make a fireproof finish. If the shield is adjacent to a wall made of flammable material, you need to lay the partition separately in brick. If the material is non-flammable, the masonry is made of half a brick. Particular attention is paid to the corner stove; here you need to make cuts between the wall and the structure on both sides. If the shield is thin-walled, it is recommended to upholster it with sheets of metal, since the wall warms up completely.
Stages of work
Before starting work, you must purchase a pick, plumb lines, a ruler, a level, a tape measure and a square, a cord, a hammer and a combination trowel, which is used to remove excess mortar.
The material for constructing a standard heating panel and fittings will require fire bricks (about 310 pieces), about 6 buckets of clay and about 4 buckets of sand, 1.5 meters of waterproofing roofing felt, 3 special cleaning doors, a 20-centimeter grille for ventilation and 3 pieces of valves (smoke) measuring 13x13 cm.
As mentioned above, the shields are erected on the foundation. Therefore, the process begins with the arrangement and waterproofing of the base.
Construction of the foundation
The solution in the foundation is leveled using a level, without reaching approximately 10 cm from the floor. A brick is placed on the dried layer, the base of the structure is treated with waterproofing material, and the outline of the unit is outlined. Then a second layer of brick is laid, finally comparing it with the floor level.
Don't miss: Do-it-yourself heat exchangers - how to make plate, water, pipe-in-pipe, air, drawings
The basic algorithm for laying the foundation is the same for arranging a heating panel of any configuration.
Laying a shield without an autonomous firebox
- Row 1 – completely lined with bricks.
- The 2nd and 3rd rows are laid following the order.
- At the level of the 4th row, 2 clearings are installed and a window is left among the bricks for further connection with the shield.
- On the 5th row, the same work is done, but attention is also paid to bandaging the seams of the stove. The 6th row is placed, not forgetting to leave 2 channels.
- Starting from the 7th, including all remaining odd rows (up to the 25th), lay out the bricks in order, leaving 3 channels.
- Starting from the 8th and including all even rows, they act strictly according to the order scheme.
- At the level of the 10th, 11th, 17th, 23rd and 24th rows, a different masonry is used, which ensures a stronger connection of seams.
- In the 10th, 18th and 24th rows, do not forget to put the valve on the right.
- At the level of the 21st and 22nd layers, a samovar is installed, which will be blocked on the 27th row, which combines the 2 left channels into one common one.
- A reliable latch is placed on the 28th layer, and the 29th is laid out in accordance with the order, not forgetting about the dressing.
- On the 30th row, the channel on the left is blocked, and the valve is reinstalled.
- The 31st and 32nd rows should provide ligation of seams and overlap with a thickness of 3 rows.
- The levels of the 33rd, 34th and 35th layers are laid based on the order, and on the final - 36th row, care must be taken to leave channels (ventilation with smoke).
Arrangement of the shield with an autonomous firebox
This scheme is more complex and provides for the possibility of separate combustion of the shield and the stove. Here you will also need much more material than with a simplified version of the shield.
After the foundation is securely installed, the first two layers are laid, following the ordering pattern. 3rd row - similar, but with an ash pan, which is needed for the firebox.
- The 4th layer is quite important: 2 valves are installed here (for winter and summer), as well as doors (blowing and cleaning) in the amount of 4 pieces. Similarly on the 5th row, but here they additionally bandage the seams.
- On the 6th level they install an oven with a water-heating box, and also reduce the size of the channels and block the doors.
- On the 8th layer, doors are installed: a large one for the stove and a small one for the shield.
- The 9th and 10th rows are laid according to the diagram, but on the 10th row a steel seal is laid over the oven structure.
- On the 11th row, the upper edge of the oven is smeared with clay, and the doors are also blocked.
- The final row is the 12th, serves to strengthen the frame and install cast iron flooring.
The need to heat rooms around the clock prompted the creation, instead of a standard potbelly stove, of a highly efficient heating panel that has excellent heat capacity and guarantees comfort both when preparing food and when staying in the room.
Disadvantages of metal cooking stoves and how to fix them
- The compact dimensions of metal stoves also have a drawback - the air heat exchange surface is too small.
- In addition, gaseous combustion products have a very high temperature - from +300° degrees or more. Therefore, you have to think about fire safety and thermally insulate the chimney.
- As is known, the efficiency of stoves is inversely proportional to the temperature of the exhaust combustion waste. To prepare food, cooking units do not use all the generated thermal energy.
- In addition, such stoves usually have short chimney ducts. Therefore, they also absorb some heat.
- Such heat losses are irrational from any point of view. There is a need to minimize them. One of the most common ways to reduce the energy losses of a furnace is to equip the unit with a heating panel yourself.
What is the device
- The shield is a small brick wall attached to the stove, inside of which there is a developed chimney system.
- Such devices are almost never made with a firebox. The shield heats up thanks to the gases removed from the stove. Structurally, the wall is not capable of releasing much heat into the environment.
- There are more complex and convenient designs, the price of which is higher. They are equipped with their own small fireboxes. You can make them independent of the hob and attach them, for example, to stoves with a fireplace.
- Brick has good thermal conductivity, and most importantly, high heat capacity. Warming up when lighting the stove or cooking, it gives off heat to the room for several hours. This way you can get an analogue of a brick stove. Only simpler in design and for less money.
About wall thickness
- Thick-walled panels are laid in half a brick. They must be warmed up well beforehand. When a hob with a heating shield is used constantly, such a device is advisable. Among other things, thick-walled structures are preferable from a fire safety point of view.
- A thin-walled heating shield is placed in a quarter of a brick. To meet fire safety requirements, such structures are often covered with metal casings.
- The surface of the walls can be plastered, tiled with tiles, or, after opening the joints, left unfinished. The fireplace stove with heating panel should be covered during its installation.
- The devices can operate in two operating modes – winter and summer. In the first of them the structure is heated completely, in the second it is partially heated.
Note! When a heating panel is laid, increased fire safety requirements are applied to them. For example, the device must be built on a separate foundation. It needs to be waterproofed.
Schematic diagrams of operation Based on the principle of operation, two types of devices are distinguished. Duct shields
- Inside such a device there is a kind of labyrinth of chimneys, which have the same cross-section.
- When such heating panels are installed, they can be arranged in both horizontal and vertical partitions.
- The combustion products release thermal energy to the walls during their uniform movement along the entire length of the channels.
- In duct type devices, jumpers are often installed that bypass the chimney. They are fenced off with partitions. This is necessary so that in the summer the cooking stove does not heat the room.
In fireplace stoves, jumpers are not needed, because they are equipped with shields for greater heat transfer. A device for a powerful metal unit, for example, for Bavaria (thermal power 14 kW), should not be made without such a jumper.
Channel type shield device
In this case, a winding type chimney is always used; it is placed horizontally or vertically, depending on the design of the stove. It is necessary to install jumpers that prevent the entire surface from heating up in the summer. The device is quite simple, so shields of this type are often built by hand.
It should be noted that both types of structures must be adjusted differently in winter and summer. This is necessary so that in the hot season you can use the stove without heating the walls (in stoves with a duct-type heating panel, you need to close the pipes where air circulates with the above-mentioned valves), and in winter, use all the capabilities of the stove with a heat-storage panel, and thus achieve the maximum possible heating.