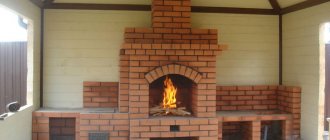
Problems when building a mini-oven with your own hands
Amateur stove makers, due to inexperience, make mistakes, which then lead to problems. Let's look at the most common cases:
- Laying stoves with deviations from the design. As a result, there is no normal draft in the smoke ducts, and the walls heat up unevenly. The solution to the problem will be to disassemble the stove and lay it according to proven schemes.
- Laying stoves “by eye”, without using a level, frame, plumb lines, or rules. The device warps, the center of gravity shifts, and during operation the device collapses faster.
- Incorrect preparation of the solution. The masonry is cracking and crumbling. A temporary solution to the problem is to purchase a factory-made mixture and seal the cracks with a new solution. If the masonry cracks constantly and deeply, the stove will have to be moved.
- Firebox of a freshly built and wet device. This will lead to cracking of the masonry, which will need to be covered with mortar.
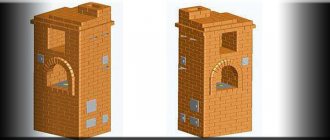
Types of furnaces
Based on the principle of operation, there are several types of brick kilns:
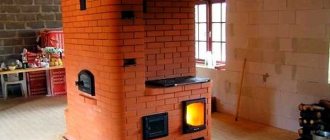
Russian – Large and multifunctional. It has an open firebox, which is closed with a damper; the chimney runs along all the walls of the stove. In addition to heating, you can cook any food in a Russian stove.
The disadvantage of the Russian stove is that it needs to be constantly heated, since when cooling, condensation forms in the stove, which remains on the bricks and the bricks crack the next time they are used.
Also, a Russian stove requires constant cleaning of the chimney.
Dutch - a stove with a vertical chimney. It has small dimensions and a fairly low price.
Bell-type - have wide straight channels. The smoke rises and lingers until it cools completely. Then it goes down, heating the walls of the furnace. The advantage of such furnaces is their low cost, simple design, and fast heating.
Possible difficulties and problems
When building stove walls, inexperienced craftsmen do not use a frame made of wooden beams and a plumb line, which leads to the walls deviating from the vertical.
If during the construction process a distortion of the walls is discovered, the masonry should be dismantled and repositioned.
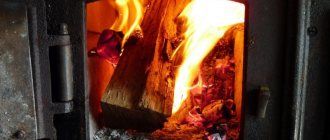
After finishing the work and natural drying, the mini-oven begins to be heated with small portions of firewood.
In this case, the stove walls become covered with cracks due to the fact that shrinkage processes are taking place in the heating structure. To eliminate cracks, dilute the solution and cover the seams.
a07ff0f2bc47417ca4e38dc4d992141a.jpe
Improper sealing of the door fasteners can cause the door to move. To avoid skewing the door, do not leave it open until the fasteners are completely sealed into the seams. If displacement is discovered during construction, the rows are dismantled and the fasteners are sealed again.
Preparation of the solution
To prepare the solution, you need to stock up on a suitable container, as well as a sieve with 3x3 mm cells. To work with the mixture you will need a shovel, a drill mixer and a small board. The solution will include water, sand and clay. The harvested water must be clean, without the smell of mold and with a minimum amount of mineral additives.
If the tap water in your area is contaminated, try to bring it in advance in the right quantity. Its volume depends on the number of bricks that the masonry will contain: for example, for every hundred there are from 15 to 20 liters of liquid. The solution requires fine sand. It is sifted through a sieve to remove pieces of crushed stone and gravel. In addition, you need to purchase high quality clay: the strength of the solution depends on it.
Preparation of the mixture begins by mixing water and clay in such proportions that the mass is not too liquid, but not too thick, homogeneous mass.
After it becomes plastic, add sifted sand in a ratio of 1 liter per bucket of water. You can check the readiness of the solution by lowering a board into it: the thickness of the mixture adhering to it should be at least 2 cm. When the desired result is achieved, stop adding sand.
Dutch oven
Dutch oven
This stove unit is perfect for small private houses, country houses and even apartments. The stove will be very useful in the absence of a centralized heating system. In addition, such a stove can be equipped with a hob and used for cooking.
It is recommended to choose a location for the stove at the stage of planning the house. But even if your house has already been built, there will be no problems with the construction of the “Dutch”.
Dutch - home decoration
The stove can be built either on a foundation or without it, but in the first case the stove will last a little longer.
The Dutch oven has a very spacious firebox. At the same time, the design is not equipped with a blower, which further distinguishes the stove in question from its analogues.
Among the important advantages of the “Dutch stove” it is necessary to include the efficiency and rationality of fuel use - in such a stove, firewood burns out much more slowly than in most other existing units.
Video - Oven with glass door
Rows 1-9
Rows 10-18
Rows 18-26
Chimney
First step. Prepare a solution of clay, water and sand. First soak the clay in water and sift the sand. Mix the ingredients in such a ratio to obtain a homogeneous mass with the consistency of sour cream. Typically, sand and clay are mixed in different quantities, and about 25% of the total volume of dry components is added to water. For the rest, focus on the characteristics of your clay.
The brick also requires preliminary preparation - it needs to be dipped in water for about a day.
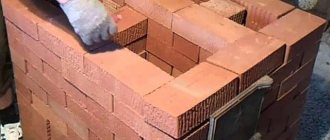
Proceed with laying the stove. Every 2-3 rows, check the evenness of the masonry with a building level.
Second step. Lay roofing felt or polyethylene on the floor. For the stove in question, you will need insulation measuring 530x780 mm. Apply a 1-centimeter layer of sifted sand onto the waterproofing and carefully level the backfill.
Third step. Place the first row on top of the sand bed. Check the evenness of the brick laying and carefully fill the entire resulting surface with mortar.
Install the ash door. Use steel wire for fastening.
Fourth step. Lay out the second row of Dutch stitches according to the order. In general, this row will not differ from the initial row.
Fifth step. Lay out the third row. Starting with it, fire-resistant bricks must be used for masonry. Place a grate on the third row.
Sixth step. Lay out the fourth row. At this stage, the bricks should be laid on edge.
At the same stage, you need to mount the door for the combustion chamber. Use steel wire to secure the doors.
Seventh step. Lay out the fifth row in the same way as the fourth, only lay the brick in the usual way, i.e. flat.
Eighth step. Lay out the sixth row. Place the brick on its edge again. Check the corners and overall evenness of the masonry.
Ninth step. Lay out the seventh row. Place the bricks flat. Place only the back wall on edge. Lay all subsequent rows of bricks flat.
Tenth step. Proceed to laying the eighth row. At this stage, the combustion door is completely closed. The inner brick (it must be fireproof) above the combustion chamber should be beveled.
Eleventh step. Lay out the ninth row offset back. Lay a moistened asbestos cord on top of this row, and then a hob. Carefully seal the joints between the brick and the slab. You can make the cooking surface square or round - whichever you prefer.
Twelfth step. Proceed to laying the tenth row. At this stage you need to lay out the base of the chimney. The “Dutch” has compact dimensions, so you should abandon the installation of a major brick chimney, opting for a metal structure.
Thirteenth step. Lay out the eleventh row and install the smoke damper. Pre-wrap the valve with asbestos cord.
Fourteenth step. Lay out the twelfth row. At this stage, form a joint between the chimney and the metal pipe.
The furnace installation is complete.
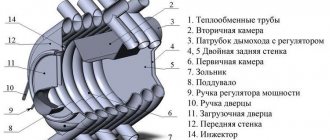
Detailed diagram of the furnace device
Finally, you just have to do the following:
- bring the smoke exhaust pipe to the required height;
- seal the joints between the floor and the stove unit using a plinth;
- plaster the "Dutch". You can also use whitewash, paint and even ceramic tiles for finishing.
Thus, independent laying of a heating and cooking stove is not such a difficult undertaking. All you have to do is follow the instructions in everything.
Heating and cooking room with fireplace
Good luck!
Read the article on our website about making a Dutch oven with your own hands.
Buslaevskaya stove: projects
projects of houses with a stove For installation you will need the following materials:
- doors - firebox (0.2x0.25 meters), VK (0.39x0.5 meters), blower (0.14x0.14 meters);
- refractory - 43 pieces;
- solid brick – 382 pieces;
- oven-cabinet 28x33x50 centimeters;
- cast iron stove 0.7x0.4 meters with burners (removable rings of different diameters);
- valves - steam exhaust (12x13 centimeters) and smoke (12x25 centimeters);
- grate - grate 30x20 centimeters;
- corner - three equal-flange blanks 1 meter long and 45x45 millimeters in size;
- steel - piece 0.3x0.28 meters;
- strip - 4 pieces of meter (4 graph paper), 0.25 meters (2 graph paper), 0.35 meters (3 graph paper);
- cast iron plate – 0.4 x 0.25 meters; 40x15 centimeters.
Projects for brick stoves of this type look like this:
- Full row.
- Blower door.
- Window opening for cleaning.
- The bottom of the oven is lined with refractory, three sides are lined with iron.
- Installation of the combustion door, grate, refractory under the firebox, cleaning cover, ash door.
- Installation of DS.
- Laying refractory on the edge around the door.
- Laying according to the scheme.
- The oven is top coated with clay (1 centimeter), the heater is covered, and a stove with burners is attached.
- Installation of smoke circulation with cleaning windows, the stove is not laid. Subsequently, the brick is placed on its edge.
- The cleaning is overlapped, channels are created, and 25-centimeter strips are laid.
- The cleaning is completed and the fastening wire is installed.
- The cap is installed.
- Installation of the VK ceiling, while the hoods remain.
- The stoves are laid out according to the diagram.
- The small stove ends in sheet iron, the masonry is done in the same order as a brick stove.
- The cleaning hole of a large stove is laid out, the edges of the side walls of the channels are cramped.
- Laying protrusions.
- The projections are duplicated and the corner is installed.
- The BP chimney is closed in the same way as row 19.
- A three-row neck is made, the size of the chimney is reduced to a section of 26x13 centimeters for the top valve.
- A chimney is created with grooves on this and subsequent rows.
Where is it more efficient and safe to place a small-sized stove?
In order for the heating stove to efficiently release heat, it is placed in the middle of a one-room dwelling or built into interior partitions. Small heating and cooking stoves are placed in the center of the kitchen or against the wall.
The heating structure will be safe if the ceiling is properly cut. A spark arrestor is placed on the chimney.
The combustion chamber is a source of increased danger. The stove is placed so that coals and sparks do not fall on walls, doorways, or furniture. If necessary, walls are protected with non-combustible materials (flat slate, ceramic tiles).
Schemes of small brick stoves
Compact stoves do not take up much space, which is especially important for small spaces. Heaters have a rectangular cross-section at the base
The height of the stoves depends on the height of the building and the chosen model. A brick chimney is often replaced with a factory-made steel pipe.
Heating and cooking mini-oven
In small stoves designed for heating the home and cooking, a niche for the stove is built in.
An oven or water heating container can be built into another niche located above the firebox. Niche space is often used for drying things.
bbf7fb962a830ba83a9417eeb9ffbf86.jpe
b906bdd2e27548d30c2db6edec3f39da.jpe
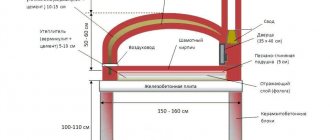
Let's consider a specific diagram of a compact stove with a base size of 0.64 x 0.51 meters (2 x 3.5 bricks) and a height of 2.15 meters (32 layers of masonry).
This heater model is designed to heat small and medium-sized houses with an area of 25 to 40 square meters. Ceramic solid (ordinary) brick is suitable for masonry.
The oven is built in the kitchen (in the middle of the room or against the wall). The furnace of this model contains the following structural elements:
- combustion chamber;
- blower;
- smoke ducts;
- hole for cleaning smoke ducts;
- hole for building a chimney;
- niche with cooking floor;
- niche for installing an oven or hot water tank.
Metal elements for the heater are purchased at a hardware store. The list of factory parts includes:
fire door measuring 20 x 20 cm (solid cast iron or with fireproof glass in a metal frame);
Photo 1. Fire door measuring 30 by 30, made of polished cast iron and fire-resistant glass. It is possible to regulate traction.
- door for the blower (14 x 14 cm);
- 2 doors for cleaning smoke ducts (20 x 14 cm);
- grate (45 x 25 cm);
- cooking floor measuring 20 x 35 cm (with or without hole);
- 2 valves;
- steel corner profile 50 cm long (attached between the firebox sheet and the stove wall);
- pre-furnace metal sheet measuring 50 x 60-70 cm.
The oven and hot water tank are welded from steel sheet. Asbestos cardboard of the same size is placed under the firebox sheet. For furnace work you will need:
- 222 units of solid red brick;
- ready-made masonry mixture for fireplaces and stoves (or a solution of sand and ordinary clay taken locally in a quarry).
Small heating device
Let's consider a specific heater circuit. The base of this model has the shape of a rectangle measuring 0.89 x 0.51 meters (2.5 by 2 bricks). The height of the stove is 2 meters 38 cm.
Compact dimensions allow the heater to be installed in a corner or in the center of the room. If the dacha has a kitchen and a couple of living rooms with a total area of up to 40 square meters, the heater is built into the wall openings (interior partitions).
The main elements of this model:
- firebox;
- blower;
- smoke channels;
- outlet to the chimney.
A door with heat-resistant glass in a metal frame or a solid cast-iron door is built into the firebox portal. The furnace is built on a solid foundation buried in the ground. The foundation is made solid or columnar.
Important! The stove is made of ceramic and fireclay bricks. The firebox is made of fireclay bricks, and the lower and upper parts of the heater are made of ceramic bricks.
The masonry is done using sand-clay and fireclay-clay mortars.
Arrangement of heating and cooking stoves
Rows 1-2. The first two rows of the heating and cooking stove with your own hands must be laid out with continuous masonry, overlapping the seams. Laying is done from red brick. At the same time, keep an eye on the horizontal, since in the future, mown areas may appear. The angles are checked on each of the rows with a square. To make the work easier, it is recommended to hook up plumb lines.
Row 3. In this row you need to start organizing the ash chamber, lower heating chamber and vertical channels. An opening is left on the front side for the door. Almost the entire stove is laid out using red refractory bricks; fireclay is needed for the ash pan and ash pit.
Row 4. In this row, the laying is carried out similarly to the previous one. Vertical channels must be combined into one.
Row 5. You need to start laying this row towards the right. The ash chamber is finished forming and the door is closed. The latter should be secured with wire. Then you can install the grate. A gap of about 10-15 mm between it and the brick is filled with sand, since the metal will expand when heated.
Row 6. At this stage, it is necessary to begin forming the furnace and oven, leaving an opening for the door on the front side. The U-shaped channel, which was formed earlier, is divided into 3 vertical ones. The chambers must be divided by a wall, which is made of fireclay bricks.
Rows 7-8. The next two rows form the combustion chamber. However, in the eighth, the third channel should be closed.
Row 9. This row is the last for the combustion chamber. Its bricks must be cut at an angle. This is necessary so that the smoke flows smoothly into the chimney and does not linger near the corners.
Row 10. To lay the inside of the tenth row of the heating and cooking furnace with your own hands, you need to prepare fireclay bricks. At this stage, close the oven door. In this case, the bricks are ground down at the same angle as in the previous row, but the partition between the oven and the furnace is no longer installed.
The horizontal level of the brickwork is checked again and a hob is installed. Under it, as well as under the grate, gaps of about 12-18 mm are made to take into account thermal expansion. A metal corner with a side of 45-50 mm is placed flush on the front side.
Row 11. In this row, you need to start forming a chamber above the hob. It is recommended to continue masonry using red brick. You can make another oven if you install a large door for the cooking chamber.
Rows 12-16. From rows 12 to 15, the walls of the cooking chamber continue to be laid out, but in the first row you can combine a pair of channels that are located on the left. Having laid the 16th row, you need to install four corners along.
Row 17. At this stage, cover the cooking chamber with brickwork, leaving a small hole, about half the size of a brick. Steam will be removed through it.
Row 18. The next row is laid out similarly to the previous one, taking into account the dressing. You need to install a metal safety corner on it, which will strengthen the base of the drying chambers. In this case, you should not block the previously left hole.
Rows 19-21. In this row, a pair of drying chambers are formed, equipped with doors, and ventilation from the cooking room. The next two rows will be laid in a similar manner.
Row 22. One of the dryers, preferably smaller in size, must be covered with an iron plate.
Rows 23-25. In the 23rd row you need to install a damper for the cooker exhaust duct. In the 24th row, the first and second vertical channels should be combined. In the 25th row you will have to make a connection between the third channel and the cooker hood.
Row 26. In this row it is necessary to cover the drying chambers with a corner. A reinforcing mesh is laid on top.
Row 27-28. The time has come to completely cover the top of the stove, while slightly expanding the perimeter of the masonry (about 3-5 cm). To remove smoke, you need to leave a 3rd channel, into which all the previous ones will converge. In the 28th row, a small side should be formed, once again increasing the perimeter of the masonry.
Click to enlarge image
Rows 29-last. In the 29th row they return to the previous perimeter. Next, you need to install a valve that blocks the chimney channel and allows you to regulate the overall draft. From the 31st row onwards, a chimney pipe is formed, leading outside.
Types of stoves
In the past, houses were built “from the stove”, that is, it was installed first, and then the walls and ceilings were erected. Nowadays, it is not necessary to do this, but it is advisable, especially when you plan to position the stove in such a way that it heats several rooms at once.
454581eb825c7405a99754f8687d5b66.jpe 9c05dcdd6e25fb34fe8fcae867d33ffb.jpe
72d6731b9b342a72d16bb6ae4cf3b6f7.jpe e1cf46657f7d139dbcb2f33aebb6bdc3.jpe
The most common types of stoves are Russian, Swedish and Dutch. At the same time, the Russian one must be erected before the construction of the house begins, and besides, it requires a separate foundation. In general, any kiln consisting of 500 bricks or more needs a foundation that is separate from the base of the building. It's easier with Dutch and Swedish ovens. They are compact, can be installed in an already constructed building and do not require an additional foundation.
There is another wood-burning stove - a bell-type stove. Its advantage is its efficiency, reaching 70% compared to 50% for other types of furnaces. The disadvantage of such a stove is its complex design, which makes it almost impossible to assemble it with your own hands. Also, the stove cannot be equipped with a hob - the design is intended exclusively for heating premises.
Swedish stoves for home
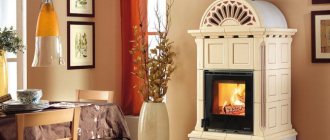
For heating a small house, the best option would be a so-called heating and cooking stove. Usually this is a Swedish oven. As part of its arrangement, a fireplace is installed. In addition, certain rules must be followed.
Assembling such a structure yourself is not at all difficult; you just need to know the basic rules of order, which will help even a beginner assemble a safe structure with his own hands.
The main advantage of a Swedish stove is the combination of its structure. That is, it is suitable not only for cooking, but also for heating small rooms. If desired, you can add other functions to such a structure, such as a niche for storing food or an oven. In addition, it may contain a stove bench or other designs of a Swedish stove.
Swedish brick oven detailed diagram
One way or another, you can assemble a Swedish oven with your own hands only from high-quality materials of high quality. Only in this case can you count on its long-term and, most importantly, safe operation. Swedish brick stove, see photos for placement options in the house.
Basic concepts for making your own brick kiln
To lay the furnace, you can contact specialists. But to save money, you can make a brick oven with your own hands. This will not be difficult even for a beginner, as it does not require special knowledge.
First you need to choose the type of stove, then find a masonry diagram. There are many DIY brick oven designs on the Internet for every taste.
After the scheme has been found, it is necessary to make a foundation. It should be slightly larger than the oven itself on each side.
The chimney is also made of brick. After completing the laying of the stove, you can line it with finishing materials to give it a beautiful look.
It is also very important to choose the correct installation location. If the stove has a cooking function, it is better to install it so that the cooking part is in the kitchen and the heating part in the living room.
What is important to consider when installing an oven in a brick oven
There are the following points:
- The iron cabinet must be blown with hot gas (i.e. smoke). To do this, during the laying process, four bricks are placed flat, the entire height of the oven.
- The fuel chamber cannot produce heat evenly, so the wall of the oven closest to it is protected by brickwork. Yes, iron is unlikely to burn out when it comes into contact with a flame, but cooking in this version will cause a lot of problems.
- Since there is a partition between the firebox and the oven, how will the cabinet be heated? It’s simple: in this very brick partition (lower part) they make a gas channel. This is how the iron element will be heated without the risk of burnout.
- The partition must also be raised 10 cm above the oven in order to successfully cover the upper part of the latter with a layer of clay.
- A cast iron stove is always placed on top of the oven. The dimensions are also maintained here: the distance from the top layer of clay on the oven to the hob should be 7-8 cm. This space should be empty.
Russian stove: drawings of brick stoves
Russian brick stoves To lay the stove you will need the following materials:
- solid red brick – 1610 pieces;
- view for a valve measuring 0.3x0.3 meters - 2 pieces;
- dry clay solution in dissolved form;
- samovar 14x14 centimeters - 1 piece;
Heating stoves for a brick house - we do it ourselves. To work, you will need the following tools:
- trowel – for laying and leveling the mortar;
- pick - a multifunctional hammer with a blade located perpendicular to the axis of the handle. At its other end there is a square windshield;
- bubble level for masonry and hydraulic for the first row;
- rule - serves to align the bricks of each row;
- plumb lines - one of them must be permanently attached to the axis of the chimney (floor), and with the help of the second the verticality of the corners is checked;
- brush – needed for grouting joints;
- cord - it is pulled over each row of masonry.
Drawings of brick stoves for any type of home look like this:
- Cooking chamber. For masonry, 3/4 ground corner bricks with locks are used.
- Under. There is a slope from the back, for the purpose of which the space is filled with sand, on which the brick is laid.
- Covering the bottom. The structure is covered with bricks along rods, corners or sheet blanks.
- Vault with a castle. In some cases a central lock is used, in others the last two symmetrical bricks are used.
- Rows to the lower arch. The bricklaying of the stove is carried out in the usual way, then a vault template assembled from chipboard or springs cut from wood are installed on top of it.
- Wells. They are tied rows in which a hole is left leading to the underside.
- Sub-bake. Bricks are laid on a foundation mortar; hollow stones are not allowed.
- VK code. For convenience, the bricks are cut into a wedge-shaped shape.
- Covering the channel above the samovar. It is solid, only solid stones are used.
- The holes above the pole become smaller. The brick is cut in accordance with the drawing.
- Alignment of walls. At the same time, the over-pipe is reduced and the samovar channel is laid.
- Installation of a samovar. The structure is closed with a separate lid.
- Installing a view. To embed the structure, two rows are laid.
- Chimney. The height of the pipe from the bottom to the top must be at least 5 meters. The upper rows form a canopy that prevents precipitation from entering the chimney.
The construction process of the Swedish
The process of constructing a Swedish stove. For the construction of the furnace, the following calculations are taken: for the stove - 71 by 41 centimeters; for the firebox (height, width, depth) 30 by 35 and 45 centimeters; for oven 30 by 35 and 50 centimeters. These dimensions may vary depending on the oven version. The metal walls for the oven must be at least 4 millimeters. The distance from the edge of the grate to the oven should be about one brick. There should be a gap of a quarter brick from the back of the oven to the firebox. The oven is made of dense cast metal.
Orders of the Shvedka stove
When the oven approaches the firebox, the walls are additionally protected with vermiculite. The door must be cast iron. It is attached to the masonry, which guarantees reliable fixation.
Before laying the brick stove, thermal insulation of the floor is done. Insulation can be made from basalt cardboard. The insulation is laid so that at the end a 1.5 centimeter layer is formed. The middle layer is made from a foil sheet. The foot of the oven (the first 2 rows) is laid out with widened centimeter seams, this creates a protrusion. The brick is moistened before laying. The next two rows form an ash pan and three doors are installed for cleaning the oven. The doors are mounted with a gap. An asbestos cord is inserted into the gaps.
| ORP Shvedka (Swedish stove) No. 3 |
With a two-layer stove made of red and fireclay bricks, a distance of 6 millimeters is made between them. The internal lining of the furnace is lined with fireclay bricks. The grate bars are inserted. And the oven is inserted into the same row. From the sixth to the ninth the combustion chamber is formed. The door is inserted. The tenth row covers the oven.
Next, the slab is laid and smoke channels are made. When laying the slab, quarters are cut out of the bricks. From the twelfth to the sixteenth, the cooking chamber and smoke exhaust channels are laid out. The next two are laid with trimmed bricks. From the twenty-first to the twenty-eighth there is a chimney. In the twenty-seventh, a valve is inserted with a basalt cord gasket in the gap. From the twenty-ninth row there is an extension for the cornice of 5 centimeters. The channels (except the pipe) are closed.
The next row is made even wider by 5 centimeters. Then the size is reduced to the original size. The pipe is laid out in 5 bricks. In front of the ceiling, 3 rows of pipes are fluffed up. The thickness of the pipe is one and a half bricks. An iron smoke cap is placed on top of the pipe. The pipe running outside the house is lined with cement mortar.
Laying the furnace in order
During masonry, special attention will have to be paid to the strength and evenness of the surface. So, there should be no excess mortar or voids in the seams, and all channels from the inside should be perfectly smooth
In this case, they bandage it into half a brick.
Swedish stove stove When laying a Swedish stove with your own hands, special attention is paid to the cross-section of the smoke channel. It must remain unchanged throughout the entire laying of the furnace.
Otherwise, even with minimal narrowing, flue gases may escape into the room.
Once the first row is ready, you can install the blower door. Further work will be carried out based on the chosen order. To form the internal space of the main elements of the furnace, including the blower, the bricks used for them are somewhat cramped. Already on the next row the doors can be closed.
50e706ce2b402c827a19ce0e27a05ae1.jpe
Advantages and disadvantages
Before deciding how to properly lay a brick wall, you need to evaluate all its advantages and problem areas.
Experts highlight the following advantages:
- compactness – base area up to 1 sq. m and height no more than 2 m;
- possibility of use both for heating and for cooking, relaxing, and drying things;
- excellent performance indicators - high efficiency and heat transfer;
- simplicity of design;
- decorative function of room decoration;
- the ability to regulate heating modes;
- efficiency of heating;
- ease of maintenance and infrequent fuel stowage.
Effective use of the Swedish stove is only possible with regular combustion processes. If the room is not heated too often, then it is necessary to dry it.
The optimal area for a heated room is considered to be 40 square meters. m. When laying a stove, you must use high-quality raw materials, and the door of the combustion chamber must be cast.
Selection of bricks and heating elements
For the construction of passages and heated elements of the furnace, refractory bricks are used. Ordinary brick is used to furnish parts that are not exposed to high temperatures. The dimensions of any type of brick are 250 mm in length, 120 in width and 65 in height. If necessary, brick blocks are broken.
Thus, a distinction is made between a three-quarter brick, the length of which is 3/4 of the whole, and a half-brick - with a length cut in half. Very small pieces of brick, equal to 1/4 of the whole, are called quarter bricks. The cutting of the material is carried out using a sharp steel knife and a squeegee - cutting a metal pipe. To build a furnace, you will also need metal elements, including:
- a door for the firebox, a door for the blower and a door for cleaning passages;
- view valve;
- grate
All listed details must be comparable to the dimensions of the brick blocks. The stove is waterproofed using roofing felt. The length of the sheets of this material depends on the dimensions of the structure. This factor determines the number of bricks. Typically, the amount of building materials needed is indicated in the project documentation or calculated individually. Knowing the number of rows, the size of the brick and the dimensions of the oven, this is done simply.
Progress of laying rows
The construction of the furnace begins with the installation of guide posts. The formwork is attached to them - a wooden box without a bottom. It is needed to ensure that the masonry is even. The formwork is designed for several rows: when they are completed, it is raised to the top. It is also used to create vaults and arches, although for this purpose semicircular formwork is used, and not in the form of a box. When the masonry is higher than the chest, you will have to work on platforms.
When everything is ready, you need to choose the ordering method for laying heating stoves and construction technology. There are two popular options for installing blocks - splice and spoon. They got their name depending on which part of the brick faces outward. There is another method - bed, when the bricks are installed on a spoon or a poke, but it is unreliable. To avoid problems, it is recommended to monitor the thickness of the seam: it should be at least 5 mm.
Laying stages
Let's take a closer look at the stages of laying a stove in a house using a Swede as an example. The first layer of brick is the most important; it is laid strictly in compliance with the level. Bricks are not placed in the place where the ash pit chamber is located. There will be a blower between the chamber and the front side of the furnace; the blocks behind it are cut at an angle to make it easier to remove the ash. A three-quarter brick is placed in front of the ash pit.
The second and third rows are placed after the ash pan is secured. Otherwise they are similar to the first
It is important that the height of the third row coincides with the height of the blower door. In the fourth row, a door is installed for cleaning the passages with your own hands, and the passages themselves are laid out directly behind it
A row of bricks from above blocks the door of the blower.
With each subsequent row, the opening of the ash pan is narrowed. A grate is installed on the fifth row of bricks. The combustion chamber door is mounted on top of the sixth row above the ash pit. It is necessary that its height coincides with the height of the ninth row.
The first ten rows are made of refractory bricks, the next superstructure is made of ordinary building material. A hob is placed on top of the bricks of the tenth row. In the next rows, the passages for the movement of heated air smoothly transform into a smoke outlet. A more detailed arrangement of the furnace is determined by the configuration and purpose of the structure.
Brickwork
By following this construction scheme, you will get an excellent heating and cooking installation, made by yourself.
The first row must be perfectly level, because the entire harmony of the future heating installation depends on this. As in other stove models, the masonry is continuous, without gaps or holes.
In the second row everything is repeated, and it is also completely filled with ceramic material. The place of the fireplace insert is laid out with sand-lime brick, and after the installation of this row is completed, the holders are attached and the fireplace grate is welded.
Blower chamber
In the 3rd row there is a blower chamber, cleaning channels and a place for an oven (if the Swede comes with an oven). Here they begin to form a vertical chimney. A fireplace fuel chamber is installed on the reverse side of the structure. Also, at the same time as the masonry, the doors tied with wire are fixed.
On the back side of the oven installation site, a corner of the brick is cut off to ensure connection with the cleaning chamber. The 4th row completely repeats the previous one, but fits into the dressing.
In the 5th row above the blower, a place for the grate is formed, but otherwise there are no differences from the previous stages. In the area of contact with open fire (grid), silicate material is used. An oven rewound with asbestos rope and a grate are also installed here.
At the next stage, the firebox door is installed. The silicate brick between the firebox and the oven must be placed on the rib part, which will contribute to better heating of the oven (the channel between it and the vertical one must be blocked here).
The 7th row is no different from the previous one, and two strips of metal are laid on top of it, which will serve as a support for further masonry.
Stages 8 and 9 are performed according to a given pattern, but in the last stage two metal strips are laid above the oven. This will help relieve the load on the supporting areas of the camera.
Hob
The 10th row is distinguished by the formation of a place for the hob, under which asbestos strips are laid. We use a corner to strengthen the area above the oven and the firebox door. On the left you need to provide a gap for the purifier door, into which you can immediately install it.
Stage 11 provides a cooking niche. The bricks to the right of the stove should bridge the gap between it and the oven wall. At level 12, the bricks that cover the firebox are cut obliquely, which helps direct the smoke in the right direction. Row 13 - according to the diagram.
Levels 14 and 15 involve the installation of a fireplace mantel. The sixteenth is covering the cooking niche with strips of steel and laying a corner on the front edge.
Until stage 19, everything is carried out according to the scheme, and then the chimney openings are formed. Doors are also installed on the cleaning channels. Then everything follows the diagram, and in rows 21 and 22 the doors are mounted on the cleaners.
23 - according to the diagram, 24 and 25 - installation of valves on the fireplace chimney. Row 26 involves installing the last door on the purifier and combining the gas outlet with a vertical channel. Next, the next two rows follow the pattern.
Levels 29 and 30 are solid masonry with all channels blocked, excluding the chimney, on which a damper is installed in the next row. From the 32nd row a chimney is formed, the height of which depends on the height of the ceiling, and the thickness should be at least half a brick.
Furnace structure
The Dutch oven is a classic wood-burning channel stove. Its operating principle is based on the circulation of hot air along passages laid in the body of the furnace.
But installing a tank for heating water will not work: this will lead to a decrease in efficiency due to the accumulation of soot in the channels. In addition, even without a tank, the efficiency of the furnace barely reaches 40%.
In turn, the “Swedish” has an efficiency of 60%. It is considered the most advanced heating and cooking oven, where the oven serves as an air chamber. In the chamber part, the combustion gases burn out, and they go into the convector heated to 800°C. The convector itself is narrow, but has a large height, due to which the house is heated evenly.
The Swede can be equipped with a heat exchanger for the hot water supply system. The storage tank is placed on the roof or in a drying niche. As a result, the efficiency does not decrease: there is no feedback energy connection between the oven and convector on the one hand and the combustion part on the other.
f81d8331c0cbcabbffbacb2c82230306.jpe
f33d6b7f2ad72e47625b790336eb38f8.jpe