Where and when to fill coolant
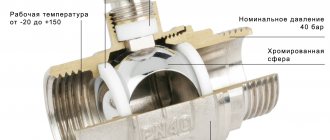
The method of supplying coolant depends on the structure of your system. If tap water is to be used, there is a special tap that opens the supply. To fill other liquids, the supply part of the manifold must have a special tip with a shut-off valve, to which a special pressure testing device is connected, which can also be used to fill the coolant. These devices can be manual or automatic. In principle, you don’t have to buy the device, but rent it from a specialized store. But if you use water as a coolant, you will have to use it every year (you need to change the water in heated floors before each season), so in this case you can think about buying it. A video in which a representative of one of the companies talks about crimping machines is located at the bottom of the page. If you're interested, take a look. To drain the system, there must also be a special tap on the outlet manifold.
Regardless of whether the supply manifold is located at the top or bottom, we supply coolant through the supply shut-off valve
Before adding coolant, the heated floor must be washed with running water. Inside there are inevitably lubricants and compounds that were used in the production of system components. Most likely, shavings, small scraps and other debris got into the pipes during the installation stage. Therefore, washing is a mandatory step. To do this, the system is filled with water several times and then drained. After the water has drained completely clean, the washing can be considered complete.
In addition to the first start-up of the system, flushing is required before each coolant change. If water is used (soft or distilled), replacement occurs annually. When using antifreeze, you must follow the manufacturer's recommendations. Some recommend changing the coolant every 2-3 seasons, and others once every 10-15 years (there are such compositions). But it is necessary to flush the system with water before each coolant change.
Filling the heating system with antifreeze
Before pouring antifreeze into the heating system with your own hands, you need to correctly calculate how much liquid will be needed and how much to buy. To carry out calculations, it is necessary to calculate the volume of the entire heating system.
There are special tables that allow you to accurately calculate how much antifreeze needs to be poured before initial use or replace one antifreeze liquid with another, based on calculations made per linear meter of pipe. Using such calculations and knowing the diameter of the pipes, you can calculate how much coolant is required per 10 m of the system. It remains to be clarified how much antifreeze needs to be added to fill the battery section. By adding up all the data, you can get the total volume of antifreeze required to fill the system. There is no single formula - filling depends on the diameter of the pipes and the volume of the radiators.
In most cases, the container in which the thermal fluid is sold contains information about the antifreeze sold and its density. Such data allows you to calculate how much water needs to be added to the liquid, which will serve as a heat carrier.
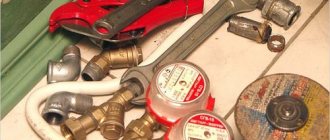
To refill the antifreeze with your own hands, you need to have a pump or special equipment that allows you to carry out the procedures of purging and flushing from used residues. For filling work you will need: a screwdriver, pliers, an adjustable wrench, hoses for pumping coolant, fixing clamps and sealing tape.
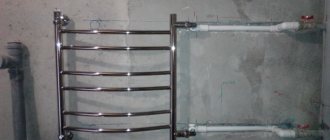
Test run of a water floor or pressure testing
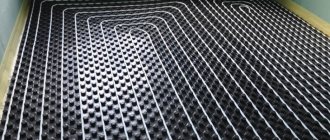
After the system is assembled, before pouring the screed, the water floor must be checked for functionality. This way it will be possible to eliminate any shortcomings that might have been made during installation. To do this, first the water floor pipes must be washed, drained well, and then filled with the coolant that will be used.
There is no need to drain the system before screeding: the solution is laid when the pipes are filled so that they take on “working” dimensions.
There are three methods for checking the functionality of the system and identifying installation defects:
- bring to operating temperatures and leave in operation for several days;
- test with cold coolant at high pressure;
- Pressurize heated floors with air.
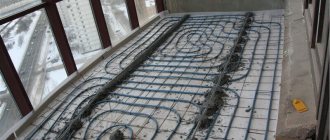
Before pouring screed or laying rigid base slabs, the underfloor heating system is pressure tested - pressurized
The choice is yours, but running the system at high pressure without a tie may result in the pipes being torn out of their sockets. This is if you used mounting tapes or single fasteners. To prevent this from happening, you can install beacons for the screed before the test run, and secure them with small sections of mortar at a certain step. Pressure testing must be carried out after the solution holding the guides has set. You will get a kind of frame that will hold the pipes, so they will not break out of their sockets. Will the guides interfere with troubleshooting? No. If the pipes were not bent during installation and the coil was rolled out, then your pipes are intact and there will be no problems in this part. If leaks can occur, they will occur at the junction of the pipes and the manifold, in the boiler piping.
You need to make a frame if you used self-focusing fastening systems. If you tied the pipes to the mesh, there are no problems.
Now let's talk about how to test the system using each method.
The first method is running at operating temperatures . The system must be brought to operating temperature gradually, starting from 20°C. After a few hours, raising it to 5°C. All this time you need to monitor the joints, connections, contours. If leaks are detected, stop the system, drain, repair, refill and test. After reaching the design coolant temperature, leave the system for 2-3 days. If no damage is detected, you can fill the screed (after pre-cooling the coolant).
A manual device for pressure testing water supply systems, with which coolant is pumped into a heated floor system
Second method: with excess pressure . Here everything is somewhat simpler: having filled the system with a “working” coolant, create a pressure 1.5-2 times higher than the working one and leave it for a day. If in a system made of PERT or PEX the pressure drop during this time does not exceed 1.5 Bar, there is no leak - you can fill the floor. If there are any shortcomings, everything is exactly the same as when reaching the temperature: stop the system, drain it, fix the breakdowns, fill it, test it.
The third method of dry pressure testing is used if it is impossible to fill in coolant for some reason or for special cases. Then, using a compressor, air is pumped into the system . But in this case you will have to create a pressure that is 2-3 times higher than the working one. This method is not entirely reliable, especially if you use a heated floor with antifreeze. “Anti-freeze” products are characterized by increased fluidity. Therefore, it is advisable to check the system before filling the screed with the working fluid. Moreover, the screed needs to be poured on filled pipes, and air is poorly suited for this.
When testing with pressure above 4 Bar, the air vent valves must be closed, because after a while water or coolant will begin to come out of them.
More about which testing method is used with which pipes. For metal-plastic pipes, testing with cold water at high pressure (6 bar) is recommended. If the pressure in the system has not dropped within a day, then the system is reliable and you can pour the solution or lay base sheets when using flooring systems.
The automatic crimping machine does everything yourself, you just need to control it
Crimping of a system made of cross-linked polyethylene takes place differently. First, the system is checked three times in cold water at high pressure. The test pressure is twice as high as the working pressure, but the lowest is 6 bar. Bring the pressure in the system to 6 Bar, after which it begins to drop. Leave the system for half an hour, then raise the pressure to 6 Bar again, and after half an hour again (3 times in total). After this, raise the pressure to the pressure test (twice as high as the working pressure) and leave it for a day. If during this time the pressure drop is insignificant (less than 1.5 Bar) and there are no signs of leaks, the test was successful.
But that is not all. According to German standards (this country has the most stringent safety requirements for construction technologies and materials), after pressure testing in cold water, the system must also be run at operating temperatures. Smoothly bring the system to operating temperature and leave for several days. After successfully passing all tests, we can confidently say that the system is reliable.
How to fill coolant
Before pouring the heated floor, you need to close all the valves of the manifold assembly and connect the hose to the inlet tip. If you are planning to flush the system, then it is also better to attach a hose to the outlet tip, the second end of which should be led into a sewer, container or drain hole.
Start pouring with one loop. The valves on this circuit open (all others are closed), it fills, air is released (bleeder valves hiss). Turn on the pump for a short time. The air vents begin to hiss again, the pump is turned off. We waited until all the air came out and turned on the pump again. Repeat until air stops escaping, then proceed to fill the next loop.
The coolant must be poured into the underfloor heating system through the corresponding collector inlet.
Before filling another circuit, the valves of the filled circuit are closed. The process is repeated until all the loops of the heated floor are filled. Then all the valves (input and output) of the working circuits are opened, water (or other coolant) is pumped until the air is completely removed. The system is ready for testing or launch.
How to start a heated floor
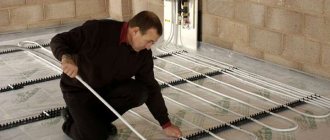
The heated floor is brought to the operating temperature of the coolant within a few days. First, set the supply temperature to 20-25°C. Then every day you raise it by 5-10°C. The temperature can be increased by 5°C if antifreeze is used, and by 10°C if water is used. Also, the rate of temperature increase depends on the size of the heated area. If the area is small and the screed array is small, then you can reach the specified mode faster. But this is the case when it is better not to rush: with uneven and rapid heating, the screed may crack, and if non-freezing liquids are used, they may overheat, which will immediately lead to system failure.
Control start of heated floor
Before you finally hide the contours under the screed, it makes sense for you to put the heated floor into operation. This way you can ensure that the entire system is fully operational.
In general, the control launch of heated floors is carried out in the following sequence:
1. Close the taps to the distribution manifold and ensure circulation of the section from the boiler to the manifold. Turn on the boiler and circulation pump. In this case, the boiler should not be started at maximum power. Check all connection points.
2. Open the valves of the circuit that is located at the greatest distance from the boiler and wait until it warms up. When a temperature difference of 5-10⁰C is reached between the supply line and the return line, you need to open the second circuit. Naturally you will hear hissing sounds. Using a similar scheme, you launch all the circuits.
3. Raise the temperature to the maximum value for a heated floor - 60⁰C, provided that the heated floor is the only heating.
4. If there is combined heating, the operating temperature must be set on the system thermostats. The system must remain at maximum temperature for at least 6 hours.
Once the crimping has been completed and all components have been checked, you can begin pouring the screed and laying the finishing coating.
Warm floors have recently begun to be used more and more often. However, turning it on for the first time is a rather responsible procedure and not many people know how to deal with it.
If the floor is made of wood or a flooring system, then after filling it with coolant, you can immediately proceed to operation. If you use a water floor based on a concrete screed, the first start-up procedure will be significantly different.
In this article we will look at how to properly turn on heated floors for the first time and study this procedure in more detail.
How to drain water from circuits
The peculiarity of a water heated floor is that, when installed correctly, it does not have a lower point and there is no tap there either. Therefore, to drain the system you will have to use a compressor. It is connected to the input (supply) manifold (do not confuse it, exactly to the input). If your collector assembly is factory-assembled, then it has special devices that prevent the coolant from flowing back. And if you connect the compressor to the “return” manifold, the coolant will not drain, but you may damage the unit.
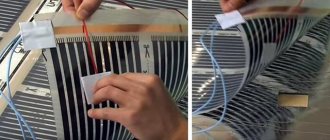
So, on the supply manifold, at the special valve for filling water, remove the air vent, and, screwing the adapter in its place, connect the compressor output. On the return manifold, connect a hose to the drain valve, which is discharged into a bucket or into the sewer.
What do the collector elements look like that will need to be manipulated when draining/filling coolant?
Leave the shut-off valves of only one heated floor loop open. Turn on the compressor, water begins to come out under pressure (hold the drain hose). Leave the compressor on until airborne droplets begin to flow. Then turn it off, close the valves of the drained circuit, open the shut-off valves of the next circuit and turn on the compressor again. So, opening the shut-off valves one by one, drain the water from all circuits.
Since the length of the contours can be significant, a significant amount of liquid remains on the walls. It needs to be removed again. That is, repeat the procedure after a few hours. Only then can we say that the underfloor heating fluid has been completely drained.
Thermostat operation
As a rule, any model comes with instructions and a diagram for connecting the heated floor thermostat. In general terms, the instructions for operating the device are as follows.
Preparing for work.
- performing external and internal inspection to identify the presence or absence of foreign objects or debris on the equipment;
- checking the reliability of fastenings and connections of the system;
- checking the correctness of the thermocouple connection, as well as the load connection.
Control
- the power is turned on after connecting the thermostat to the network and pressing the “0” button;
- Temperature control is carried out using the “^” and “v” buttons (in most models). The readings are displayed on the indicator;
- the required heating temperature is also set;
- when the temperature is set, the “Set” indicator lights up;
- when the set temperature is reached, the “Run” indicator lights up;
- Disconnection from the network is performed using the “ON/OFF” button.
Installation
Important condition: DIY installation of a thermostat for a heated floor must be done only when the power supply is turned off. This will help prevent electric shock.
- A mounting box is mounted on the wall in advance or a recess is made.
- The thermostat is installed in a prepared recess or mounted in a box.
- The temperature sensor is contained in a corrugated tube with a diameter of 16 mm. It should be between the cable bend lines or under the infrared film.
- The end of the tube with the temperature sensor must be sealed tightly to prevent moisture from entering.
Installing a thermostat for a water heated floor is somewhat different from an electric one. In most cases, the pipeline is simply connected to the heating system and is not regulated in any way.
If such a device is used, it can be installed vertically or horizontally. The recommended height is 120 centimeters from the floor. In this case, the sensor is built into the floor. Thermostats control the system with a servo drive that regulates the supply of warm water.
I once wrote about choosing a thermostat , but today I want to show you how you can configure it. After all, the fact is that cheap Russian or Chinese models (and they are almost identical) and all assembled in China have the same settings. The manufacturer's name may be EASTEC, MENRED, RTC, InTERMOE-202, or it may simply bear the abbreviation E51 (sometimes attributed to .716). Essentially it's all the same thing. The regulator is really not bad, but there is one big drawback - they do not come with instructions for setting them up. Today I will correct this injustice, there will be both photo and video material...
- Text version with photos
- Setting the time and date
- Setting heating by day and hour
- Advanced Settings
- Child lock
- VIDEO
The thermostat is really good; I have 3 of them at home and have been working for two years now, no complaints. YES, and the price is now in the range of 1500 - 2000 rubles, which is not bad, especially during a crisis. But damn, was it really difficult to include the setup instructions!? Here I would like to scold the manufacturers a little, and it is not in any of the above. Therefore, my readers rightly ask me questions. I can adjust these thermostats with my eyes closed, and soon you can too, let’s not delay, let’s start...