Peculiarities
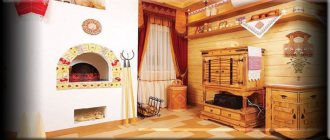
The Russian outdoor stove, unlike the classic model, is equipped with a horizontal firebox and hearth.
Its chimney is shorter, and the side walls are insulated, which increases efficiency with less fuel consumption. For ease of use, the cooking chamber in such an oven is placed on the front, and the combustion chamber on the left side.
The rational design of the frying chamber allows it to be used not only for cooking or frying food, but also as a kebab maker, smokehouse for meat or fish. And if you install a damper, it turns into an oven for baking culinary products and bread.
A place to build an outdoor stove or fireplace with your own hands
Before starting work, you need to decide on the location of the fireplace and stove. Usually they try to make a complex near one of the walls of the house or gazebo. It is important to remember that there should be no wooden buildings , garages or workshops in which combustible or flammable materials are used nearby. Plants can also be damaged by proximity to a hot stove or chimney. It is important to determine in which direction the smoke from the barbecue or fireplace will go, so that in unfavorable weather it does not corrode the eyes of those sitting in the gazebo or on the terrace.
Materials and quantity of bricks
To lay a stove with your own hands, you need to purchase all building materials and stove fittings in advance:
| No. | Name | Unit change | Quantity |
| 1 | Burnt solid red clay brick | thousand pieces | 0,55 |
| 2 | Fireclay brick | thousand pieces | 0,15 |
| 3 | Oily clay | kg | 250 |
| 4 | Sand | kg | 200 |
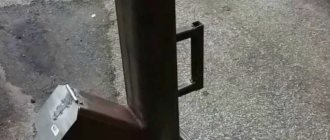
| 5 | Cast iron blower door | PC. | 1 |
| 6 | Cast iron fire door | PC. | 1 |
| 7 | Hob | PC. | 1 |
| 8 | Stove valve | PC. | 1 |
| 9 | Chimney cap | PC. | 1 |
| 10 | Steel corner 50x50 mm | m | 10 |
| 11 | Steel corner 25x25 mm | m | 8 |
| 12 | Concrete mixture for foundation | m³ | 1,2 |
| 13 | Steel reinforcing mesh | m² | 3,5 |
| 14 | Ruberoid or polyethylene film | m² | 3,5 |
| 15 | Formwork boards or plywood sheets | m² | 3,5 |
| 16 | Nails | kg | 0,5 |
| 17 | Asbestos cord | m | 30 |
Waterproofing the foundation of the barbecue
In order to protect the foundation from moisture, you should make a clay castle.
Foundation waterproofing: 1 - concrete; 2 - ventilation; 3 - drainage pipes; 4 — concrete blind area; 5 - chimneys; 6 - basalt wool; 7 — ventilation windows; 8 - sand; 9 — waterproofing; 10 - foundation; 11 - clay castle
Using the example of waterproofing the basement of a house, you can waterproof the foundation of a barbecue. For this, fatty clay of any color is used: red, yellow, white, etc.
It is laid in layers 200mm thick around the foundation and compacted. Such waterproofing is no worse than modern waterproofing made from various artificial materials. And the cost is much cheaper. .
Advice: There should be no crushed stone, sand, or gravel around the foundation or under the foundation. Because crushed stone, sand and gravel are used for drainage, and not for waterproofing.
Handy tools
A set of necessary tools is also collected in advance. It should consist of:
- Angle grinders 230;
- Angle grinders 125 (not necessary, but preferable so as not to rearrange the wheel and cup);
- extension cord with a tee (so as not to switch sockets);
- level 80 cm;
- level 30 cm;
- metal ruler 1 m;
- tape measures 3m;
- masonry trowel;
- regular and rubber hammer;
- a mixer with a nozzle for preparing a solution or a drill with adjustable speed;
- buckets for mixing the solution;
- containers for soaking bricks;
- hand and brick rags;
- concrete mixers (although you can mix by hand);
- shovels.
Preparation of the solution
The mortar for laying the stove must not only be heat-resistant, but also plastic, in order to simplify the masonry process as much as possible. The preparation of the solution should begin by checking the quality of the clay. To do this, take several parts of clay with the same volume and add water in such quantity to form a thick mass.
Then sand is introduced into each part in different proportions. The resulting mixtures must be thoroughly moved, diluted with water to the desired consistency. After approximately 2 - 3 hours, the solution is tested. For these purposes, introduce a wooden stick or other object into the mixture, take it out and shake it.
The quality of the solution can be judged by the thickness of the layer remaining on the surface of the object:
- less than 2 mm - not enough clay;
- more than 3 mm - not enough sand.
The correct selection of ingredients can be checked in this way:
- from each test composition of the solution, make bundles 10 - 15 mm thick;
- leave them for 2 - 3 days to dry completely;
- check the quality of the clay-sand solution by the condition of the bundles: cracks on a sample of the correct mixture composition will form only on the surface, and the inner part will remain intact, without breaks.
Having decided on the proportions, proceed to kneading the main volume of the mixture:
- soak the clay for 2 - 3 days in water, stirring periodically with a shovel;
- the sand is sifted through a metal sieve with a mesh size of 1.5 mm, separating various impurities in the form of small pebbles, shells, etc. In case of heavy contamination, the sand is washed and dried;
- the settled clay water composition is also passed through a sieve to remove foreign inclusions;
- combine some ingredients in one container and mix until thick.
Number of bricks and what kind
To build an outdoor stove, use bricks that have:
- resistance to temperatures above 1000ºС;
- high strength;
- the ability to maintain integrity during sudden temperature changes.
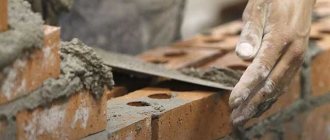
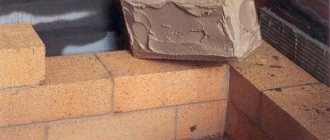
Red stove brick M200 or M250 is used to lay out the internal surfaces of the stove body. It provides more uniform heating of the furnace and uniform heat transfer. Kiln bricks have a very dense structure and low moisture absorption coefficient. To lay a Russian stove on the street you will need 550 pieces.
In the combustion chamber and chimney, the temperature can reach 1300ºС, so for its construction you need a more fire-resistant brick - fireclay. It contains fireproof clay, which ensures its high heat resistance and heat resistance. Typically, to insulate fire in a Russian stove, fireclay bricks of the Sh8 brand with dimensions of 250x120x55 mm are used. In this case, 150 pieces will be required.
Material selection
If the fireplace or stove is outdoor, that is, not located inside the gazebo, then, firstly, it will be necessary to build a canopy over it, and secondly, a more responsible approach to the selection of materials. They are usually made of brick or natural stone. Although recently barbecues made of reinforced concrete with the addition of marble or granite chips have appeared on sale. They are a package of ready-to-assemble elements that are assembled on site like a kit, according to the supplied design.
Natural stone is more durable, but requires special skills in working with it and special equipment. Considering the large weight of the stone, the foundation for such a barbecue will need to be made solid, to the depth of soil freezing.
Brick is most often used to build an outdoor fireplace, stove or barbecue. The main mistake is the use of refractory refractory bricks for this. In regions where the temperature constantly fluctuates from positive to negative in winter, it will fail very quickly. It is best used in stoves and fireplaces with constant use or in outdoor stoves, provided that it will not be used frequently during the winter.
It is better to use red solid stove brick, but in practice both hollow and white silicate are used as finishing or facing bricks.
For laying fireplaces and stoves, a solution containing clay is considered the best. It must first be soaked in water , then it will become more plastic. For busy people, there are special building mixtures on sale for laying outdoor stoves.
Manufacturing instructions
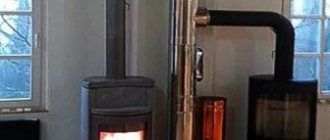
A Russian outdoor stove usually has relatively small dimensions, does not take up much space and warms up quickly. Their construction does not require special professional skills. With proper preparation and having the order at hand, it is quite possible to build it with your own hands.
Foundation
The Russian outdoor stove is a heavy, massive structure. Therefore, a soil cushion or concrete screed will not be sufficient as a support. A reinforced concrete base in the form of a slab should be built under such a furnace. The depth of its underground part should be at least 50 cm and protrude 10 cm above the ground surface. The step-by-step process of pouring the foundation is as follows:
- tear off the pit 25 - 30 cm deeper and wider on each side by 10 cm of the future structure and compact its bottom;
- lay a layer of sand 15 cm thick and compact it with water;
- arrange a crushed stone cushion 10 - 15 cm thick with layer-by-layer compaction;
- install the formwork by knocking it down from individual boards. It is better to use sheets of plywood for these purposes, cutting them into pieces of a suitable size. Formwork made from plywood panels does not have large gaps, does not allow moisture to pass through, holds concrete well in a given shape, and it is advisable to cover the structure of boards from the inside with roofing felt or sheets of polyethylene film;
- install a reinforcing structure from two layers of reinforcing mesh. One of them is placed in the lower and the other in the upper part of the monolithic slab. They are connected to each other by vertical reinforcement rods. All these elements are connected into a single system with knitting steel wire;
- concrete is poured in layers, compacting each layer with a construction vibrator;
- The concrete mixture gains initial strength within a week. During this period, the upper plane of the foundation slab should be covered with plastic film. Periodically, it needs to be removed and the mixture spilled with water so that the structure can dry evenly, without cracking;
- Now you can remove the formwork. It is recommended to begin masonry work no earlier than 25-30 days later.
To protect against the effects of soil water, the side surfaces of the finished support are coated with hot bitumen 2 times, and two layers of roofing material are glued to the upper surface on the bitumen.
Laying the stove and chimney
Order:
Arranging an outdoor Russian stove
| Row No. | Order |
| 1 — 6 | Laying according to the order of the stove stand, observing the dressing |
| 7 | Overlapping stand elements |
| 8 | Bandaging the floor elements and forming the bottom of the firebox |
| 9; 10 | Laying the firebox with fireclay brick lining, installing the door |
| 11 | Covering the combustion chamber, installing a barbecue grill |
| 12 — 16 | Forming the walls of the frying chamber with brick ligation in each subsequent row |
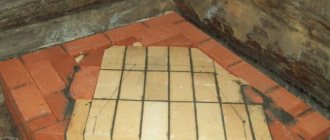
| 17 | Covering the frying chamber. Installation of a hob and asbestos-cement cord in the gaps between it and the brick surface |
| 18; 19; 20; | Laying the roof of the frying chamber, continuing to form the walls |
| 21 | Vault ceiling |
| 22 | Laying the canopy around the perimeter of the body. To do this, the outer rows of the body extend |
| 23 | Narrowing of the smoke hole |
| 24 | Complete covering of the frying chamber and formation of a smoke channel |
| 25 | Completion of the formation of the frying chamber lid and smoke channel |
| 26 | Beginning of chimney construction |
| 27 | Bandaging the first row of the chimney |
| 28 -29… | Laying a chimney of the required height |
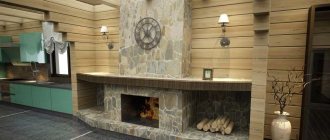
Example of finished work
Making a canopy
A canopy over a Russian stove on the street can have a square, rectangular or multifaceted shape and be built from any material: metal, polycarbonate, wood. It is faster and more economical to use coniferous or linden wood for supports and other load-bearing structures.
After marking the dimensions of the building, the following is done:
- Excavation of soil for the foundation. Trenches at least 30 cm deep are dug around the perimeter of the future canopy.
- Compacting the bottom of the trench with crushed stone.
- Laying two reinforcement rods with a diameter of 10 mm along the entire length of the trench and pouring 15 cm of concrete solution;
- Installation of a frame of 4 racks, fastened together in the upper part with spacers and beams. The lower part of the supports is fixed to the monolithic tape using metal corners.
The roof construction stage is the most critical element of the structure and has a rafter system that can withstand the weight of the roofing and the effects of snow and wind loads:
- The rafters are attached to the horizontal beams of the frame, and the sheathing is nailed to them, on which the roofing material is laid.
- The shape of the roof for a canopy over a Russian stove on the street can be gable, hip, or hipped.
- For roofing, bitumen shingles, wooden shingles or metal profiles are used.
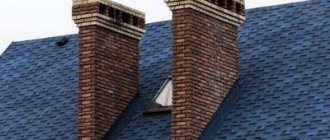
- An important point in this design is the protection of the junction of the roofing covering and the chimney from fires.
- The chimney must be framed with a steel apron, attaching it to the sheathing with dowels or self-tapping screws.
- To prevent moisture from penetrating through the gaps between the apron and the roofing, they should be filled with silicone sealant.
- The soil on the site under the canopy needs to be leveled and compacted. Then pour a layer of crushed stone 15-20 cm thick and make a sand cushion. The final flooring can be made from paving slabs or flat stone. The base under the floors must have a slope in one direction to allow water to drain.
Example of a stove canopy
In addition, all wooden elements must be impregnated with special compounds to increase fire resistance and moisture resistance.
Drying and finishing work
Before you start using the stove with maximum heat output, you need to dry it with small portions of fuel. Drying should begin immediately after finishing masonry work and should be carried out daily until all damp spots on the surface of the body disappear and the ash door remains dry without drops of condensation. In the summer, a week is enough, but in winter it is unlikely that such work will be carried out outside.
You can decorate a Russian outdoor stove with your own hands using decorative plaster or tiling.
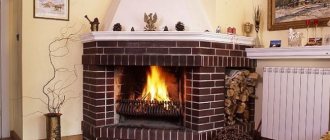
Do-it-yourself construction of outdoor fireplaces
Like any stationary fireplace, an outdoor fireplace will have:
- firebox for storing firewood;
- fireplace body;
- foundation;
- fireplace chimney.
Sometimes the design of such a fireplace may include built-in seating and storage for firewood. You can choose a fireplace model based on a large number of photos on the Internet.
When laying out the firebox, it is very important to line its interior with refractory fireclay bricks, and add a high-temperature mixture to the solution (it is better to use special compositions for outdoor stoves). After laying out the fireboxes, it is worth suspending further work for 1-2 days so that the solution dries thoroughly and gains the necessary strength.
After this, you can install the finished pipe and cover it with bricks or lay out the chimney yourself. It is important to remember to make a shelf to reduce backdraft. When installing the fireplace stove, be sure to use a level to be sure that it is level.
Decorating an outdoor fireplace with your own hands can be done either with facing bricks or decorative stones, or with the use of special plaster. At least three days must pass between the completion of all types of work and the start of operation.