Author: Yuriy Fedorovich Kolesnikov, thermal power engineer
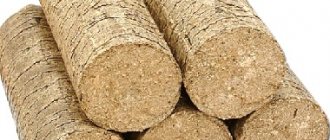
Pellet fuel, or simply pellet, as is known, is granular waste from wood processing or agricultural production (straw, husks, etc.) pressed at elevated temperatures. The cost of heating with pellets in countries with abundant natural energy resources may be lower than with coal (excluding places directly adjacent to coal-mining regions). Pellets do not emit harmful fumes like liquid fuel, they are explosion-proof, they stain no more than firewood, but do not require wood harvesting for fuel.
At the same time, pellets are a rather capricious energy carrier; if used incorrectly, they are a fire hazard, and when searching for a DIY pellet burner there is very little useful information; They will show a torch shooting out of a nozzle, and that’s it. Or they give a diagram of a supercharged ceramic burner to a vague description of a gravitational non-volatile burner, or something else like that. This article is intended to fill this gap to some extent.
Fuel pellets and heating boilers with pellet burners
Why a burner?
Pellets can be loaded into a regular stove and set on fire, they will burn. They will also burn in a stove or long-burning boiler. But the ash content will be at best 20%, and maybe even 60% (!). Therefore, when burning pellets, preliminary pyrolysis of the fuel mass is widely used; in this case, the ash content will be 2-5%. But there is no point in loading pellets into a pyrolysis furnace or boiler: in a device that burns pyrolysis gases in a separate chamber, they will coke, sinter, and there will be even more fuel waste, plus unscheduled cleaning and/or repair of the boiler. Therefore, pellets are burned in special burners, where the zones of pyrolysis and formation of a torch of burning gases partially overlap. The design of the burner is, in principle, simple. How to make a simple pellet burner, see for example. video:
Video: a simple homemade pellet burner
However, for a more or less technically literate person, an obvious question will arise: the temperature of the torch flame reaches 1000 degrees or more. How long will ordinary structural steel last in direct contact with it? There are other, no less important nuances, so it’s too early to install a simple pellet burner in your home boiler. By the way, you can get burned, see below. First you need to figure out how to properly make a pellet burner, suitable at least as a spare, in case of shortage or unavailability of the main fuel.
Is it worth it?
Economically, independent production of a spare pellet burner makes complete sense, because prices for fairly reliable branded products start around $500, if we are talking about a semi-automatic burner that requires daily maintenance; This one will be suitable as a spare. And for an automated set of equipment for heating with pellets, which requires a trip to it once a week to reload fuel, you will have to pay $3,000 or more.
Types of pellet burners
Today you can choose one of the following types of burners:
- Volumetric combustion. Common models that are highly efficient. It should be taken into account that in equipment with a large angle of inclination, an excessive amount of slag accumulates, which can lead to the auger stopping.
- Flare. Such burners are small in size, which makes it possible to place the equipment on a boiler with a small combustion chamber. Flare burners are reliable and easy to use. At the same time, the equipment has low power.
- Fireplace. As you can guess from the name, the devices are installed in fireplaces. Also, pellet burners can be used in a number of models of pyrolysis boilers. The equipment is most often used in everyday life. This is due to its small dimensions and configuration features.
Burners are also divided into equipment with fixed and movable grates. The first variety is designed for the use of high-quality pellets made from hardwood. Equipment with moving grates may use fuel with high levels of ash and moisture.
Pellets as fuel
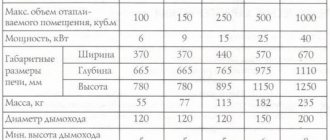
Pellet is a fairly energy-intensive fuel: 1 kg of it produces approx. 5 kW/h heat. Those. To heat a medium-sized house in mid-latitudes, the burner should burn approx. 2 kg pellets per hour; In terms of volume, it’s about half a bucket. You need to add pellets to the bunker (see below) 1-2 times a day and at the same time empty the ash pan of the boiler; the ash is quite suitable for fertilizer. A good branded burner should be cleaned no more than once a week (those requiring cleaning once a season cost from $5,000); homemade will have to be cleaned every 3-4 days.
But, firstly, pellets burn well and just like that, although they produce a lot of ash. The problem with all existing pellet burners without exception is the possibility of the so-called. reverse combustion, when the pyrolysis zone penetrates the fuel bunker, and then - smoke, stench (poisonous), fire. Secondly, pellet burners are critical to the air supply: if there is too much air, the pellets can be blown off the burner and produce a lot of ash; little - again a lot of ash and coking. The air requirement of the burning mass of pellets depends quite strongly on the combustion mode. As a result, it is not so easy to set the correct combustion mode for pellets. In general, a pellet burner is ignited in stages: way:
- Ignition is carried out with a special lighter, which is a ceramic rod heated to 900-1100 degrees. A homemade burner can be lit with a torch, but in no case should it be flammable! The combustion will immediately jump into the bunker!
- Starting - the air supply is adjusted (see below) until a stable flame is formed;
- Acceleration (reaching operating mode) - also using air (possibly together with the fuel supply) to achieve a smokeless flame (possibly with control of its temperature) and blowing off ash from the burner without blowing out the pellets;
- Operation in standby mode - the air is covered until the specified temperature of the coolant in the return is achieved;
- Stop - the fuel supply is cut off, and air is supplied according to step 3 until the remainder is completely burned.
Forced fuel systems
It is the method of fuel supply that determines the fire safety of a boiler with a pellet burner. In general, pellets can be fed into the burner by force or by gravity, when they themselves pour out of the hopper. The safest method is forced. However, this is exactly the case when you have to pay for safety and convenience: forced-feed burners are the ones that cost from $3000.
Pellet boilers with forced fuel supply and burners for them
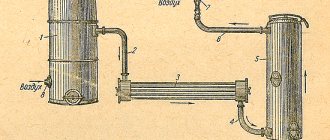
Forced pellets to the boiler from the bunker can be pneumatic lift (item 1 in the figure and auger (item 2 and see below). What they have in common is that there is an ascending branch in the fuel supply path. If the fire comes out of the burner, then it to get into the bunker, you will need to go down, which is unlikely. Pneumatic supply completely eliminates combustion leakage into the bunker, since there is no solid mass of pellets in the fuel line, and the air blows towards the possible path of fire, so boilers with pneumatic supply can be powered from open bunker, which is loaded once a month. However, in both cases, a cup burner is needed (volumetric, see below) with a screw feed of pellets from the feeder, positions 3 and 4; it is technically complex, and its cost is at least 1/ 3 of the entire boiler power system.
Auger feed systems use 2 separate mechanical units (left and center in the figure): a pick-up auger lifts the pellet from the hopper. The fuel then falls into the feeder (receiving hopper) of the burner, where another auger pushes the fuel into the combustion zone. Oddly enough, combustion leakage into the bunker is not completely ruled out, because In the ascending branch of the fuel line, the pellets lie in a solid mass, so the descending section of the fuel pipeline is made of fusible (but not flammable!) or heat-shrinkable material. If the feeder catches fire, it will melt or break off and interrupt the path of the fire. The system with free fall of pellets into the feeder (on the right) is used less frequently due to lower fire safety, but it can be used to power gravity burners, see below.
Note: sometimes, for the sake of compactness, the fuel hopper is placed on the boiler, see fig. on right. In this case, the forced-feed system loses its fire safety property, because the ascending branch of the fuel line is excluded from the supply path.
A serious drawback of systems with forced supply of pellets is their energy dependence: you need to turn 2 electric motors. But then it makes sense to use the burner with forced pressurization, this increases the efficiency of the boiler by 3-7 percentage points, and connect the control automation, see below. In cold countries that heat themselves with imported fuel or their own waste, savings on heating for the season in this case can amount to an amount that pays for the cost of a burner with a boiler.
Burners in forced-feed systems use volumetric screws, i.e. The pellets in them are also forcibly squeezed into the pyrolysis chamber, and the pyrolysis gases are burned in the boiler furnace. Burners with a flame bowl (item 1 in the figure) are gradually falling out of use: if the automation fails (see below), the fuel in the bowl cokes, which means an extraordinary cleaning or repair of the boiler, and the penetration of fire into the feeder is not such a rare occurrence in models from the best manufacturers. When using standard fuel (recommended by the manufacturer), you need to clean the burner with the bowl from any remaining ash once a week.
Methods for supplying fuel from the feeder to the pellet burner
Burners with secondary air supply to the afterburner (item 2) or with a retort that forms primary and secondary flows directly in the bowl (item 3) are free from most of these disadvantages. A burner with an afterburner almost never cokes, but it still needs to be cleaned manually once a week, while a burner with a retort needs cleaning monthly, and only then based on the results of an inspection.
Note: according to the retort scheme, the so-called. fireplace burners with gravity fuel supply for boilers and stoves up to 5 kW, pos. 4 in Fig.
About automation
Burners of systems with forced supply of pellets are not examples for beginners to repeat, not only because of the complex mechanics. All its advantages, incl. safety, they show only under the control of a microprocessor operating from a whole set of sensors:
- In the chimney - it gives not only the presence, but also the amount of draft.
- In the firebox – shows the flame temperature.
- In a heating system, it gives the return temperature.
- In the burner, in the combustion zone - shows the presence and level of fuel.
- Same thing in the feeder.
- Same thing in the bunker.
The microprocessor, guided by data from the sensors, regulates the supply of both fuel and air according to a program specified by the user from the remote control, for example. “Winter”, “Spring/Autumn”, “Lower level of comfort”, “House is empty”, etc. It is the simultaneous coordinated regulation of air and fuel supply that ensures the highest possible efficiency of the boiler using any available pellets; this is a serious advantage of systems with forced supply.
Gravity burners
The gravity pellet burner can be made non-volatile, because the fuel in it is poured directly into the pyrolysis chamber, and pressurization can be provided by draft in the chimney. It is also possible to enter the gravity burner into operating mode manually, manipulating only the damper on the burner and the damper (draft regulator in the chimney). However, this costs a slightly lower boiler efficiency and a greater fire hazard. Therefore, any gravity burner requires qualified maintenance. Let's hope that this article will help the reader with this too.
Pellet burners with gravity feed
Non-volatile gravity burners with manual control are not produced by industry: if used incorrectly, they are extremely dangerous. Semi-automatic burners with self-feeding fuel are sold under the name gravity burners. To prevent fire from entering the bunker, either install a gateway (on the left in the figure) made of thermosetting, i.e. elements that expand when heated, or use a double-grid scheme on the right. The movable grate periodically moves back, takes a portion of fuel and transfers it to the combustion zone, while simultaneously pushing the ash into the ash pan of the boiler. In this case, a complex burner with a screw is not needed, but this design is bad in that the gap between the grates quickly becomes clogged with ash residue. If the movable grate gets stuck in the rear position, fire penetration into the hopper is almost inevitable, so a fire sluice in a burner with a double grate is also necessary.
Without electricity
A homemade pellet burner can be made non-volatile if it is made according to the basket-flare scheme:
- The fuel is poured directly into the pyrolysis chamber, which is a perforated steel basket. The basket is made removable, because For each caliber (diameter) of pellets you need a separate basket.
- The immediate penetration of fire into the bunker prevents, to a certain extent, “tertiary” air being sucked in through the holes in the feeder.
- Primary air provides pyrolysis of fuel in the basket.
- Pyrolysis gases and secondary air enter the combustion chamber, where the main combustion occurs.
- A torch of hot gases erupts from the combustion chamber, heating the boiler.
Note: some factory burners are also built according to the described scheme, incl. well-proven Pelletrons. But they are by no means energy independent, because... equipped with built-in automation. A UPS (uninterruptible power supply) for Pelletrons can be purchased optionally or use a computer one.
Looking at Pelletrons
The operating diagram of a non-volatile pellet burner with a boiler is given on the left in the figure, and the diagram of its device and description of the principle of operation is on the right in the same place:
The device of a gravity pellet burner
An indispensable condition for successful operation is a damper in the chimney with obviously excess draft. This burner is put into operation quite simply:
- Fully open the burner damper and air damper.
- Open the fuel supply valve on the bunker (it must be there!)
- Light the pellet and immediately close the damper on the burner.
- Observing through the inspection window of the boiler (also mandatory), smoothly and slowly open the burner damper until the torch flares up and a cloud of ash appears. Do not blow out pellets!
- Using a damper on the boiler temperature sensor (or according to the type of torch), the burner is brought into operating mode.
Stopping the burner is also easy:
- At the end of the cycle, the furnaces shut off the fuel supply to the bunker.
- The gate is opened completely.
- Immediately upon opening the gate (preferably simultaneously with it), the burner damper is closed for approx. at 3/4.
- Preventative work on the burner (if necessary) begins no earlier than 10 minutes after the last signs of combustion disappear.
Details and dimensions
The most important part of the burner is the basket. The Achilles heel of homemade baskets is the pellets getting stuck and coked in the inclined back wall, which disrupts the pyrolysis process and causes the fire to go into the bunker. To avoid this, the slots in the rear wall should not be made solid, but as shown in the inset at the top right in Fig. The dimensions of the slots are 2-3 mm smaller than the size of the pellets in plan. The gap between the back wall and the bottom of the basket is 2 mm less than the caliber of the pellet, but not less than 6 mm. But the slots in the front wall separating the pyrolysis part from the combustion chamber need to be solid. It’s even better if they are open at the bottom. The height of the secondary air channel under the bottom of the basket for a 15 kW burner is 28-30 mm. The back wall is tilted 45 degrees. Such a basket with a tray measuring 130x130 mm in plan and 100-120 mm deep will burn 2-3 kg of pellets per hour.
Drawings of a gravity pellet burner and a hopper for it
An equally important part is the bunker. It is precisely into bunkers of arbitrary design that fire most often breaks through. Fortunately, there is no need to be clever here: the bunkers from Pelletrons, the drawings of which are given on the left in the figure, have shown themselves to be excellent. With a 15 kW burner, a 34 kg bunker in an average winter in the middle zone provides daily heating, and 17 kg semi-daily.
The dimensions of the combustion chamber can be taken from Pelletron 15 (highlighted in color on the right in the figure. It is better to make the secondary air channel L-shaped with an upward bend, this will ensure its active mixing with pyrolysis gases and a slightly higher boiler efficiency.
The combustion chamber must be made of heat-resistant steel with a thickness of 2 mm. Since hot steel is difficult to weld, you need to draw a chamber profile, roll it up and rivet the joints or spot weld them. By the way, you can also make a tabletop spot welding machine with your own hands at home.
Note: for another version of a homemade gravity pellet burner, see next. video clip:
Video: DIY gravity pellet burner
Method for adjusting pellet burner pressure
Possible improvements
It will greatly simplify starting the burner and make it safer due to less reaction to the draft in the chimney. For a 15 kW burner, a 20 W fan is sufficient. The easiest way to adjust the boost is from a scroll fan, as shown in Fig. on right.
Note: on pellet heating forums, e.g. American: donkey32.proboards.com, you can find ideas to put Peltier elements in the boiler and run a 12 V computer fan from them to supercharge. Firstly, the Peltier elements will instantly burn out in the chimney. Secondly, the computer fan power is an order of magnitude less than required. Thirdly, without control electronics powered by a thermocouple in the furnace, the system will go into overdrive, because It will turn out - it flared up more, the pressure was stronger, but it should be the other way around.
You can also carry buckets of pellets not once or twice a day, but weekly or even monthly. An indispensable condition, according to fire safety rules, is that the boiler must be located in a separate fireproof boiler room. Then we put a large hopper with a long-term fuel supply, an auger and free fall of pellets (see above), but not in the burner feeder, but in the supply hopper. The latter has 2 fuel level sensors, upper and lower (preferably optocouplers). There is little fuel - the engine turned the auger and sprinkled. The consumables are full - stop! Well, if the electricity goes out, you’ll have to carry it in buckets.
Making a burner with your own hands
How to make a pellet burner? The combustion chamber is made of steel pipe. Wall thickness – 4 mm no less. The steel is heat-resistant and can withstand high temperatures. Attachment to the boiler unit body is carried out using a flange plate. For manufacturing you will need 3 mm steel. It is better to buy a conveyor for feeding pellets or use an auger.
To rotate the mechanism, you need bearings, a low-speed motor (electric) and a gearbox. A fan for supplying air can be purchased at the store. It is fixed on the plastic, in which the place has already been prepared. The plate is made based on the drawing. The configuration depends on the boiler door itself. A drawing of the burner can be seen in this photo.
A mandatory step is to adjust the amount of incoming pellets and air. Without this, the device will work unstably or constantly at full power. To change the intensity of the fan and auger, you can install a manual regulator. In this case, you will have to constantly monitor and adjust the burner, taking into account the temperature of the coolant and air.
It is important that during various work processes, fuel and air are correctly selected. Only then will the torch be even and stable. To do this, you cannot do without an automated device. You will need a control unit. The burner controller has free control contacts, to which the electric motor from the screw and fan is connected.
To automate the ignition of pellets and control the flame, you cannot do without a photosensor and an electric incandescent element. A photo sensor monitors the appearance of a stable flame and notifies the controller. It will turn off the filament element. But an incandescent element is needed to ignite the pellets. The supply pipe is equipped with a filling sensor. It stops feeding pellets when the auger and top pipe are full.