Insulation of facade walls
Even before construction begins, the question of insulating the house is raised.
Often walls made of expanded clay concrete blocks are laid in 2 rows (40 cm), and it is believed that additional insulation is not required.
However, this is a misconception. To save on heating costs, it is necessary to carry out insulation work.
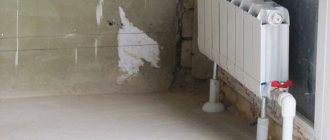
The second reason why it is necessary to insulate walls from the outside is external negative factors, under the influence of which walls made of this material quickly become unusable. To protect the material and give the house an aesthetic appearance, it is faced, and the space between the blocks and the facing material (for example, brick) is filled with insulation.
Should I do it?
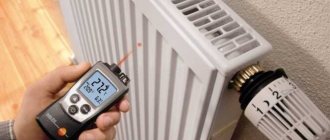
Experts recommend insulating external walls in any case to avoid condensation, which negatively affects the integrity and properties of expanded clay concrete blocks. You can neglect this procedure if the premises are not residential, or the country house is visited only in the summer, but again it is worth remembering the negative external factors that will certainly affect the material.
Some people refuse insulation and instead install a heated floor, which ensures a comfortable temperature in the room, but experts say that this is only a half-measure that will not solve the problem entirely.
How to do it correctly?
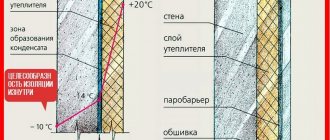
Correctly insulate the walls from the outside. Firstly, there is no need to waste useful space indoors. Secondly, insulation from the inside can create strong humidity in the house, which can cause rot. This occurs due to the fact that the facade is not heated and goes into a low temperature zone. Because of this, condensation will appear between the wall and the insulation, which has an equally negative effect on both materials.
Important! If there is no other option and you have to insulate from the inside, then additional ventilation work will be required.
Thermal calculations
You can make thermal calculations for high-quality insulation yourself or using programs based on the properties of expanded clay.
When purchasing expanded clay concrete blocks, you should make sure that the inherent properties of the product are indicated on the construction product. If the information is not contained, you need to ask the seller to provide it, since all these indicators will be needed for thermal insulation. Thermal engineering calculation considers the required thickness of a particular material for high-quality thermal insulation. The calculation can be carried out using two methods:
- on one's own;
- according to a special program.
An untrained person will not be able to do an independent calculation, so it is better to turn to the computerized version for help. To run the program you need to have the following information:
- wall thickness;
- possible resistance to heat transfer;
- percentage of thermal conductivity of expanded clay concrete block;
- width;
- thermal conductivity of insulation material;
- thickness of the insulation material.
Materials
Specialists use different materials based on the budget, the purpose of the room, and even the geographic location.
There are several options for insulating the outside of a house made of expanded clay concrete blocks.
Among the most popular materials are the following:
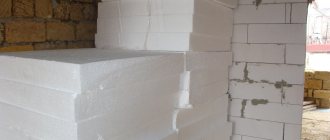
- Styrofoam.
- Penoplex.
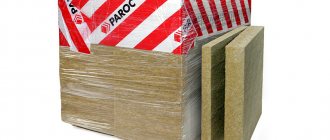
- Mineral wool. Usually this is stone (basalt) wool.
- Polyurethane foam.
- Unpopular insulation materials (expanded clay, sawdust, clay, linen, etc.).
There are other materials, but their use is not advisable, since they have more negative sides than positive ones, but in some cases they can serve as an additional measure.
Tools and consumables
To install an insulating layer in an expanded clay concrete bath, you may need:
- Certified slabs (or rolls), with the specified factory markings and instructions, calculated in the required quantity.
- Construction tape, sharp utility knife, large scissors.
- Reinforcing mesh with standard cell size.
- Brushes and brushes of various sizes.
- Glue and foam (polyurethane).
- Primer and mastic (bitumen or universal).
- Vapor barrier membrane or foil material.
- Fastening elements (screws, angles, dowels, aluminum sticks).
- A container for diluting glue (if you need to prepare it yourself).
- Work clothes, shoes, gloves, glasses.
- Screwdriver, drill.
If the insulation is carried out by a construction company with which the customer has signed an agreement, then there is no need to independently purchase tools and consumables.
The company has all the necessary tools, and it will provide the necessary materials for the work itself, in accordance with the project estimate. Some rolled types of insulation are found immediately with a foil layer .
This greatly simplifies the process of improving the premises and saves costs on separate purchases, and the separate arrangement of layers of insulation and separately - foil. 1 roll of such compact material (replaces two) = 1 insulation + foil sheet, which further increases the speed of work.
Step-by-step instruction
Foam plastic, penoplex and “wet facade” system
Foam plastic and penoplex are the most popular materials used for insulation. These two insulation materials can be classified as the same type, since their properties are very similar. Both materials are created from the same raw material - polystyrene. The only difference is in the technology of creation. There is also a fairly significant difference in price: penoplex insulation will cost much more than foam insulation.
Among the advantages of this material, the following points can be noted:
- low level of thermal conductivity;
- moisture resistance;
- low cost;
- ease of installation;
- lightness in terms of weight;
- wide temperature range of application.
These materials are not without some disadvantages:
- low level of resistance to chemicals;
- lack of fire protection;
- reduced sound insulation;
- poor resistance to ultraviolet rays;
- low level of vapor permeability;
- attracts insects and rodents.
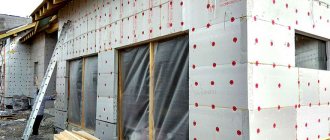
How to insulate facade walls? This process itself is quite simple and can be performed even by a non-professional builder .
The tools you will need are a hammer drill, polyurethane foam or special glue, a primer, flexible connections with clamps and, of course, the material itself.
Step-by-step instructions for insulation are as follows:
- Surface preparation stage. It is necessary to pay attention to the cleanliness and dryness of the walls so that there are no negative factors that would affect the adhesion of the adhesive composition. After this, it is necessary to treat the wall surface with a deep penetration primer.
- Checking wall adhesion. Some skip this stage and completely in vain. It is necessary to glue about 7 samples of material in several places. It is enough to cut squares 10 by 10 cm. After three days, you need to try to tear them off the wall. The rupture should occur in the piece of foam itself, and not in the place where it is fixed to the wall.
- Installation of the base profile. This is a kind of support for the insulation, which additionally protects the material from rodents and insects. The profile must be fixed using dowels in increments of 3 pcs. by 1 m. If the wall is uneven, you need to use special pads.
- Preparation of the adhesive solution. When using a special solution, you must strictly follow the instructions for use, which are indicated on the package. Sometimes they just use polyurethane foam.
- Applying glue to the material. In the case of using high-quality, even blocks and obtaining a smooth wall surface, a notched trowel with 10-12 mm teeth can be used to apply glue. If the wall turns out to be crooked, then it is necessary to apply the adhesive composition in a thick layer along the entire edge of the foam board, and make several applications inside the contour. It is important to remember that the adhesive composition occupies at least 40% of the entire surface of the slab.
- Laying insulation. The slabs are placed according to the principle of brickwork in a checkerboard pattern. If pasting occurs in several layers, then it is necessary to ensure that the seams of 2 rows do not coincide. Near the openings, the insulation must be fixed in such a way that the seams do not coincide with the edge of the openings in the wall. Otherwise, cracks may appear during finishing.
- Working with gaps between polystyrene foam. If the seams between the insulation are more than 2 mm, it is necessary to fill them with polyurethane foam or glue that was used to install the slabs.
- Fixing foam to the wall. This stage involves fixing the insulation to the wall to protect it from tearing off. For this, special dowel umbrellas are used, but you can start working only after the solution has completely dried. Often 1-2 days are enough. The penetration depth of the dowel should be within 5-6 cm.
- Treating the surface of the insulation with a layer of glue with a reinforcing mesh. On top of this layer (after drying) you can apply a finishing finish. For example, “bark beetle”.
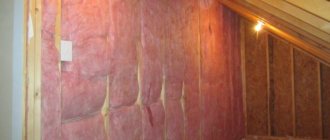
Mineral wool and the “hinged (ventilated) facade” system
No less popular is the second material for insulation, which, along with foam plastic, is used by professional and novice builders - mineral wool. Typically, mineral wool is supplied in briquettes made of mats or slabs, which consist of fibers intertwined in a chaotic manner.
Insulation with mineral wool can also be done using “wet” technology, but all the advantages of the material are most fully revealed with a ventilated system .
Glass wool, blast furnace slag or rocks can be used as raw materials for this material. The composition is additionally impregnated with moisture-repellent oil for better adhesion of the fibers.
The most popular type of insulation for facades is stone (basalt) wool.
Among the advantages, the following points can be noted:
- chemical resistance;
- low level of thermal conductivity;
- mechanical strength;
- temperature stability;
- excellent sound insulation;
- fire resistance;
- good vapor permeability;
- good air exchange.
There are also several negative sides , which are as follows:
- complexity of the work;
- health hazard, the need to use personal protective equipment;
- loss of properties when wet;
- airflow.
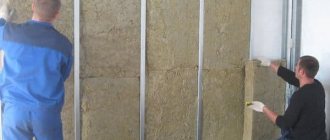
Insulating walls with such material implies the need to install lathing. Step-by-step instructions for all actions:
- Surface preparation. As in the previous insulation option, you first need to prepare the walls and clean the surface of any interference, including mortar leaks, pins, and dirt. Usually, before installing this type of insulation, a vapor-permeable membrane is laid.
- Installation of sheathing. Wooden or metal sheathing must be mounted vertically. Often, 50x50 mm timber is used for these purposes. The pitch must be determined based on the size of the wool slabs used, so that there is no need to make additional trimming. Some experts prefer to lay the wool without lathing, but then you will need to install a base profile.
- Installation of mineral wool slabs. At this stage, you can make a choice between mounting with glue or fixing with special disc-shaped dowels. When applying the adhesive mass, using a comb spatula, it is necessary to distribute the adhesive over the entire surface of the slab. For 1 square meter, you need to take about 5-7 dowels for the second method.
- Water and wind insulation. After installing the insulation, it is necessary to fix the wind and waterproof membranes. This is done with an ordinary construction stapler, and the joints are glued with construction tape.
- Ventilated gap. The final stage is the installation of vertical sheathing, which can create a ventilated gap. Such lathing can become the basis for fastening if the facade is covered with siding.
When does it make sense to insulate?
Initially, when purchasing such wall material, pay attention to its functionality. In terms of strength and density, blocks are produced for load-bearing walls, partitions and as an independent thermal insulation layer.
For structures with a thickness of 400-600 mm, a separate layer of thermal protection is not required , which is acceptable for houses in the central regions of Russia. For blocks with a smaller thickness of 250-350 mm, an external protective layer of at least 100 mm will be required; for walls less than 250 mm, two layers will have to be installed - outside and inside the walls.
Important ! The decision on the choice of insulation thickness and protection option should be made at the design stage of a household made of expanded clay concrete. If the developer chooses the right material and implements the technology of laying a multi-layer wall, then it will be warm and durable.