For summer residents, the warm season means relaxing in nature and cooking barbecue. But during the harvest period of vegetables and fruits, the time comes for preservation. Doing it in the house is uncomfortable, hot and stuffy. But equipping a separate room with a stove for these purposes is an excellent option. Among the many materials, a summer kitchen made of brick will be the most durable and safe to use. A closed building can be used even in winter.
Drawing up a work plan
Owners who want to build it with their own hands should seriously approach the development of a building drawing. Draw a detailed diagram of the future kitchen indicating the dimensions, location of walls, window and door openings, roof, stove. It is necessary to immediately calculate the amount of materials and their cost. Ensure a convenient supply of communications and the availability of the necessary tools.
To simplify the task of arranging the interior, you can make sketches of the approximate arrangement of furniture in advance. In choosing the exterior decoration of the facade and design for the kitchen, the main condition is maintaining harmony with other architectural structures on the site.
Photo of the garden kitchen project
Advantages of a brick barbecue oven
Brick BBQ ovens are versatile and allow you to cook a range of delicious dishes. Recreation areas equipped with a canopy and equipped with barbecue stoves are convenient for use in any weather, regardless of the time of year.
The stoves look beautiful and serve as an excellent addition to the interior of any area.
Furnaces can be equipped to use any type of fuel, which is also their undoubted advantage.
The disadvantage of brick barbecue ovens is their large size. In addition, fire safety measures force us to take their placement on the site very seriously.
Construction of the foundation
A summer kitchen is a massive structure and therefore must have a reliable foundation, the appropriate type of which is determined based on the size of the structure and the expected load.
You can learn how to choose a foundation for construction and what features of each type of masonry can be found in the article “Foundation for a gazebo.”
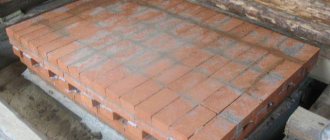
Photo: monolithic foundation design. Read the article: “Foundation for a gazebo.”
Often, for brick structures, a monolithic or strip foundation is poured with a depth of up to 80 cm. The solution hardens within 1–2 weeks, depending on weather conditions.
When the base is ready, you can begin arranging the floor. It is laid with tiles or stones on top of the cement screed.
It is worth considering that the floor level in an open kitchen is at least five or even ten centimeters above the ground. This will prevent rainwater from entering and accumulating on the floor of the room.
Open summer kitchen: views and photos
Open is more like an open gazebo or veranda. A very good option for the warm season. Not in all regions, even in summer, you can stay outside for a long time. Then they make closed summer kitchens - this is already a small house that can be built using any technology that seems most attractive to you.
Summer kitchen - extension
Let's start with open areas. If you plan to move your main activity to fresh air for the summer, it will be more convenient to attach a summer kitchen to the existing house. In this case, they make a veranda. Most often, they first make it open. The easiest way is to make a wooden extension. In a very open version, these could simply be pillars supporting the roof.
DIY summer kitchen
This option is very good for the southern regions, where for most of the year you can stay outside for as long as you like. For more northern regions or if this is a permanent residence, they usually decide to make the extension more closed. First they make the railings, and then they often think about covering the spans with something else: they want to extend the “period of use.” As a result, the open summer kitchen becomes closed.
Open summer kitchen made of timber, attached to the house
The most common material for this type of extension is wood. It is flexible, forgives many mistakes, which can be corrected later without disassembling the structure, so it is easy to work even without skills. It is also lightweight, so the foundation for a summer kitchen can be made of wood lightweight - columnar or pile, or with a grillage.
The second most popular material is brick or decorative stone. If you have direct hands and follow the technology, amateur developers can work with this material. You shouldn’t take on building a house without experience, but you can try putting together pillars and partitions for a summer kitchen.
An example of an extension to a house with brick pillars
But since even a pillar made of brick or stone no longer weighs a hundred kilograms or more, a more solid foundation is required for it. If we take into account that it will also take the load from the roof, then we will have to make pillars or piles with good load-bearing capacity.
Take-out on the side of the house - an open terrace with an oven and barbecue
If you are thinking about putting up brick walls later, it is better to immediately pour a pile-strip foundation, and bury the tape below the freezing depth. If this option is not suitable - the freezing depth is large or the soil does not allow it, you will have to either make a monolithic slab, or abandon the brick partitions, making them using a different technology, even using the same wood or frame-panel technology. The good thing about a self-built summer kitchen is that, knowing all the design features down to the smallest detail, you can subsequently modernize the building.
Detached building
Some people don’t really like kitchen odors that can enter the house from the extension. Then a small building is erected at some distance from the house. The presence of summer kitchens is almost a mandatory attribute of private houses in the southern regions. Before the era of air conditioning, cooking in the heat indoors was a real torture: high temperature “outside”, heated walls, and even heat from the stove - the conditions were hellish, while the rest of the rooms were also heated. That’s why they made at least small free-standing gazebo houses, in which a gas stove and a cylinder with liquefied gas were installed in cities, and a small stove was installed in villages. Some even cooked on a “kirogaz” or primus stove.
Combined open-closed type
Modern climate control technology can eliminate all these inconveniences, but free-standing summer kitchens are still being built. They are often also used as a guest house - having them with an attic floor.
The cheapest option is poles that support the roof. They can be wooden, brick or combined - consisting of a stone base and a timber top. This is the best option from the point of view of operation: the wood is protected from the effects of most precipitation, and at the same time the weight is not very large.
The optimal type of pillars for an open summer kitchen
There are plenty of options for free-standing outdoor summer kitchens. They are built according to the same type as gazebos, only perhaps they are larger in size.
Sometimes they may have areas for grills or barbecues. How to make a brick barbecue - here.
One of the easy options
What to make the floor from
The floor in such a kitchen can be made of planks. It’s easier to do, but many are confused by the fact that the wood will be left with virtually no protection. There are two ways to solve the problem. The first is to use effective protective impregnations - such as wood oils or waxes intended for outdoor use. They do not create a shiny surface, but protect well from moisture and dirt. Using varnishes for summer kitchens is not the best idea. They begin to burst and crack; to renew the coating, the old one must be completely removed, while oils and wax require only thorough preliminary cleaning; after drying, a fresh layer can be applied.
This terrace has been treated with Pinotex Terrace Oil
The second way is to use not wood, but a wood-polymer composite (WPC). These are boards that consist of a mixture of wood fibers and polymers. They look and feel very much like wood. The only difference is that they almost do not change size depending on humidity, although thermal expansion is present. Such boards are called “decking” or “planken” depending on the profile of the board. There is also “garden parquet”. This is a covering made from the same material, only assembled into panels, like parquet. They can simply be laid on the ground, without any preparation.
The terrace and floor in the summer kitchen are made of WPC - wood-polymer composite
The advantages of WPC include a long period of operation without changing the original properties. It dates back decades, but varies greatly depending on the manufacturer. The downside is that the price is not the most affordable. This may be due to the fact that the technology is relatively new, not yet particularly mastered, although there are Russian manufacturers of similar products.
Stone or specialized tiles withstand weather conditions better, but installing such a floor is not an easy task. If you simply lay it on a gravel-sand backfill and let it soak in the fall, in frosty weather the tiles may crack or bounce off. You have to make an insulated monolithic slab, following all the technology: with a sand and gravel layer, insulation, reinforcement, pouring concrete. The dimensions of this slab are 50-60 cm larger around the perimeter than the planned building. In general, the costs and work are serious, although it is convenient to use.
One of the floor options is large concrete slabs made of high-grade concrete
After a time when the concrete gains strength (at least 2 weeks must pass, and this is at an average temperature of +20°C), the coating can be laid. You can use flagstone - stone sawn into layers, you can use porcelain stoneware, or frost-resistant tiles.
A simpler option is to lay out the area with paving slabs. But this is an exclusively summer option. But - without fussing with the foundation.
The area for the summer kitchen can be laid out with paving slabs
If you build a summer kitchen with your own hands at the dacha, this is perhaps the best option. It turns out inexpensive and practical.
Wall masonry
When starting to build walls, you need to consider that:
- Brick rows begin to be erected from the corner. Their evenness is checked by a level.
- It is recommended to use half or one brick masonry technology.
- Each subsequent row is shifted by half a brick.
- Lintels and support beams are installed under window and door openings in masonry areas.
- Finished walls are checked for cracks. The gaps are filled with cement-sand mortar.
- Surface irregularities are eliminated with a grater and sandpaper.
Upon completion of the wall laying, the foundation for the roof should be prepared. It will be a mauerlat made of wooden beams.
Tools for building a summer kitchen in the country
- Woodworking machine with decent power. Dry planed wood costs three times more. If you have time, you can process the wood yourself; if you have extra money, buy something ready-made.
- Chain saw for timber It is better to use a light, electric one.
- Jigsaw. The more powerful the better.
- Screwdriver
- Drill
- Belt sander for finishing edges.
- Electric planer
- Circular hand saw
- Hacksaw
- Brushes
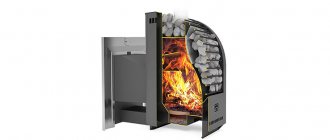
How to build a stove complex inside a summer kitchen
If you plan to build a barbecue stove or other type of wood-burning stove inside, you should provide a convenient place for it in advance so that you can make a separate foundation.
The following article will help you choose the appropriate type of stove and learn about the main stages of its construction: “Stoves for gazebos.”
It is not recommended to work with concrete mortar at temperatures lower than +50 C. Its uneven drying will lead to the appearance of cracks on the surface.
The stove masonry is made with fireclay (fire-resistant) bricks two weeks after pouring the base.
Read the article: “construction of a furnace complex.”
If the owners want the stove to be built professionally, then its construction can be ordered from craftsmen who will create a reliable turnkey stove and do it quickly.
No less convenient are ready-made factory versions of furnace complexes, which can be purchased in stores at an affordable price.
Construction of a kitchen with a gazebo
Before starting construction work, you should decide on the location of the future structure. First of all, you should think about the possibility of extending communications so that there is light in the gazebo, and, if necessary, a sink and stove. When installing a barbecue or stove, fire safety rules must be observed. According to the regulations, such a structure should be located no closer than 7 meters from other buildings. It is advisable to choose a shady corner among the trees, away from the roadway, toilet and compost pit. If there is a swimming pool, lake or pond on the site, a gazebo with a summer kitchen can be placed there and a full-fledged lounge area can be equipped. If the family has small children, the playground should be within sight so that parents can keep an eye on the kids from the gazebo.
Construction of the foundation
Depending on the type of gazebo chosen and the materials used in construction, the foundation can be poured, columnar or strip. The first option is most often used. Before starting work, you should clear the ground of debris and remove the top layer of soil along with the plants. It is necessary to dig a 30–40 cm hole around the perimeter, fill it with crushed stone or sand, and compact it well. Then the surface is filled with 10 cm of concrete mortar or a ready-made concrete base is installed.
Logs placed on the foundation must be treated with an antiseptic
Installation of frame and walls
There are 4 supports installed around the perimeter, to which horizontal beams are attached. Beacons will help prevent distortion of the structure. During construction, you can use foam blocks in combination with wooden floors.
Vertical posts are installed on wooden dowels
The support posts are aligned strictly vertically and temporarily fixed with boards
Roof installation
After tying the beams, it is necessary to install the rafter system. For ease of installation, experts recommend using polycarbonate. It is desirable that the roof be pitched, that is, made at a slope. This will prevent water from accumulating on the surface. To do this, fix beams of different heights on opposite sides.
Preparing the base for roofing
Soft tiles are best suited for a gazebo - they look attractive and do not get hot in the sun
Finishing work
When covering the facade, lining, siding or natural stone are most often used. The last option is impractical for the complete construction of a gazebo: it is better to choose it when finishing the base, where it will combine beautifully with green bushes. Wooden lining fits perfectly onto the foam block, but requires special care and installation skills. The best option is considered to be siding panels, the service life of which significantly exceeds other materials. They are lightweight, resistant to humidity and temperature changes, and are inexpensive.
5de1ebbcfd296753df5635932396dfc7.jpe
The workplace can be a homemade frame structure with a purchased tabletop laid on top
To equip a gazebo with a barbecue, you will need certain skills, so experts do not recommend installing the structure yourself. An experienced technician will help you determine the size of the furnace and carry out high-quality installation. It should be borne in mind that such a kitchen will be much larger in size, and additional communications will be required to install a sink. Fire-resistant bricks will help extend the life of the barbecue. When finishing the floor, it is strongly recommended to use tiles that are resistant to high temperatures.
Roof installation
There are no restrictions in choosing the type of roof. But the easiest to build is considered to be single or double slope. An important installation condition is maintaining the correct angle of inclination.
Suitable materials:
- corrugated metal sheets;
- tiles;
- slate;
- metal tiles;
- ondulin.
To make the roof frame, longitudinal and transverse beams and bars are used, and sheathing is made. If this is a closed building, then before laying the roofing material it is necessary to make a layer of thermal insulation made of mineral wool.
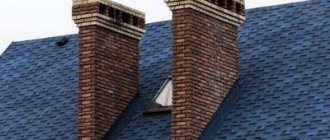
An important stage of roof installation is the installation and removal of the chimney. All work must be carried out in accordance with the set of rules SP 7.13130.2013.
Photo: chimney lining diagram
Therefore, you need to consider the following:
- The optimal pipe height is 5 m and above. With a lower value, problems with traction may occur.
- It is better to install the chimney at the ridge of the roof. If placed lower, there will be a high probability of snow bags in winter.
- The minimum distance of a brick chimney to combustible materials is 13 cm.
- Hydro- and thermal insulation of the pipe is required. In the first case, with a special film, in the second - with basalt mineral wool.
The roofing material must be positioned so that its edges extend beyond the frame. When draining, the water will not enter the room.
After installing the roof, you can begin installing windows and doors.
Finishing touches – interior arrangement
Photo: open extension as a kitchen
It is better to place only the necessary kitchen utensils for cooking, furniture and a sink inside the room. Other decorative details should not clutter up the space, and the distance from the stove to other furniture should be at least 1.5 m.
There is no need to hide ceiling beams. They can be highlighted by painting them in a bright color or simply varnishing them. An interesting lamp in the center made of natural materials will complement the picture. A closed kitchen must be equipped with a hood.
For furniture, you should choose a practical wooden table with chairs, benches, and wicker chairs. Windows are usually decorated with transparent tulle or not covered at all. You can hang small decorative lanterns along the façade of the building.
Planning and arrangement
In a private courtyard, a summer kitchen design is being designed that aesthetically matches the main residential building. At the same time, at the dacha they do not use a strict stylistic link between one structure and another.
Having built the summer kitchen, we begin to arrange the premises. For this purpose, interior finishing is performed. For example, you can sheathe walls with plastic, plasterboard, or clapboard. Next, furniture is installed, electricity is connected, i.e. make the building functional. So, to transform your kitchen space into a livable space you need to:
Equipment
For a building to become a kitchen, it must have the appropriate equipment installed. The main kitchen equipment is:
- Cooking surface, oven, stove;
- Dishwasher;
- Refrigerator for food storage;
- Hood;
- Auxiliary devices: meat grinder, microwave, mixer, steamer, other items.
Selection of furniture and zoning
The choice of furniture will depend on the type of building in question. For open structures, items without soft finishes that absorb moisture are suitable. Use chairs, benches, tables made of wood or plastic. There are no restrictions for indoor spaces. A soft dining set and a sofa for relaxing would look great here.
If the kitchen and dining room are not separated by a partition, the room is often zoned. To do this, you can make the floor from different building materials, paint the walls in two colors, and arrange a podium. You can also use a screen or furniture. They often use a bar counter, like those installed in a cafe. It perfectly divides the room into a work space and a relaxation area.
Lighting
Lighting the space correctly is very important. If the room is small, attached to a house or cottage, then a few lamps and street lighting of the residential building itself will be enough
For large buildings, be it frame kitchens or closed buildings, one lamp or central chandelier is not enough. The following should be provided:
- General lighting. Located in the center of the room or above the table for eating. Standard, flat chandeliers are used;
- Work area lighting. The place where dough is kneaded, meat products are cut, potatoes are peeled must be additionally equipped with fairly bright lamps. They are placed at the bottom of wall cabinets, in the form of LED strips, or floor lamps are installed;
- Dining area lighting. First of all, the location of the table relative to the window is taken into account. You don't need too much light here. Enough wall sconces and lamps with adjustable suspension.
Gardening - selection and planting of plants
The object will look more impressive if it is landscaped. For this purpose, it is best to use climbing plants. It is necessary that they have an attractive appearance, exude a good aroma, and weave along the walls, creating additional comfort and protection from sunlight. Let's consider the options for the most suitable plants for a summer kitchen:
708334297301748e352842da23442544.jpe
9220523e8e5571bb1c42b45601f56430.jpe
- Wild grapes;
- Wisteria (wisteria);
- Ampel varieties of strawberries;
- Clematis (clematis);
- Hop;
- Schizandra.
You can plant perennial flowers, shrubs, and dwarf trees around. For each style, a characteristic set of vegetation is selected.
Photo gallery of brick summer kitchen projects
The photo below shows options for open and closed buildings of different styles with different types of stove complexes.
An equipped summer kitchen is a godsend for summer residents. Oven dishes make regular dinners family occasions, and canning food becomes more convenient and easier outdoors. Therefore, for those who want to relax in comfort and not sweat at the stove in a stuffy room in the summer, building a summer kitchen on their site is an excellent choice.
Summer kitchen design: photo
After building a summer kitchen, another problem arises: it is necessary to decorate it. The arrangement includes not only the choice of a table and chairs, it is also necessary to somehow organize the work area, somewhere to store food for the stove, which is often placed here.
And some more ideas in video format