Additional requirements for choosing a furnace
Since we suggest doing everything yourself, rather than buying a ready-made stove in a store, when choosing the required design, we recommend paying attention to the following parameters:
- Easy to use . The heating process should be a pleasant and uncomplicated task that every family member can handle.
- Economical . This point is especially important if you plan to use only this stove to heat the house on an ongoing basis (in winter). In this case, one unit of fuel will provide maximum heat transfer.
- Simplicity of design . If a person who does not have experience in masonry takes on the construction of a complex model of a device, difficulties may arise that will subsequently lead to incorrect operation of the stove.
- Appearance . The design of the structure should please the eye and create coziness in the room, so it is worth paying special attention to the quality of the brick.
- Presence of a water circuit . It is known that even a small heating stove with a built-in heat exchanger for heating the coolant is much more productive than other models without this device.
When choosing a heating stove, you should consult with a qualified stove builder. He will tell you which configuration to choose and what you should pay special attention to.
Selecting a location
Before you begin construction, you should decide where the stove will be located. If there is only one small free area in the house, there is nothing you can do about it. But to obtain maximum heat transfer, it is recommended to place the stove in the central part of the house or room. Thus, none of its elements will touch the street wall, and accordingly, warm air will not escape outside. In addition, when adjacent to the supporting structure, temperature changes may occur, which negatively affects the durability of the heating device and the operation of the chimney.
How to build a mini brick oven with your own hands?
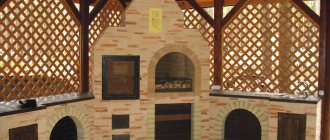
All lovers of country holidays dream of a stove in their cozy cottages. As you know, a brick stove is the oldest universal design for heating rooms. Its effectiveness and high performance have been proven for centuries.
It is not at all necessary to build a serious bulky structure. Sometimes a small-sized stove is enough, which you can build with your own hands. Models may differ in shape, size, type or design of the chimney, but in general, their construction will not take you much time and will not require serious stove-maker skills.
What are we going to build?
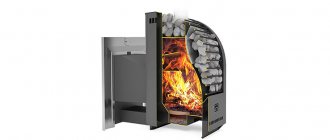
The stove that we propose to build with our own hands has several names among the people: Malyutka or the single-bell stove PTO-2300. Its dimensions are 770x510x2380 mm. This design is well suited for country house construction. The firebox is made of refractory bricks. The device can operate on almost any solid fuel, namely wood, coal, peat, anthracite.
PTO-2300 is the most compact of all thick-walled models. Below you can see a 2x3 brick oven with a fairly simple design. The name itself speaks about its power, i.e. the device can produce up to 2300 watts per hour. One firebox is enough to heat a room measuring 25 m² or two adjacent rooms measuring 35 m².
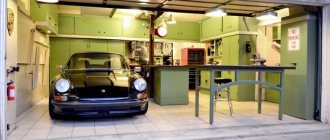
Basically, a similar structure is installed in the central part of the house. Thanks to the shape of an elongated rectangle, it acts as a partition between rooms.
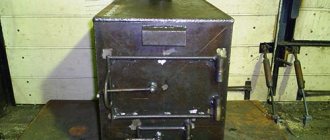
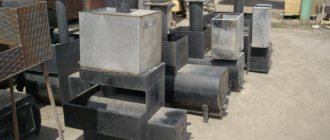
Option for beginner stove makers: a stove with a cast iron firebox
A mini-brick oven can be built with your own hands based on a ready-made cast-iron firebox. Cast iron fireboxes are durable - they do not crack or burn out. This option is more suitable for beginners, since the design already includes all the basic elements. The combined stove heats up quickly and cools down for a long time, thereby significantly increasing the efficiency of the fireplace. If desired, you can choose a fireplace-type hearth with a fireproof glass door - this model will not only heat, but also decorate the room.
Before starting work, prepare a strong and level base. To do this, you can pour a small concrete podium. The lining of a cast iron firebox is made in half a brick, leaving an air cushion 1 to 10 cm thick between the walls and the lining. Additionally, it is necessary to provide small ventilation holes in the lower part of the building - they will ensure the release of heated air and improve heat transfer.
Example of lining a cast iron firebox
You can start building a mini-oven with your own hands only if you have firm confidence in your knowledge and skills. Any doubts are a good reason to postpone independent work and entrust the construction to a professional stove-maker.
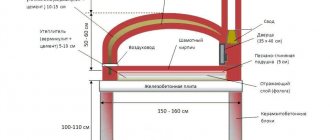
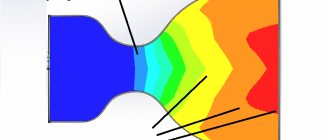
Device
In the presented furnace, hot gases rise through the firebox channel into the bell (their path is indicated by arrows in the diagram). Next, the gases descend, go around the “undercut,” enter a vertical channel and rush into the chimney, where two valves are installed.
In the absence of a convective system, the solid fuel stove would not have time to heat up. The cap serves to slow down gases and increase their contact time with brick walls.
You can download the drawing in high quality from this Link.
Advantages of a small stove
Among the main advantages the following are noted:
- The simplest design allows even a non-professional to build a stove independently.
- The device occupies an area of only 0.4 m². Thanks to these dimensions, this heating device is popular in country houses.
- A strong foundation is not required since the weight of the structure is light.
- The efficiency of the stove allows you not to make large stocks of firewood. In addition, it can be heated with other types of fuel: coal, peat, anthracite.
- The device does not contain heating channels. Their functions are performed by the fuel cap.
- Can heat a room up to 35 m². In the spring and autumn, one firebox will be enough to heat the room, and in winter – two.
- The structure can be installed in a wall, thereby saving space and uniformly heating two rooms.
Foundation
The foundation must be separate, not connected to the house. Depending on the material, rubble, rubble concrete and brick foundations are distinguished. Usually cement or lime-cement mortar is used.
The size of the foundation should be laid 5-7 cm larger than the dimensions of the stove itself. In depth it should be 15-20 cm below the floor. A cement-sand screed is placed on top of the masonry. It is recommended to use a level and check that it is horizontal. Then you need to lay two layers of roofing felt and lay out 2-3 rows of bricks to the floor level.
Furnace order
Below we will consider in detail the order of the heating furnace.
Row 0. As described above, you first need to lay out two levels to the floor mark. They are placed on the waterproofing layer of the foundation. For this purpose, roofing material is used.
Row 0(1) is continuous. The number of bricks in a row is 12 (red).
Row 1. An ash chamber is formed, where ash from products burned in the oven will be collected. To make it easier to remove the combustion residue, two bricks are cut down to the middle in the front part.
1 row. The number of bricks is 11 and ½ (red).
Row 2. We continue to form the ash chamber, to access which we install a hole for the door. Its size is 140x140 mm.
2nd row. Number of bricks – 12 (red).
Row 3. Identical to the previous row and continues to form the ash chamber.
3rd row. The number of bricks in a row is 10 and ½ (red).
Row 4. Here the ash chamber is blocked and grooves are cut out in the bricks for installing a grate measuring 200x300 mm. It is recommended to do this as follows: apply the existing grate to the row without mortar and trace it along the contour with a margin (usually about 5 mm is left, which is necessary for temperature deformation of the metal). Next, each brick needs to be processed and hewn. Then an estimate is made and everything is put into solution. After this, the grate is immediately placed.
4 row. The number of bricks is 11 and ½ (red).
Row 5. Refractory bricks are laid and a fuel chamber is formed. At the front and rear it contains bevels of the inner surface towards the grate. This is necessary so that combustion products can roll down to where there is sufficient air access.
5 row. The bricks installed in the front and back of the chamber are cut at an angle of 45 degrees. Number of bricks – 11 (fireclay).
Row 6. Continuation of the fuel chamber. Here the door for the combustion chamber begins to form. Its size is 250x210 mm. It is worth noting that the rear brick has a slight slope towards the combustion area.
6th row. We cut the brick of the back wall of the chamber at an angle of 45 degrees. Number of bricks – 8 (fireclay).
Rows 7 and 8. Continuation of the fuel chamber.
7th row. Number of bricks – 7 (fireclay).
8 row. Number of bricks – 7 (fireclay).
Row 9. The fuel chamber door is closed and its height continues to increase.
9 row. Number of bricks – 8 (fireclay).
Rows 10 and 11. The fuel chamber is formed. It turns out to be quite voluminous. It is necessary to pay attention to the different placement of bricks on levels 10 and 11.
10 row. Number of bricks – 8 (fireclay).
11 row. Number of bricks – 9 (fireclay).
Row 12. The chamber begins to overlap. Three-quarter bricks with an edge are installed, leaving a vertical channel that will be used for the escape of gases.
12 row. Number of bricks – 11 and ½ (fireclay).
Row 13. Complete closure of the fuel chamber continues, leaving only the vertical channel. Its size is similar to the parameters of a whole brick.
13 row. Number of bricks – 13 (fireclay).
Row 14. The formation of the vertical channel continues. The chamber is covered with another level of fireclay bricks.
14 row. Number of bricks – 12 (fireclay).
Row 15. The formation of a new vertical channel and a hole for installing a door for cleaning begins. Its size is 140x140 mm.
15 row. Number of bricks – 9 (fireclay).
Row 16. Regular brick is used here. It should be noted that it is not placed in the center, since a connection is formed there between the first and second channels to ensure the passage of hot gases.
16th row. Number of bricks – 8 (red).
Row 17. The cleaning door opening is blocked. The channels are still connected to each other in the center, the brick is not laid.
17th row. Number of bricks – 9 (red).
Row 18. The formation of the cap begins, which will continue to the very top. Subsequently, the front channel will turn into a pipe.
18th row. The number of bricks is 9 and ½ (red).
Rows 19, 20, 21, 22, 23. The configuration completely repeats the previous level.
19 row. Number of bricks – 10 (red).
Row 24. The hole in the vertical channel narrows in the shape of the letter G. A hole is formed for the valve.
24 row. Number of bricks – 10 (red).
Row 25. A hole equal to half a brick is left, and a seat for the smoke valve is cut out.
How to make a lightweight mini camping stove with your own hands
Dear visitors to the “ Self-made Friend ” website, today we will look at how to make a mini camping stove with your own hands from a tin pipe with a diameter of 200 mm.. On a long hike or on an overnight fishing trip, you will have to be left alone with the wild nature and its unpredictable whims. To comfortably spend the night in a tent, you will definitely need a small and compact stove for heating. In the summer, of course, there is little need for it, but in the autumn or winter, such a stove must be in the equipment of a hunter, fisherman, tourist, SURVIVALIST
This stove can be easily made with your own hands, for which you will need a tin pipe with a diameter of 200 mm, 2 plugs, an 80-100 mm pipe for the chimney and ash pan. We cut off a piece of pipe 50 cm and make a hole for installing a chimney guide, where the flue is installed and riveted from the inside, the chimney pipe itself is secured with a clamp.
The furnace-blower is made of a sheet of tin rolled into a pipe; holes are drilled in 3 rows along its entire length; they are necessary for the formation of draft and natural air circulation to the combustion center. There is also a special plug-glass with which you can regulate the intensity of combustion, or stop it altogether.
So, let's look at the step-by-step instructions.
Materials
- tin pipe 200 mm length 50 cm
- chimney pipe 80-100 mm
- clamp
- folding fishing chair
- sheet metal 0.5-0.7 mm
Step-by-step instructions for creating a mini camping stove with your own hands.
You will need a 200 mm tin pipe, 2 plugs and clamps for a reliable tie.
Chimney pipe 80-100 mm.
A piece of pipe 50 cm long will serve as the furnace body.
You can immediately install a plug in the back.
A hole is cut for the chimney flue. It is riveted from the inside.
A strip is cut from sheet metal to make a blower.
Plug - glass.
Holes are drilled in 3 rows; they are needed to create better traction and natural air circulation.
Using a plug, you can regulate the draft and air supply to the combustion source, or completely block the holes to extinguish the fire in the stove.
The stove is installed on an unfolded fishing chair, like this.
The tests are already carried out directly in the tent. Such a stove will heat an army tent designed for a platoon in a short time; the stove consumes quite a bit of fuel in economy mode. You can throw firewood into the stove and install a plug on one hole, thereby maintaining low combustion and maximum heat transfer, which is very important in camping conditions.
We hope this material was useful to you. Thank you for your attention!
Source
FAQ
Question: Is a 14x14 chimney section sufficient for this project? Answer: The device power is 1760 W. With this parameter, the chimney cross-section is quite sufficient.
Q: On what mortar is it better to lay fireclay bricks? A: It is recommended to use a ready-made mixture for refractory masonry, which is sold in any specialized store. As a rule, the packaging contains instructions for its use. You can use a regular solution, but it is recommended to add fireproof mortar to it in the amount indicated on the package. There may be pieces in it, so you should either sift it or grind it further.
Q: The power of such a stove will not be enough for a 6x6 m house consisting of three rooms? The walls are made of adobe blocks or frame-panel. In winter, the average temperature is -10 °C, but there are frosts and up to 35-40 degrees below zero. A: For such conditions this will not be enough. You need to use something the size of a Swede.
Q: If the oven is extended by four meters, stretching the hood higher, will it function normally?
A: In practice, it has never happened that the furnace was extended to four meters. The design, of course, provides for a change in height due to the upper cap, but 4 m - this needs to be tried.
Q: Is it possible to make a stove without a foundation by placing it on the floor? A: The weight of the structure excluding the pipe is almost 1.5 tons. See for yourself whether the floor can withstand this.
Q: Can the height be reduced? A: This can be done using rows 19-22 and 27-30. If any two consecutive levels are removed from the presented range, the design will not be broken.
Q: Tell me, will this stove be enough to heat two rooms (20 m² and 15 m²)? A: It all depends on how well the house is insulated and at what outside air temperature you will heat it. If you are going to live in this house in winter, it is better to choose a larger stove.
Q: What is the advantage of having 2 dampers? Is it possible to leave only the top one to simplify the design? A: Two valves hold heat better. You are allowed to place one, but it must close tightly.
Q: Can these ovens be made entirely of refractory? Will it be possible to lower the firebox and what will this affect? A: Laying a furnace from refractory bricks is possible. There is no need to make the firebox lower. In this case, the fuel may not burn completely and soot will form.
Q: How is the difference in size between regular and fireclay bricks resolved? A: Due to the better geometry of the refractory material, the seams are thinner when laying. This hides the difference in brick sizes.
What is the best red brick for laying a stove?
Ordinary red clay brick for the stove, classified as the first grade (GOST 8426-75), is the main material for the construction of stoves. The standard brick shape is a rectangular parallelepiped with flat edges and right angles. Its surface must be free of cracks and chips. This is the best brick for stoves that will have all the benefits of safe operation.
The size of the brick for the stove is 250 X 120 x 65 mm, the weight can vary from 3.5 to 3.8 kg. 380 bricks are placed in 1 m3 of solid masonry. Ordinary red brick of normal firing is divided into seven grades, each of which is designated by a number: 300, 250, 200, 150, 125, 100, 75. The markings indicate the compressive strength kgf/cm2 (1 kgf/cm2 = 0.1 MPa).
What kind of brick for laying a stove is prohibited from being used for the construction of stoves is unburned or burnt ordinary clay material. Unfired brick has a pale pink color. It is a rather fragile material, which is characterized by significant water absorption, so it can often get wet in water. When tapping such a brick, a dull sound is heard.
As a result of firing at temperatures above 1000 °C, the brick becomes burnt. It is distinguished by its dark color. A glassy film is partially visible on top of it, and the surface itself is slightly curvature and covered with cracks. Burnt brick is very durable. It is difficult to trim, but it weakly binds to the solution. This type of brick is called “burnout” or “iron ore.”
For laying arrays of stoves and smoke ducts, it is recommended to use only solid clay bricks. It is prohibited to use perforated, silicate or slotted bricks in such masonry, because they quickly collapse under the influence of high temperatures.
Refractory brick is made from refractory clays, which are characterized by increased strength and fire resistance. Such bricks can withstand temperatures of 900-1000 °C. It is used for laying and lining the fireboxes of furnaces, which are designed to burn fuel with low calorific value (for example, firewood).