The search for high-quality material for plaster sometimes leads to expensive but reliable material - tile mixtures. High adhesiveness, relative ease of use, and quick drying are good characteristics for plaster. Are all the nuances visible at first glance, and is it possible to plaster with tile adhesive?
General information
Mixtures for fixing tiles differ from other building compositions in their increased strength and ability to operate in extreme conditions (high humidity, vibration, temperature fluctuations). Depending on the chemical composition and consistency of the mixture, three types are distinguished:
- dry, cement-based, with resins in the composition;
- dispersive, ready to use;
- liquid nails (polymer base, used for sealing small defects, not plaster).
The cheapest and most popular to use are dry mixes. The consistency depends on the amount of added water and sand, and is regulated by the builders themselves. There are also epoxy mixtures, which contain resins and other synthetic substances that impart greater resistance to external factors and plasticity.
Dispersion adhesives are expensive and dry quickly. High ductility indicators allow the composition to be used under significant mechanical loads. Due to the high cost and difficulties when applying over large areas, it is used only for its intended purpose.
Liquid nails containing rubber are a durable material and are used for working outdoors and not indoors. The packaging resembles a tube with a dispenser. The mixture is immediately ready for use.
It is recommended to use adhesive mixtures for minor amounts of wall reconstruction work, but no more.
The choice of adhesive for its intended purpose depends on the characteristics of the room (humidity, temperature) and the type of surfaces prepared for gluing.
About finishing the sauna stove
The advantage of mixing the basic elements yourself is environmental friendliness, low price, positive reviews and the test of time.
The disadvantages include the difficulty of maintaining the number of components in the correct proportions, a lot of dust and a lot of time spent on preparatory work.
You can give the stove an attractive look by finishing it with tiles. There are special tiles for stoves that are heat-resistant, but they cost a lot. There are special tiles, but they are laid during the construction of the stove (they cost even more). For the most part, ordinary ceramic tiles are used for stove cladding. If it is of normal quality and laid correctly, nothing happens to it. There are two restrictions:
- use tiles of small formats, as it has been noticed that they hold up better;
- do not use gypsum-based tiles - they greatly reduce heat transfer.
Furnaces are plastered for lining mainly with cement compounds. When clay dries, it shrinks very much, which is why the tiles inevitably fall off. Moreover, it is recommended to use the same composition for plastering and gluing tiles - this guarantees good adhesion.
We invite you to familiarize yourself with Non-standard types of foundations for a bathhouse
A few more technological points that relate to laying tiles near furnace castings and other metal elements. The gap between the edges of the tile and the metal should be about 5 mm. This gap should be left empty, without mortar. It is subsequently laid with asbestos cord, and covered with tile adhesive on top, and grouted. This way, when heated, the metal will not tear or squeeze out the tile.
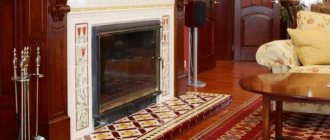
Example of tiling a stove door
Craftsmen who finish brick stoves advise first plastering the stove. After the plaster has dried, you can glue the tiles using a special heat-resistant adhesive. If you adhere to this technology, then the preparatory stage will be exactly the same as for plastering (described above):
- unstitch the seams by 1 cm;
- nail/weave a mesh;
- we wet the oven;
- Apply and level the plaster.
Gluing tiles to a plastered stove
After the plaster has dried, the tiles are glued using conventional technology. Some craftsmen place the tiles on a heated stove, others - on a warm one. There are styling options without heating. The technology is no different from conventional finishing work, the only difference is that the seams are made larger - from 3 mm and they try to leave them unfilled.
An example of tiling a stove
To maintain the seams, the same crosses are used. They are then filled with gypsum grout, which is more elastic and less prone to cracking. In this case, the seams compensate for thermal expansion.
If the surface of the stove is initially smooth, but the appearance of the bricks is disappointing, you can try gluing the tiles directly onto the brick. Only it must be clean, without any dirt or dust. Take heat-resistant glue for lining stoves or fireplaces (there are such). Dilute strictly according to the instructions, also according to the instructions, apply the composition to the tiles and glue it to the brick.
There is one trick: if the tile format is such that it overlaps several bricks, the glue should be on only one of them. The rest remain empty. The solutions have a high degree of adhesion and hold well even in this situation. And this method allows you to bypass the different magnitudes of thermal expansion of different materials (the seams expand more, which is why tiles glued to two bricks can tear).
But this furnace lining technique has a disadvantage: voids filled with air do not conduct heat well, and heat transfer drops significantly. In this case, there is one way out: buy tiles the size of a brick. It is difficult to find the required sizes, but some craftsmen cut smaller ones from large-format ones, with the required dimensions.
Find or cut tiles to fit bricks
There is a technology that combines the two described above. The stove is lined with masonry mesh with 50*50 mm, wire diameter 0.5-1 mm. They nail the mesh with staples - powerful ones from a construction gun, or using finishing nails. The mesh should fit tightly. The tiles are laid on this base without prior plastering. The disadvantage of this technology is the high consumption of expensive glue.
What tile adhesive can be used in this technology? The following heat-resistant brands performed normally:
- Plitonite VT;
- Retainer;
- Emelya glue, suitable even for finishing with torn stone;
- Ceresit 17;
- Fireproof;
Torn stone glued to Emelya glue
Everything said above also applies to brick sauna stoves, but only to those located in heated rooms. If you have a bathhouse that you visit periodically and it freezes, it is useless to finish the stove. No matter how hard you try, no matter what techniques you use, everything will fall off.
When moving the furnace from a deep “minus” to an even deeper “plus”, the temperature expansions are too great. After several such transitions, bricks tear, and even more so plaster and tiles. In this mode of operation, brick ovens last no longer than 4-6 years. Then move them anyway.
All this is true for heating and heating-cooking options that are located in unheated dachas, and which are periodically heated several times during the winter. There is only one way out - at the dacha, cover it with sheet iron and calm down, and in the bathhouse - come to terms with the not very attractive appearance.
Stoves wintering in unheated rooms are easier to trim with iron
Properties of the adhesive composition
Dry mixtures are sometimes used for plastering. The reason for this is a number of properties:
- high adhesiveness;
- plastic;
- resistance to environmental conditions (temperature, humidity);
- quick drying of the mixture (important for situational rather than planned repair work).
The parameters of universal and specialized compositions are, in most respects, higher than those of profile mixtures for plaster. If you have a tight time frame for wall finishing, this is an indispensable option.
Plastering works using glue
Each building material is designed for specific purposes. Walls are usually leveled using plaster followed by putty . The first hides deep irregularities, the second gives the treated surface smoothness.
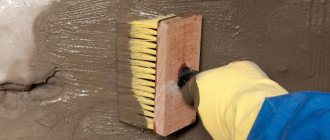
Remove fungi and mold with a wire brush. Adhesive mixtures are intended for gluing tiles, but in practice at home they are often used to level walls. The plastering process with them is similar to work using putty. High-quality installation is the key to the durability of the primary finishing. The stages and actions performed are summarized in a table.
Varieties
Among tile adhesive mixtures, several product groups can be distinguished.
- For fixing porcelain stoneware, natural stone, mosaic (Ceresit SM-11, Litoflex, Litokol). Complete drying within 24 hours. Suitable for wet areas. Apply in a thin layer (up to 6mm).
- For external and internal work under any type of tile (Eunice mixtures). They dry quickly, consumption is about 5 kg per square meter. Apply a thin layer to a previously cleaned surface.
- White adhesive for interior and exterior use. The composition includes coarse white sand. The mixture is suitable for any type of installation. Consumption and functionality are similar to Ceresit mixtures. The difference is the color when drying (whitish).
- Quick mixes. Complete drying in less than a day. You can walk on tiles installed with a similar composition after just 5 hours. Disadvantages - the work must be lightning fast, the solution loses its abilities after 40-45 minutes from the moment of complete dilution with water (“Prospectors”).
The presented types are universal, suitable for finishing work inside the house and outside.
Self-mixing of facing mortar
However, most professional craftsmen recommend using exactly these mixtures for facing work and offer several options to choose from.
It is also worth noting that such a solution, which consists of clay, water and filler, is used for laying stoves, but is used extremely rarely for facing work. This approach is associated with the influence of high temperatures imparted to the clay, which significantly changes the strength of the solution, which subsequently becomes covered with cracks.
The composition of such heat-resistant tile adhesive depends on the fat content of the clay, which is determined by the sand content in the clay. The lowest sand content in clay is 15%, and the clay will be considered oily. Clay containing from 15 to 25% sand is considered normal; if the amount of sand exceeds 25%, then the clay is considered lean.
We suggest you familiarize yourself with the height of the foundation above the ground for a wooden house
Plastering walls with adhesive mixture
The use of an adhesive mixture as plaster requires careful technical preparation and compliance with work standards. Let's take a step-by-step look at how to prepare a wall for plastering.
Preparing the base
The surface on which the adhesive mixture will be applied must be cleaned of unstable pieces, large debris, grease, and biological substances.
Removal of traces of fat occurs with a sponge soaked in a soap solution.
In places with high humidity, treatment with antifungal compounds is carried out. A mandatory item in any room is to apply a primer to the cleaned surface (durable adhesion of the plaster to the wall).
Installation of beacons
When working on an entire plane, be sure to place beacons. Their function is to prevent unevenness. Depending on the surface on which the plaster is applied, the step between them varies in the range of 0.4-0.6 m.
When working with glue, it is better to make beacons in small increments, since the mixture is quite dense, it is difficult to level a large area at once.
A special profile is attached to self-tapping screws, or a small amount of plaster itself. Mounting is carried out according to the level, and before final fastening everything is checked again with the device.
Preparation of the solution
When working with adhesive dry mixture, you must always have sand and water on hand. When mixing the components with a mixer, watch for “stickiness”. If the tools are difficult to pull out, they are all in the solution, then add sand.
It is better to dilute mixtures with glue by adding them to water, and not vice versa (adjusting the consistency).
A high-quality solution is always prepared in small portions, no more than 5 kg of glue. The reason is simple: the longer the contact with air, the less pronounced the gluing capabilities become. A realistic assessment of your strength when mixing the composition will prevent the glue from peeling off the wall.
Applying the composition to the wall
You can begin work after completing all preparatory stages. To apply and level the composition you will need a trowel and a rule.
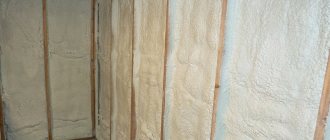
- The first layer is applied with a thickness of no more than 0.4-0.6 mm. The consistency of the diluted glue resembles thin sour cream.
- It is better not to try to repair irregularities that are visible to the naked eye with the first layer. Too much mixture will lead to drying out with cracks and a separate piece falling off.
- The second, even thinner layer is applied a day after the first. It is desirable, but not essential, to treat the dry ball with a primer, then the second one will form a more reliable layer.
- The rule is to level the second layer. They pull it from the bottom up, guided by the placed beacons.
- The corners are leveled with a special spatula.
- Grouting is carried out after 12-24 hours. Depends on how quickly the composition dries.
The technology for applying tile adhesive as plaster is simple and does not differ from the use of plaster mixtures. Unless the layer should be thin, and the mass should be prepared in small portions.
Answer
Tile adhesive is not good for plaster. It is not intended to be applied in a thick layer. And its cost is decent. As for the type of plaster, there are now compounds on sale that can withstand quite significant temperatures; they are a little expensive but provide good quality. Usually the stove was plastered with a clay composition with the addition of a small amount of cement (about 10%). In order for the plaster to turn out to be of high quality, you need to choose the composition well. To do this, clay is mixed with sand in different proportions to achieve the optimal combination of plasticity and shrinkage. Alas, clay plaster, even with the addition of cement, requires periodic “renewal”. Cracks will still appear, the only question is how often and how big. For stoves and fireplaces, tiles have long been the optimal, “eternal” finishing option, and perhaps it makes sense for you to think about this option.
Leave your tips and comments below. Subscribe to our newsletter. Good luck to you and good luck to your family!
In practice, it happens that the plaster is made with tile adhesive to the walls and even the floors of the toilet (bathroom) rooms of apartments. There is no clear answer to the question about the feasibility and effectiveness of this option.
How many specialists - so many opinions. In order to draw any objective conclusions on this matter, it is necessary to consider the features of adhesive compositions and their practical application.
Plastering with tile adhesive
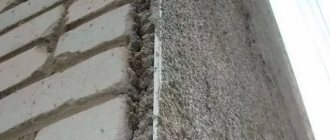
Plastering with tile adhesive is possible, but it is labor-intensive and financially expensive. If we are not talking about the remains of the mixture that we decided to use as plaster, but about a meaningful choice for the sake of safety from moisture in the room, then you should take care of leveling the walls. Applying several layers of adhesive onto an uneven surface is risky. Wide cracks may appear or the plaster may fall off in chunks.
Leveling the walls with a traditional cement-sand composition, treating with a primer, and then applying the final ball of plaster with an adhesive mixture - this is the version for high-quality repairs.
Plastering work carried out only with tile adhesive requires the addition of sand (the density of the mixture decreases slightly, making it easier to level). The leveling procedure is carried out with balls in increments of 40-50 cm. If you wait until the entire wall is covered and everything is leveled at the end, the composition will most likely have dried out from below.
Since the cost of tile adhesive is much higher than mixtures for plaster, it makes sense to take a white product right away (it simplifies painting), with a certain sand fractionation (wall texture).
The opinions of repair professionals differ on the appropriateness of using an adhesive mixture (price and adhesion are two problems). Consent only arises in cases of minor ongoing repairs (sealing cracks, attaching a piece of plaster that has fallen off).
The adhesive mixture is not intended for leveling walls with damaged masonry: a layer thickness of 1.5-2 cm will lead to cracking and falling off of the composition.
In such situations, glue will give a reliable and durable result, especially when it comes to outdoor work.
Plastering with tile adhesive instead of plaster
Alina asked a question:
If you don't mind. Please give me some advice. We still have a whole bag of tile adhesive left. They didn’t calculate it when they hired it to renovate the kitchen and bathroom. Can I plaster with tile adhesive? We have nowhere to use it for its intended purpose (in such quantities), but it would be quite enough to plaster the wall of a veranda built from blocks. It needs to be used somewhere before it gets damp. Can it be used for plastering or just gluing tiles? Give answer. I really don't want to have to do the work again if it falls off. What size spatula is best to use? As I understand it, the serrated one is not suitable for tiles? Or should I take two, one large and one smaller?
Take a closer look at foam blocks. They do not require large expenditures of plastering materials. And they do not need additional insulation. But this is a small nuance. Let's get back to business.
Isn't it a pity? Plaster is cheaper after all. I answer your question. Of course, you can use tile adhesive instead of plaster. It holds better, lays down well, but requires subsequent finishing putty. It's about its structure. It is rougher than that of gypsum mixtures. This makes the surface rough to the touch. If you're happy with it, you don't have to put in the finish line. But this is a matter of taste. I'm used to doing quality work. This is a fairly simple process if you follow the sequence of steps step by step.
- If your masonry is uneven (and most likely it is), you will need to do several layers. For better adhesion to the surface, treat with a primer. A solution in several layers has a large mass. This will avoid the risk of repeated repairs.
- After treating with a primer, dilute the solution with a consistency close to sour cream. Take a wide molar brush and coat the entire wall well. After that, leave to dry for a day. If necessary, repeat the procedure. But maybe once will be enough.
- Level the plaster profile. Attach properly. Take the rule (it’s a tool). It will save you time. Of course, you can use a regular spatula, but this is a long and labor-intensive job. At this stage, plastering is done with tile adhesive. The solution should be thicker, adhere well, and not stick too much to the trowel. Use a trowel to place the mortar on the wall. After this, you align with the rule. Do this with each section of the wall to completely plaster it.
- Leave to dry. After a day, you can remove your profile. It is necessary to cover the voids from the profile with tile adhesive using a spatula. Then align the corners.
- The surface is prepared for applying putty. But you don't have to do this.
As you can see, the composition is quite suitable not only for gluing tiles. Compared to conventional gypsum plaster, it is moisture resistant and has increased adhesion. In terms of tools, you definitely want a medium sized spatula, an angle trowel. A rule is required, otherwise your work will be done crookedly. A trowel for laying mortar is also necessary. And one last piece of advice. Because the glue dries quickly. You will have to scrape it off periodically. Do not dilute it in large portions. Do not leave the solution for a long time. Otherwise it will dry out. This will increase the consumption of materials.