Is it possible to make fuel briquettes with your own hands? This question interests many owners of suburban areas today. And it didn’t take long for folk craftsmen to wait and come up with a technology to make fuel from seemingly unnecessary materials that could be used to heat a house, garage, greenhouse, and so on. And such materials can be found at any dacha! This can be not only old boards and sawdust, but also straw, cardboard, paper, dry branches and leaves. And this is not a complete list.
- 1 Strengths and weaknesses of fuel briquettes
- 2 Stage 1. Preparation of the necessary equipment 2.1 Video - Making a press for fuel briquettes
- 5.1 Video – Making fuel briquettes
- 7.1 Video – Industrial production of briquettes
Simply put, what burns can be crushed and used for briquettes. And the chopper itself will not be a problem in this case, because ready-made devices are sold in many stores. This could be, for example, a rotary machine that grinds all materials of plant origin using a set of knives. This kind of machine is relatively cheap, but in our case it will be very helpful at the initial stage of making briquettes. But let's not get ahead of ourselves - first let's get acquainted with some important points.
And here we compare the technical characteristics and cost of fuel briquettes from different manufacturers - read more
Strengths and weaknesses of fuel briquettes
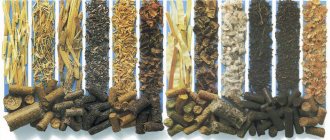
Such fuel can be used not only for solid fuel appliances, but also for stoves or fireplaces. If we talk about the industrial production of briquettes, then the following raw materials are used:
- wood processing waste;
- charcoal;
- straw and various husks;
- peat.
And everything mentioned above is, as you know, renewable natural resources.
Attention! The main advantage of this type of fuel is its environmental friendliness, as well as excellent heat transfer and efficiency.
Moreover, if we compare briquettes with wood, they burn faster, smoke less, due to which the humidity in the air does not increase and remains at the desired level. During combustion, a permanent temperature is maintained and no sparks are formed, and thanks to the correct geometric shape, they are convenient to transport and store.
Of course, there are also disadvantages - for example, briquettes are easily damaged during transportation and have low moisture resistance.
However, if you make fuel briquettes with your own hands, you solve several problems at once:
- heating the house (although, rather, as an additional source, since you are unlikely to be able to prepare the amount of fuel necessary for the winter);
- savings - briquettes will cost practically nothing;
- Finally, by making briquettes, you thereby get rid of various garbage that you could not take to a landfill.
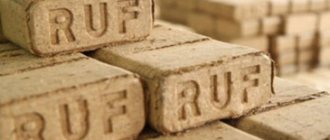
Attention! The most convenient form for briquettes is bricks. Therefore, future technology will be based precisely on this.
We also advise you to look at our article on how to make biofuel on your own
We produce fuel for biofireplaces
Biofuel for fireplaces is in great demand due to the popularity of biofireplaces.
Biofuel fireplaces are a decorative element of the interior with live fire. The industrial production of biofireplaces offers models of a wide variety of sizes and configurations. However, many people make biofireplaces with their own hands.
The structure of a biofireplace is very simple: a container for liquid fuel, a grate and a burner. The rest is a matter of taste.
To make a fuel block for a biofireplace with your own hands, you need to take a metal box and place a container with bioethanol inside. Cover the box with a metal grill (you can use a simple barbecue grill). Place the wick on the grate, light it, and the bio-fireplace is ready.
Essentially, that’s all you need to make a biofireplace with your own hands. All that remains is to decorate it with stones or other elements to your taste.
There is very little heat from such a fireplace; it is rather just an original decoration for the house.
No hood or specially equipped space is required, so biofireplaces are suitable even for apartments. Their installation does not require special permission from the gas or fire department.
It is quite possible to make fuel for a biofireplace with your own hands. It contains ethanol and gasoline. Let's consider the process of producing bioethanol at home.
The following ingredients will be required:
- Ethyl alcohol 96%, sold in pharmacies
- Aviation gasoline (it is also used to refill lighters). It is practically odorless, which is important for use in a residential area.
For a liter of alcohol you only need about 70 g of gasoline. Mix well and pour into the fuel container. A liter of biofuel will last from 2 to 8 hours of continuous burning, depending on the type of fireplace burner and flame intensity.
- LiveJournal
- Blogger
Do-it-yourself biofuel
Bioethanol is a safe type of fuel; when it burns, only hydrogen gas and carbon dioxide are released. However, an open fire burns oxygen, so you need to regularly ventilate the room. This will also help remove excess carbon dioxide from the air.
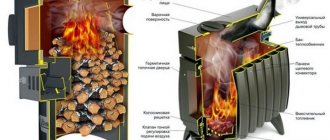
Stage 1. Preparing the necessary equipment
There are a number of enterprises that specialize in the production and sale of equipment for the production of fuel briquettes. Moreover, such equipment is usually delivered, installed and tested (for an additional fee), and sometimes even trained in proper use.
So, for work you will need:
- device for grinding raw materials;
- drying complex;
- a special press, which can be screw, mechanical or hydraulic.
Of course, if you produce briquettes at home, you can do it without a drying complex, because the finished briquettes can be dried simply in the open air. And if sawdust is used as a raw material, then a chopper is also not needed.
Also take care of a box with cells of the same shape - you can make it yourself from any box by nailing strips of the appropriate sizes to divide it into equal sectors. You will pour the raw materials into these sectors!
Often home craftsmen resort to another option - making their own equipment for pressing.
Video - Making a press for fuel briquettes
Stage 2. Choosing a room - what should it be like?
And the room should be chosen in such a way that it can not only accommodate all the necessary equipment, but also store raw materials and finished products. The area of such a room directly depends on the scale of future production, but, for example, a minimum of 55-60 m2 is required for pressing.
Attention! When arranging the premises, carefully monitor the quality of ventilation of the area where pressing is planned, as well as the fire extinguishing system and the reliability of electrical networks.
Preliminary calculations
Before starting the construction of a biogas plant, it is necessary to perform accurate calculations to assess its future productivity.
Count all possible gas consumers (stove, water heater, etc.), and how much fuel they will need. If biogas is needed to heat a barn or garage, you need to take into account their volume.
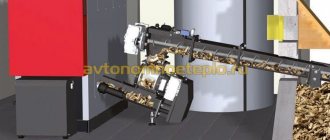
What you need to produce biogas at home:
- A metal sealed container is buried in the ground. Its volume depends on how much raw material will be used, taking into account the fact that the container is loaded to 2/3.
If there is no suitable container, you can pour it out of concrete on site, always with reinforcement for structural strength. The concrete reactor should be carefully waterproofed. If water leaks in, it will stop the gas production process.
- A bunker device is built on top of the reactor to load raw materials.
- The processed manure is removed through a pipe at the bottom of the tank.
- Biogas obtained by decomposing organic matter has a complex composition, 60-70% of which is methane, 25-35% carbon dioxide and impurities. You can purify the gas using a water seal. CO2 and impurities are dissolved in water, and purified methane is collected in a gas tank.
- The resulting biomethane is similar to natural gas.
- Industrial waste is an excellent organic fertilizer.
The volume of biogas produced differs when using different raw materials. For example, a ton of cow manure produces 30-50 m3 of biogas (60% methane). Plant raw materials of different types will produce 150-500 m3 of biogas (methane 70%). The largest amount of biogas is obtained from fat—1300 m3 (up to 87% methane).
- LiveJournal
- Blogger
Biofuel boilers take up more space than any other
Stage 3. Preparation of raw materials
This is the most important stage of the process in which you create your own fuel briquettes. But to work you will need not only waste, but also components such as:
- water in a small amount - only to soften the clay;
- the clay itself will serve as a binder; Note that in industry no additives are used, since the binding element is lignin, a substance released by wood at high pressure, but at home you are unlikely to achieve such pressure, so you will use additional components so that the briquettes “keep their shape.”
Stage 4. Formation of briquettes
Step 1. First, take the prepared raw materials (sawdust, etc.) and mix it with dry clay. For a kilogram of waste, approximately 100 grams of clay will be required, therefore the ratio will be as follows: 10:1. Add a small amount of water to the resulting mixture and mix everything thoroughly again. Make sure that the mixture is not too thin or too thick - ideally it should stick together perfectly.
Attention! In this case, one should take into account the fact that the density of the finished product depends inversely on the amount of added water. Moreover, if there is too much liquid, the briquettes will take a long time to dry.
You can add some finely chopped paper to the mixture - this will significantly improve combustion.
Step 2. Pour the resulting mixture into prepared molds and compress thoroughly. Try to ensure that the maximum amount of liquid comes out of the products under the press. Leave the briquettes in this form for a while.
Step 3. Next, dry the finished products. For drying, it is advisable to use a firebox, although if you don’t have one, you can do it in the sun. Make sure it dries completely! If the briquettes turn out damp, they will not only not burn, but will also crumble due to their low strength. And in order to somehow increase strength, cover the products with dry leaves or paper when drying.
Step 4. Once the briquettes are completely dry, place them in a previously prepared place and subsequently use them for their intended purpose.
Here's another interesting production option.
Video - Making fuel briquettes
Manufacturing technology
Craftsmen have learned to produce briquettes using sawdust as a base . The manufacturing method is simple and consists of several stages.
The sawdust should be pre-chopped. The smaller the fraction size, the denser and better quality the resulting solid fuel will be. You can use the device to make compost.
In a separate container, sawdust is mixed with dry clay in a ratio of 1:10 (instead of clay, you can add soaked cardboard or glue). A construction mixer or compact concrete mixer is suitable for mixing.
The mixture ready for pressing should not be very liquid or thick. It will be good if it molds like plasticine. Excess water gives the product less density and prolongs the drying process. Adding chopped paper will improve the flammability of the briquettes. The resulting mass is placed in a mold and a brick of fuel is squeezed out using a manual or hydraulic press.
You can dry the briquettes outside, but it is better under a canopy so that they do not get wet in case of rainy weather. At night they must be covered with polyethylene. Poorly dried fuel bricks will turn out brittle, crumble in your hands and burn poorly. You can increase their strength if you cover the drying tiles with dry leaves or paper.
Use of other materials
Perhaps there is no need to talk once again about how well the paper burns and how much ash remains after it. For example, a kilogram of compressed paper can burn for about 2 hours, releasing large volumes of thermal energy during this time. At the same time, very little ash remains after this - about 5 percent of the original mass.
Therefore, the question is: is it worth selling waste paper and is it possible to buy firewood with the money received for it? Or is it better to use it in the manufacture of fuel briquettes? In this case, everything is quite complicated, since there are a number of important nuances.
- To make briquettes you will need a lot of paper.
- The paper needs to be shredded somehow, which is extremely difficult - this is not sawdust or firewood! All waste paper will need to be torn into pieces measuring 20x20 millimeters. To do this you will have to use a combine harvester.
- Next, the shredded paper should be filled with warm water. Then you need to wait until the paper transforms into slurry and the solution becomes liquid.
- The remaining water is removed, and the resulting mixture is poured into pre-prepared molds.
- After the mass has gotten rid of all the liquid, the briquettes are removed from the molds and dried in the open air.
From the trash
Attention! Experienced craftsmen who have used the described technology advise adding starch to the paper after filling it with water.
In addition, paper can be used as a binder when fuel briquettes are made with your own hands from wood shavings (we have already mentioned this above). But there are a number of other materials that can perform a similar function - for example, seed husks or pine needles. To be honest, not the best options, but in the absence of an alternative, they are quite suitable. Although they have their drawbacks:
- if the pine needles are very large, then they will have to be chopped using ordinary scissors, and this is very difficult and takes a lot of time; and the pine needles in the finished products will constantly prick your hands;
- with husks there are even more troubles - yes, in the manufacturing process it is quite convenient, but mice love ready-made briquettes made in this way, so in winter you will have a lot of them in your warehouse; rodents will begin to “feast” even at the drying stage, therefore, a large number of products will be hopelessly spoiled.
Features of mixture preparation
The use of old paper in production increases the flammability of briquettes, because paper burns well and generates a significant amount of heat. When a briquette is burned, little ash remains. There are certain conditions for preparing paper:
- You need to shred the paper into pieces measuring 20x20 mm. This process is labor-intensive and time-consuming. You can use a combine for cutting.
- The paper filled with water must stand for some time to turn into mush.
- Remaining liquid must be removed, then place the mixture into molds.
- Adding starch will improve the bonding of the paper to the solution.
Making briquettes yourself is not the most difficult thing, but there are some tips that will be useful to everyone. Different types of heating devices require different briquettes. It is good to use molds made from birch waste or peat in the fireplace. It is best to light a bathhouse or get coals in a barbecue using wood briquettes or purchased European firewood. The latter burn longer and smolder slowly. The humidity of self-made fuel briquettes should not exceed 13%.
The feasibility of organizing your own production raises some questions. Briquettes made by hand from sawdust have a lower calorific value. Due to their low density, the products are very light and for heating they need three times more than European firewood.
The process of making such briquettes requires significant physical effort, and pressing takes many hours. To dry the raw materials, you need a dry, heated room so as not to depend on weather conditions and to avoid getting the raw materials wet. Storing homemade briquettes is difficult because they absorb moisture very easily. The use of electrical equipment in this case leads to an increase in production costs.
Everyone can independently compare the investments of their own effort, money and time in the process of handicraft production of briquettes from sawdust and give an answer about the advisability of such use of their efforts. Enthusiasts and innovators are constantly improving solid fuel manufacturing technologies. They communicate on forums and share experiences, improve equipment and look for new technologies.
Industrial production
If we talk about industrial production, here fuel briquettes are made using one of three possible technologies:
- through hydraulic presses and at high pressure - the result is products that look like small bricks;
- through screw presses under pressure and heat treatment - the result is briquettes that have the shape of an empty polyhedron;
- using hydraulic or mechanical presses at high pressure - as a result, products are cylindrical in shape.
To learn more about this process, watch the thematic video.
Video – Industrial production of briquettes
Let's summarize
Do-it-yourself fuel briquettes are inexpensive and at the same time quite effective!
They can be used for heating not only commercial buildings, but also residential buildings. But does it make any sense to make it yourself if briquettes can be purchased in specialized stores? Of course, it does, as always when it comes to making something with your own hands. After all, with a little effort and desire, you can save a lot in winter!
Warm winters and good luck at work!