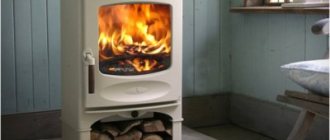
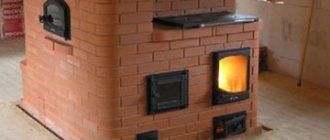
- Where to place the stove in the house
- Russian with a high bed
Connecting to central heating is not always possible and economically justified. Especially when it comes to life in a dacha cooperative or a remote village. In such a situation, you can limit yourself to a beautiful brick stove for a private house; photos of the best options are in our article.
The main advantage of this heating option is the use of brick blocks. They accumulate heat and release it over a long period of time. The draft promotes ventilation of the premises, the walls of the building remain dry, which is especially important for wooden cottages.
If this is provided for by the design, you can cook food. Some models provide a special bed for resting and sleeping.
But we should not forget about the negative aspects. In particular, only the rooms directly adjacent to the heating equipment are heated. The further the room is from the firebox, the colder it will be. There is only one way to fix the problem - to equip several units. They may have combined or separate chimneys. If the cottage is compact (according to the five-wall principle), the stove is placed in the central part. From the living rooms one can admire the open brazier; in the kitchen one can cook dinner.
Types of brick stoves for the home - photos
All existing modifications belong to one of the basic variations. They are adjusted, modified in size and shape, taking into account the parameters of the room and the wishes of the customer.
Russian
The main differences from all other variations are the massiveness and the presence of a sleeping place. For pots and pans there is a wide firebox, closed with a damper. The walls are heated by smoke channels of considerable length.
Dutch
You won't be able to cook a roast on it. The main purpose is to heat rooms through special passages from bottom to top.
Heating appliances are relatively small in size. They are chosen by the owners of country houses, including two-story ones. The shape of the unit is not strictly regulated. It can be chosen based on personal preferences. One thing remains mandatory - the height exceeds the width.
Swede
It is smaller in size than the Dutch one, but in terms of efficiency and versatility it is comparable to the Russian one. You can cook food on it and dry wet shoes in special niches. The Swedish stove is a channel-type stove, but the flue gases burn out under the roof. The design is not intended for large cottages. Its power is only enough for neighboring rooms. Another application is as an addition to a standard heating system.
A significant disadvantage is the high cost of masonry due to the use of fireclay bricks. In addition, a significant part of the heat escapes through the lower part. This can be avoided if you spend money on thermal insulation.
Bell furnaces
They appeared relatively recently, but have already gained popularity due to their uniform heating and ability to retain heat for a long time. The main difference from all the previously listed options is the lack of channels.
When wood or coal is burned, smoke rises to the top of the dome. Here it slowly cools and falls down along the walls, warming them up. The internal space can consist of dozens of individual vaults, which significantly increases the efficiency of the equipment.
Bell-type structures are characterized by minimal masonry costs and the ability to quickly warm up, including in winter. The gas view will not allow the structure to cool quickly when the damper is open. The original version does not have a hob, but if necessary, it is quite easy to build it in.
Why do we need a water circuit in a heating system?
It is believed that in a house with stove heating, the corners and floors are always cold. There is also an opinion that in a house with stove heating the windows always “cry”. The whole point is that the heating device - the stove in the house - heats in a fairly localized manner. There is a stove in one place...
So, in order to reduce heat loss near the windows - from the windows. And also in order to distribute the heat from the stove to the edges of the house - to the corners and places where the walls meet the floor - we need a water circuit.
It can be assumed that a water circuit is necessary if there is at least one room in the house where the surface of the stove does not directly open. And if there are 2 or three such rooms, then even more so...
Briefly about how a water circuit is usually made in a house with a stove.
In old houses, in villages without gas, stove heating with a water circuit in a wooden house was solved as follows. a boiler was built into the furnace - right into the firebox. From the stove, by gravity, through a regular open expansion tank (under the ceiling), water was released through wide pipes. This could be done either in a circular pattern around the house. Most often they did it closed - supply and return along one wall.
Modern building materials make it possible to make wiring with the transition to plastic. The wiring is already done on aluminum radiators under the windows. This allows you to significantly reduce the need for heating; the coolant releases heat “in doses” through radiators, which can also be adjusted.
In this way, you can try to solve one of the main problems of stove heating with a water circuit in a wooden house - the rapid cooling of the coolant. Still, plastic has lower thermal conductivity than steel. Moreover, a plastic pipe can be thermally insulated.
But modern building materials cannot solve some problems of furnaces with a water circuit.
Watch a short video about a stove whose customer refused to connect the already installed heating registers:
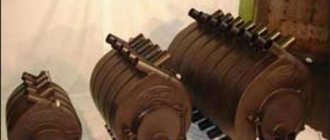
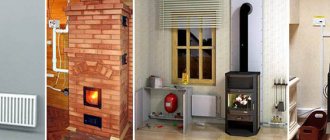
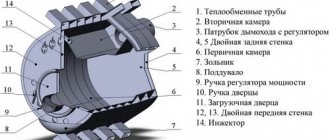
Types of furnace equipment for gas movement
The brick warms up well and releases energy into the surrounding space for a long time. But this is not enough for high-quality heating of the kitchen or bedrooms. The heat capacity is increased due to the arrangement of special chambers that promote heating of the walls.
Without going into technical details, the movement of smoke through special channels occurs as follows:
- During the combustion of wood or coal, gases are formed that have an extremely high temperature. Under the influence of physical laws, they rise upward, but are delayed due to obstacles in the form of jumpers and valves;
- smoke begins to spread through the flues, heating the walls;
- the temperature of combustion products decreases. They go into the outlet pipe.
If the channels are laid horizontally, less time is spent on cooling than in analogues with vertical ones. The reason is the low air speed. The inevitable consequence is uneven heating of the rooms.
If we analyze all existing types of stoves, it is preferable to choose units with chimneys laid from the bottom up. No additional effort is required to move the gas. They inevitably move upward and warm up the surrounding space.
But equipment with a vertical chimney is not without its drawbacks. If, in the presence of horizontal channels, the space around the firebox warms up more, then here the heat accumulates in the upper part. The first option is more consistent with fire safety standards.
Another important point concerns furnaces with vertical channels. They should not be too long. The gas passing through them will cool down greatly. The result is uneven heating.
In bell-type heaters, it was possible to partially eliminate the disadvantages associated with heat distribution. Here, separate outlets open into a single chamber. The smoke passes through small-diameter holes and is collected in a hood under the upper ceiling. The combustion products partially cool and fall down. Then they rush into the atmosphere, obeying the natural forces of nature.
In terms of heat capacity, bell-type units are better than their analogues. They are chosen when it comes to heating a house of a large area. If you need to heat a small building at the dacha, a Dutch or Swedish one is enough.
Brick kiln performance
The task of any stove is to compensate for heat loss during the cold season. Cooking food and drying things are additional, albeit important functions. But when calculating power they are practically not taken into account.
The main parameter is the thermal characteristics of the building. To calculate them, energy losses through the floor, walls, ceiling, doors and windows are added up. If the building has ventilation ducts, they must be taken into account. The productivity of a Dutch or Swedish woman should exceed the obtained value by 10-15%. Otherwise it will be cold in winter.
During the use of stoves for a red brick house (pictured), the interdependencies between the area of a separate room and heat loss under different conditions, for example, in the presence of only one or two external walls, were experimentally established.
In the second case, the calculations become more complicated, since the height of the ceiling is taken into account. If the surfaces of the firebox face the rooms and are closed, correction factors are used. They allow you to correct the data.
Correct oven placement
As in the old days, building a house begins with planning the placement of the stove. There are some rules to follow:
- The area of the room must be more than 16 square meters.
- You should not install it close to a stone wall, then most of the heat will be transferred to the outside of the house. But in wooden houses this is not at all recommended for fire safety reasons.
- A heavy stove will eventually break any joists and rafters, so a brick stove needs a separate foundation.
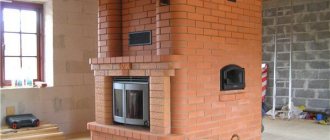
A large stove with storage for firewood and a stove bench separating the kitchen and living room Source argo-project.ru
If the goal is to heat as many rooms as possible, then it should be installed so that the stove is part of all these rooms. It is installed in the partitions of rooms in such a way that its walls or corners fall into these rooms.
This is how, for example, stoves were installed in the old days in many village huts. The stove is located in the center, and the rooms are located around its perimeter. This is a classic option for placing a stove. The whole house is heated at the same time.
Classic stove layout Source tproekt.com
If the layout consists of two rooms: a common room and a kitchen, then it makes more sense to move the main part into the room, and the hob and firebox into the kitchen.
How often should you light the stove?
Taking into account how often fuel has to be loaded, all units belong to one of the groups listed below:
- periodic action. Firewood or coal is added from time to time. The combustion temperature can reach 1000 0C. To avoid fire and premature destruction of the structure, the wall thickness should start from ¾ brick;
- continuous burning. Heat is not accumulated. The density of the walls does not exceed ½ stone. The firebox is of shaft type. In the standard version, firewood smolders for up to a day. Energy is released evenly, in relatively small portions.
The second type of firebox requires large volumes of oxygen to operate. They are recommended for homes with permanent residence. At dachas and cottages used only on weekends, it is better to choose designs with periodic action.
In relation to the previously discussed types of equipment, the following must be indicated:
- Russian stove. During the cold season it is heated continuously. The body should not cool down. Otherwise, condensation will accumulate in the channels. The brick gets wet and cracks during subsequent ignition. In the summer months, by moving the valves, the fumes from the firebox are directed directly into the chimney. There is no heating effect;
- Dutch. After ignition, it warms up in a few minutes. But it cools down just as quickly if you don’t close the view in time. Recommended operating mode: continuous smoldering;
- Swede. In winter, it cannot be cooled completely due to accumulating condensation. The masonry can completely collapse within a few months;
- bell-shaped Operation in any mode is allowed. Warm up in a few minutes.
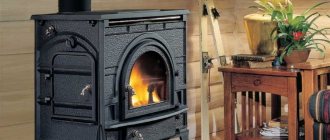
How to choose a stove for a red brick house - photo
If we are talking not only about heating, but also about complementing the interior, you can give preference to a round Irish stove. The thickness of the walls is ¼ stone. To give additional strength and increase heat transfer, a metal frame is “put on top”. It will strengthen the masonry and allow you to decorate the outer surfaces with forging.
If there are always people in the building, and there is a desire to cook food on wood or coal, you should choose a square or rectangular design, for example, Russian or Swedish. If you need a fireplace more as a stove for your home, pay attention to thin-walled Dutch or round Irish stoves. They are ideal if you don't need a special cooktop. And the front surface can be decorated with elegant tiles. They can become both an addition to the interior.
Do you want to stop using a gas stove? Variations of the Swede are at your service. They will warm you up and allow you to brew coffee over an open flame. The main thing is to correctly lay out and select the source materials.
Where to place the stove in the house
The main focus is on the design phase. The quality of the drawings determines the safety, performance properties, and aesthetic appeal of heating equipment. If you don’t have your own drawing skills, it’s better to turn to professionals. When choosing a place for placement, both the type of heater itself and the area of the cottage or part of it that is planned to be heated are taken into account.
Selection of working tools
Then you can move on to the tools. For work you will need:
- jointing With its help, concrete is poured into the seams;
- trowel;
- pick;
- shovel for mixing and supplying the solution;
- special line.
Materials
The next stage is purchasing the material. The heat transfer of the stove and its durability will depend on the quality of the brick. The rules are as follows:
- the outer surface is made of brick (grade M-500). They do not crack, do not lose their consumer properties during periodic heating or cooling;
- Only refractory bricks are suitable for the combustion chamber.
In addition, you will need sifted sand and high-quality clay.
Laying the foundation
Materials have been purchased. You can move on to the construction stage. It is important to understand that the stove must stand on a strong and high-quality foundation. It is better to lay it at the same time as the base of the entire house.
If the decision to build a Dutch or Swedish one is made only now, you will have to:
- dig a hole. On each side there should be at least 20 cm to the walls;
- level the bottom and fill it with sand, followed by thorough compaction;
- lay a waterproofing membrane;
- install formwork;
- pour concrete (1 part cement x 2.5 parts sand x 4 parts small crushed stone) to ground level. The surface of the foundation must be strictly horizontal;
- wait 5-6 days for the concrete to harden. After this, you can disassemble the formwork and lay waterproofing.
If, as a result, the foundation ends up below the floor level, it is leveled by additional pouring of concrete mixture. In the latter case, the formwork is rebuilt. The entire space around the foundation is filled with soil and thoroughly compacted.
Masonry process
First, a mixture of sand and clay, previously soaked, is prepared. It fills the gaps between the outer and inner walls. They are displayed separately, but there should be no spaces between them. The lowest rows are only made of solid brick and with a sling. Then the brick is cut taking into account the selected modification. The chopped side faces the inside of the masonry. To build a chimney you will need red burnt stones. Knowing the “castle” layout will not be superfluous. A brick chimney must be lined with a FERRUM stainless steel chimney to prevent the formation of condensation and premature destruction.
Is the oven built? There is no need to rush to melt it. You must wait at least 3 weeks.
Installation
Construction of a brick kiln
Installing a brick heating structure is not an easy task. First of all, you should decide on the location of the stove. The most suitable room for a brick stove is the kitchen: you will have the opportunity to cook food without running to another room.
It is recommended to lay a foundation for a brick stove when designing a structure or during the process of pouring the foundation. An average brick oven weighs about 300 kg, so be sure to design a monolithic concrete support so that the structure does not push through the wooden floor .
If the house has already been built, dismantle the floors in the place where the stove will be installed, dig a recess of about 25 cm, arrange a cushion of sand and gravel and fill the reinforced base.
The video below shows the features of preparing the base for installing a stove in a wooden house:
A reliable foundation is a guarantee of confidence in the safe operation of heating equipment and its durability.
Important! The foundation area should be 10-15 cm wider than the lower part of the structure.
Insulate the wall. The foundation for the stove is laid in accordance with the dimensions of the structure.
How to properly install a chimney in a wooden house? Design it as far as possible from the matrices located between the floors. In most cases, the smoke exhaust system is designed next to the outer wall. A chimney located next to the outer wall will protect the home from drafts.
After finishing the masonry, plaster the stove or tile it.
Which material is better? Choose one that is resistant to fire and do not forget that it will become very hot when heated. Advice. It is worth finishing the stove with fire-resistant plaster or fire-resistant tiles: these materials do not interfere with the transfer of heat.
Installing a brick structure to heat a wooden house is a labor-intensive task. Installing a metal stove will take less time.
The video below discusses in detail the process of laying a budget version of a brick kiln:
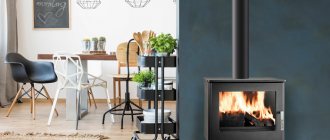
Installation of a metal heating structure
Beginners in installation are recommended to give preference to metal heating structures . It is possible to assemble a metal stove in a few hours. Fully equipped models with smoke removal systems are available for sale. You can also make a metal structure for heating a country house with your own hands: it’s not that difficult.
Which stove is easier to install? Metal is easier to do than brick, but it also has its own subtleties: take them into account before you begin installation work.
How to install a stove in a wooden house? The first rule of installation is: the stove should not stand close to the wall .
The optimal distance from the heating structure to the wooden wall is 25 cm. It is recommended that the wall be tiled, especially for surfaces located in the immediate vicinity of the stove. Advice. Place the stove near the wall on the opposite side of the door - this will ensure sufficient air flow from the street to maintain the fire.
Metal structures are placed on a base made of a sheet of steel or a small elevation is used. Having completed the design of the podium on the floor, the racks are fastened under the floor as additional protection from the load. This is an important point when installing cast iron structures.
Manufacturers offer hanging models of metal stoves that do not require supports and will protect your floors.
The stove needs a chimney. It is possible to route the pipe to the street in any way - either through the ceiling or through the wall.
The diameter of the smoke exhaust pipe must correspond to the size of the pipe: this will provide powerful draft. Insulate the chimney to avoid heat loss .
Recommendation: Before installing a new metal stove, perform the first firing in the open air, this will allow the paint covering the internal and external parts to set, and the characteristic odor will also go away.
For large country houses, it is recommended to install several metal stoves to ensure a comfortable temperature in the home.
Three options for laying a stove with orders
Below is information regarding the construction of the main body of heating equipment. Laying the foundation is discussed in detail in the previous paragraph of this article. The most popular modifications are selected as examples.
Russian with a high bed
Settles in regions with cold and temperate climates. It is heated once/twice a day.
Below are descriptions of the rows:
- The first should be continuous using cement or lime mortar.
- Starting from the 2nd to the 4th, they begin to build a semblance of a well. On the front side there is a hole for baking. A prerequisite is the presence of a dressing.
- 5th - beginning of the arch. To lay it out, you will need shaped formwork, and the heels of the bricks will have to be pulled off. The operation continues in lines 6 and 7. In the 8th the vault closes.
- Rows 8 to 10 are laid out in one stone. At 11, the cold stove turns off. A layer of sand is poured on top. It should slope towards the rear.
- In the 12th, a continuous surface of refractory stone is laid out over the poured sand. This part of the firebox will be in direct contact with the fire. It is desirable that the floor is perfectly level. Does not work? You can add sand and sand the outer surface.
- Rows 13 to 16 are a crucible. Blocks - 3/4, with a sling. No masonry mortar is required at this stage. To make castles, the stones are cut to 450.
- Starting from the 17th line, the mouth and posterior surface are formed. The cooking chamber is being built. A brick with hewn heels is placed on its edge.
- 18th. The furnace walls are laid out. To fill the free space between the individual chambers you will need sand. You can add cut heels to it.
- 19th - laying out the vaulted opening above the pole. Behind it is the mouth.
- 20th - the walls are leveled. The hole above the pole is reduced. A cross-pipe is formed.
- The 21st row is no different from the 19th.
- 22nd - the vault closes. On the right is a chamber in which soot will accumulate. The view is also located here. With its help, the chimney is blocked so that the heat does not escape into the atmosphere too quickly.
- Lines 22 to 32 - laying out the overpipe, laying the view and building a chimney channel. The cross-section of the latter is 26x26 cm.
After this, all that remains is to remove the outer pipe and mount an additional damper. It will require a steel corner or strip 3 mm thick.
Semicircular chambers can be replaced with ordinary rectangular ones.
Improved "Teplushka"
All brick ovens have one common drawback - the walls heat up unevenly. Builders are trying to solve this problem by introducing changes to the design. This is how “Teplushka” appeared. After fuel combustion, part of the gas leaves the house immediately through the chimney. The remainder goes into the channels and is intended for space heating.
Heat transfer in comparison with the classic Russian modification increases immediately by 2.5 times. Structurally, “Teplushka” is closer to its bell-type analogues. The chamber is divided into 2 parts: food is prepared in the upper part, fuel is burned in the lower part. The floor itself is supported by pre-installed posts. Additionally, there are 4 openings on the sides to allow combustion products to pass through. The minimum chimney height is 5 meters. The countdown is from the bottom of the firebox.
The main differences from the traditional version are the displacement of the channel relative to the firebox. To remove cooled gas, special holes are laid at the bottom of the channel.
Important! The damper must be closed during cooking. You can use a special peephole.
The orders for the "Teplushka" are presented in numerous diagrams. The main requirement is that to increase heat transfer, the ceiling installed in line 21 is carefully covered with a mixture of sand and debris.
Simple stove with shield
This option is for those who want to build a stove at their dacha or in a small country cottage (no more than 20 square meters) with minimal costs, including temporary ones. The firebox is made of fireclay clinker, optionally red solid (provided that only coal will be used as fuel).
Cooking and burning fuel are in separate chambers. Gases pass through the cooking chamber and pass into the chimney. Photos of brick stoves for the home allow you to see in detail all the necessary masonry sections.
A horizontal channel is installed at the very bottom. Thanks to it, the air near the foundation warms up well. A microclimate favorable for humans is created in the room.
Advantages of a brick kiln
The main advantage of Swedes and bell-shaped variations is their heat capacity. If you choose the right place for placement and lay it out without errors, you can maintain a comfortable temperature in 4 rooms at once using one device.
Additional advantages include:
- independence from central heating;
- environmental cleanliness. If you don’t throw plastic yogurt jars into the firebox, a minimum of harmful substances will be released into the atmosphere;
- unpretentiousness in care and maintenance;
- the ability to choose a completely unique exterior design.
Another important aspect is the creation of a favorable microclimate in the rooms. The air does not dry out, and the walls warm up well.
Tips from the professionals
A brick stove in a wooden house will create an aura of warmth and comfort - interior photos confirm this. But its masonry should be treated with special attention.
On specialized websites, experts and amateurs share their experiences and present ordering schemes. You can also find plenty of finishing tips.
To summarize the most frequently encountered recommendations, we can highlight the following:
- special attention to the dressing and thickness of the seams. The last parameter must be the same throughout the array;
- brick blocks are pre-soaked in water;
- for cutting you will need a grinder with diamond wheels;
- In the smoke ducts on the walls, no cement should be visible from the seams.
Main advice: if you have no experience in construction work at all, it is better to initially contact a specialized company.
Schemes and designs of stove heating in the house
Stove heating of a private house is divided into several types according to the design of the firebox:
- Straight-through . Basically, such stoves are made of brick. The principle of their operation is to pass a flow of air through the ash pan, then through the grate, maintaining the combustion of fuel, and then exits through the pipe, already in the form of smoke. The big drawback of this design is its very low efficiency: a significant part of the heat, in the literal sense, simply flies out into the chimney. Once-through furnaces are equipped with special valves that close when the fuel burns out and stops producing carbon monoxide. This allows you to maintain the heat for a long time. Also, to increase the efficiency, during assembly of the furnace, broken glass can be placed in it, which holds the temperature for a very long time.
- Channel . The main feature of such stoves is a system of channels through which smoke moves and uniformly heats the entire stove. Thanks to this solution, the entire structure heats up faster and retains heat well. The heating rate depends directly on the length of the channels and their number.
Channel-type brick oven Source yandex.ru
- Kolpakovaya . The operating principle is based on the movement of flow gases in a natural way. First, they fill the cap, where they cool and then come out on their own through a special cover. This allows the stove to heat evenly and quickly, which then retains heat for a long time, heating the room. Unlike the first two options, this design is easy to maintain. Soot can be easily removed from the hood through a special hole, whereas in the first two cases you will have to clean the chimneys and pipe, which is not very convenient.
- Water circuit . This is not a firebox design, but a fairly common element of the heating circuit that can be installed on any stove. You just need to add a heating tank to the firebox or a coil on the pipe.
Diagrams of various designs of brick kilns Source domvpavlino.ru