Warm plaster mixtures appeared on the construction market relatively recently, but quickly gained popularity. Their use makes it possible to reduce the cost of construction, installation and finishing works, reduce labor costs, and shorten the duration of construction. Thermal insulating plaster is a new generation material with unique properties and high performance characteristics.
Exterior facade decoration
What is thermal insulation plaster
The composition of warm plaster includes the following components:
- binder – Portland cement grade M400;
- a filler that creates pores in the volume of the material, reducing thermal conductivity and density;
- modifiers that increase workability, increase the “life” of the composition, and prevent cracking during drying and hardening.
Most manufacturers also add original plasticizers and water repellents of their own design. When making a solution at home, modifiers sold in stores, PVA glue, and detergents are added as additives.
In terms of adhesion to the surface of the walls, insulation under plaster is superior to cement-sand mixtures. Any suitable decorative coating can be applied to the surface.
Important! The use of warm plaster, due to the low volumetric weight of the material, reduces the load on the base.
Warm plaster based on polystyrene
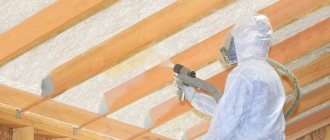
DIY application technology
Warm plaster is used more often for exterior work. External wall plastering activities are carried out in warm weather. It is advisable that there is no wind. This way the result will be of better quality. If beacons are used, then after the coating has hardened they should be removed and the voids should be filled with warm plaster.
Preparatory work
The base requires standard preparation before plastering. To do this you need to eliminate:
- old coating in the form of plaster and paint;
- protruding reinforcement elements;
- available material for wall insulation;
- excess adhesive mortar between the blocks from which the building is constructed.
It is advisable to fill all the recesses first. Some manufacturers claim that priming is not required. Most experts disagree with this.
Therefore, it is recommended to carefully read the instructions for using warm plaster and still treat the surface with a strengthening or impregnating composition.
Necessary tool
To prepare the plaster you will need a container and a mixer. You can purchase a special attachment for a drill or hammer drill. To work with the solution you will need spatulas (facade and auxiliary) and a rule.
Devices and tools
When using beacons, plaster is applied by machine or manually. Then the mixture is leveled with a trapezoid-shaped cloth. The surplus is further used.
Reinforcement
When applying the solution in a single layer, no additional reinforcement is required. However, there is often a need for a coating in excess of 20 mm. In this case, use a mesh with cells up to 5x5 mm. It will not allow the coating to crack.
The reinforcement process looks like this:
- the first layer of plaster is applied;
- after 100-120 minutes, the plaster mesh is attached using a notched trowel;
- the next layer of solution is applied after 1.5-2 days.
Reinforcement
Each stage, with the exception of reinforcement, is carried out after the base or fresh coating has completely dried. Priming is taken into account in this case.
Calculation of the amount of material
Before covering the plaster, be sure to take into account the fact that the solution has a limited action time. As a rule, it is equal to 4 hours.
Layer thickness calculation
For sound insulation, a layer of warm plaster 5 mm thick is sufficient. For thermal insulation, 50 mm is considered optimal. For leveling, the layer is calculated depending on the differences that will need to be eliminated. If they exceed 5 cm, then it is recommended to first use analogues without heat-insulating fillers.
Mixture consumption
If the plaster layer is 20 mm, then you will need about 12 kg of dry mixture per 1 square meter. meter. With a two-layer coating, 2 times more material will be required.
Application
The rules for applying warm material are actually the same as for other analogues. The differences lie in the reinforcement and drying time of the coating. In particular, the latter is about 3 hours. Thermal insulating plaster gains maximum strength within a month.
Applying the mixture
To give smoothness, the hardened surface is moistened with water and treated with a grater. Possible deficiencies can be corrected within 2 hours.
Advantages and disadvantages of warm plasters
Thermal insulating plasters for interior and exterior use contain organic or mineral components that retain heat in the wall. Instead of ordinary sand, such mixtures use expanded clay, foam glass, perlite, polystyrene and other light ingredients.
Warm plaster has the following advantages:
- Fire safety. None of the components burn, and flammable components are pre-treated with fire retardants.
- Soundproofing. Thermal insulating coating prevents extraneous sounds and noise from entering the room.
- Resistant to temperature changes.
- Availability. The cost of the mixtures is relatively low; for even greater savings on thermal insulation, the composition can be prepared independently.
- Easy to apply. To perform finishing work, no specific knowledge or experience is required.
- Low specific gravity. The load on the wall is insignificant even when applying a massive layer.
- It is possible to process any surfaces, including plaster over insulation.
Thermal insulation of the wall
The disadvantage is high hygroscopicity, especially of materials containing vermiculite, sawdust or perlite.
To solve this problem, a layer of plaster can be covered with a decorative moisture-repellent material, for example, a ventilated facade.
How to make it yourself
If you are confused by the price of the material in question, prepare plaster to insulate the walls inside and out yourself.
- Buy cement, sand, porous additives and plasticizer - sold in construction stores. PVA will work as a plasticizer: for one bucket of cement-sand mixture - 50-60 grams of glue.
- Pour water into the container. Don't overdo it: it's better to top up than to add mixture.
- Mix cement and sand in a ratio of 1 to 3 and pour into a container with water. Mix with a mixer so that there are no lumps left.
- Add as many porous additives as the cement-sand mixture. Stir.
- The mixture should look like semolina porridge. If it is thick, add water. If liquid - mixtures and porous additives.
Thermal insulating plaster for interior work in its finished form should be like semolina porridge.
And the video below shows how to prepare the mixture in the cold season using a mechanized method.
Calculation of the thickness of the layer of warm plaster
The composition is mainly used as an additional thermal insulation material, applied to the insulation. The use of plaster as the main thermal insulation is justified and rational only in regions with a mild climate. For use in other climatic regions, it is necessary to perform calculations depending on the conditions and characteristics of the wall material (aerated concrete, foam blocks, brick).
Most manufacturers recommend a layer thickness of 20-50 mm.
Important! To actually insulate a building with a wall thickness of 500 mm, it is necessary to apply a solution in a layer of 80-100 mm.
Main advantages
- can be used as an additional thermal insulation layer. Moreover, it surpasses its main competitor - polystyrene foam - in many respects;
- thanks to such a component as clay, warm plaster has antiseptic properties due to the fact that it does not create a favorable environment for fungi, insects and even rodents;
- It is also clay, deeply embedded in the structure of wood and paper, that makes these combustible materials non-flammable. Therefore, the fire safety parameter of warm plaster meets the requirements in construction;
- waste is used in the production of this plaster, which makes it environmentally friendly;
- increase in thermal insulation parameters due to the absence of so-called “cold bridges”, which can serve as metal elements (except for cases when it is necessary to apply plaster to the reinforcing mesh in places where there are cracks or at corners);
- fits perfectly on all materials from which walls are made, possessing excellent adhesion and forming a single monolith with the wall;
- ease of application without a lot of time;
- does not require preliminary work to level the walls;
- Due to the porous structure, warm plaster gives the room the opportunity to “breathe”, which contributes to the creation of natural favorable climatic conditions for human life. The pronounced capillary action due to the large number of micropores (about 75% of the volume) dries out the walls. Therefore, walls always have their original thermal conductivity characteristics. The walls will be constantly dried, and will additionally receive protection from moisture from the outside;
- the plaster is resistant to aggressive weather conditions;
- 5 cm of warm plaster replaces the masonry of two bricks;
- if warm plaster is used for external work, then it is able to accumulate heat emitted by the sun and distribute it evenly over the entire surface;
- The modern warm plaster produced for external work is quite resistant to ultraviolet rays. And also it practically does not age and does not become cracked;
- This is the most environmentally friendly material, since basically there are no chemicals in its composition.
In some publications you can find information that warm plaster is an excellent soundproofing layer. It can be said with authority that this is exaggerated.
Plaster does not have the necessary elasticity so that it can dampen the noise from falling objects - the so-called “impact noise”. Also, warm plaster does not have a fibrous structure and “blowability” indicator, which are necessary for the material to be called a good sound insulator. And the layer should be quite impressive - from 50 mm. In the case of warm plaster, it is not correct to talk about this.
Areas of application of warm plaster
The compositions are used both inside buildings and to create external insulation of walls for external use. Used to solve the following problems:
- Insulation and finishing of the facade. Not all plasters are suitable for external use. Some types must be additionally covered with other finishing materials to protect them from moisture and sudden temperature changes.
Insulation of the building facade
- Leveling and thermal insulation of internal walls. For this you can use any type of plasters. Some have not only thermal insulation properties, but also decorative ones.
- Insulation of buildings erected with “well masonry”. In such cases, the material is used to fill cavities formed in the walls.
- Protection of water supply and sewer networks from freezing. The mixtures are mainly used at the points where pipes enter the house.
- Insulation of window and door openings, slopes, preventing the appearance of cold bridges.
- Thermal insulation of floors and ceilings.
Insulating walls with plaster
Proper installation of walls will save on heating costs.
By insulating a building from the outside, you can achieve improved performance. These include:
- increasing the “life” of the structure;
- improving the room climate;
- reduction in heating costs.
Living in a house without insulation in the winter, heat constantly escapes through doors, windows, and street walls, so it is recommended that before moving into a new building, be sure to insulate the façade of the building.
Pay attention to façade defects first.
In addition to the insulation itself, thermal insulation materials protect walls from dampness, moisture, mold, mildew and wind.
It is worth understanding that all these indicators can be achieved if the finishing materials themselves are selected correctly, taking into account the characteristics of the building, and the finishing work is carried out with high quality in compliance with installation technologies.
Before directly insulating the facade of a building, it is initially important to carry out preparatory work, these include the following activities:
- It is important to find the parts of the building with the greatest structural defects to determine where heat is lost more quickly.
- Insulation of directly problem areas of the structure. As a rule, there are two types of insulation: internal and external. The second method is more popular, since when insulating, the actual usable area of the internal space of the building does not change, but the installation of the material itself is more complicated than with internal placement.
The advantages of insulating walls from the outside of a building include: Improved sound insulation of walls, protection from condensation that destroys the structure of the walls themselves, fungus, mold, protection from external factors.
You can handle wall insulation from the inside with your own hands.
The advantages of internal insulation include:
- no need for high-altitude work;
- Possibility of installation in any weather conditions;
- significantly lower cost of installation work;
- possibility of independent insulation.
Insulating walls indoors has a huge drawback. It cannot be accomplished without subsequent finishing of the walls indoors, therefore, if you have chosen this method of wall insulation, you should think about it and calculate the costs of building materials and the cost of production work.
Types of heat-insulating mixtures for plastering
Mixtures are divided according to purpose and type of filler used. Plaster for internal use is made on the basis of cement or gypsum and fillers:
- Perlite. The material has a porous structure, formed as a result of the melting of volcanic glass. It is resistant to temperature changes, hygroscopic, and biologically inert.
Perlite filler
- Expanded polystyrene granulate with high thermal insulation properties and low cost.
- Foam glass made from quartz sand. It is moisture resistant, the mixtures are allowed for use in rooms with high humidity.
- Vermiculite obtained from mica. It has high strength and is biologically inert. Not used for finishing rooms with unstable humidity conditions.
- Sawdust. For the production of warm plaster mixtures, only small wood sawing waste is used. They impart porosity to the material and ensure uniformity throughout the entire volume.
- Expanded clay sand. It is characterized by low specific gravity, porosity, and low thermal conductivity.
Expanded clay is one of the popular fillers.
Plaster for external use is made in the same varieties as for finishing inside buildings, but exclusively on a cement base.
Advantages and disadvantages
Before you buy warm plaster for finishing and insulation, you need to carefully familiarize yourself with its advantages and disadvantages.
So, the advantages of this mixture include:
- light specific weight, no more than 250 kg/m3, allowing the material to be used even for thin walls;
- solidity of the applied layer, which avoids the appearance of cold bridges, peeling and partial collapse;
- high adhesiveness, allowing the plaster to be used for all types of walls;
- easily restored if damaged;
- easy to apply, does not require special tools or experience;
- environmental safety, the composition includes natural materials;
- versatility, wide scope of application.
Warm plaster also has its disadvantages:
- high price;
- the required layer thickness is 1.5 times greater than when applying a decorative mixture;
- gradual application in several layers.
If, after weighing all the pros and cons, you decide to use this material for interior decoration, then you have made the right choice.
Professional construction engineers have calculated that the use of this composition pays off in an average of 2–4 years, due to its high heat-retaining properties, which reduce heating costs.
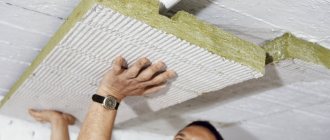
Basic rules for applying warm plaster
To create a reliable heat-insulating layer, you must follow some rules:
- Work should be performed at a temperature of 5-30°C. Drafts, direct exposure to atmospheric moisture, and sunlight are not allowed.
- Switches and sockets located on the wall being treated must be de-energized.
- To protect the eyes and skin, the use of glasses and protective clothing is necessary.
- To increase adhesion, the use of primers is required.
- The plaster should be thin-layer, with a layer thickness of no more than 25 mm. If it is necessary to create several layers, the next one is applied after the previous one has dried. The surface is not smoothed to improve adhesion.
Mixture consumption
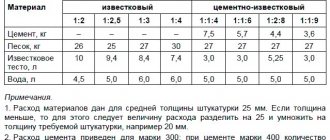
Warm plaster is supplied in bags of 7-10 kg. Typically, manufacturers indicate on the packaging the average consumption per 1 m2 of surface based on the creation of a layer 10 mm thick.
The consumption of the prepared material is determined by the thickness of the future coating. For standard volumes of mixture the following flow rate is accepted:
- for 1 m2 with a thickness of 25 mm, 10-14 kg will be required;
- with a thickness of 50 mm - 18-25 kg.
Section of plastered wall
Cost and storage conditions
The cost of this material is significantly higher than cement plasters. The packaging is different, minimum -7 kg, maximum -20kg . For convenience, manufacturers often produce packages of 10 kg, calculating a layer thickness of 2-2.5 cm to cover 1 m2 of surface.
Depending on the manufacturer, the price varies significantly. On average, for a package of 20 kg the price is from 350 rubles. It is recommended to store the mixture in a dry place for 12 months.
More information about insulating plasters can be seen in the video:
Making warm plaster with your own hands
Purchasing a mixture in a store is not a cheap pleasure, especially if we are talking about large volumes. That’s why some craftsmen make solutions themselves; all the necessary ingredients can be purchased separately: lime or clay, any fillers, liquid soap, cement and even a water repellent.
For thermal insulation of the facade of a house, the following recipe is recommended:
- Portland cement grade M400 – 1 part;
- polystyrene granulate fraction 1-3 mm – 1 part;
- perlite – 3 parts;
- polypropylene fiber – 50 g;
- plasticizer (in accordance with the manufacturer's instructions).
The ingredients are mixed, the consistency of the solution is adjusted by gradually adding water.
To decorate the interior of the premises, the following composition is used:
- white cement M400 – 1 part;
- filler – 4 parts;
- factory-made plasticizer (according to the manufacturer's instructions) or PVA glue - 50 g per bucket of binder.
- water.
Preparing the mixture
Do-it-yourself technology for applying warm plaster
The process of applying heat-insulating plaster is no different from traditional solutions. The work is carried out in several stages:
- Preparing the wall. The mixture should be applied only to previously cleaned and leveled surfaces. Cracks, crevices and other damage must be carefully covered in advance.
- Applying primer. The composition is used to strengthen the surface, remove dust, and increase adhesion.
- Making a solution. The ingredients must be mixed in proper proportions.
- Mixing the material. It is recommended to use a construction mixer at low speed. To obtain a high-quality solution with a homogeneous composition, it is recommended to add the dry mixture to water, and not vice versa.
- Installation of beacons. Elements placed over the entire surface of the wall allow you to obtain a perfectly even layer.
- Plastering. The composition is applied with a wide spatula from bottom to top. When filling the space between the beacons, the surface is leveled using the rule.
After the plaster has hardened, the beacons are removed, the holes are filled with mortar, and the surface is completely leveled.
Leveling the surface
Rules for working with warm plaster
To get a good result, you need to apply warm plaster correctly, you need to prepare the walls - remove dust, possible residues of other solutions, and if necessary, treat them with deeply absorbing impregnations. In some cases, it can be reinforced with reinforcing mesh. Before proceeding, the walls where the plaster will be applied must be thoroughly moistened with water.
It should be noted right away that the plaster prepared for work cannot be stored. It must be used all at once and preferably within 2 hours. Preparing it is quite simple - pour it out of the bag and dilute it with the specified amount of water or plasticizer (or both). The mixture is mixed with a mixer, and readiness is also checked simply by turning the trowel with the mixture over. When finished, the plaster will not fall off. It is applied using a spatula, grater, trowel, etc.
The thickness of each applied layer should not exceed 20 mm, otherwise the solution will slide. The intervals between applying layers should be at least 4 hours. But if the room has high humidity or low temperature, then the time should be increased. And the final work should be accepted no earlier than after 3-4 weeks. You can then visually inspect whether there is any peeling or cracking.
It is also necessary to check the quality of work in terms of compliance with the correct geometry, using a plumb bubble level and a two-meter rule. The rule is applied to the surface and checked to see if there are gaps. The minimum acceptable tolerance for deviation from the vertical or horizontal surface with good performance cannot exceed 3 mm per 1 meter.
Many people consider warm plaster as additional thermal insulation, so to get the maximum effect from it, they use it in combination with conventional insulation materials. This is especially important if warm plaster is not suitable for external work. Although there are cases when it was also used as the main thermal insulation layer.
Composition characteristics
Mixtures in cement mortar are used for external and internal work.
Thermal insulating plaster reduces heat loss due to its special composition. It includes porous filler, binder and special additives. Fine-fraction components make up from 45 to 70% of the mixture volume. Most often used:
- expanded perlite;
- granulated expanded clay;
- pumice crumbs;
- expanded polystyrene granules;
- foam glass spheres.
The binder is cement, gypsum or lime. Gypsum-based mixtures are used for interior work, while cement compositions are universal. To improve the characteristics of the solution, add to it:
- antiseptic;
- water repellents;
- plasticizers;
- air-releasing additives.
The insulation is sold in the form of a dry mixture, packaged in bags of 12-25 kg.
Work on the reinforcing layer
The reinforcing plaster layer is intended for internal strengthening of a thick coating, applying it to the facade insulation, at the joints of layers with different shrinkage characteristics, as well as in the case of plastering a building before its shrinkage is completed. For example, a reinforcing layer is made where part of the wall is made of gas silicate blocks, and part of it is made of brick. This section of the plaster coating must be reinforced. It is carried out using a plastic or fiberglass mesh, which has sufficient strength and is not afraid of the internal alkaline environment of the insulating plaster coating. Reinforcement work is carried out inside the solution. A layer of the mixture is applied to the ceilings and walls, then the mesh is laid out and recessed. On the facade walls on top of the insulation, the reinforcement work is slightly different. First, the solution is applied in strokes, then the mesh is attached, and then plastered. They work with spatulas and polishers. When the layer has dried, apply the next one on top of it in the usual way.