Specifics of using solar collectors
The main feature of solar collectors, which distinguishes them from heat generators of other types, is the cyclical nature of their operation. No sun - no thermal energy. As a result, such installations are passive at night.
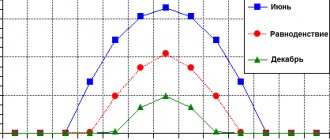
The average daily heat production directly depends on the length of daylight hours. The latter is determined, firstly, by the geographical latitude of the area, and secondly, by the time of year. During the summer period, when insolation peaks in the northern hemisphere, the collector will work at maximum efficiency. In winter, its productivity decreases, reaching a minimum in December-January.
In winter, the efficiency of solar collectors decreases not only due to a decrease in daylight hours, but also due to a change in the angle of incidence of sunlight. Fluctuations in solar collector performance throughout the year should be taken into account when calculating its contribution to the heating system.
Another factor that can affect the productivity of a solar collector is the climatic characteristics of the region. There are many places in our country where for 200 or more days a year the sun is hidden behind a thick layer of clouds or a veil of fog. In cloudy weather, the performance of the solar collector does not drop to zero, since it is able to capture scattered solar rays, but it is significantly reduced.
Homemade solar collector from an old refrigerator
Homemade solar collector from an old refrigerator
A solar water heater (collector) is an indispensable assistant in the household. A collector of the required size and design can provide hot water to a family of several people, while saving hundreds - thousands of rubles, which are spent on electricity and other types of energy resources.
If your dacha does not yet have electricity and gas, and heating water is a certain difficulty, I suggest making a solar water heater for showering and washing dishes from materials that can often be found in a landfill. First, you need to find the faulty refrigerator, namely, its coil, which is attached to the back wall, is damaged. After the coil is dismantled, it must be washed with a stream of water to get rid of the old freon. We stock up on slats that we will need in the future to make the frame.
I found an old rubber mat, which is often placed under the door.
Glass is also not necessary to buy. It can be dismantled from an old window, which is usually thrown into the trash, when replaced with plastic windows. Since our rubber mat turned out to be too big, it was decided to cut it to the size of the future frame.
We knock down a frame from the slats so that the coil fits freely between the slats. We try on the coil and rubber mat to the frame. We mark the place of fastening of the bottom rail of the frame and the places of cuts for the exit of the tubes. We install the bottom rail of the frame, spread foil between the rubber mat and the frame.
On the back side of the frame, we stuff slats to add rigidity to the structure.
We carefully tape all the gaps between the frame and the foil with tape. This is necessary to prevent cooler outside air from entering the collector.
To supply water to the coil, a PVC pipe was purchased. Sealing of the connections of the tubes and the coil is ensured with tape.
To secure the coil, clamps were used that were removed from the refrigerator. Fastening the clamps was also secured with tape. But for reliability, I recommend securing it with screws.
We cover our structure with glass and tape it around the perimeter.
The homemade solar collector is ready. For best heating, the sun's rays must fall on the surface of the collector at a right angle. Therefore, the fastening of the supporting elements of the structure completes the work. To prevent the glass from moving from the heat, you need to screw in a couple of screws at the bottom that will serve as stops. Now all that remains is to attach the hot water storage tank. Circulation occurs only due to natural convection. When heated, the water in the collector expands, becomes less dense, rises up the collector and enters the upper part of the storage tank through a pipe. As a result, cooler water at the bottom of the tank is displaced and flows through another pipe to the bottom of the collector. This water in turn is heated and rises into the tank. 1 - hot water; 2 — pressure relief valve; 3 - hot water drain; 4 - shut-off valve; 5 — make-up valve; 6 - cold water; 7 — cold water supply; 8 - drain valve. As long as the sun shines, the water will constantly circulate along this circuit, becoming increasingly warmer. Due to the fact that the tank is raised above the collector, the effect of turning over the circulation as a result of night cooling of the coolant in the collector is negated, since cold water simply accumulates at the lowest point of the system (at the bottom of the collector), while warm water remains in the tank. This simple solar collector design can heat water on a sunny day up to 70 degrees.
27.11.2015
See also:
- Do-it-yourself collector repair using galvanic extension
- DIY solar collectors (cool video compilation)
- Highly efficient DIY solar collector
- Solar collector (photo, calculation, step by step)
- Heating by solar rays
Rate a homemade product, a master class, an idea. Comments
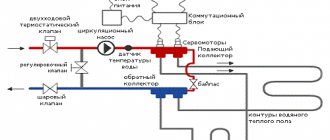
Operating principle and types of solar collectors
The time has come to say a few words about the design and operating principle of the solar collector. The main element of its design is the adsorber, which is a copper plate with a pipe welded to it. Absorbing the heat of the sun's rays falling on it, the plate (and along with it the pipe) quickly heats up. This heat is transferred to the liquid coolant circulating through the pipe, which in turn transports it further through the system.
The ability of a physical body to absorb or reflect solar rays depends, first of all, on the nature of its surface. For example, a mirror surface perfectly reflects light and heat, but a black surface, on the contrary, absorbs it. That is why a black coating is applied to the copper plate of the adsorber (the simplest option is black paint).
The principle of operation of the solar collector
1. Solar collector. 2. Buffer tank. 3. Hot water.
4. Cold water. 5. Controller. 6. Heat exchanger.
7. Pump. 8. Hot flow. 9. Cold flow.
You can also increase the amount of heat received from the sun by correctly selecting the glass covering the adsorber. Regular glass is not transparent enough. In addition, it glares, reflecting part of the sunlight falling on it. In solar collectors, as a rule, they try to use special glass with a low iron content, which increases its transparency. To reduce the proportion of light reflected by the surface, an anti-reflective coating is applied to the glass. And to prevent dust and moisture from getting inside the collector, which also reduce the throughput of the glass, the housing is made sealed, and sometimes even filled with inert gas.
Despite all these tricks, the efficiency of solar collectors is still far from 100%, which is due to the imperfection of their design. The heated adsorber plate radiates part of the received heat into the environment, heating the air in contact with it. To minimize heat loss, the adsorber must be insulated. The search for an effective way to thermally insulate an adsorber led engineers to the creation of several types of solar collectors, the most common of which are flat and tubular vacuum.
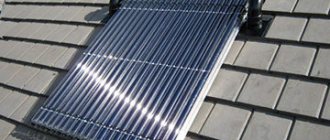
Flat-plate solar collectors
Flat solar collectors.
The design of a flat solar collector is extremely simple: it is a metal box covered with glass on top. Mineral wool is usually used to insulate the bottom and walls of the housing. This option is far from ideal, since heat transfer from the adsorber to the glass through the air inside the box cannot be ruled out. With a large temperature difference between inside and outside the collector, heat loss can be quite significant. As a result, a flat solar collector, which functions perfectly in spring and summer, becomes extremely ineffective in winter.
Design of a flat solar collector
1. Inlet pipe. 2. Protective glass.
3. Absorption layer. 4. Aluminum frame.
5. Copper tubes. 6. Heat insulator. 7. Outlet pipe.
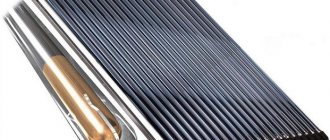
Tubular vacuum solar collectors
Tubular vacuum solar collectors.
A vacuum solar collector is a panel consisting of a large number of relatively thin glass tubes. An adsorber is located inside each of them. To prevent heat transfer by gas (air), the tubes are evacuated. It is precisely due to the absence of gas near the adsorbers that vacuum collectors are characterized by low heat loss even in frosty weather.
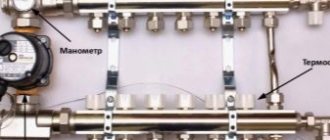
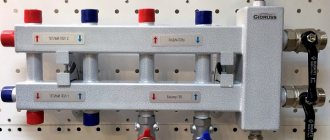
Vacuum manifold device
1. Thermal insulation. 2. Heat exchanger housing. 3. Heat exchanger (collector)
4. Sealed plug. 5. Vacuum tube. 6. Capacitor.
7. Absorbing plate. 8. Heat pipe with working fluid.
DIY solar air collector: step-by-step manufacturing process
Humanity began to use inexhaustible and free solar energy a long time ago. To collect it, there are special devices - solar collectors. Every year their design becomes more and more advanced, but their high prices do not yet allow their use widely and everywhere. Therefore, people with an inquisitive mind and skillful hands are trying to make solar collectors on their own. And they are ready to share their knowledge. This article suggests learning how to make a solar air collector with your own hands.
DIY solar air collector
What is a solar collector
The task of a solar collector is to collect the thermal energy of solar radiation and transfer it to some substance, which will then transfer it to the “addressee”. This substance is called a coolant and can be either liquids (most often water) or gases (almost always air).
Water is a more effective coolant, since its heat capacity is much higher than air, but its use is associated with certain difficulties: discharging excess heat in summer or protecting against freezing in winter. Air will not be able to transmit such an amount of energy, but the design of air collectors is much simpler, they are much more reliable and safe. And making a solar air collector with your own hands is much easier than making a water one. By the way, air is the first coolant that people began to use. What advantages does air have as a coolant:
- The air is not subject to freezing and boiling.
- The air is not toxic.
- The air does not need to be endowed with any special qualities (antifreeze is added to water systems); it is always available.
Air solar collectors are widely used in air heating systems of both residential buildings and basements, garages, and storage facilities. In which countries exactly air solar systems are used most widely is shown very eloquently by the diagram.
Use of airborne solar collectors in different countries of the world
It is clear that the most economically developed countries do not at all neglect the capabilities of the Sun to heat the air. And we, alas, are still among the many 4.3% of others.
Design and principle of operation of an airborne solar collector
The solar air collector consists of several main parts:
Scheme of operation of an air solar collector
- The entire collector structure is placed in a durable and sealed housing, which is necessarily equipped with a thermal insulator. The heat trapped inside the collector should not “leak” out.
- The main part of any collector is the solar receiving panel, which is also called an absorber or absorber. The task of this panel is to receive solar energy and then transfer it to the air, so it must be made of a material with the highest thermal conductivity. Such properties available in everyday life are copper and aluminum, less often steel. For better heat transfer, the lower part of the absorber is made as large as possible, so ribs, wavy surfaces, perforations and other methods can be used. For better absorption of solar energy, the receiving part of the absorber is painted in a dark matte color.
- The upper part of the collector is hermetically sealed with transparent insulation, which can be tempered glass or plexiglass, or polycarbonate glass.
The solar collector is oriented to the south and the surface is tilted so that the maximum amount of solar energy reaches the surface. As experts say - for maximum insolation. Cold outside air naturally or forcibly enters the receiving part, passes through the fins of the absorber and exits from another part, equipped with a flange for joining with the air duct leading into the heated room. It is worth noting that there are a lot of design options for solar collectors and the one described above is shown only as an example.
Air heating using solar collectors cannot completely replace the main heating in our climate zone, but it will be a very good help even on frosty winter sunny days.
Prices for popular models of solar collectors
Solar collectors
DIY solar air collector
Determining the installation location and available space
First of all, you need to decide on the installation location of the solar air collector, as this can greatly affect its performance. Several factors should be taken into account:
- The solar air collector should be located as close as possible to the place where the heated air will flow, since losses in the air ducts may become such that the use of the collector will be impractical.
- The collector should be located on the south side of the house or other building and, if possible, at a certain slope to ensure maximum insolation. If this is not available, then you should try to install it as close to the south side as possible. The dependence of insolation on azimuth and installation angle is shown in the diagram.
How does the orientation of the solar collector affect insolation?
- Surrounding objects, buildings and plants should not interfere with the natural lighting of the collector surface.
In the selected location that meets all the conditions, you should see what area the solar collector can be placed. Obviously, the larger the collector area, the more productive it will be.
Selecting a collector absorber design
The absorber (absorber) is the most important part of any solar collector and its performance will largely depend on its design. Factory models use parts made of special alloys with a special highly selective coating, but this mainly determines the high price. Our task is to find a material that is available and, nevertheless, will cope well with its function - to capture solar heat and transfer it to the air.
And such an affordable material is an ordinary aluminum can of Coca-Cola, beer or other drinks. We will not describe how to collect the required amount of empty containers, but rather focus on those wonderful properties that allow the use of aluminum cans as an absorber:
Aluminum beverage can is an ideal material for a collector absorber
- Firstly, the cans are made of aluminum (steel is very rare), and it has very high thermal conductivity.
- Secondly, all cans of any drinks have the same dimensions: the lower diameter is 66 mm, the upper diameter is 59 mm, the height of a 0.5 liter can is 168 mm.
- Thirdly, the cans are made in such a way that they are placed on top of each other in the packaging, that is, they fit perfectly together.
- And finally, the thin aluminum from which the cans are made can be easily processed with accessible tools.
As the required number of aluminum cans accumulates, they must be thoroughly washed with detergent and dried. Otherwise, in the future they will emit an unpleasant odor, which will be more difficult to deal with.
Manufacturing of the collector body and its thermal insulation
Depending on the available area of the collector, its overall dimensions are calculated. In this article, it is proposed to make a solar air collector measuring 8 by 8 0.5 liter aluminum cans, which in overall dimensions will be approximately 1400 * 670 mm. One sheet of plywood 21 mm thick, standard size 1525*1525 mm, is enough to make the entire solar collector, and the thickness of the plywood will provide the necessary strength and rigidity of the structure.
To make the case you need:
Carefully mark the sheet of plywood. For the collector you will need:
- The back wall measures 1400*670 mm.
- Two side walls 1400*116 mm.
- Two end walls 630*116 mm.
- Two guides for cans 630*116 mm.
When marking, it is worth considering that for further processing of the edges of the parts it is necessary to give an allowance of 3-5 mm on each side. To ensure cutting occurs without failures, it is better to draw lines with a bright marker.
It is best to cut plywood with a circular saw, and the smaller the teeth on the disk, the better. For a more even cut, you can use a guide, which can be a chipboard sheet with a factory edge. The guide can be tightened to a sheet of plywood with clamps.
For even cutting of plywood edges, a circular saw together with a guide is best suited
If the cut goes across the fibers, then it is better to first cut through the top layer with a sharp knife along a metal ruler, this way there will be fewer chips. After cutting the sheet into parts, if the edges are uneven, they can be processed using a milling machine according to a template until they are perfectly even and perpendicular.
It's time to assemble the frame. To do this you need:
- Attach two side walls to the rear wall of the collector. You can fasten it with 6.3*50 mm furniture screws - they are also called confirmats. Just before doing this, you must first go through a drill with a diameter of 4 mm. For fastening, you can use ordinary screws and various angles. The collector must have a sealed housing, so it is advisable to coat the bonded surfaces with silicone sealant.
Furniture confirmation screws are quite suitable for connecting parts made of plywood with a thickness of 21 mm
- The end walls are attached to the rear wall, and then to the side ones. After this, the correct assembly and dimensions are checked.
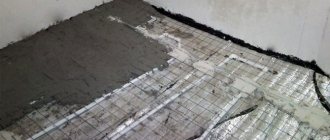
The rear and side walls of the collector must be insulated, and extruded polystyrene foam (EPS) 2 cm thick is ideal for this. Before gluing the insulation to the walls, it is necessary to treat the plywood with an antiseptic or simply paint it, since moisture can condense in these places.
Extruded polystyrene foam boards are excellent for thermal insulation of solar collectors
EPS sheets can be glued to the plywood surface with mounting foam, acrylic “liquid nails”, “Master” glue, “Moment” glue - in any case it will adhere securely. The main thing is that in the description of the glue, foam plastic is indicated as one of the surfaces to be glued. When gluing the insulation, it is necessary to ensure that all joints are completely closed. If necessary, in the future they can be “blown out” with polyurethane foam.
After the entire internal surface of the collector has been insulated, it can be covered with reflective thermal insulation, which is a base made of fiberglass or polyethylene foam and aluminum foil. Very often these materials have an adhesive base, which is very convenient, and if not, then they can be glued to any suitable composition. The joints must be taped with aluminum tape.
The joints of the heat-reflecting layer must be secured with aluminum tape
Manufacturing guides for the absorber
In order for columns made of aluminum cans to accurately maintain their geometry, it is necessary to make guides for them. To do this, two pieces of plywood 630 * 116 mm were previously cut out, which must be marked and drilled as follows:
- Step back 53 mm from the top and draw a line parallel to the long side.
- Divide the resulting line into 9 equal segments, that is, 70 mm each, and place marks. These will be the centers of the holes.
- Using a crown-cup wood drill with a diameter of 57 mm, you need to drill holes in the plywood. But before that, it is better to measure the diameter of the stability support ring at the bottom of the can, since the dimensions may vary. If necessary, select a different drill. The jar should fit into the hole quite tightly. When working, do not press hard on the drill and periodically allow it to rest.
The cup drill is simply irreplaceable for large diameter holes in plywood
- Markings are made on the top guide in the same way. The diameter of the head part of the can is slightly larger (57.4) than the rear support ring, so before drilling it is better to measure it with a caliper and select the appropriate cup crown, and then try on the top of the can.
Manufacturing of absorbers
To prepare the cans for installation, a number of operations should be performed:
- All jars must be checked with a permanent magnet. Very rarely, but there are steel cans that need to be sorted.
- In the upper part of the can, cuts are made with metal scissors from the hole to the edges, and then these “tongues” are tucked inside. Wear gloves when working to avoid cuts from the sharp edges of the aluminum. A piece of polymer pipe clamped in a vice will help guide the sharp tongues inside the jar and align the edges of the hole. We process all 64 jars in a similar way.
It is best to use metal scissors to open the top of the can.
- It's time to work on the bottom part. To do this, using a conical metal drill, three holes with a diameter of approximately 20 mm are drilled in the bottom, located at 120° to each other. In order not to crush the jar, it must be placed in an elastic mandrel (for example, a piece of pipe insulation) and not squeezed tightly with your hands. All banks are processed this way.
The conical drill cuts very even holes in the bottom of the can.
- To glue cans, it is best to use High Heat Mortar high-temperature adhesive-sealant based on silicate cement. It is used for sealing stoves, fireplaces, and chimneys. Perhaps its fire resistance will be excessive for the collector, but “the reserve is not good for the pocket.”
This sealant for stoves and fireplaces is also excellent for making an absorber
- In order for the cans to maintain a line during gluing, it is necessary to make a template from two even boards, fastened together at an angle of 90°. To fit the cans to the surface, the template is placed obliquely and leaned against the wall.
The template is very helpful in assembly.
- Before gluing, the cans are degreased with any available solvent (acetone, No. 646, 647). This work is best done outside.
- Before starting the next stage, you need to put rubber gloves on your hands and have a container of water nearby. The surfaces to be glued are moistened, the adhesive-sealant is squeezed out from the gun in an even “sausage” onto the bottom of the can, and then it is joined to the upper part of the can located below.
Adhesive sealant is applied to the top of the jar
- Using a moistened gloved finger, smooth out the squeezed out glue so that the entire joint and the surface next to it is covered with glue. Then all these operations are repeated for all cans of one column (8 pieces). After this, all the cans are placed in the template, aligned and pressed on top with a weight.
- After the glue has hardened, the column is removed and carefully laid on a horizontal surface. Other columns from cans are assembled in a similar way.
The absorber blanks dry completely on a horizontal surface
- While the blanks are completely dry, you can paint the back wall of the solar collector and the guides for the cans in matte black. In good auto stores you can always find such paint intended for mufflers or brake drums.
You can always find this kind of paint at a good auto store.
- The side walls of the collector do not need to be painted, so they should be covered with newspapers attached with masking tape. After degreasing the surfaces, paint is applied in two layers.
Assembly of an air solar collector
- It's time to start assembling the absorber battery. To do this, each column fits into the corresponding guide, first from below and then from above. Before joining, the cans are coated with sealant, and then the sealant is leveled with a moistened finger. At this stage you need to be especially careful. It is better to collect on a horizontal surface. After assembly and checking all connections, you can carefully tighten the two guides with a rubber band and leave to dry.
- When the entire absorber structure has dried, it can be carefully lifted and placed on top of the box so that the distances above and below are the same. After this, the position of the guides is marked, because to install them in the box you will have to cut a groove in the insulation so that they fit tightly and rest against the plywood sheet of the rear wall. After installation, the guide strips are fastened from the ends through the sidewalls with furniture confirming screws. After this, all joints are sealed with sealant.
The absorber (absorber) is mounted in its regular place
- For air inlet and outlet, you must immediately provide holes, which are best made in the rear wall. For this, it is best to use ready-made solutions in the system of plastic ventilation ducts, namely wall plates with a flange, which can be easily mounted into the rear wall at the entry and exit points not occupied by the adsorber. To do this, a rectangular hole is cut in the plywood sheet and insulation according to the dimensions of the plate, and then it is attached to the wall with screws through a layer of sealant.
Wall plates with flange of PVC ventilation duct system are great for air solar collector
- If there is a need to switch to a round air duct, install a duct fan, make a turn, etc., then the manufacturers’ assortment includes any pipes and fittings that should be adjusted locally.
- The upper and lower front parts of the solar collector at the entry and exit points of the air ducts must be lined. The lining is very suitable for this, but it must first be cut exactly to size, and then the insulation on the side and end walls of the collector must be trimmed exactly to the thickness of the lining. After that, it is glued to the sealant, and all joints are treated with it.
It is convenient to line the entry and exit points with pieces of plastic lining
- For painting, the collector is placed on stops in a position close to vertical. Before painting, surfaces are degreased and dried. The paint is applied in several layers until it covers the entire visible surface. Each layer is applied so that no drips form. The surface should be deep black and matte.
Painting the collector
- After the paint has dried, it's time to mount the front glass. For these purposes, acrylic plexiglass or polycarbonate glass is best suited. First, a sheet of glass is applied to the surface, its dimensions are outlined, and then it is cut out. The edges must immediately be sanded and adjusted to the exact size. Before installation, it must be thoroughly cleaned, especially the lower surface, and several bags of silica gel must be placed in the compartment with the adsorber. It will prevent condensation from appearing on the inner surface of the glass.
- Before fixing the glass, all parts adjacent to it must be treated with sealant: the perimeter of the box and the guides. Moreover, it is not necessary to apply sealant to the entire surface; it is enough only to the ends of the plywood sheets. It is best to fasten with screws with a press washer, having previously drilled holes before doing this. It is also advisable to cover the edge of the glass with a special corner furniture profile.
Corner furniture profiles are perfect for finishing edges
- To attach the air solar collector, you can screw brackets to it on the rear wall. This completes the assembly of the collector itself.
Connecting the solar air collector
The air solar collector can either be integrated into an existing ventilation system or work completely separately. Even in the absence of forced ventilation, inexorable physical laws will still “push” heated air through the collector, but this process will proceed rather sluggishly, so a fan with a capacity of at least 150 cubic meters per hour is desirable.
The use of a ventilator raises two important questions:
- Where should the fan be installed: at the inlet or outlet of the collector? If the collector raises the outlet temperature to 60-70 °C (and this is quite possible), then the fan standing there will not last long. On the other hand, a fan standing outside is exposed to atmospheric influences and is more difficult to control. In most cases, it is still installed indoors, and on hot days, when the air is already heated, the fan is simply not turned on or it is connected through a thermal relay.
Most often the fan is mounted indoors
- The use of a fan makes some skeptics doubt the feasibility of air heating. Isn't it easier to use the energy spent on rotating the fan motor to heat the room? But practice shows that the above-described collector design is still effective and profitable. The temperature difference between the outside air and the outlet from the collector can reach 35 °C.
When operating an air collector, another reasonable question arises: at night, when there is no insolation of the collector, even with the fan not working, cold air will penetrate into the room. The solution to this issue is quite simple. Among the components for ventilation systems you can find special check valves that open only under the pressure of the air flow. When the fan is not working, the valve will be closed. It is only important to install it correctly so that it does not block the air duct. There are also fan models with a built-in valve that you should pay attention to.
The check valve will prevent unauthorized access to the room of cold air at night
To quickly warm up with warm air, you can consider a recirculation system, when air from the room passes through the collector and returns to the same room. In this case, it is justified to install a fan that will force air into the collector, and not create a vacuum in it. The disadvantage of recirculation is the lack of fresh air flow.
Operation and maintenance of the solar air collector
In order for the collector to serve for a long time and without failure, you must follow two simple rules:
- Periodically it is necessary to clean and rinse the front glass of the solar collector.
- On hot summer days, when there is no need to heat the air, it is better to cover the collector with a thick, light-colored cloth to prevent overheating of the absorber surface.
- To prevent the fan from running idle, it is worth periodically checking the tightness of the air duct connections and their integrity.
Find out how to make a solar battery with your own hands, and also consider the principle and assembly procedure from our new article.
Conclusion
To summarize the article, it is worth paying attention to several points:
- The solar air collector model proposed in this article has proven its effectiveness in practice and is successfully used all over the world.
- If desired, you can make a more powerful solar collector or connect them several in series.
- Airborne solar collectors can be used periodically. For example, for heating air in greenhouses in early spring or for drying agricultural products in autumn.
Video: How to make an airborne solar collector (English)
Video: Slideshow about making a solar collector from aluminum cans
Application areas of solar collectors
The main purpose of solar collectors, like any other heat generators, is to heat buildings and prepare water for a hot water supply system. It remains to find out which type of solar collectors is best suited to perform a particular function.
Flat-plate solar collectors, as we found out, have good performance in the spring and summer, but are ineffective in winter. It follows from this that using them for heating, the need for which appears precisely with the onset of cold weather, is inappropriate. This, however, does not mean that there is no use for this equipment at all.
Flat-plate collectors have one undeniable advantage - they are significantly cheaper than vacuum models, so in cases where you plan to use solar energy exclusively in the summer, it makes sense to purchase them. Flat solar collectors do an excellent job of preparing water for hot water supply in the summer. Even more often they are used to heat water in outdoor pools to a comfortable temperature.
Tubular vacuum manifolds are more versatile. With the arrival of winter cold, their performance does not decrease as significantly as in the case of flat models, which means they can be used all year round. This makes it possible to use such solar collectors not only for hot water supply, but also in the heating system.
Comparison of flat and vacuum solar collectors.
Operating principle of a flat solar collector
The flat-plate solar collector consists of the following main elements housed in an aluminum housing:
- copper adsorber plate over the entire area of the body;
- protective glass or polycarbonate;
- a coil of copper tubes located under the adsorber.
The operation of a solar collector for heating water of this type is very simple. The adsorber heats up from the sun and transfers thermal energy to the coil through which the coolant circulates.
Thanks to its simple design, the flat-plate collector is relatively inexpensive and does not require complex maintenance. However, its disadvantage is a fairly high level of heat loss. To reduce them, thermal insulation of the rear surface is used. For this purpose, mineral wool or other effective insulation materials are most often used. However, the problem cannot be completely solved. The highest heat losses are observed when there is a significant difference in temperature between inside and outside the housing. This makes flat-plate collectors ineffective during the cold season.
Location of solar collectors
The efficiency of a solar collector directly depends on the amount of sunlight falling on the adsorber. It follows from this that the collector should be located in an open space, where shadows from neighboring buildings, trees located near mountains, etc. never (or at least for as long as possible) fall.
Not only the location of the collector is of great importance, but also its orientation. The “sunny” side in our northern hemisphere is the southern one, which means that ideally the collector “mirrors” should be turned strictly south. If it is technically impossible to do this, then you should choose a direction as close as possible to the south - southwest or southeast.
One should not lose sight of such a parameter as the angle of inclination of the solar collector. The magnitude of the angle depends on the deviation of the position of the Sun from the zenith, which in turn is determined by the geographic latitude of the area in which the equipment will be operated. If the tilt angle is set incorrectly, the optical energy loss will increase significantly, since a significant part of the sunlight will be reflected from the collector glass and, therefore, will not reach the absorber.
Making a window air solar collector
With the help of such a homemade collector, you can heat an apartment or any other room without any problems. It is very easy to install, as is removal. After removal, the collector can be put into storage until the new heating season. Due to the use of aluminum in the design, the device weighs little; in addition, such metal has high thermal conductivity, which increases efficiency.
Materials and tools for manufacturing: - aluminum profile (it is used in the manufacture of mask nets for plastic windows); — aluminum sheet (thickness 0.1-0.5 mm); - stationery knife; — hole punch (used when working with leather); - aluminum tape; - drill; — absorber (black wrap or cinefoil); - Double-sided tape; - thermoresistant paper; — loops for attaching the collector to the window.
Manifold manufacturing process:
Step one. We make a frame
To make the frame you will need an aluminum profile. You need to make two frames from it. The size of these frames can be varied, it all depends on the desired performance of the collector and the installation method. If the collector will be installed directly on the window frame in the same way as a mosquito net, then the frame should be approximately 50-60 mm larger than the visible part of the glass unit.
If the collector will be attached to the glass unit using Velcro, then any size can be used, as long as the collector is placed closely on the glass.
Step two.
How to make the back wall of the collector In order to create the back wall you will need an aluminum sheet about 0.1-0.5 mm thick. In principle, the thickness does not play a special role here, the main thing is that the sheet does not wrinkle and is not too thick so that it is convenient to cut it. Thin aluminum is cut using a regular stationery knife.
Now you need to make holes, the easiest way to do this is with a hole punch, the diameter of the holes should be 5-6 mm. There should be two rows of such holes at the top and bottom of the collector. Thanks to these holes, natural convection will occur inside the collector. In other words, cold air will be sucked from the room into the collector through the lower openings, and then it will be heated and forced out through the upper ones. Aluminum tape is excellent for attaching an aluminum sheet to a frame. You only need to fix it in the corners and in the center of each side.
Step three. We make stiffeners
Due to the fact that the absorber and the rear wall are thin, ribs need to be installed to make them rigid. To do this, pieces of aluminum profile are installed in the center of the collector. The ribs are fixed using rivets; to do this, you need to drill holes of a suitable diameter in them.
Step four.
Manufacturing and installation of an absorber An absorber is needed to receive heat from the sun's rays. That is, it must be some kind of material that heats up well in the sun. The author recommends using black wrap or cinefoil for these purposes (this is black foil). These materials are used to create screens by illuminators and photographers. But buying such foil can be problematic, since it is quite rare. Yes, this is not a problem, however, it can be replaced with an aluminum sheet painted with black heat-resistant paint. It will be even more effective to use copper sheet, since it has a higher degree of thermal conductivity, but then the structure will be a little heavier. Aluminum should be as thin as possible, this will allow it to heat up quickly even in cloudy weather.
The absorber must be cut so that it fits the rear wall. The absorber is installed on top of the stiffeners. The material is fixed using pieces of aluminum tape.
Step five.
Glazing the collector In order for the collector to be glazed, a second frame must now be installed on top of the absorber, which was previously made from an aluminum profile. The profile is fixed using pieces of aluminum tape. Thus, the frames are connected to each other.
Now you need to glue double-sided tape around the perimeter of the top frame. For glazing, shrink film is best suited. It needs to be stretched on the table and secured at the edges with electrical tape. Now the frame with double-sided tape glued can be placed on the film. After the film sticks, you can trim off the excess edges.
To make the collector more beautiful and ensure maximum tightness of the device, its perimeter must be carefully covered with aluminum tape. You can use a hair dryer to smooth or tighten the film.
That's all, now the solar collector is ready for use. Now you just need to install it on the window. This particular model is installed on the window using Velcro; therefore, loops are attached to the corners of the profile. You can make as many of these collectors as you like; for example, you can equip all southern windows with them. Of course, the design will darken the room a little, but if desired, it can be removed at any time. According to the author, in December, during cloudy weather, the collector produced air at a temperature of 65 degrees. And in sunny weather, the temperature of the exhaust air was 85 degrees. The air convection was quite strong; if you put a paper sheet on top of the collector, it would rise from the flow of warm air coming out of it. Source
Become the author of the site, publish your own articles, descriptions of homemade products and pay for the text. Read more here.
How to choose a solar collector of the required power
If you want the heating system of your home to cope with the task of maintaining a comfortable temperature in the rooms, and hot and not lukewarm water flows from the taps, and at the same time you plan to use a solar collector as a heat generator, you need to calculate the required power of the equipment in advance.
In this case, it will be necessary to take into account a fairly large number of parameters, including the purpose of the collector (DHW, heating or a combination of both), the heat needs of the facility (the total area of heated premises or the average daily consumption of hot water), the climatic features of the region, and the features of the collector installation.
In principle, making such calculations is not so difficult. The performance of each model is known, which means you can easily estimate the number of collectors required to provide heat to your home. Companies involved in the production of solar collectors have information (and can provide it to the consumer) about changes in the power of the equipment depending on the geographic latitude of the area, the angle of inclination of the “mirrors,” the deviation of their orientation from the south direction, etc., which allows making the necessary adjustments when calculating collector performance.
When selecting the required collector power, it is very important to achieve a balance between the shortage and excess of generated heat. Experts recommend focusing on the maximum possible capacity of the collector, i.e. using the indicator for the most productive summer season in the calculations. This goes against the desire of the average user to take equipment with a reserve (i.e., calculate according to the power of the coldest month) so that there is enough heat from the collector even on less sunny autumn and winter days.
However, if you follow the path of choosing a solar collector of increased power, then at the peak of its performance, i.e. in warm sunny weather, you will face a serious problem: more heat will be produced than consumed, and this threatens overheating of the circuit and other unpleasant consequences . There are two options for solving this problem: either install a low-power solar collector and connect backup heat sources in parallel in winter, or purchase a model with a large power reserve and provide ways to discharge excess heat in the spring-summer season.
How to assemble a solar air collector for heating with an area of 9 square meters. m
The main requirement for any solar collector is its area, because the power of the collector depends on it.
The larger the area of the device, the more heat it can receive from the sun. And thanks to the high power, you can quickly heat a small room or warm a large one. The peculiarity of the collector, which was proposed by one author in this article, is that it represents one of the walls of the room, that is, it is not even visible, so the collector does not violate the harmony of the facade. In this example, the air manifold was built on the south wall of the garage.
Due to the fact that the collector area is large and when air circulates, dirt will appear on the glass, which will be quite difficult to clean, it was decided to take heated air from the back of the absorber. But the collector will still be glazed.
Materials and tools for making the collector: - silicone; - glass; — corrugated sheeting (black); - wooden beam; - drill; - saw; — black polyethylene film; — plugs for corrugated sheets; — air duct liners; — decorative film; - pipes; - pump; - corrugation; - pieces of old bicycle tubes.
Manifold creation process:
Step one. Preparing the garage wall
First of all, all the cladding was removed from the garage; here the scale already depends on the size of the collector.
Since there were windows on the south side of the garage, they had to be bricked up to make the design of the collector simpler.
Next, black plastic sheeting was attached to the outside of the wall. It can be placed on glue.
Now on top of the film you need to make a frame of wooden beams measuring 20X40.
You need to make two holes in the upper part of the wall; through one, cold air will enter the collector, and through the other, already heated air will exit. You need to install sleeves in these holes to connect the air ducts. The author has both holes drilled at the same height, so there will be no natural air circulation in the system. In order for air to circulate, the inlet must be at the bottom of the manifold.
Well, at the end of this assembly stage, you need to nail the plugs at the bottom that match the type of corrugated sheet used.
Step two.
Installing corrugated sheeting At the next stage, you need to attach corrugated sheeting; here it plays the role of an absorber, that is, a heating element. Of course, the corrugated sheeting should be black; if you come across a different color, it can be repainted with black heat-resistant paint.
In the central part of the wall you will need to fix at least one wooden beam; it will form a kind of labyrinth through which air will circulate. It is best to have as many of these labyrinths as possible, then the air will warm up better.
Step three. Collector sealing
After installing the corrugated sheeting, you need to take mineral wool, polystyrene foam or any other insulation and plug the cracks with it.
Those cracks that have formed at the junction of corrugated sheets must be sealed with silicone.
Step four.
Installing glass To install glass, wooden beams need to be secured on top of the corrugated board. It is important to understand here that the thinner the glass, the smaller the area it should have. If you need to use glass over a large area, it should be as thick as possible. If you use glass from small fragments, as in this homemade product, then a thickness of 4-5 mm will be enough.
Now the beams can be painted black so that they blend in with the background of the corrugated board.
After installing the glass, you need to seal it again, this is done so that dirt does not get inside the collector. Silicone is used for these purposes. To hide the places where silicone was applied to the glass, you can use decorative tape.
Now the collector is almost ready, in the photo you can see what it will look like.
In the picture you can see one ventilation hole, as it is necessary for safety precautions when arranging garages. Step five.
Installation of a circulation pump Since the system does not provide for natural air circulation, it is necessary to use an air pump; in this case, a device with a capacity of 400 cubic meters was used. To reduce the noise level in the pipes when the fan was operating, it was connected through an air duct corrugation. And to attach the fan to the pipe, the author used pieces of bicycle inner tubes.
According to the author, the collector showed very good results in the case. So, for example, when the air temperature outside was only +2 degrees, the homemade product was able to produce an output temperature of +74 degrees. The device showed good results even in cloudy weather.
The disadvantage of such a system is that there is no air movement between the absorber and the glass, and therefore condensation forms on the glass, which reduces the performance of the device. But this problem can be solved; you just need to drill a couple of holes to drain the water.
Source
Become the author of the site, publish your own articles, descriptions of homemade products and pay for the text. Read more here.
Stagnation of the system
Let's talk a little more about the problems associated with an excess of generated heat. So, let’s assume that you have installed a sufficiently powerful solar collector that can completely provide heat to the heating system of your home. But summer came, and the need for heating disappeared. If you can turn off the power supply to an electric boiler, or turn off the fuel supply to a gas boiler, then we have no control over the sun - we cannot “turn off” it when it gets too hot.
System stagnation is one of the main potential problems of solar collectors. If not enough heat is taken from the collector circuit, the coolant overheats. At a certain moment, the latter may boil, which will lead to the cessation of its circulation along the circuit. When the coolant cools down and condenses, the system will resume operation. However, not all types of coolants easily tolerate the transition from liquid to gaseous state and back. Some, as a result of overheating, acquire a jelly-like consistency, which makes further operation of the circuit impossible.
Only stable removal of the heat produced by the collector will help to avoid stagnation. If the calculation of equipment power is done correctly, the likelihood of problems occurring is almost zero.
However, even in this case, the occurrence of force majeure cannot be ruled out, so methods of protection against overheating should be provided in advance:
1. Installation of a reserve tank for storing hot water. If the water in the main tank of the hot water supply system has reached the set maximum, and the solar collector continues to supply heat, a switch will occur automatically and the water will begin to heat up in the reserve tank. The created supply of warm water can be used for domestic needs later, in cloudy weather.
2. Heating the water in the pool. Owners of houses with a swimming pool (whether indoor or outdoor) have an excellent opportunity to remove excess heat energy. The volume of the pool is incomparably larger than the volume of any household storage tank, which means that the water in it will not heat up so much that it will no longer be able to absorb heat.
3. Drain hot water. If it is not possible to use excess heat profitably, you can simply drain heated water from the hot water storage tank into the sewer in small portions. The cold water entering the container will lower the temperature of the entire volume, which will continue to remove heat from the circuit.
4. External heat exchanger with fan. If the solar collector has a high productivity, the excess heat can also be very large. In this case, the system is equipped with an additional circuit filled with refrigerant. This additional circuit is connected to the system via a heat exchanger equipped with a fan and mounted outside the building. If there is a risk of overheating, excess heat enters the additional circuit and is “thrown out” into the air through the heat exchanger.
5. Discharge of heat into the ground. If, in addition to the solar collector, the house has a ground source heat pump, excess heat can be directed to the well. In this case, you solve two problems at once: on the one hand, you protect the collector circuit from overheating, on the other, you restore the heat reserve in the ground that has been depleted over the winter.
6. Isolation of the solar collector from direct sunlight. This method is one of the simplest from a technical point of view. Of course, you shouldn’t climb onto the roof and curtain the collector manually - it’s difficult and unsafe. It is much more rational to install a remotely controlled barrier, like a roller shutter. You can even connect the damper control unit to the controller - if the temperature in the circuit rises dangerously, the manifold will close automatically.
7. Drain the coolant. This method can be considered radical, but at the same time it is quite simple. If there is a risk of overheating, the coolant is drained through a pump into a special container integrated into the system circuit. When conditions become favorable again, the pump will return the coolant to the circuit and the operation of the collector will be restored.
LiveInternetLiveInternet
solar water heater
Solar water heater for a summer house, from an old refrigerator.
A solar water heater (collector) is an indispensable assistant in the household. A collector of the required size and design can provide hot water to a family of several people, while saving hundreds - thousands of rubles, which are spent on electricity and other types of energy resources. If your dacha does not yet have electricity and gas, and heating water is a certain difficulty, I suggest making a solar water heater for showering and washing dishes from materials that can often be found in a landfill. First, you need to find the faulty refrigerator, namely, you will need its coil, which is attached to the back wall.
After the coil is dismantled, it must be washed with a stream of water to get rid of the old freon. We stock up on slats that we will need in the future to make the frame. I found an old rubber mat, which is often placed under the door. Glass is also not necessary to buy. It can be dismantled from an old window, which is usually thrown into the trash, when replaced with plastic windows. Since our rubber mat turned out to be too big, it was decided to cut it to the size of the future frame.
We knock down a frame from the slats so that the coil fits freely between the slats.
We try on the coil and rubber mat to the frame. We mark the place of fastening of the bottom rail of the frame and the places of cuts for the exit of the tubes. We install the bottom rail of the frame, spread foil between the rubber mat and the frame. On the back side of the frame, we stuff slats to add rigidity to the structure. We carefully tape all the gaps between the frame and the foil with tape. This is necessary to prevent cooler outside air from entering the collector.
To supply water to the coil, a PVC pipe was purchased. Sealing of the connections of the tubes and the coil is ensured with tape. To secure the coil, clamps were used that were removed from the refrigerator. Fastening the clamps was also secured with tape. But for reliability, I recommend securing it with screws.
We cover our structure with glass and tape it around the perimeter.
The homemade solar collector is ready. For best heating, the sun's rays must fall on the surface of the collector at a right angle. Therefore, the fastening of the supporting elements of the structure completes the work. To prevent the glass from moving from the heat, you need to screw in a couple of screws at the bottom that will serve as stops. Now all that remains is to attach the hot water storage tank. Circulation occurs only due to natural convection. When heated, the water in the collector expands, becomes less dense, rises up the collector and enters the upper part of the storage tank through a pipe. As a result, cooler water at the bottom of the tank is displaced and flows through another pipe to the bottom of the collector. This water in turn is heated and rises into the tank. 1 - hot water; 2 — pressure relief valve; 3 - hot water drain; 4 - shut-off valve; 5 — make-up valve; 6 - cold water; 7 — cold water supply; 8 - drain valve. As long as the sun shines, the water will constantly circulate along this circuit, becoming increasingly warmer. Due to the fact that the tank is raised above the collector, the effect of turning over the circulation as a result of night cooling of the coolant in the collector is negated, since cold water simply accumulates at the lowest point of the system (at the bottom of the collector), while warm water remains in the tank. This simple solar collector design can heat water on a sunny day up to 70 degrees.
Sources: Thesietch.org, Sense-Life.com
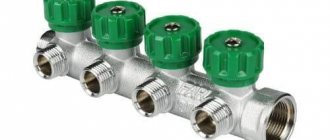
Other system components
It is not enough to simply collect the heat emitted by the sun. It still needs to be transported, stored, transferred to consumers, all these processes need to be controlled, etc. This means that in addition to the collectors located on the roof, the system contains many other components, perhaps less noticeable, but no less important. Let's focus your attention on just a few of them.
Coolant
The coolant function in the collector circuit can be performed by either water or non-freezing liquid.
Water has a number of disadvantages that impose certain restrictions on its use as a coolant in solar collectors:
- Firstly, at negative temperatures it freezes. To prevent the frozen coolant from breaking the pipes of the circuit, it will have to be drained as cold weather approaches, which means that in winter you will not receive even small amounts of thermal energy from the collector.
- Secondly, the boiling point of water that is not too high can cause frequent stagnation in the summer.
Non-freezing liquid, unlike water, has a significantly lower freezing point and an incomparably higher boiling point, which makes it more convenient to use as a coolant. However, at high temperatures, the anti-freeze may undergo irreversible changes, so it should be protected from excessive overheating.
Pump adapted for solar systems
To ensure forced circulation of the coolant along the collector circuit, a pump adapted for solar systems is required.
Heat exchanger for hot water supply
Heat is transferred from the solar collector circuit to the water used in the hot water supply or to the coolant of the heating system via a heat exchanger. As a rule, a large volume tank with a built-in heat exchanger is used to accumulate hot water. It is rational to use tanks with two or more heat exchangers: this will allow you to take heat not only from the solar collector, but also from other sources (gas or electric boiler, heat pump, etc.).