Foil insulation is a specific thermal insulation material that not all professional builders know how to use correctly. The reason is trivial: they do not know at all or do not fully understand the principles of operation of foil insulation. What can we say in this case about home craftsmen who understand the essence of the issue even worse. As a result, you can see that the foil thermal insulation of the walls is carried out in accordance with all the rules and regulations of building science, but in the end it turns out to be meaningless from the standpoint of saving heat in the house. This is especially true for facade insulation.
The editors of the StroyGuru portal decided to take a closer look at the problems that arise when insulating walls with foil-coated thermal insulation materials and give specific recommendations to everyone when purchasing them.
Characteristics, pros and cons of foil insulation
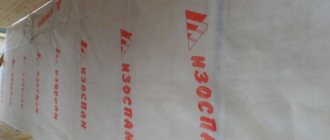
Foil insulation is a combined material of 2 layers: a base, which can be polystyrene foam, extruded polystyrene, glass wool (basalt wool) and a reflective layer - aluminum foil. This insulation works on the principle of a mirror: it returns infrared (heat) rays back into the room, and the base insulation retains that part of the heat that has broken through the foil.
Therefore, foil insulation is always laid with a metallized layer towards the heat, i.e. premises.
The most important performance characteristics of insulation with foil
The foil applied to the insulation significantly changes the quality indicators of the base:
- Sudden changes in temperature and humidity are better tolerated;
- the vapor permeability threshold decreases, almost to zero value - 0.001 mg/m*K;
- the thermal insulation capabilities of the insulation increase - up to 97% of the heat is reflected back into the room;
- sound insulation abilities increase even for materials with conditional noise protection properties - up to 68%;
- the operational life of the foundation increases almost 2 times.
Pros and cons of foil insulation
Insulating walls with foil insulation has its advantages and disadvantages. Among the advantages we should highlight:
- increase in service life by 25-75% of the type of insulation on which the foil is applied;
- improving the level of thermal insulation;
- appearance (expanded polystyrene) or improvement (basalt wool) of noise protection properties;
- reducing the thickness of the insulation, which leads to a reduction in mechanical loads on the building structure, and also preserves usable space in the house;
- more efficient heat conservation, which, firstly, saves the family budget, and secondly, reduces the load on heating systems installed in private homes. And this, in turn, extends their resource;
- absence of drafts in rooms insulated with heat insulators and foil;
- simple installation - you can insulate the walls yourself;
- moisture resistance - there are no restrictions on use in rooms with high humidity, for example, a bathhouse.
Important: in almost all materials in which foil insulation is considered, one of the main advantages is considered to be low price, which is an incorrect approach to analyzing the strengths and weaknesses of this thermal insulator. After all, there is such a range of prices on sale that it is better not to touch the price factor. It can be both a plus and a minus.
Among the disadvantages, first of all, you need to pay attention to the following points:
- no screed is poured onto foil insulation - the point of using foil for insulation is lost: it simply does not work;
- thin insulation with foil does not provide complete protection against heat loss. It is necessary to pair other thermal insulators with such material;
- to glue the butt seams, you need to buy a special, metalized adhesive tape, which increases the estimated cost of repairs (construction);
- It is undesirable to fasten insulation with foil with nails and dowels - the integrity of the foil layer is compromised, as a result of which the thermal insulation properties of the material decrease.
How to properly lay polystyrene foam with foil
Expanded polystyrene mats for floor insulation and subsequent installation of a low-temperature “warm floor” system.
It is necessary to consider which side to lay the insulation with foam foil in the narrow direction of installation of low-temperature heating systems, that is, heated floors. Now you can find on sale special foam mats (sheets), which are covered with foil on one side. In addition, markings are applied to the foil for laying polymer pipes or electrical cables. As you know, heat sources when installing heated floors must be at a certain distance from each other for the system to work correctly.
In this case, the most important role is played by insulation with foil; how to fix it correctly is a key point. The essence of reflective insulation is to reflect infrared rays, that is, heat. Like a mirror, it reflects up to 97% of all IR radiation. Naturally, the reflected rays must return back into the room, so the logical conclusion on how to lay foil insulation suggests itself. Of course, with the reflective surface inward.
Methodology for laying insulation with foil for heated floors:
- the subfloor is leveled;
- foam boards with foil are glued with construction adhesive;
- Cable or pipes are laid according to the markings;
- everything is filled with screed with reinforcing mesh.
Another important point is how to correctly lay insulation with foil: the slabs must fit snugly to the floor. It happens that due to the unevenness of the mats themselves, they lie unevenly on the floor, even if it is perfectly flat. To correct the situation in places where the thermal insulation does not fit tightly, it is simply cut. That is, several smaller ones are made from one sheet, and the operation is carried out locally, after the mats are laid.
Considering the principle by which foil insulation works, figuring out which side to put is as easy as shelling pears. Reflective insulation should reflect IR radiation into the room; accordingly, it is placed with the shiny side in the middle.
Such slabs are used only for floor insulation; they are not used for walls and ceilings, since there are thermal insulation options specifically designed for this. These include:
- mineral wool in mats and rolls with one-sided or double-sided foil;
- foamed polyethylene with foil.
By the way, ordinary foam plastic or its extruded analogue in tandem with penofol perfectly replaces mats for insulating floors and further laying a low-temperature heated floor system. The only inconvenience is the lack of markings.
If you are going to build a private house, then water heating will be the best option for heating it. There are, of course, air, steam and electric heating, but they cannot compete with a liquid coolant circuit.
The two-pipe water heating scheme for a two-story house can be vertical and horizontal. Drawings with explanations here.
Which foil insulation is best for walls?
Different operating conditions of insulation indoors and outdoors dictate their own requirements for insulation, including those with an applied layer of foil.
Inside
In principle, any foil insulation can be used to insulate walls. Even if income allows, a foil stopper. But the practice has introduced its own specialization: for walls, foam plastic and mineral wool, for warm floors, cork and extruded polystyrene.
For thermal insulation of walls in residential premises, foiled polystyrene foam and cotton wool have no advantage over each other either in the ability to retain heat or in the simplicity of technology. Here the price factor comes first, and in some cases durability. In this regard, we note that basalt wool has a longer service life than foam plastic and glass wool.
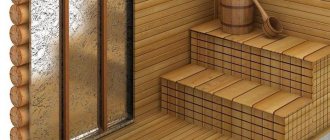
But in rooms with high temperature and humidity, such as a steam room in a bathhouse or a sauna, foil basalt wool is needed. Glass wool is afraid of humidity, and polystyrene foam is afraid of high temperatures. At the dacha, you should avoid using polystyrene foam and mineral wool because of mice and rats.
Outside
The use of foil insulation to protect the facade from heat loss is inherently meaningless. To explain what has been said, abstruse reasoning is needed about the nature of infrared rays, their length, ability to be reflected, etc. and so on.
Let's get away from all this and use a few simple examples to show that in cold weather the reverse process occurs: the cold is transmitted inside the insulation.
1. The work of foil in reflecting heat is completely identical to the work of a mirror. In bright sunlight, the reflected bunny is very bright and clearly visible. On a cloudy day, the reflected rays will form a faint spot. At night there is no reflection of light to speak of.
Foil works the same way. The higher the thermal energy flux, the more efficiently the polished surface of a thin layer of aluminum works, reflecting a large flux of thermal radiation. This example already shows that at subzero temperatures the foil simply has nothing to reflect - the number of infrared rays is low, and they have a long length, which, by the way, is also important (long waves easily overcome a thin layer of foil).
2. Let's carry out a simple experiment. On a sunny day, place a mirror, a sheet of construction foil for wall insulation, and a piece of any metal nearby, facing the sun.
After 3-4 hours, we touch our hand alternately to the mirror (you feel cool), the foil (warm), and the metal (you can get burned). And then we will carry out the same operation in severe frost. Let’s touch again (those who are very curious can do this with their tongue) to the materials one by one. They are all equally cold. Or did someone hope that aluminum would be warm?
Let's summarize: in cold weather, the foil cools down to the same temperature that it stays outside. Glued to the insulation, it intensively relays the cold to the substrate (insulation). The result is insulation in reverse: the foil layer does not protect, but rather reduces the thermal insulation properties of the insulation on the facade.
Which side to attach polyethylene foam with foil
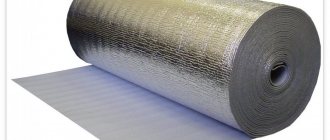
When the question arises about how to attach foil insulation to a wall, most often we are talking about penofol. This is insulation that consists of two layers. The first layer is polyethylene foam, and the second layer is foil. In addition, there are products in which the foil is on both sides. The reflective surface can be glossy, like a mirror, or crumpled (embossed). It is believed that the relief allows you to slightly increase the reflection area, but not critically, so there is not much difference.
Unlike mats for floor insulation, regarding penofol, the answer to the question: “Which side should we attach the insulation with foil?” sounds like this: with a base (foamed polyethylene) to a wall or other insulation.
The thing is that this material is used for both internal and external insulation. It turns out that during thermal insulation of the facade, it will not be possible to put penofol with the shiny side inward; it will look outward. What will this give us:
- Such insulation will not reflect heat from the room, since there is no ventilation gap between the foil and polyethylene;
- the insulation will not let summer heat into the house.
Two-layer reflective insulation, where polyethylene foam acts as a damper and reinforcement.
It is precisely because of the absence of any significant shifts towards increasing the thermal insulation qualities of the room that experts do not use penofol for external insulation. How to properly lay foil penofol insulation:
- should be placed from inside the room with the shiny side facing the heat source;
- there must be an air buffer zone (ventilated gap) between the foil and the finish;
- the material is laid end-to-end;
- secured either with nails or staples;
- The joints are glued with aluminum (not ordinary, but aluminum) tape.
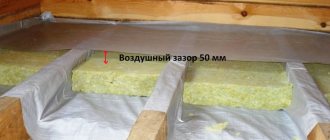
These manipulations are performed in order to create a sealed reflective screen, which additionally acts as a vapor barrier, since it does not allow steam or moisture to pass through. Why, when answering the question of how to properly lay insulation with foil, do we focus on the ventilation gap? The fact is that without it the material will not perform its functions. The air space allows the foil to repel IR radiation from structures in front (plasterboard, lining, siding, whatever).
If there is no air gap, then heat will be transferred to the foil not through IR rays, but through direct contact of the materials. Aluminum's thermal conductivity is exceptionally high, so the process of transferring heat outside the room will even speed up in this case. A thin layer of foamed polyethylene does not create a special barrier to heat loss, and its main function is different: it acts as a damper and reinforcement for the foil, everything else is indirect.
This will cause an undesirable side effect – condensation. The foil does not allow steam to pass through, and it settles on it in the form of condensation. If there is a ventilation gap, then micro droplets of moisture simply evaporate. In the absence of a buffer air zone, moisture collects and is absorbed into the finish, causing fungus to appear. This is what can lead to not knowing which side to put insulation with foil on.
Despite the fact that there is plenty of information about heating a house from sip panels, many can still decide on the method of heating a house made from this material. Although there are quite a lot of approaches that have a lot of advantages and benefits.
You can find all the necessary information about convector heating at home with photos and video files on our website by following this link.
Required materials and tools
There are several types of foil materials in the retail chain. Their installation requires different materials and tools. Therefore, we provide a complete list of the required set of tools, specifying when and where they will be needed.
Materials you will need:
- foil insulation;
- wooden beam 50x50 mm for lathing;
- spacer bar (20x50 mm) for installing a counter-lattice;
- plasterboard or OSB for covering the frame;
- primer;
- adhesive for insulation - individually for a specific type of substrate (“CERESIT CT 190” for basalt wool, “CERESIT CT 85” for foam plastic);
- metal corners, self-tapping dowels for the wall and wood screws - fasteners for assembling the sheathing.
The tools you should have on hand are:
- homemade sawhorses or stepladder (you can use a strong table);
- a hammer drill or electric drill - will be required when attaching the sheathing trim to the wall;
- screwdriver;
- mixer attachment for stirring glue;
- glue container;
- wood hacksaw;
- construction knife with replaceable blades;
- putty knife;
- level;
- roulette.
What to glue mineral wool with foil to
Mineral wool with foil is produced in rolls and sheets. It is attached with universal construction adhesive.
Mineral wool with one-sided and double-sided foil is produced in rolls and sheets of different thicknesses. Mineral wool refers to all its varieties: from glass wool to basalt wool. It, like polystyrene foam, is glued to the wall and is additionally reinforced with dowels. What to glue insulation with mineral wool foil to? For work, use a universal plaster-adhesive mixture, which is suitable for both cotton wool and expanded polystyrene.
When choosing what to glue foil insulation with, you need to consider only high-quality mixtures from leading manufacturers:
If the surface on which the insulation is heated is flat, then apply the adhesive in a 3 cm layer with a notched trowel along the entire perimeter of the thermal insulation sheets. If the cotton wool is glued to an uneven surface, then the glue is applied with a thickness of 4 cm in cakes, the diameter of which is at least 10 cm.
In addition, before laying insulation with foil, you need to clean and prime the working surface for better adhesion. Again, we remind you about the ventilation gap and that the reflective foil should face the inside of the room. This material is not used for external insulation, as it is impractical. Mineral wool with foil is suitable for baths, as it is resistant to high temperatures, but it is afraid of moisture, so it must be protected with a vapor barrier. This does not apply to stone wool, since it practically does not absorb moisture.
Preparatory work
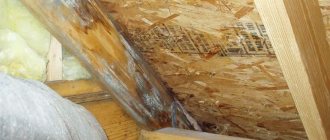
Before we consider the technology for preparing walls for insulation, we note that we will only consider internal work, since foil thermal insulation for external walls is essentially money thrown away in the cold, as mentioned above.
The presence of a layer of foil on the insulation eliminates the “wet” method of insulation for several reasons:
- additional fastening of the slabs with dowels is necessary, which destroys the integrity of the metallized layer, reducing the effectiveness of thermal protection;
- decorative plaster will not adhere to foil;
- when the outer layer of the reflector is in close contact with any other materials, the effect of reflecting infrared rays disappears: the material in contact with the foil will heat up, in turn heating the aluminum, and it, along the chain, will transfer heat out into its substrate, and not into the room. That is why the instructions for using foil materials for insulation provide for the installation of a ventilation gap. In this case, the reflected heat rays will heat the skin. In this case, the foil itself does not heat up much.
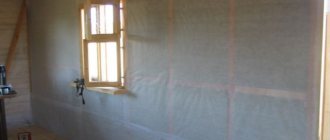
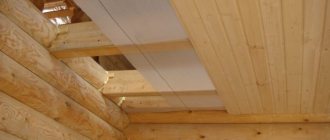
Since there is no “wet” method of thermal insulation, then there will be lathing. This is where all the preparatory work is geared towards. Necessary:
- remove from the wall everything unnecessary that interferes with work: switches, sockets, lamps, various fasteners, etc.;
- remove old finishes and, if necessary, plaster;
- clean the surface from dust, dirt, soot and grease stains;
- repair small and large cracks;
- prime the wall in two passes.
There is no need to carefully level the surface - the insulation will hide everything.
In more detail, the process of performing the above operations can be found in the article “How to prepare walls for wallpapering.”
After the primer has dried, you can begin installing the sheathing. Detailed instructions for this stage of work are presented in the material “Wall insulation with stone wool”.
Attention: window and door openings are covered with battens under mineral wool. This is not done under foam plastic. However, in the case of foil foam, the openings will also have to be padded, because... Great difficulties arise when strengthening the ends and outer corners of polystyrene foam.
Let us briefly list the main stages of the sheathing installation:
- vertical trim posts are adjusted to the height of the ceiling and attached to the wall;
- horizontal strapping is screwed to the fixed racks using metal corners;
- Vertical internal slats are installed. The pitch is equal to the width of the insulation sheets;
- horizontal slats are installed. They are only needed under drywall. Vertical posts are sufficient for OSB boards.
Properties
The materials used in production are most often environmentally friendly, safe for health and the environment.
Related article: Rubber tile laying technology
Advantages:
- light weight;
- durability;
- resistance to loads;
- protection against moisture penetration;
- high rates of heat saving and sound insulation;
- resistance to temperature changes;
- ease of installation;
- high reflective properties.
Such insulation can be used in any premises. In addition to the described qualities, it is capable of reflecting radiation.
Insulation technology
For work on insulating walls indoors and facades made of foil insulation, the same instructions apply. However, there are nuances that we will talk about.
Inside
Foil for insulating walls from the inside of a house with different substrates is attached to the sheathing using almost the same technology, but with adjustments for the type of insulation base.
Styrofoam. Polystyrene foam can be with or without a pre-applied adhesive layer on the back side. In both cases, the slabs are cut to size for the cells. The protective film is removed from the insulation with glue, after which it is pressed against the wall surface and held in this position until the adhesive composition begins to polymerize (the time is always indicated on the packaging or on special inserts).
To fix the foam without glue, you need to perform a little more operations:
- dilute the glue, strictly following the instructions on the package. Stir with a mixer until you get a homogeneous mass without lumps;
- give the glue time to mature. Minimum - 5 minutes;
- apply glue to the back of the polystyrene foam;
Important: polystyrene foam is the only type of insulation that has secrets when applying glue. All the nuances of a seemingly simple operation are in the article “Wall insulation with foam plastic.”
- insert the plate into the cell, then fix it with glue;
- all gaps and cracks are filled with mounting foam or polyurethane adhesive foam;
It is extremely important: when using polyurethane foam, you must check how the foam reacts to it. Many brands melt polystyrene foam with their own solvent.
- after completing the insulation work, fill the counter-lattice;
Attention: vapor barrier work is not carried out: the foil itself serves as an excellent vapor barrier.
- sheathing is installed.
Glass wool. It is attached with glue using the same technology as polystyrene foam. But there is a nuance here. Each roll of glass wool is rolled out one day before the start of work and remains in this position until cutting to size begins.
Basalt wool. Unlike previous materials, basalt wool is cut larger than the sheathing cells and inserted into them at random. It's enough.
The sheathing is also laid on top of the mineral wool, and the sheathing is mounted on it.
In cool steam rooms and saunas, a frameless insulation system is used on the walls. Basalt wool is glued to the wall, the seams are closed with a special tape... and that’s it. No finishing work.
If children use the sauna, there is a risk of getting burned. Then vertical frame posts are attached to the wall, basalt wool is glued, the main part of the sheathing is mounted, and finishing work is carried out.
Outside
Man is designed in such a way that he likes to learn not from others, but from his own mistakes. For those who belong to their number and still want to use foil material for external insulation (by the way, there are many of them, which is confirmed by numerous photos on the Internet), we refer you to the works on our website: “Insulation of walls with foam plastic” and “Insulation of stone walls cotton wool”, where the processes of facade insulation are described in detail. All operations are performed absolutely accurately, without any changes or exceptions.
Still, it’s better to learn from other people’s mistakes. By the way, a question for the owner: how will he apply decorative plaster? Judging by the photo, the façade was prepared specifically for it.
Laying methods
Let's consider which side is the correct way to lay the insulation with foil on the floor.
Heat-saving properties depend on how correctly the insulation is installed.
Foil reflects infrared radiation, therefore, the metallized layer must be laid so that it faces the inside of the room.
Insulation of concrete floor
Place the casing with the foil side down
Most often, the rolled material is fixed to the concrete base using a special glue made on the basis of rubber.
Installation sequence:
- We prepare the surface. We level the slab so that there is no large difference in height. We seal all cracks and cracks with cement mortar.
- We spread the material on the floor with the foil layer facing up and cut it to the required length. We move the strip aside and apply glue to the place where it is laid. Let it sit for a few minutes according to the instructions for the glue. We lay and press the material well. We place the strips close to each other.
- We secure the joints with foil tape, which is sold in hardware stores.
For additional insulation of cold floors, wooden logs can be laid on top, the space between which is filled with slab insulation. Floorboards or sheet material (OSB, fiberboard, chipboard) are placed on top of it. For an interesting comparison of foil materials, watch this video:
You can secure the material with double-sided tape glued around the perimeter or dowels.
Wood floor insulation
It is most convenient to lay the material on an adhesive layer
It is most convenient to lay foil insulation on a wooden floor, which has a bottom self-adhesive layer.
If you bought material without an adhesive base, then you need to fix it with staples using a construction stapler or with double-sided tape.
Related article: Decorating a balcony with your own hands: step-by-step instructions (photos and videos)
Laying sequence:
- We remove the baseboards, remove debris and dust using a vacuum cleaner.
- If the boards have uneven surfaces, we sand them with a special machine and, if necessary, sand them (remove the top layer of the board).
- We seal all existing cracks with wood putty.
- We prime with an antiseptic composition.
- We measure the room, cut the roll, and lay it up with foil. It can be easily cut to size using sharp sewing scissors.
- Lay out the strips end to end. We wait a day for the material to settle and straighten out. If the heat insulator has a self-adhesive base, gradually remove the protective film and press it tightly to the surface. We lay the next strip end-to-end.
- We fix the joints of the strips with foil tape.
Once the material has been laid, the selected flooring can be installed.
Foil insulation for heated floors
When laying insulation under heated floors, lay the material with the foil facing up so that it reflects heat into the room
The base for heated floors must be flat without differences in height or defects. All errors must be eliminated.
Stages of laying thermal insulation with a layer of foil:
- We lay out the foil material in strips end to end, and glue the joints with special tape.
- We install a system of electric or water heated floors on top.
- We lay hydro- and vapor barrier material. It will prevent concrete from leaking onto the floor heating elements.
- We fill the screed with a thickness of 30-50 mm, depending on the type of heating elements and the functional purpose of the room.
Warm floors can only be turned on after the screed has completely dried. This will take about a month.
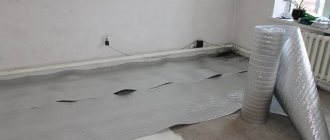
Insulation under floating screed
Having bought a two-layer material, you don’t have to bother with the question of which side to lay the insulation on
It is characterized by the fact that the slab is not rigidly fastened to the concrete screed; thermal insulation is laid between them.
Installation sequence:
- We prepare the base and eliminate all defects.
- We plaster the lower part of the walls.
- We stick damper tape around the perimeter of the walls; its height should be equal to the thickness of the floor: from the slab to the floor covering.
- We prime the base in two layers. Apply the next layer after the previous one has dried.
- We lay thermal insulating foil boards with the foil facing up. We use a metallized coating that is resistant to cement mortar. We lay the slabs strictly in a horizontal plane, close to each other. Uneven laying of insulation boards contributes to the formation of cracks in the concrete solution.
- We glue the joints of the plates with tape.
- We pour the concrete screed.
Related article: How to choose a modern slide for the living room (hall)
Lightweight and durable insulation with a layer of foil is becoming increasingly popular among consumers and professional builders due to its high heat retention and ease of installation. For more information about isolation, watch this video:
We looked at how to properly lay foil material for high-quality floor insulation. Thermal insulating material is always laid with foil on the outside; if you lay it the other way around, it will not retain heat fully.
The best posts
- Choosing paint for printing on fabric
- Connecting a washing machine yourself
- Laminate or PVC tiles: what to choose?
- Orange tree made of beads: do-it-yourself weaving pattern with photo
- Decorating a hallway in Provence style: photos of interiors and general tips
- Review of the house of Michael Douglas and Catherine Zeta-Jones [$11 million]: interior and exterior
- How to choose the perfect photo rollers for different rooms
- How to create a successful design for a bathroom combined with a toilet (+50 photos)
How to style
Before placing the substrate under the laminate with foil, you should study the sequence of work:
- Before installation, the rolled material is cut to length and left to rest in the room for 10-12 hours. This period is enough for the stripes to straighten out.
- The flooring of the first line is carried out with an allowance of 50-100 mm on the walls. Subsequently, before installing the plinth, excess material is cut off with a construction knife. The material is rolled out with the reflective side facing up, since this is how the foil backing is laid.
- It is not recommended to walk on the foil substrate, so laying the next strip is carried out simultaneously with the advancement of the process of laying the lamellas. The substrate strips are installed end-to-end, after which the contact area is glued with special tape with a metallized coating.
- If foiled sheet material was chosen for the substrate, then in this case the laying pattern will differ from the rolled version. The sheets are laid out staggered so that the joints do not overlap. To ensure a uniform surface of the substrate, the joints should also be taped with metallized tape. The edges of the sheet material are not placed on the wall and are mounted end-to-end; the advancement of the laying of the substrate occurs, as in the case of rolled products, along with the advancement of the laminate line.
- The laminate should be laid in such a way that the joints of individual boards in length and width do not coincide with the places of contact of the sheets or backing sheets.
When working with wooden bases (for example, plywood), the work process is similar to the process of installing laminate flooring on concrete bases.
In addition to laying laminate flooring over a foil backing, there is a method for installing linoleum using a backing with a reflective surface. Typically, linoleum with a backing is laid directly on top of the concrete screed. The reflective ability of the substrate is enough to ensure a normal microclimate in an apartment with such floors - it performs the function of heat protection, sound insulation and vapor barrier.
Novice builders, having learned about the positive qualities of a substrate with a reflective surface, try to use it when installing floors made of wooden structures, but they do not always understand how to put a substrate with foil under chipboard, boards or plywood.
Indeed, the properties of the foil backing make it possible to increase the protective characteristics of the floor covering, but when this material is laid on a wooden base, the integrity of the carpet is broken by self-tapping screws, which negates all the advantages.
In addition, it is undesirable to arrange such a sandwich when the finishing coating is linoleum; in this case, the wooden base ends up in the gap between two insulating surfaces, which leads to rotting of the wood and the appearance of fungus.
Laying a foil lining can be done on top of a wooden base before laying laminate or linoleum. With this installation, all the positive characteristics of the lining are preserved.
What thickness to choose
When choosing a foil backing for laminate, you need to decide on the thickness of the material. The thickness of the lining depends on the preparation of the base:
- for concrete bases with height differences of no more than 1 mm, pads with a thickness of 2 to 3 mm are suitable;
- if height differences within 2 mm are detected, it is recommended to lay cushioning material 4 mm thick;
- the maximum permissible deviation of the base in height is 3 mm, such an error can be leveled out with a substrate 5 mm thick;
- if the differences in the base are higher than the specified values, it is necessary to take measures to level the surface by laying a self-leveling mortar or pouring a new screed.
Application
Foil insulator can be used everywhere:
- for thermal insulation of ventilation air ducts, wells, wells;
- lining of pipelines (water supply, gas outlet, heating, etc.);
- for the purpose of reflecting heat emanating from heating radiators and other devices;
- when installing heated floors;
- to reduce heat loss in the room (installation on walls, floors, roofs).
It is advisable to use foil material when insulating the attic, roof ceiling and other internal surfaces of the building. The insulator operates in bathhouses, steam rooms, garages and other outbuildings. It is used for brooders and incubators and is used in crop production for growing seedlings.
The scope of application of foil insulation can be called unlimited due to its high performance qualities.
When choosing, it is recommended to take into account not only its cost, but also the following factors:
- All types of foil insulation have excellent noise-absorbing qualities, vapor and waterproofing properties.
- To reduce heat loss through the floor, preference should be given to a base made of solid polystyrene foam blocks.
- When finishing a bath/sauna, glass wool material is often used.
- A self-adhesive insulator will help create a reflective effect from radiators and batteries.
Installation of foil insulation
Foil insulation has a fairly wide range of applications, it is used for insulating pipes with cold and hot water, for insulating walls, as a substrate when laying parquet or under laminate, for insulating hives, soundproofing rooms, roofing work, insulating ventilation ducts, thermal insulation of industrial equipment.
This insulation is used to line the walls from the inside of the room behind the radiators to reduce heat loss, since it is heat-resistant. The following brands are represented on our market: Alufom, Ursa, Penofol, Folgoizol, Izolon, Knauf, Lavsan, Magnel, Megaflex, Penoplex, Ecoteplin, the most popular type is with foil and foam rubber.
How much does this material cost? It all depends on the manufacturer you choose; the price ranges from $1 to $4 per meter2. Let's try to take a closer look at how to properly place this material on various surfaces.
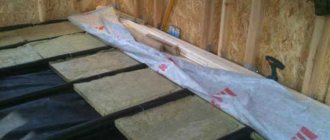
On the wall
Often, walls are insulated with similar material in baths, saunas, and balconies; in this case, polyethylene-based material is used. It is recommended to use insulation with a thickness of at least 10 mm; such material can be covered with foil on one side or on both sides.
If we consider the options on what it can be attached to, a construction stapler or double-sided tape is best; you can also use a special rubber-based glue; the joints of the sheet are glued with tape. If we are talking about insulating a balcony, then you need to lay an additional thermal insulation layer, for example, polystyrene foam, basalt material or something else.
Is it possible to insulate without them? Of course yes, however you will not get the desired result. In order for the insulation to fulfill its intended purpose, it is necessary to figure out how to install it correctly. The distance between the material and the sheathing should be approximately 20 mm, this will create some kind of air gap that will serve as an air barrier.
Let's take a closer look at how to properly mount it to the wall:
- Attach the foam to the previously prepared surface.
- Secure foil insulation over it.
- Then install wooden blocks on top, then sew everything up with the selected material (gypsum, siding), and seal the joints with foil tape.
To the ceiling
As a rule, the maximum thickness of insulation is selected for the ceiling, since all the heat rises upward, and its maximum loss occurs there. Thanks to its reflective surface, the insulation is able to reflect up to 90% of the heat, thus increasing the overall efficiency of the insulation system by 60%. These characteristics can be obtained subject to compliance with the installation rules.
To carry out the work you will need the following:
- Construction stapler.
- Small nails.
- Hammer.
- Insulation material.
- Aluminum tape.
This product is sold in rolls; for ease of installation, cut it into the required lengths. Which side should you lay it on? Installation should be done so that the foil surface is indoors (with the silver side facing you). So, let's figure out how to nail this material.
The gap between the finishing material and the insulation should be about 20 mm; this buffer zone protects the room from heat loss.
When attaching to the ceiling, secure it using a stapler; the fastening should be butt-to-edge, and seal the assembly seams with aluminum tape to ensure hydro- and thermal insulation.
On the floor
Perhaps the installation process on the floor is the most labor-intensive, and there are more possible variations, since you can lay a warm floor system (not just a water floor) under linoleum, parquet, laminate. All this is possible thanks to its non-flammable base, since there is reflective foil on one side and foam rubber on the other.
Some manufacturers have variations with foam on both sides. So, let us describe in more detail the process of installing a wooden floor. To do this, we will need the following: a construction knife, insulation, aluminum tape, meter, grinding machine, antiseptic primer, putty.
For this type of work, it is better to give preference to a material with an adhesive backing, however, you can get out of the situation with double-sided tape.
Work order:
- Prepare the base, remove the baseboard, sand the floor; if there are any uneven spots, remove them using putty.
- Treat with antiseptic liquid. After drying, take measurements and cut into the required pieces. Lay a sheet with foam inside and foil outside.
- Seal the seams using metallized tape.
- Then lay parquet or laminate.
If you are insulating a concrete floor, the technology is similar, however, it is better to use specialized rubber adhesive for gluing. But in all other respects the technology is the same. If you have a very cold floor, in this case, wooden logs are stuffed onto the insulation, the niches in them are filled with insulating material, the top is sewn with sheets of OSB boards, then the selected covering material is primed and laid.
Advantages and disadvantages
When choosing foil insulation, you should pay attention that its coating is made of aluminum. The main advantages of thermal insulation with foil are:
- high levels of noise insulation;
- environmental Safety. Their use for insulating surfaces in residential premises does not harm human health;
- resistance to temperature changes. They are insensitive to moisture;
- simple installation procedure;
- have high thermal insulation properties;
- have a long service life.
Properties and composition
This type of material should be considered as a new solution in the field of thermal insulation. They are an excellent choice when it is necessary to ensure high-quality insulation of the floor covering in a building. Often such products are chosen for insulating ceilings and walls. Its use is widespread in saunas and baths.
In appearance, foil insulation resembles a standard thermal insulation material made on the basis of mineral wool or expanded polystyrene. Its only difference is the presence of a layer of aluminum on top. Manufacturers often use metallized polypropylene film instead.
High thermal insulation performance is achieved by reflecting the generated thermal energy into the room. Although foil models are endowed with certain water-repellent properties, they cannot be considered as an effective solution for protecting structures from moisture.
The thickness of the metallized layer, as well as porosity, can be different. Often the material contains granules filled with air in the structure of the slabs. This feature has a positive effect on the thermal conductivity of the product.
This video will help you get acquainted with the characteristics and properties of foil insulation:
Types of material
Let's look at what types of insulation are called:
- With foamed polyethylene, it looks like a roll of self-adhesive material, similar to film with foil. Scope of application in various equipment, lining of pipes, shafts, roofs, since it has a high temperature range from -160 to +160 degrees, it is fire resistant.
- Mineral wool with foil coating can have the form of a plate or cylinder. It also has a high degree of fire resistance.
- Expanded polystyrene, coated with foil on both sides. It also has a wide temperature range, the diameter can be 5mm, 10mm, 15mm.
- Basalt, just like the materials described above, is made on the basis of foil material, however, thanks to its unique technology, it can withstand temperature fluctuations from -200 +600 degrees, and is resistant to aggressive chemical environments.
How to put insulation on pipes
As a rule, such material has the form of a pipe “cocoon” made of mineral wool (withstands high temperatures) or polystyrene foam (moisture resistant). And how to insulate them, the question disappears in itself, since they have the appearance of a “cocoon”, which is put on top and fixed. There are main ones for chimneys of various diameters and temperature conditions.
Related article: Treating bathroom walls before laying tiles
However, if you decide to purchase sheet insulation, you may be faced with the question of how to glue it to metal? Aluminum tape will come to your aid, which is wound onto the insulation over the pipe. And, as in the options described above, you need to wear it with the shiny side facing you.
Is it possible to insulate the walls from the outside?
To insulate the walls from the outside, perforated foil insulation is used. This is a material that, among other things, has soundproofing qualities, can protect your home from moisture and wind, and also does not prevent moisture from leaving the room. This option is ideal for those who do not have the opportunity to perform such work indoors. However, such activities can only be carried out in the warm season and in dry weather.
To do this you will have to do the following:
- If you had any covering on the wall, you need to get rid of it. Then treat the surface with an antiseptic solution. It is better to do this in hot weather so that everything dries well; treat the lower part of the building especially carefully. Within two days the surface will dry completely.
- Next, build a frame from timber, secure it with self-tapping screws. Lay Penafol, then leave an air tunnel, glue the joints, then install the outer frame.
In conclusion, we suggest watching a video about the installation of Penofol thermal insulation:
Types of insulation
Foamed polyethylene.
This type is made in the form of a roll with a self-adhesive side, 2-10 millimeters thick, and in appearance resembles a thin film with foil. It is mainly used for sheathing pipes, various shafts, insulating roofs and floors. It is especially often used as a substrate for heated floors. It has a temperature range from -160 degrees to +160 Celsius and is highly fire resistant. Popular brands are Izolon, Ecofol, Penofol and Isoflex.
Foamed polyethylene has several subtypes:
Type A is covered with foil on only one side and is a classic version of insulation. Cannot be used in conditions of high humidity.
Type B - covered with foil on both sides, has a high density and does not require an additional protective layer from moisture.
Type C - this type is covered with foil on one side, and on the other it has a self-adhesive layer
ALP – covered with foil on one side and laminated with polyethylene on top. It is often used when laying warm electric floors.
R - this type differs from others in that one side is embossed, covered with foil, and the other is smooth.
M - this type of insulation must be placed in several layers, since its foil is located on the smooth side, and the raised one is open.
Super NET is a type that has the highest thermal insulation properties and can be used for many years without loss of properties.
It has a special structure, consisting of several canvases with a polyethylene foam mesh between them.
Penohome - this insulation is made from fiberglass and mineral wool.
Its thickness varies from 50 to 100 millimeters, and is sold in rolls or slabs.
Most often it is used as insulation between floors in ceilings, as well as for insulating saunas and baths.
Foamed polystyrene foam - made in the form of gray slabs, treated with foil on both sides and also has a wide range in temperature.
It comes in thicknesses of 5,10 and 15 millimeters. Most often used when laying warm water floors and for insulating surfaces that are exposed to high humidity and heavy loads.
Basalt - is made on the basis of foil, but due to its unique technology, its temperature range is from -200 degrees to +600. It is also resistant to chemical elements.
But this insulation contains phenol, which is considered unsafe for human health. The most famous brands of basalt insulation are Izover, Rockwool and Knauf.
Features of using foil insulation
The use of materials with foil for insulation depends on a couple of indicators: the properties of a particular heat insulator and the place where it will be used. In general, with the help of such thermal insulation, floor structures are insulated, the heat transfer of heating radiators is increased, and air ducts and pipelines are finished. Thermal insulation of entrance doors of verandas, loggias, porches and balconies also gives excellent results
When installing foil-type insulation, you need to acquire all the necessary tools for the job:
- Construction stapler.
- Small carnations with large heads.
- Nail puller and hammer.
- Construction tape with foil coating.
- Direct insulation with foil.
The most common mistake many builders make is incorrect installation of the material with the foil surface facing outward. Due to the fact that the foil is a reflector, it is designed to return heat to the room. But if you place the insulating material on the wrong side, you won’t be able to achieve this effect.
When laying foil insulation , it is recommended to enclose it in a wood sheathing.
Slabs, rolls or sheets of material must not be laid overlapping. They must be installed strictly on the same plane, secured with nails or construction staples.
Material with an adhesive surface does not need to be secured with additional fasteners, but to increase service life it is still better to use small nails. In the absence of an adhesive coating, rubber or acrylic adhesive can be used to fix the material on the surface.
After installing and securing all layers of heat insulation, the joints between them must be treated with foil tape. This completes the installation.
When installing a heat insulator on vertical surfaces that have mold, wallpaper or dirt on them, they must first be cleaned, otherwise the fixation will be very unreliable, and the material will simply fall off over time. In addition, it is recommended to treat the surface with antiseptic agents.
Easy to use and very high-quality foil insulation will save money and keep your home cozy and warm.