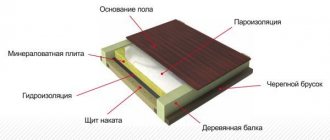
Base insulation
Purpose
Application of polyurethane foam to the basement structure.
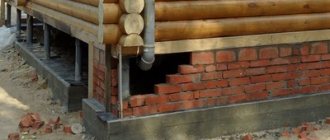
Why is it so important to insulate the basement? To answer this question, you should understand the operating features of this building unit (see also the article “Insulating the base from the outside - reliable protection of the foundation”). The plinth is located at the bottom of the wall, between the first floor and the basement
Often the base is the top crown of a strip foundation, but traditionally it is laid out between the foundation and the main walls
The basement is located at the bottom of the wall, between the first floor and the basement. Often the base is the top crown of a strip foundation, but traditionally it is laid between the foundation and the main walls.
The masonry creates a gap between the base and the floor, which allows for ventilation of the underground space and avoids direct contact of the house structures with the basement.
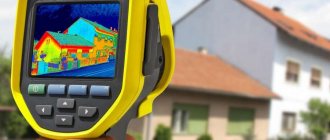
The photo from the thermal imager clearly shows how thermal energy is lost through the base.
This gap becomes a kind of buffer that does not allow moisture to penetrate from the thickness of the concrete into the masonry of the walls by capillary suction. In addition, the air gap between the floor of the first floor and the ceiling of the basement creates additional thermal insulation of the room.
Thus, it turns out that the base takes on a number of negative impacts:
- Due to capillary suction, moisture concentrated in the concrete foundation structures penetrates the basement masonry and accumulates in it;
- Under the influence of gravity, moisture absorbed into the walls gradually sinks and penetrates into the base material. For the same reason, it accumulates water that flows down the surface of the walls during rain;
- In winter, snowdrifts accumulate around the house, which, during the spring melting, flood the lower part of the house and saturate the base structure with water;
- The basement space is not heated by anything, so during winter frosts it can freeze. As a result, drops of water enclosed in the pores of the brick crystallize and, expanding, destroy the structure of the material;
- Add to this the rather impressive pressure of the entire house, which creates enormous stresses in the base structure and leads to its increased wear.
Competent builders always insulate the basement masonry.
Materials
Expanded polystyrene is the most popular insulation material.
Various means are used to insulate the base.
The modern construction market can offer a very wide range of materials suitable for the role of insulation:
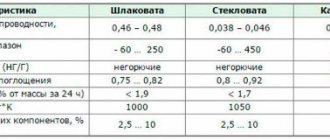
- Mineral or stone wool. They use high-density boards, which, due to their rigid structure, adhere well to a vertical surface and do not wrinkle;
- Expanded polystyrene and polystyrene. Excellent for the role of wall insulation, it does not allow moisture to pass through or absorb it. Easy to install and inexpensive;
- Polyurethane foam. One of the best insulation materials, it adheres perfectly to the surface, creating a monolithic continuous coating that does not have “cold bridges”. The main disadvantage is the too high price of the material and the work required to apply it;
- Plasters, wood paneling and other additional cladding layers. These products can hardly be called thermal insulation, since the listed materials have a fairly high thermal conductivity coefficient compared to classical insulation materials.
Foam can be mounted on the wall alone.
Do-it-yourself methods for insulating the base
Builders use a wide variety of technologies for insulating foundations and plinths. Some have been known for a long time, while other methods began to be used after the emergence of new materials. The base of the house should be insulated around the entire perimeter to reduce heat loss and protect the foundation from freezing.
Insulating the base of a house with your own hands The base is usually divided into two parts: above and below ground level. It is in constant contact with the ground, moistened by rain, melt water and splashes, so it is in a wet state. This means that to insulate the foundation base, you should use moisture-resistant insulation.
If the thermal insulation system is based on a non-waterproof material, for example, you decide to insulate the base with polystyrene foam or mineral wool, then the insulation should be located more than 30-40 cm from the top edge of the ground so as not to be negatively affected by melt water.
There are several technologies for thermal insulation of the foundation - ideally, external insulation has priority over internal insulation, since the structure of the base in this case will be completely protected from the cold. However, due to various circumstances, this is not always possible - so we will consider each method of insulation separately.
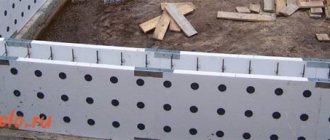
Installation of polystyrene foam on the base
Expanded polystyrene is easy to cut to the size of the plinth masonry.
For those who decided to insulate the base with their own hands, we have compiled step-by-step instructions for laying polystyrene foam:
- The masonry should be cleaned of foreign objects, dust and dirt, and surface defects, cracks and holes should be eliminated;
The basement is cleaned and put in order.
- The entire surface of the base gap is treated with a deep penetration primer;
The primer is applied using a paint brush.
- After the primer mixture has dried, a sheet of polystyrene foam is cut out along the width of the base and a layer of glue is applied to it using a dosing notched trowel;
The glue is applied with a notched trowel.
- The sheet with glue is applied to the wall in the mounting position and pressed tightly. Then holes are drilled in the corners of the sheet with a puncher, into which disc-shaped dowels are inserted and hammered. The dowel caps should be slightly recessed;
The sheet is pressed against the wall with umbrella dowels.
- Next, glue is applied to the next sheet, and the locks are also coated. The sheet is applied to the wall so that its locks coincide with the previous sheet, and fixed with dowels;
The next sheet is joined to the locks of the previous one.
- Using the same scheme, the remaining sheets are installed until the entire surface of the base is covered. At the locations of the ventilation ducts in the insulation, holes are cut according to their size;
Gradually cover the entire masonry.
- The covering is covered with a fiberglass reinforcement mesh, which is fixed with a stapler or a small amount of foam glue. Then the polystyrene foam is puttied over the mesh with a decorative facade mixture or other finishing material is applied.
Putty is applied using the reinforcing mesh.
Rules to consider when insulating the basement
Types of plinth: protruding, in the same plane with the wall and recessed.
The thermal insulation layer (usually expanded polystyrene sheets) that will cover the base of the foundation must be protected from mice. They very often triple their home there. To do this, the insulation trench is deepened. A screed (12 cm thick) is poured onto the bottom; after installing the thermal insulation, a blind area is made. A layer of expanded clay concrete is applied to the insulation. This will increase the strength of the insulation and make it inaccessible to mice.
After work related to insulating the base, it is necessary to carry out facing work using special glue and artificial or natural stone. Siding materials are used for cladding.
The simplest cladding option after all the work related to insulating the base is the process. After this process, you need to paint the base. You can use acrylic and facade paint.
Most often, the insulation of the base is carried out with polystyrene foam extrusion boards or polystyrene foam. They are inexpensive and hold heat very well.
Materials and tools for insulating the base:
Base design diagram.
- Scraper.
- Wire brush.
- Soil solution.
- Expanded polystyrene (3 cm).
- Special adhesive for polystyrene foam.
- Mesh for reinforcement (in roll).
- Concrete mortar of thick consistency.
- Putty knife.
- Plastic mushrooms for fastening.
- Drill.
- Hammer.
- Polyurethane foam.
- Stationery knife.
Benefits of thermal insulation
Insulating the basement in a private house from the outside protects it from the negative influence of underground groundwater and precipitation, thereby improving the microclimate not only in residential premises, but also in the basement of the house.
Thermal insulation protects the base from freezing and mechanical damage
Such a structure will last much longer without major repairs. Condensation does not form on the walls of the insulated basement ; this saves building materials from premature destruction.
Internal thermal insulation performs similar functions. As practice shows, external and internal insulation has the same result. The difference between them is only external.
For internal insulation, finishing from decorative materials is used for greater attractiveness. Whereas the inner lining is often left simply plastered.
You will see how to properly insulate a foundation with polystyrene foam yourself from this video:
Features of insulation of pile foundations, strip and slab foundations
The technology of insulating a foundation slab is similar to the thermal insulation of a concrete floor on the ground. To do this, first of all, the soil is compacted, on top of which a geomembrane is laid, protecting the foundation from the capillary rise of groundwater. Next are the following layers:
- crushed stone-sand cushion, which increases the load-bearing capacity of the soil and correctly distributes the load;
- roll waterproofing;
- insulation, most often used polystyrene foam or penoplex.
There is a large selection of technologies for insulating strip foundations. Along with insulating the outside of the foundation with penoplex, the technique of permanent formwork, application of sprayed insulation, or finishing with expanded clay is used. Mineral wool is rarely used in this case due to its ability to absorb moisture.
If you choose the permanent formwork method, then it must be planned at the construction stage, because the thermal insulation materials used to insulate the foundation are an integral part of the structure.
For different foundations it is advisable to use different types of insulation
Formwork is made from various materials, but most often the foundation base is insulated from the outside with penoplex or expanded polystyrene. Before starting work, it is necessary to make a recess from the compacted soil for the blind area, which is then filled in turn with the following materials:
- crushed stone;
- sand;
- waterproofing;
- insulation;
- formwork;
- reinforcing layer;
- concrete.
Equally important is the insulation of the base from piles or pillars. Of course, with a properly designed foundation of this type, it is no longer threatened by freezing forces or the damaging effects of soil moisture.
However, there are a number of other, no less important issues that can only be solved by creating thermal insulation.
Schematic example of insulation of a strip foundation
Reinforced concrete gratings or post piles require thermal insulation, which must be no less than the base of the strip
It is important to understand that piles are often connected to a monolithic reinforced concrete grid, which, without proper insulation, becomes a powerful refrigeration element. A characteristic feature of a foundation on piles is the presence of a gap between the ground and the ceiling of the first floor, where utilities are usually laid
Insulation of a pile-screw foundation of a wooden house is most often accompanied by decorative finishing of this part of the facade. In any case, the space between the house and the ground will be closed on all sides and will not become a place for dirt or debris to accumulate. Measures to insulate a pile-screw foundation are also necessary to ensure comfortable living, increase the service life of the building and improve the appearance of the structure.
Choosing insulation for the base
The following materials can be used to insulate the base.
Expanded polystyrene foam
Foamed polystyrene or polystyrene foam is a popular option for base insulation. It holds its position despite the advent of more modern materials. Such insulation has low thermal conductivity, is not hygroscopic, can be cut without problems, weighs little, and therefore does not cause problems during transportation and installation. You can install such insulation yourself without additional help.
As for the costs of such material, they are small, especially compared to other options for polymer insulation, so foam is chosen when the budget is limited. It is important to buy the correct brand of material - PSB-S 25 or PSB-S 35.
A material such as polystyrene foam has increased strength and is well suited for insulating the base because... tolerates mechanical loads, the thickness of the plate can be in the range of 20-100 mm. The colder the climate, the thicker the insulation layer should be. In some cases it is laid in two layers. The operating temperature of the foam is from – 60 to +80 degrees Celsius – within these limits the material does not change its characteristics. Polystyrene foam will work for at least 25 years; if you properly arrange the thermal insulation cake, you can count on 35 years of operation.
The disadvantage of this material is that it is fragile, so it cannot be bent, and it often suffers from mice. It needs waterproofing, since moisture is absorbed into the upper layers of the material, and the foam cracks in frost.
Extruded polystyrene foam
Extruded polystyrene foam or penoplex is in first place in the list of thermal insulation materials for insulating the foundation base. According to its characteristics, such insulation for the basement of a house from the outside is similar to polystyrene foam, but is more rigid and durable, so it can better withstand soil pressure without sagging. The benefits include the following:
- Low thermal conductivity ensures good thermal insulation properties
- Does not absorb moisture due to the closed-cell structure
- Shows good compressive strength
- Designed to last at least 50 years
- Does not attract biological objects, be it rodents or mold
- No installation or processing complexity - all necessary work can be carried out on your own
- Affordable price
- Additional sound insulation
Does not absorb moisture due to its closed-cell structure.
Additionally, it is worth noting the material’s resistance to fire - it is due to impregnation with fire retardants. This material also has disadvantages, which include a large number of joints. This drawback is typical for any other tile materials for basement insulation. In order for the insulation layer to become monolithic, it is necessary to treat the joints - they can be covered or foamed. Interlocking tile materials are also available to ensure a tight joint. At the same time, the likelihood of cold bridges appearing is reduced.
If we are talking about insulating the base in a harsh climate, then it is better to make a double layer of polystyrene foam to prevent joints from joining; the second layer is shifted by half the length of the slab relative to the first.
This material is quite strong and elastic, so it can bend. However, it can be cut without any problems with a special knife, and the material will not crumble like polystyrene foam. It is preferable to install insulation in dry weather at high temperatures. You can also use extruded polystyrene foam to insulate the blind area.
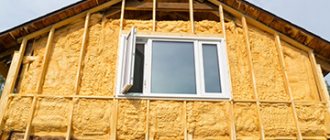
Spray insulation
Foamed polyurethane foam has an ideal set of qualities for insulating a basement. This material is applied with special installations, inside which the polyol and isocyanate are mixed, which provokes the synthesis of the polymer, as well as the release of carbon dioxide. It is the gas that provides the foamed structure of the material. In this case, the bubbles do not connect with each other - this guarantees the absence of hygroscopicity. This material is sprayed in a thin layer onto the prepared base; some of its positive properties include:
- Resistance to mold, mildew
- Excellent thermal insulation material with low thermal conductivity coefficient
- Due to spraying, the layer becomes monolithic without cracks and defects, seams and other fluctuations
- The material is tough, elastic, light and durable
- Excellent maintainability - any crack can be repaired with a portion of polymer
- Minimum application time - the base can be treated in one day
Any crack can be sealed with a portion of polymer with such insulation of the base.
Among the disadvantages, one can note the high cost of such finishing of the base. You will also have to hire a specialist and rent equipment. Having completed the insulation, it is important to promptly complete the finishing of the facade, since such material does not tolerate sunlight.
Insulating the foundation of a house from the outside with polystyrene foam
Insulating the foundation with polystyrene foam is considered one of the popular methods among builders that prevents freezing of the foundation. The base and foundation are covered with expanded polystyrene slabs, which are characterized by increased density; the thickness should not be less than 5 cm. Among the main advantages of insulating the foundation with expanded polystyrene are:
- high thermal insulation qualities and optimal thermal conductivity coefficient;
- inability to absorb moisture or degrade when exposed to water due to its closed cell structure;
- long period of operation - over 50 years;
- good sound and noise insulation properties;
- resistance to ignition due to the applied fire retardant;
- no possibility of mold or fungal growth;
- simple and quick installation of sheets, easy processing and the possibility of self-fixing without the use of special tools;
- low cost of material and its installation.
Expanded polystyrene as foundation insulation has a lot of positive qualities
If we talk about polystyrene foam, it is worth noting that it has a significant disadvantage - instability in front of rodents, which can damage the sheets. Disadvantages also include a large number of joints between sheets. Extruded polystyrene foam (penoplex) has slightly fewer negative characteristics, characterized by its smaller thickness but higher density.
Insulating the foundation and blind area of a house from the outside with polystyrene foam is more effective than with conventional polystyrene foam, due to the interlocking system of joints, which ensures a more dense arrangement of sheets relative to each other. In addition, the material is characterized by less fragility, it does not crumble when cut and can withstand greater loads.
Extruded polystyrene boards have many different advantages, including lightness, high heat transfer resistance, ease of processing and installation (including due to the clear geometric shapes of the panels), environmental friendliness, durability and many others.
Expanded polystyrene has excellent thermal conductivity, as well as sound and sound insulation
When insulating the foundation of a house from the outside with your own hands using polystyrene foam, it is quite easy to calculate the required amount of material, especially if you have a building plan with the parameters necessary for vertical and horizontal basic insulation. The calculation is usually based on the standard dimensions of Penoplex boards (1200x600 mm) and the range of insulation thicknesses of Penoplex F panels developed specifically for foundations (in ml):
- 20;
- 40;
- 50;
- 60;
- 80;
- 100.
Why do you need to insulate the basement?
The basement is a very important part of any building, especially if it is a residential building.
Many people do not understand why spend extra money and insulate the facade of the house. Of course, there are situations when you can do without insulation. Additional thermal insulation will not be needed if the house does not have a basement and the basement itself is small. There is also no need to insulate houses that are designed exclusively for summer living or the building is located in a region where winters are quite warm. In these cases, you can use, for example, an insulated floor.
But if the winters are quite cold, the house has a basement and year-round living is planned in the building itself, then it will not be possible to do without insulation.
How to organize water drainage from the base?
Melt and rain water lead to the destruction of the foundation over time. Often even proper insulation cannot save in such a situation.
Therefore, it is important to organize the drainage of liquid from the base of the house. For this purpose, an open or closed drainage system is made
The easiest way to do it yourself is open drainage. It consists of ditches about 0.5 meters wide and 1 m deep, dug along the entire perimeter of the building. The walls of such a trench are beveled at an angle of 30 degrees for better water drainage. Liquid from the pits should move to the drainage well. Therefore, the efficiency of such a system is much higher if the site has a slope.
Closed drainage has recently become the most popular. It consists of pipes that are dug into the ground outside the building around the perimeter. They are laid at an angle to allow water to flow independently into the drainage well. Pipes must be wrapped with geotextiles.
Insulation of various types of foundations
The choice of materials and methods of work will depend on the type of foundation of the house. There are three main options.
Tape
A strip foundation consists of a closed system of beams placed under all the walls of the building. They are made of reinforced concrete, rubble stone or brick. Frame buildings are often built on this foundation.
In this case, the choice of ways to insulate the foundation of a house is widest. You can use any materials: EPS, EPS, polyurethane foam, expanded clay.
When carrying out work, observe the following sequence of actions:
- They dig a trench around the perimeter of the building. If the foundation is shallow, this can be done manually with a shovel. Otherwise, it is better to use special equipment.
- The bottom of the trench is covered with layers of sand and crushed stone for better moisture removal.
- All foundation surfaces are cleaned. Leave to dry for a week.
- Apply a layer of waterproofing. It is better to use polymer or bitumen mastic. If insulation is carried out with liquid polyurethane foam, then this stage can be skipped.
- After the waterproofing layer has dried, installation of the insulation begins. The material is laid from top to bottom in horizontal rows.
- The structure is left for several days to dry completely. After this, you can bury the trench. If necessary, finishing work is carried out in the above-ground part of the foundation.
Your home should not only be beautiful, warm, but also safe
Therefore, it is important to take a responsible approach to the choice of materials used. Purchase all products only from specialized construction stores
Always check that the seller has certificates and other accompanying documentation for the products.
Columnar and pile
Column and pile structures are a system of free-standing supports. A grillage is subsequently laid on them - a frame onto which the pressure of the load-bearing walls of the building is distributed.
Both types of such foundations are similar, but have a number of differences. The pile is buried at a distance of 5 meters or more. It has a smaller cross-sectional area. Can be screw or driven. Its sole and side surface are functional. The pillars are dug in just below the freezing point of the soil. They have a large cross-section and rest only on the ground with their lower part.
Insulating the foundation takes longer and is more difficult than others. First of all, you need to create a foundation wall, which is called a fence. It is on this that the insulation will subsequently be attached. It can be made from brick or metal profiles on which a wooden board is laid.
An important stage of the work is the insulation of each pillar or pile from moisture. To do this, each support is wrapped in roofing felt. It is good to coat metal structures with mastic, and wooden structures with a special solution that prevents rotting. The grillage beams also need to be treated. The further insulation process will be similar to a strip foundation.
Slab
Slab foundation is a monolithic structure made of reinforced concrete. It is the most reliable and durable. It can be built on any type of soil.
Insulation of such a base from the outside is possible only at the construction stage. There is no opportunity to do this later.
The process is divided into several stages:
- The soil at the base of the dug pit is compacted.
- A geomembrane is lined to protect against groundwater.
- The pillow is made from a mixture of crushed stone and sand. This will improve the bearing capacity of the soil.
- A layer of waterproofing is laid. Any roll material is used for this.
- Sheet insulation is installed. It is better to use PPS or EPS.
- A slab is being made.
If insulation was not carried out at the construction stage, then the only option is to lay the material under the floor screed of the first floor.
Insulation options
The plinth cladding can be of several types. The decision which one to use is made based on aesthetic considerations, financial capabilities, and the qualifications of the workers who will perform the finishing.
Insulation of the base can be done in two ways:
- on a separate tape structure;
- along the sheathing, which is attached to the piles.
Tape design
The first option is more complicated and also has a number of limitations. A shallow-type tape structure can be made of concrete or brick. Most often, it rests on the ground or its own small monolithic foundation (read more about the construction of a shallow strip foundation). But when building on heaving soils, it is strongly not recommended to use this option. Especially if we are talking about a brick base. In this case, the ground rises (swells) in winter. Moreover, the process occurs unevenly. Having dug out the snow from the plinth structure, at some point you will see inclined cracks, which indicate damage from frost heaving.
A strip base on which, if necessary, you can even attach insulation
This phenomenon can be prevented by eliminating one of the heaving factors:
- low temperature;
- moisture.
It is impossible to fulfill the first condition when manufacturing a non-buried tape. The soil under the cladding of the basement of the house will still freeze and deform. Moisture removal may also be ineffective.
It is reasonable to use strip lining only on those soils that are not prone to heaving. Such bases include coarse soils, medium or coarse sand. This option is also suitable for regions with warm climates, where negative temperatures are rare.
The insulation is attached to the brick according to the standard scheme. Penoplex is best suited
The insulation is fixed to a concrete or brick wall, similar to the type of thermal insulation of the external enclosing elements of the building. It can be performed both without an additional frame and with its use. The method depends on the type of finish chosen.
Insulation of the base along the frame
This option for your home will be less expensive and easier. Insulation of the foundation on piles in this case can be done using a variety of materials. Examples include:
- basement siding;
- clinker panels;
- metal profiled sheet.
The choice among options is based on financial capabilities and aesthetic considerations. All options are attached approximately the same. Read a detailed article about finishing the base of a pile-screw foundation. To provide a foundation for cladding the base of the house, it is necessary to provide a frame.
The frame can be made of wood or rolled metal. When facing with metal materials, it is more reasonable to use steel as a lath. The frame is usually made of two longitudinal straps. If necessary, a larger number of longitudinal elements can be provided. It all depends on the height of the base. It is also possible to provide vertical frame elements. The need for them depends on the chosen material for cladding the basement of the house.
Before insulating the foundation on screw piles, it is necessary to provide for attaching the frame to them. The method depends on the material:
- When attaching the cladding to wooden slats and bars, it is necessary to provide metal embedded parts in the upper part of the piles in advance. They can be made from angle iron or other similar types of rolled products. Fastening to the piles is carried out by welding.
- When using steel frame elements, there is no need for preliminary preparation. The metal profile is welded directly to the foundation elements.
To prevent ground moisture and frost heaving from destroying the finishing and thermal insulation, it is worth raising the base above the ground. The damper gap can be from 5 to 15 cm. This distance can be closed with some kind of bar at the final stage.
Vents can be provided in the place indicated on the diagram or in the gap between the cladding and the blind area
The insulation for the basement of the house is attached to the same frame as the trim. Depending on the type chosen, a number of additional measures will have to be carried out.
When insulating, it is important not to forget about underground ventilation. For this purpose, special holes or vents are provided in the finishing design. According to the standards, their total area should be equal to 1/400 of the underground area. The gap between the ground and the sheathing can also serve for ventilation. To do this, it is covered with a special mesh that prevents the penetration of rodents and insects, but does not impede the movement of air.
Foam insulation
It is cheap, adheres well to various surfaces, and is easy to process mechanically. Insulation of the base, as well as walls, with such material can be found most often.
Materials
For insulation using this method, you will definitely need the foam itself in an amount predetermined by the calculation method, and glue - any polymer with good adhesion. Insulation consumption is calculated in tiles - this is the standard norm for the production of such materials. The most common sheet sizes are 1000x1000 mm, 1000x500 mm, thickness - from 20 to 100 mm.
Preparation
The surfaces to be pasted are cleaned of dust and deposits and, if necessary, upholstered. Wet, poorly dried walls are not acceptable; they will have to be brought to perfection, otherwise the tiles will not stick. The consumption of polystyrene foam is approximately calculated based on the size of the walls and the dimensions of the sheet.
If it is not possible to use a number of slabs that is a multiple of the dimensions for thermal insulation of the base or foundation, the excess is trimmed. This can be done with a regular wood hacksaw or a fairly sharp knife.
Installation
What is the best way to insulate the base so as not to waste precious heat? Of course, polystyrene foam. Installation or cladding with plastic panels is easy and simple: glue is applied to the slab and wall, then you need to press the sheet to the insulated surface. A base lined in this way will be much warmer than the previous one. All that remains is to do the plastering and the renovation is complete.
How to insulate with your own hands?
Ideally, insulation of the basement floor should be carried out at the stage of pouring the foundation. Let's take a closer look at this process using the example of insulating the base of a strip base. After it is poured and hardened, the formwork is removed. Next, you need to clear the surface of the foundation right down to the base by digging trenches along the base. Their width should be sufficient to make it convenient for the descending worker to perform the necessary manipulations.
The next step is preparing the foundation base. Surfaces must be cleaned of dirt and dust and dried. Only in this case will it be possible to achieve good adhesion of them to the insulation.
If there are sagging concrete and other irregularities on the surface, they should be eliminated using a grinder with an attachment for stone and wood. Cracks and depressions should be sealed with concrete putty that has a high setting speed. When using classic cement mortar, you will have to wait about two weeks for it to set.
Next, a layer of polymer primer is placed on the prepared surface.
It is important to apply the composition in an even layer, excluding gaps. It is convenient to use a short-haired synthetic roller for this, and a brush in hard-to-reach places
The primer will improve the adhesion of waterproofing materials.
The next stage is the fixation of the waterproofing layer, represented by roll materials on a bitumen-polymer base or membrane waterproofing. The choice of specific material is up to the homeowner.
Bitumen roll materials can be glued to mastic (self-adhesive products) or fused using a gas torch. Straighten the material from bottom to top
When gluing corners, it is important that the material sheet covers one side and extends 100-150 mm perpendicular
After the waterproofing work is completed, they proceed directly to insulation. To fix polystyrene foam boards, you can purchase ready-made adhesive for thermal insulation work. Its advantage is its good adhesion on vertical surfaces.
If you need a more economical option, purchase a dry construction mixture. Another option for an adhesive base is the use of bitumen mastic. It is suitable if the insulation is glued to roofing felt
However, it is important that the mastic does not contain organic solvents, since they destroy polystyrene foam boards. You should choose a water-soluble composition that is most adapted for this type of work.
Next, the glue is applied to the entire surface of the insulation board using a notched trowel. The amount of glue must be adjusted so that its excess does not protrude beyond the slab when gluing. If this does happen, the exposed glue should be removed immediately.
The work is also done from the bottom up, the slabs are pressed against the foundation, and after setting, you can begin fixing the next one. If a two-layer insulation layer is required, the second row of slabs is installed in such a way as to avoid seams. That is, the second row is laid out offset from the first.
Thermal insulation material should be fixed below ground level only using an adhesive composition. Above the level, it is recommended, in addition to glue, to use additional fixation with dowels - fungi
It is important that for dowels, holes of a suitable diameter are first drilled into which the dowels are already inserted. Otherwise, cracking of the material over most of the slab cannot be avoided, which reduces its thermal insulation characteristics
If connecting seams are found, they should be filled with construction foam. It is better to choose a composition produced by the same brand as the insulation.
In fact, the insulation can be considered complete, but it would be correct to protect the foundation from the chemical influence of groundwater. To do this, a fiberglass mesh is stretched along the entire perimeter of the foundation, on top of which a thin layer of plaster is applied using a compound for coating waterproofing. You can also use a special membrane. Only after these manipulations should you start filling the base.
The towering basement part of the foundation remains to be protected with special decorative material. As a rule, these are wall panels and siding. Contact treatment with a plaster or paint composition is possible. To do this, the insulation is reinforced, covered in 2-3 layers of plaster, the finishing layer of which is carefully sanded. After this, you can apply a decorative layer.
Do-it-yourself insulation of the base
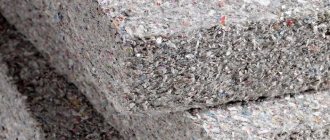
When choosing mineral slabs for basement insulation, you should consider the following advantages:
- The shape of the plates does not change depending on temperature and, when installed correctly, is durable;
- Chemical resistance;
- The slabs can be cut with a knife or hacksaw, which simplifies installation; insulating the basement of a house with your own hands is quite possible;
- The low thermal conductivity of the foundation reduces the cost of heating the house;
- Fire safety.
It should be borne in mind that during installation it is important to use hydro- and vapor barriers to isolate the insulation from moisture. Thermal insulating properties of mineral wool decrease when in contact with water
The low thermal conductivity of the foundation reduces the cost of heating the house.
Preparing the base
Preparing walls before thermal insulation is an important procedure:
- We clean the walls from dust and dirt using a spatula, a brush with metal bristles and a spray bottle.
- All cracks and irregularities on the cleaned wall must be repaired. If the surface difference exceeds 1 cm, then the insulation will not fit tightly, so the walls should be as smooth as possible. They can be leveled with gypsum plaster, having first verified the presence of curvature using a building level. We apply the level vertically and determine the difference between the extreme points. If there are large deviations, you will have to plaster, placing beacons.
- Lighthouses can be made from wooden slats. There is also a beacon profile for plaster on sale. First, beacons are placed vertically on the plaster mixture according to the level. The distance between beacons can be 1.5 meters. The working mixture is applied to the wall from bottom to top between the slats - a spatula is used for this. Afterwards you need to level the plaster along the beacons and leave it to dry.
- We apply two layers of coating waterproofing to rid the house of dampness and mold. Such an insulator can be bitumen mastic or a modern insulating mixture - in this case you will need a roller or brush. In order for all layers to dry well, work must be carried out at an ambient temperature above 5 degrees.
Tools and materials for work
To carry out insulation with mineral wool, as well as with polystyrene foam or penoplex, you must have in stock:
- Mineral wool boards;
- Dowel fungi;
- Assembly knife;
- Roulette;
- Level;
- Putty knife;
- Roller/brush;
- Drill with attachment;
- Round capacity 20-25 liters.
Tools and materials for do-it-yourself basement insulation work
Installation of thermal insulation boards
Mineral wool should not be subjected to prolonged loads, as this negatively affects the thermal conductivity of the material. Therefore, when insulating the base, it is necessary to use lathing:
We install steel brackets on the prepared surface. To minimize heat dissipation at the points of contact between the metal and the wall, you can use a gasket made of paronite or any other heat insulator. We fasten the sheathing elements to brackets - these can be wooden beams with an antiseptic or U-shaped steel profiles
The elements are fastened with stainless steel screws. We lay mineral wool slabs in the sheathing, paying attention to the high density of the material - at least 130 kg/m3, this is the kind of mineral wool that is recommended for facade work. We fix each slab using disc-shaped dowels - four units of fasteners for each slab. The gaps between the plates must be filled with self-expanding foam, which will make the insulation layer monolithic. After this comes the finishing stage, most often mineral wool slabs are covered with basement siding - such insulated panels on a steel base must be at least 20 mm thick
In this case, thin slabs of mineral wool can be used for insulation.
Penoplex foundation insulation technology
This technology can be used with a ready-made foundation, so it can be carried out both at the construction stage and during repairs. If you carry out work after the building has been erected, you will need to dig out and completely clean the foundation. After this, it is imperative to create reliable waterproofing using a bitumen primer, onto which strips of rolled materials laid overlapping are then mounted from bottom to top.
Penoplex insulation can be carried out both at the construction stage and on the finished house
After waterproofing is completed, the installation of thermal insulation materials continues. When insulating a foundation covered with waterproofing with your own hands using penoplex, various methods and materials can be used. It is best to buy a special glue designed for thermal insulation work. Extruded polystyrene foam sheet holds well on a vertical surface.
To minimize the possibility of sheets moving as a result of the pressure of the soil layer, when insulating the foundation of a house with penoplex, it is necessary to fix the sheets using umbrella dowels. The mounting holes are drilled into the base directly through the insulation boards already installed with adhesive mortar. The diameter and depth of the hole directly depend on the thickness of the insulation, the wall material and the model of the selected dowels.
Penoplex can significantly extend the life of a building
It is usually considered that the expansion part of the dowel enters the foundation wall by 45-60 mm. The number of these elements on a standard plate is 5-6. After the holes are prepared, the dowels are inserted into them so that the caps rest on the insulating panel, and then expansion spacers are driven in (depending on the specific model of fastener). If, based on the results of thermal engineering calculations, it is determined that two-layer insulation is required, then the second row of thermal insulation boards is mounted on the first so that the seams between the blocks move.
At the last stage of work on insulating the foundation base with penoplex, an adhesive solution is applied, then a reinforcing fiberglass mesh is attached, which is then plastered and finished with the selected facing material.
Insulating the foundation is an important task that helps extend the service life of the foundation, and therefore the entire building. The choice of insulation and the method of carrying out work depend not only on the material from which the foundation is made, but also on environmental conditions, for example, the proximity of groundwater, soil type and climate. Foundation insulation will only be effective if it is part of an overall insulation package of the recessed foundation, building perimeter soil, ground floor floor and façade wall. There should be no gaps between the components of the entire system, otherwise heat will constantly escape.
How to properly insulate a basement
An uninsulated base without waterproofing cannot be considered a reliable and complete foundation for a residential building. To exclude any reasons for a decrease in the strength of the foundation, it is necessary to insulate its walls only from the outside. This will guarantee that such a residential building will not need repairs for a long time.
Even in the case when it is planned to build a basement in which internal, fairly high-quality thermal insulation will be made, this can only be considered as maintaining a certain microclimate in the basement. But the problem of freezing walls and the accumulation of destructive moisture in them will remain.
Sequence of base insulation:
- Near the wall, along the perimeter of the entire building, dig a trench at least 500 mm deep. The width of the trench should be such that a person can freely work in it with insulating materials.
- The wall surface freed from the ground should be thoroughly cleaned of dirt. This is best done with a metal brush, and on a completely dry surface.
- After cleaning the wall, you should carefully inspect its surface in order to identify various defects in the form of cracks, chips and other damage. It is recommended to repair all detected defects with sand-cement mortar, and smooth out uneven areas and bulges with plaster from the same mortar. The smoother the surface, the easier it will be to work with the sheets.
- The base for the insulation is made. To do this, along the entire perimeter of concrete, a strip of about 100 mm wide and 50-100 mm thick is poured close to the wall, on which insulation slabs will be placed. In the future, it will protect the sheets from the effects of groundwater from below.
- After preparing the walls and base for the sheets, waterproofing is done, which is the most important part of the work of insulating the base. For waterproofing, you can use various bitumen-based mastics, as well as rolled materials in the form of roofing felt, glass insulation, and others. The mastic is applied to the prepared dry surface using a large brush or roller in 2-3 layers. The mastic option provides more reliable insulation.
- The fastening of sheet insulation can be glued to bitumen mastic or ordinary glue intended specifically for heat-insulating sheet materials.
- Typically, sheets of expanded polystyrene or foam are additionally secured with special plastic dowels (umbrellas). To do this, use a hammer drill to drill a hole in the wall through the glued sheet of insulation to the diameter of the dowel and insert a plastic fastener (umbrella). The depth of the hole must be at least 50 mm.
- A reinforcing mesh is rolled out on top of the installed sheets, which will additionally provide high strength. The mesh, like the sheets, is fastened with dowels and nails, and it should fit tightly to the insulation without any sagging or loose areas.
- After the mesh is well fixed, cement-sand plaster is applied on top of it. When plastering the mesh, no special care is required, the main thing is that it completely covers the mesh and insulation.
- The plastered underground part of the foundation must be covered with elastic waterproofing mastic, which will protect the entire created insulating “pie”.
- The base (the above-ground part of the foundation) can be finished with any materials intended for the facade, decorative plaster, tiles, stone, and so on.
Insulation of the blind area
Do not forget that the blind area also refers to the insulation of the foundation. It must be at least 200 mm wider than the overhang of the roof of the house, while its width, regardless of the building, must be at least 600 mm.
The blind area is insulated as follows:
- A bulk cushion is made of gravel or sand about 150 mm thick.
- Roofing felt is lined on it.
- Sheet insulation is installed.
- The formwork is being installed.
- Concrete is poured. When pouring, you need to ensure that the concrete is laid with a slight slope from the house for better drainage of water from the base.
Proper insulation of the outside will guarantee long-term operation of the house.