How to tile a stove with your own hands
Decorating with tiles seems complicated. In fact, that's how it is. In the old days, two craftsmen were invited to lay tiles: a stove maker and a tiler. By doing the work at the same time, they created a beautiful and functional heating structure. Today, thanks to the fact that technology has stepped forward, it has become possible to finish the stove with tiles with your own hands.
Let us note right away that the work time from the moment the decision is made, development and approval of the stove/fireplace project to tiling is 3-4 months. And until the first full heating of the furnace is still 1 month.
Plus, a person who decides to make the cladding himself will be forced to play several roles: artist, designer, architect, ceramist and stove maker.
But, as they say, if there is a desire, step-by-step instructions for installing the tiles are attached.
Tiling - planning
Tiled stoves are a specific type of firebox arrangement. Its peculiarity is that construction and cladding are carried out simultaneously (classic method). There is also a modern one, for those who want to cover an already working (old) stove or fireplace.
Thus, first, let's consider the first option - simultaneous construction and lining of the stove with tiles. As a rule, two specialists perform such work at once - a stove maker and a tiler.
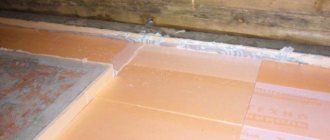
Based on the essence of the stage, we can conclude that the decision to cover the stove with tiles is made simultaneously with the idea of building it. Considering that the weight of the tile is quite large (2 kg), due to its greater thickness compared to ceramic tiles, as well as due to the installation method, the stove needs to be provided with a powerful base - the foundation. Its area should be slightly larger than the planned size of the stove or fireplace. This will allow the structure to stand firmly and support the weight of the tiles without distortion. When choosing the type of foundation, it is better to give preference to a slab foundation, and its thickness will be determined by the weight of the future furnace.
What are tiles
Tiles are called tiles made from baked clay (ceramics). Its main feature is the presence of a bowl on the back - a rump, as well as points for mechanical attachment to the stove or fireplace. In addition, tiles are thicker, and between the back and the fireplace there is enough space for laying broken bricks, sand, and clay to make a kind of thermal cushion.
It is due to the existing attachment points that the tiles are securely held on a specific surface. The mechanical method of fixing the stove to the fireplace allows the brickwork to expand without negative consequences when the temperature rises - heating. The presence of a pump allows you to increase the strength characteristics of tiles and the heat capacity of the fireplace. Its dimensions are somewhat smaller than the area of the product itself.
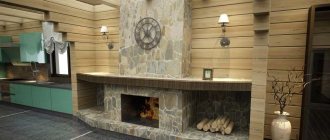
A tiled fireplace in the house effectively solves problems with heating the room
Drawing and diagram of laying tiles
An accurate diagram is necessary in order to simplify installation and calculate the exact consumption of materials. Having at your disposal a detailed installation diagram, it is easy to determine what configuration of tiles will be needed for finishing and what order of their installation. Taking into account the cost of the tile, this is an important aspect.
Note. Users recommend creating an emergency supply of tiles. At least one piece of each type of tile should be available not only in case of unexpected damage during laying, but also in case of damage during use.
You don't need to have the skills of an architect to create a drawing of a tile slab. It is enough to indicate the dimensions of the stove and the location of the tiles.
Drawing of a tiled stove
Currently, 3D visualization of the project is popular.
Materials and tools
To work you need to prepare:
- tiled tiles for the stove - the main material;
- pins made of steel wire with a diameter of 5 mm. They are needed to connect the tiles to each other and the brickwork of the stove;
- soft wire;
- steel staples;
- clay for filling the tiller;
- filler: broken brick, river pebbles or gravel (for placing in the tiller);
Note. Refractory bricks are not suitable for filling the lump, but only ordinary stove bricks. The fact is that refractory brick expands under the influence of high temperature, which can lead to splitting of the tile.
- gypsum-based grout for joints.
The tools that every owner has will suffice: a building level, a plumb line, a square, a rasp, a spatula, an angle grinder.
Selection of tiles for cladding
Master tilers have created many different tile configurations, allowing for the construction of a beautiful and functional tile stove. So, for example, smooth tiles are used when finishing planes; for cladding corners, corner tiles with a rum of the appropriate configuration are provided. Curves and decor are made by shaped parts (border, straight and corner cornice, grate, relief inserts, cover shelf, firebox frame).
Not only the types of tiles can be different, but also the method of making the front surface. Here there are relief, smooth, with and without patterns, glazed and terracotta surfaces. The method of applying the design and its color scheme determined entire schools of ceramists. Dutch, Spanish, and Russian tiles have gained popularity.
But the sizes of tiles, on the contrary, are unified and regulated by GOST 3742-47. The document contains information about the geometry of the tile and permissible deviations from the norm. The latter are no more than 1 mm. Standardization made it possible to avoid the lengthy adjustment of tiles to each other, which significantly reduces the tiling time.
How to check the quality of a tile
When buying a tile, you need to be guided not only by its aesthetic properties, but also pay attention to such indicators as:
- raw materials. Masters claim that durable tiles can only be made from white clay. Colored clays contain various impurities that affect quality;
- presence and size of pores. You don't need to break the product to see the pores. They are clearly visible at the ends of the tile. The larger the pore size, the more moisture the product can absorb. The percentage of moisture absorption determines the tile’s resistance to temperature changes and mechanical damage. Accordingly, the larger and larger the pores, the lower the quality of the product;
- method of making tiles. In industrial quantities, tiles are made in two ways: punching, pressing and casting. In the first case, wet clay is used, which simplifies the production process, but increases the drying time of the product. In addition, during the drying process, a wet product may move, which will violate the specified dimensions. The second option is more labor-intensive, but the finished product is more durable and has identical dimensions. The third method is used to obtain “tiles for tiles”;
- number (number) of firings. They can be determined by the quality of the front surface. If it is slightly cracked and has a duller shine, it means that the tile was fired once.
Preparing tiles for cladding
Considering the method of making tiles, it can be noted that all tiles will differ in size and shade.
It’s easier with the size - all the tiles are adjusted to the same size using a grinder and grinding with a rasp. Moreover, if you need to cut the product into pieces, you first need to cut down the front glazed surface.
Note. In order not to damage the surface of the tile during further grinding, you must first make a small bevel on the glazed surface. Thus, the tiles will rest on each other with an edge, and not as a decorative surface. This will not affect the quality of installation in any way.
But if the size can be brought into uniform compliance, then attention should be paid to color. Products should be grouped in such a way that the transition between shades is as less noticeable as possible. At the same time, craftsmen advise laying tiles with dark shades at the bottom.
Products with detected defects (cracks, chips, design defects) may be useful for trimming. They can also be laid at the junction with the wall or other inconspicuous places.
Options for laying tiles: the first pattern is with sorting, the second is without.
Furnace cladding with and without tile sorting
Scheme for laying tiles with and without bandaging. In addition, there are methods for laying tiles with and without bandaging.
The approaches to installation are not limited to this and are determined by the design, the relief of the tile and the imagination of the author.
Material prepared for the website www.moydomik.net
Layout of tiles
The sorted products must be laid out in accordance with the drawing on a flat surface.
Layout of tiles before and after
Note. Before laying out the tiles, it is convenient to mark the outline of the stove with masking tape.
If the dimensions of the tile exceed the dimensions of the stove, the edges of the tiles must be sanded (ground down) to the required size. If less, you can increase the thickness of the joint between the tiles. However, its thickness should not exceed 1 mm. for a vertical seam and 3 mm. for horizontal.
The laid tiles are numbered on the reverse side and proceed directly to the stove lining.
Layout of a set of tiles
Tile
201 votes
+
Vote for!
—
Vote against!
Brick is considered the most standard surface finish for a fireplace or stove. But such design does not always combine well with the design of the room. Tiles or tiles will help create an elegant and unique look for the finished heating device. This article will talk about finishing the stove with tiles.
What are stove tiles
Tiles are a type of tile with a special box-shaped shape. This type of cladding has been used for centuries and is a unique material for decoration.
Tiles for stoves photo
A significant difference between tiles and standard tiles is their special shape: the reverse side is presented in the form of a box and is attached to the surface of the heating device using built-in pins. The base for the fasteners is prepared in advance during the installation of the furnace - this is the most practical option. Without a preparatory stage, fixing the tiles requires additional surface preparation.
There is a certain classification of tiles according to the type and shape of the product:
- flat – can only be installed on a flat surface;
- cornice – designed to decorate the portal above the cornice;
- basement - installed above the floor surface, up to a row of flat tiles;
- corner - decorate the corner;
- shaped – designed for convex parts.
The main material for making tiles is clay. As the temperature rises, its expansion coefficient completely coincides with that of the brickwork. It follows from this that the material has a high level of heat transfer.
Distinctive properties of tile cladding
The material not only has a decorative function, but also has a number of advantages compared to brickwork.
- Hygiene . Tiles do not require additional care. Thanks to the glossy surface, it is easy to remove dust and soot from them. In addition, the material does not absorb fumes, which has a positive effect on the air in the room where the stove is located.
- Heat capacity . The thickness of the tile and the material of manufacture increases the efficiency of heat transfer significantly.
- Heat dissipation. The design of the material and the layer between the pump and the surface of the furnace allow not only to accumulate heat, but also to retain it for a long period after the heating element has finished operating. The heat generated is enough to heat the room for 12 hours.
DIY stove tiles
Preparing clay for tiles
To make tiles, the clay must have a certain consistency and structure. To do this, she must go through all stages of preparation:
- prepared pieces of material are evenly distributed over the wooden surface of the flooring;
- the clay is thoroughly dried;
- the resulting dry lumps are brought to a powdery state using a tamper;
- clay powder is sifted to remove fine debris;
- The final stage in preparing clay is elutriation. To do this, the resulting powder is placed in a special sifting device with holes that are tightly closed before the procedure. The container is filled with water, which descends as the mass clears. As a result of the procedure, the solution is divided into a dense and liquid layer of clay. It is the liquid mass that will be subsequently used in the process of making tiles;
- The liquid clay is dried to a thick sour cream state, after which it is mixed several times to give the material plasticity.
Forming a tile model
The finished product can have a smooth or structured surface. In the first option, only a flat tile base is made. Relief design requires a more labor-intensive process.
The workpiece in the form of a lump of clay is rolled out into a flat cake. Excess edges are cut off with a special tool - a stack. The size of the finished product is determined based on the size of the furnace in which the firing procedure will be carried out. The front side is aligned with the rule.
Relief formation:
- a drawing is applied using sculptural stacks;
- rolled clay rollers are laid out along the marked lines;
- the space between them is filled with clay mass;
- The edges of the picture are equal to the stacks.
Making a tile form . The mold material is gypsum. Working with it should be quick because it hardens quickly. Making the mold should take no more than 20 minutes. Progress:
- installation of formwork according to the size of the tile;
- a solution of gypsum and water is prepared in a ratio of 7:10;
- the model is wetted with water and immersed in the frame;
- the formwork is filled with gypsum;
- After some time the frame is removed.
The finished form is thoroughly washed and dried. The service life of the workpiece allows it to be used up to 200 times.
Molding tiles for stoves and fireplaces
In the process of making tiles, the following steps are carried out:
- the bottom of the mold is covered with a thin layer of clay and carefully compacted to draw the relief;
- the rest of the material is laid out;
- the last layer is aligned by the rule;
- Clay sides - rumps - are installed along the edges;
- holes for installation are formed in the corners of the tiller;
- the tile blank must dry thoroughly (the drying period takes from 3 to 5 days);
- The final stage is the firing of the product in a muffle furnace at a temperature of 950 C0 for 4 hours.
After complete cooling, the tile can be removed from the oven and covered with drying oil in several layers. The design is applied to the material using oil paint. The finished tile is varnished to protect the design from erasing and changing color.
Preparing the stove and mortar for lining the stove with tiles
Facing work on installing tiles is a labor-intensive process. Inadequate craftsmanship can affect the quality of the finished stove finish. In this case, it is better to turn to professionals. It is worth remembering that the price of the product and work will be quite high.
But the price is quite justified, since a stove lined with tiles will serve and have a beautiful appearance for a very long period of time. In addition, the material has a high heat transfer coefficient. This means that even after the oven cools down, the coating will continue to generate heat for some time. Tiles are not afraid of sudden temperature changes - they are a fairly high-strength material. And their environmental friendliness leaves no doubt.
Surface preparation:
- The surface of the oven is carefully prepared. If the oven is of fresh masonry, then it is necessary to remove excess mortar. To reconstruct an old heating system, you need to completely get rid of the old finish. For this purpose, it is advisable to use a wide spatula or a stiff brush.
- Existing seams are buried to a level of 1 cm to improve adhesion to the mortar.
- The surface of the furnace is covered with a construction mesh. It will increase the level of rigidity and accordingly increase the service life of the surface.
Making the solution
- There are only two options for using mortar for installing tiles: clay and cement. A more labor-intensive process is to apply a clay mixture, but this method is durable and heat-resistant.
- To prepare a solution from clay, you need to pass the material through a sieve to get rid of debris. Then the mass is mixed with sand in the proportion: 2 to 1. It is worth considering the fact that the larger the proportion of sand, the less elastic the solution will be. Therefore, the proportions should be observed as accurately as possible.
- Regarding the quality of sand, it is advisable to give preference to sea or mountain sand rather than river sand. They have less shrinkage effect and therefore guarantee a smooth surface after drying.
- The clay mass is filled with water and kept in a cool place for a day. This will allow it to absorb water as much as possible and acquire the elasticity necessary for work. Then you need to add sand to the solution and mix thoroughly until it reaches the consistency of thick sour cream.
Tip: to enhance the fireproof properties of the facing surface, you can add fireclay powder to the solution. It will not only improve the quality of the coating, but will also avoid the appearance of cracks in the joint area at the highest possible temperatures.
The peculiarity of the cement mortar suggests its use only in the case of heating with wood. Coal and higher temperature fuel options will cause the coating to deteriorate. In addition, despite being easier to manufacture, compared to clay, this solution has a shorter service life.
A cement mortar for installing tiles is prepared as follows:
- cement is mixed with sand at a ratio of 1:3;
- Water is gradually added to the resulting mixture;
- for kneading, it is best to use a special attachment on a drill - a “mixer”;
- the finished solution must be plastic and homogeneous.
Tip: The shrinkage process of cement and sand mortar occurs very quickly. To thicken the composition, you can add a small portion of any washing powder to it.
Tiles
When carrying out facing work on installing tiles, it is necessary to adhere to technical standards as closely as possible. This will allow you to avoid further unwanted violations of the integrity of the surface.
Stages of work:
- Initially, the surface to be decorated is measured and the amount of material is calculated, taking into account the corners and portals of the oven;
- All tiles must be soaked in water before installation, which will significantly increase the material’s resistance to high temperatures;
- The material is fastened from the corner of the furnace, observing the laying line; if necessary, guide beacons can be used in the work;
- the solution is applied over the entire surface of the pump, at this moment it is worth carefully monitoring the density of the material, since the resulting air pockets can subsequently lead to peeling of the lining;
- when fastening heavy tiles, it is necessary to increase the amount of mortar and add broken bricks to it to improve adhesion;
- It is necessary to insert special metal pins into the holes of the tiller, while bending the edges to improve the adhesion of the surfaces;
- a wire is attached to the edges of the pins, which is connected to self-tapping screws that are pre-installed into the furnace masonry;
- the tiles are connected to each other and to the surface of the stove using wire;
- the hollow space between the pump and the surface of the furnace is filled with crushed stone or broken brick.
After laying the first row, the rest are installed in a similar way, maintaining a gap at the seam. At the end of the work, all seams are thoroughly rubbed with a gypsum-based solution. To make the pattern monolithic, it is necessary to add a color to the grout that is similar to the color of the main material.
- While working, you should pay attention to the different sizes of tiles and the difference in shades. It is not difficult to cope with discrepancies in the size of facing materials. It is enough to use a grinder and process the edges with a rasp. Before the grinding procedure, a small bevel must be made on the surface of the tile.
Advice: if you need to cut a tile, before the procedure, first make a cut on the front surface. Otherwise, you may end up with splits along the edges of the seam.
- As for the color scheme, the formation of a pattern with the smallest transitions between tiles of different shades is considered harmonious. Experts in the field of stove cladding recommend using the most classic method of distributing the color scheme from dark to lighter colors. Dark colors should be used in the lower part of the stove. This decision is due to the fact that soot from the fire will gradually settle on the surface of the tiles and on darker versions it will be less noticeable.
- You should not throw away tiles with defects (chips, loss of pattern integrity, cracks). All of them can be useful in the area adjacent to the wall surface, or other inaccessible places.
A stove lined with tiles is not only a tribute to fashion, but also a solution to the issue of the quality of room heating. Possessing high heat transfer rates, durability and environmental friendliness, they can be an excellent option for decorating a heating device.
Cladding the stove with tiles - step-by-step instructions
The technology of finishing with tiles, like any construction process, is sequential and begins with the formation of the first row.
The first row of tiles or the so-called “hooves” set the tone for the entire construction. Their correct installation is the key to quick and high-quality further installation.
Installation of the first row
- tile preparation;
- selected and numbered tiles are immersed in water. This will avoid a situation where the clay of the tile will draw moisture out of the solution;
- After extraction, the rum of each tile is filled halfway with clay. Filling the pump increases the heat transfer of the furnace;
- then filler is packed into the clay. This can be brick, gravel, pebbles;
- the resulting voids are filled with clay;
Note. Many craftsmen use the ready-made mixture to fill the pump. Composition of the mixture: clay, quartz sand and brick in a proportion (ratio) of 1:2:2.
- laying tiles begins with the installation of corner elements;
- installation of central tiles. After the first row is laid out, it is necessary to tighten the tiles together with a steel pin. To prevent the tiles from sliding, it is recommended to bend the pin from above. Its lower edge will rest against the tiller;
- tiles in vertical and horizontal rows are connected to each other using steel brackets.
- a soft wire attached to a pin will allow you to connect a row of tiles to a row of stove bricks. The wire is tied to the pin. A loop is formed at its end, which is inserted into the brickwork. For a reliable connection, two wire loops should be tied to each pin.
Note. Hinges for connection with the furnace masonry are installed during the construction of the furnace. Installed in advance, they will interfere with work.
The procedure for attaching the tile is shown in the photo.
Methods of fixing tiles
After the first row has been laid, the seams need to be cleaned. This will help you apply the grout more accurately in the future. And also clean the tiled surface from washing.
Laying subsequent rows of tiles
After the first row is laid, another one is laid out in the same way. After this, the masonry of the stove or fireplace itself is carried out. After several rows of bricks have been laid, the space between them and the tiles is also filled with clay.
Tiling - order - 1
Tiling - order - 2 (legs)
Tiling - order - 3
Covering the stove with tiles - order - 4
Tiling - order - 5
Tiling - order - 6
Covering the stove with tiles - ordering - 7
Covering the stove with tiles - ordering - 8
Covering the stove with tiles - ordering - 9
Installation of tiles - order - 10
Installation of tiles - ordering - 11
Installation of tiles - order - 12
Installation of tiles - order - 13
Installation of tiles - ordering - 14
Cleaning the stove and grouting the joints between tiles
The tiling of the tiled stove is completed by cleaning the surface. To do this, use a soft cloth or paper. The final touch is to seal the seams (grout), if any were allowed during the work process. To grout the joints between the tiles, liquid gypsum dough is used, which is used to lubricate the joint spaces. After 10-15 minutes. After the dough has dried, remove any remaining residue with a soft cloth.
Note. No matter how much you would like to heat the built and lined stove, you should not do this earlier than a week after completing all the work. And even then, the trial fire lasts no more than an hour. A full check can be performed after the clay solution has completely dried - after 3-4 weeks.
Correct laying of tiles
You should think through all the subtleties of using tiles when facing a stove or fireplace at the fireplace design stage. This is due to the fact that the total mass of these products, together with the filled mortar inside each pump, is quite high, which means that the foundation of the fireplace must be solid in order to withstand the future weight of the cladding and avoid possible destruction. That is why we advise you to calculate the weight of the cladding in advance at the fireplace design stage, and if necessary, you can contact specialists so as not to make mistakes in your personal calculations.
The tiles themselves are considered not a cheap material, therefore, in the absence of the necessary skills and knowledge, it is advisable that the cladding be carried out by a professional. If you decide to do the fireplace cladding yourself, try to study and think through all the nuances of the future process in advance.
Why is sorting needed?
Piece production of products leads to the fact that tiles may differ slightly in color and shape. That is why, before directly covering the fireplace, it is advisable to lay out the products on a flat surface and carefully sort them. Use darker and less uniform tiles for cladding the lower part of the fireplace, and use lighter and uniform tiles for the top. If you do not pay attention to the sorting stage, the cladding may turn out sloppy. In any case, if sorting by color can be skipped, then sorting by tile shape is considered an important step in preparation for direct cladding.
Unsuitable tiles are adjusted to size manually with a special tool. A grinder or angle grinder is perfect for this. It is best to use a stone cutting machine, as it can be used to make not only straight cuts on tiles, but even small recesses and corners, if your fireplace has one.
Technology of correct fastening of the product
Most often, tiles are attached to the base of the fireplace with wire, about 5 mm long, “crutches” and staples. The crutch itself is vertically inserted into the horizontal walls of the tiller, and the end of the crutch is specially bent. The already inserted crutch is twisted in the center using a 5 mm wire, which, when laying the next row of tiles, is embedded in the brickwork.
For stronger and more cohesive masonry, horizontal and vertical tiles are additionally secured with U-shaped brackets. This allows the tiles to be pulled together with the minimum allowable gap and hold the entire structure together, which makes it even more durable. Small gaps of 2-3 mm are left between individual tiles in order to hide the remaining protruding ends of the wire crutches in them.
To achieve even greater tightening of the tiles, the master can connect the crutches remaining from the horizontal laying together with additional pieces of wire. He passes it through the bends of adjacent crutches and twists everything together. This allows the structural elements to be connected to each other, and the remaining ends of the wires are simply embedded in the seams between the products.
Competent cladding of the fireplace with tiles
The laying process begins from the bottom corner of the fireplace. At the very beginning, the master sets up all the tiles without mortar to make sure that they fit the shape. Thanks to this, you can ensure that the products fit together correctly. After this, the craftsman disassembles the structure, and before laying it, soaks the tiles in water. This increases the heat resistance of products.
During the cladding process, tile piles are filled with mortar. It consists of clay, which contains fine brick crushed stone. It is best if the additive to the clay is the fragments of the brick that is included in the brickwork of the fireplace, since then the coefficient of thermal expansion of the cladding and the main structure of the fireplace will be the same. It is more competent to use red brick in the mortar, as opposed to yellow, but vice versa due to the expansion coefficient.
At the beginning, the pump is only half filled with solution. After attaching it with crutches, the tiller is completely filled with the solution. The master also carefully fills the empty space between the filled horizontal row pumps with the same solution, and then he carefully levels the surface.
Rows of bricks are laid close to the tiles up to the very top row of tiles. The twisted ends of the remaining wire are sealed when laying the next top rows. After laying one row, the next rows of tiles and brickwork are laid. The whole process cannot be called easy, but the result is worth it, because it’s not for nothing that tiling a fireplace has always been an expensive and fashionable option. It shows the status of the owners of the house and creates a special comfort. Options for beautiful tiles for facing a fireplace can be viewed in our catalog.