Why do you need floor waterproofing?
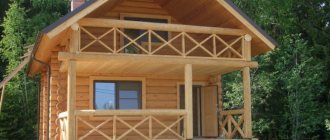
In an apartment, waterproofing is done before installing a wet screed so that water does not leave the cement mortar and the screed dries evenly. In a private house, special attention is paid to waterproofing the basement, garage and first floor. In the basement, waterproofing protects the house from the penetration of groundwater, stormwater, drainage and sewage water. If you made a cesspool incorrectly or built a toilet with a pit instead of a filtration system, then sooner or later the wastewater will reach your home.
Installation of floor vapor barrier in a wooden house: step-by-step instructions
Step 1. If you are laying a vapor barrier under the finished floor, and not during the construction process, you need to remove the floor covering and remove all debris and dirt. The wooden elements of the subfloor are treated with special antiseptic agents - this is necessary to protect against mold and mildew.
Step 1. If you are doing a vapor barrier not during a major renovation, you will have to remove the floor covering
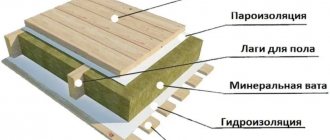
Step 2. The waterproofing is laid, a layer of thermal insulation is placed on top. If these layers are already laid on your floor, this step is therefore skipped.
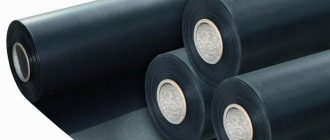
roll waterproofing
Step 2. Before the vapor barrier, hydro- and then thermal insulation is laid
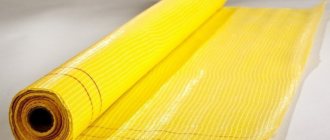
Step 3. Laying vapor barrier. It is very important to place it on the correct side (if you are using a special material and not just plastic wrap). You need to focus on the inscriptions on the material, its smoothness and roughness of the sides. The smooth side always fits against the insulation. When using metallized material, the metallized side must touch the insulation. Polypropylene, which has a one-sided lamination, is also laid with the smooth side down. And if you are using a three-layer film with a reinforcing mesh, you need to lay it so that the denser side touches the insulation.
Step 3. Lay a vapor barrier. The film, as mentioned earlier, must be laid correctly
How to fix it? As we said earlier, this can be done using special tapes and/or a construction stapler. Do not forget about overlaps of 20-30 cm. You need to try to fix the film as best as possible, in several places, but at the same time it should not be stretched - this can lead to damage.
Step 4. It is recommended to make a counter-lattice so that there is a gap between the vapor barrier and the finished floor. After this, you can lay the floor covering.
Step 4. The counter-lattice will allow you to leave a gap between the finished floor and the vapor barrier layer
Main types of waterproofing
According to regulatory documents and work practice, the following types of floor waterproofing are possible:
- Waterproofing by pasting with rolled materials;
- Painting floor waterproofing;
- Waterproofing is monolithic;
- Plaster waterproofing;
- Impregnation waterproofing of porous surfaces;
- Backfill waterproofing.
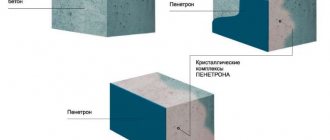
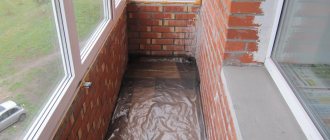
In practice, for installing floors in apartments and private houses, roll waterproofing , including simple flooring of polyethylene film for floating screeds, and painting waterproofing with liquid polymer mastics. Less commonly, monolithic waterproofing is made from waterproof solutions or mastics based on bitumen (asphalt). For concrete floors, liquid penetrating waterproofing with penetron and penecrete compounds is becoming popular.
Laying options
Among the rolled waterproofing materials, the following types are distinguished:
- lining (bitumen-polymer, polymer and polyester) materials that do not require the use of adhesives;
- film coatings glued to the primed base with special mastics and adhesives;
- weldable materials based on mastic.
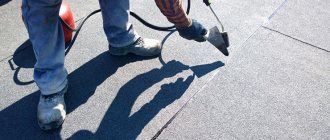
Fusing waterproofing
Depending on the chosen coating, the method of performing the work may be one of the following:
- flooring (used mainly on wooden bases);
Waterproofing flooring - gluing (universal installation method);
- fusing (ideal for concrete floors).
Some installation methods require compliance with safety measures, fire regulations and constant ventilation of the work area. Craftsmen recommend carrying out installation work in dry, warm and windless weather.
Video - Waterproofing. Types and applications
Polymer mastics for waterproofing
Polymer mastics are used in paint waterproofing.
1. In small apartment spaces, liquid polymer mastics are the most popular waterproofing agent. Its popularity is determined by its ease of use.
2. Mastic is sold ready-made, in buckets. The consistency is similar to thick jelly. Such mastics are produced from polymers diluted with water. The polymers used are polyurethanes, rubber, acrylic, butadiene styrene, etc.
3. They are applied to almost any surface: concrete, cement screeds and plasters, gypsum fiber boards, Knauf superfloor, etc.
4. Liquid mastics are applied to a dry, dust-free surface with a brush or roller. A minimum of two coats is recommended. The mastic dries in 12-14 hours. After drying, a waterproofing layer resembling rubber is formed. To avoid omissions, in isolation, mastics are made colored, usually blue or light green.
5. The relative disadvantage of such mastics is their high price.
Painting waterproofing technology
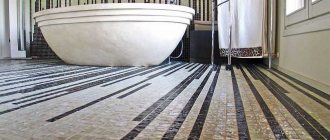
The surface that needs to be treated, usually all the joints of the walls and floors in the room, must be cleaned of grease and paint. The surface on which the mastic will be applied is primed with a deep penetration primer (do not confuse it with a surface primer, it will cover the surface and the mastic will not penetrate the surface).
After the primer has dried, mastic is applied. The mastic is applied with a brush or narrow roller. It is important to coat the entire surface without gaps. In the bathroom, the floor and 20 cm of walls plus all corners are covered with mastic. In the room in which the screed will be installed, only the corners and joints of the floor and walls are covered. There should be no gaps in the surface not coated with mastic. It is better to apply mastic twice, this is guaranteed to provide waterproofing.
Types of materials for waterproofing
The main two types of waterproofing materials are:
- Rolled (such as roofing felt and its type);
- Coatings (various types of mastics, liquid water-repellent mixtures based on bitumen).
- Liquid mixtures
- Dry type waterproofing materials
- Sprayed waterproofing
The most affordable and popular are the first two types - roll and spreadable; they are widely used both in interior decoration and in capital construction. Each of the listed varieties has its own advantages and disadvantages, which we will discuss below in the article.
Coating waterproofing
Coating waterproofing is a bitumen-based liquid composition that is suitable for both external and internal protective finishing. These include ordinary bitumen mastic, which may contain various polymer resins, rubber and plasticizers.
The advantages of waterproofing mastics are
- ease of use (applied in a thin, uniform layer and does not require experience)
- budget cost (one of the most economical ways to perform waterproofing)
- interacts well with porous materials (the liquid composition of mastics firmly adheres to concrete, stone and wooden rough coatings, deeply fills the pores, providing deep protection from moisture)
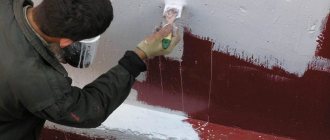
waterproofing the floor with acrylic mastic
The disadvantages of bitumen (liquid) waterproofing include:
- short service life. When used for external treatment of a floor or foundation, under the influence of seasonal temperature changes, the bitumen layer begins to lose elasticity and crack, therefore this material, as a method of external protection from moisture, is losing its popularity. For internal protection, especially in an apartment building, bitumen mastic will last much longer, since it is not susceptible to strong temperature changes.
coating waterproofing, bitumen mastic
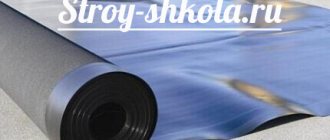
Roll waterproofing
They are dry materials combined from special fiberglass or cardboard impregnated with bitumen resins, polymer materials and plasticizers. Such materials are often made with self-adhesive bases, which greatly facilitates the installation process. The greater thickness, unlike liquid bitumen, provides better thermal protection, in addition to waterproofing. It is also an affordable material in the price category, used for both external and internal protection.
Rolled waterproofing for indoor floors
The disadvantages include the fact that
- Laying is carried out only on a prepared, leveled surface, in contrast to liquid materials.
- Does not fill the pores of the rough material and does not penetrate into it.
- Poor resistance to mechanical damage. Through damage to the cast layer of rolled material during installation work will lead to moisture penetration through this place. Therefore, installation should be taken responsibly. Repairing such damage does not always lead to restoration of waterproofing properties.
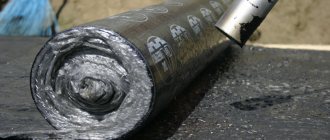
roof waterproofing with rolled roofing felt on a bitumen basis
Self-leveling, liquid mixtures for waterproofing
These are materials with a latex-bitumen base containing additional plasticizers. It is a relatively new material, used for finishing flooring and roofing. It is a viscous, waterproof mixture, which, after installation, hardens quite quickly, forming a solid, cast layer. These materials include liquid rubber and cement mixtures.
liquid waterproofing in the bathroom
The advantages of bulk mixtures include:
- Deep penetration into the pores of the rough ceiling
- Firmness and elasticity
- No seams
- High resistance to mechanical damage
- Durability. Some manufacturers claim that the service life of such waterproofing is unlimited.
- Resistance to temperature changes, seasons and ultraviolet radiation.
- Convenient and simple installation
- Can be applied to any surface
liquid rubber after hardening
The negative aspects include:
- Installation cost. The high cost of work is associated with the need to use expensive equipment, which not every builder can afford to use.
- Difficult to dismantle. It will not be possible to remove self-leveling waterproofing quickly and without partial damage to the subfloor, due to its deep penetration into the base of the floor.
- Instability to petroleum-based technical solvents. Substances such as gasoline, white spirit, etc. alcohol and the like, upon short contact with self-leveling waterproofing, corrode its structure, creating pockets for liquid penetration.
dismantling liquid waterproofing is a very labor-intensive job
Dry type waterproofing materials
They are materials of a homogeneous mass of powder type with the addition of sand or synthetic fibers, as well as chemically active elements that react with concrete and other bases on which waterproofing is installed. Rubber and rubber may be added. There are several types of dry waterproofing depending on the purpose, these are: penetrating solutions, plaster-type mixtures, coating mixtures for rough, external surfaces and the fourth type of dry-type backfill waterproofing, which is used to protect the underground part of buildings.
waterproofing based on dry mixture
The advantages of such mixtures are:
- The ability to penetrate into the structure of the subfloor and gain strength in it. This creates a reliable water-repellent layer both inside the subfloor and on its surface.
- Easy to install and apply
- Maintains vapor permeability
- Does not peel off or burst near places of mechanical damage. Retains its properties.
- No seams
The disadvantages of dry mixtures include:
- Fragility. On average, the effective service life varies from 10 to 15 years, which is a relatively short period of time if you use dry waterproofing to protect closed house structures. Therefore, this variety is more suitable for indoor flooring.
- Great cost. Regarding budget bitumen coatings. This cost is due to the expensive composition of the mixtures, which may include various types of plasticizers, thickeners, polymers and other industrial developments of modern construction.
- Some varieties, such as bulk dry mixtures, are not resistant to vibration, which significantly affects the waterproofing properties of the material.
waterproofing based on dry mixture
Sprayed waterproofing
This type includes protective compositions consisting of two basic components, one of which is a catalyst that accelerates the hardening reaction and interaction with the rough surface, and the second component is a directly waterproof liquid component - rubber, bitumen- or rubber-based polymers.
The scope of use of sprayed waterproofing is comprehensive; it is often used for repairing and covering roofs, used for treating foundations, in industrial construction and for internal repair work.
sprayed roof waterproofing
The advantages include:
- Fast installation and curing speed
- No coating seams and elasticity
- Quite a long protection period, from 20 years
- Temperature resistant and lightweight
- Applies and adheres to any surface
The disadvantages are:
- Poor resistance to chemical solvents when exposed to them for long periods of time
- Dismantling is labor-intensive, since the composition penetrates deep into the structure of the base being treated, which makes it almost impossible to remove the waterproofing without damaging its surface.
sprayed waterproofing in the bathroom
Waterproofing floors with polymer-cement dry mixtures
This type of waterproofing refers to plaster waterproofing. Polymer-cement dry mixtures are a construction mixture that contains cement and polymer additives. Usually this is a one-component mixture, which is prepared by diluting with water.
In essence, it is a plaster solution with a high elasticity of the solution, which, after hardening, does not allow moisture to pass through. Typically, such polymer mixtures are used to plaster the walls of bathrooms and toilets and walls “facing” the street.
Plaster waterproofing technology
Dry mixtures are applied to the corners of the room for waterproofing. Waterproofing areas are cleaned with a wire brush. The concrete surface is moistened. A creamy solution is prepared, which is used to coat the corners throughout the room. The second layer is applied no later than 6 hours later. The general technology is described here; read the features of each mixture on the packaging of the purchased mixture.
Stage 3. Preparation of the insulating coating
If a sticky-based coating is used as a waterproofing material, then it must be brought into the room in which the work will be carried out and left for a day.
Other types of waterproofing need to be unrolled along their length and the panels should be left in this state for 24 hours. If the area of the room is too small, then before starting work you simply need to roll the material onto the other side or cut it into pieces of the required length. The resulting blanks should be wiped with solar oil to increase the elasticity of the material and remove excess industrial mineral sand, which will help avoid swelling during installation or pasting.
Video - Laying roll waterproofing. In detail
Rolled insulation materials
Rolled insulation materials can be called a traditional material. In apartment renovations, they have found wide application in the construction of cement-sand screeds. Here it is necessary to distinguish between roll insulation materials according to the installation method. The division here is simple, some materials are glued, that is, they have an adhesive edge, other materials need to be fused, that is, they are held together with a gas torch.
Waterproofing floors with roll materials - technology
The concrete floor must be cleaned of dirt and dust. There should be no construction debris on the surface. (It may damage the insulator.) Self-adhesive roll material is laid in strips with an overlap equal to the width of the edge with glue. An overlap of 15-20 cm is made on the walls.
That's all! Let me remind you that waterproofing the floor is mandatory in the bathroom and other “wet” rooms, at the joints of the floor and walls in rooms when installing self-leveling floors and screeds. Waterproofing with roll materials is required when installing a cement-sand screed. In some cases, the rolled waterproofing material is replaced with polyethylene film.
Other articles in the section: Floor preparation
- Concrete contact in preparing the floor for screed
- DIY floor waterproofing
- Floor primer
- How concrete floors are sanded and why it is needed
- Preparing the base for linoleum
- Preparing the base for self-leveling floors
- Preparation for parquet flooring
- Preparing the floor for water heated floors
- Do-it-yourself floor preparation for laminate flooring
- Preparing the floor for cement-sand screed
- Checking the floor for clearance
Instructions for installing waterproofing on a wooden base in a bathroom
When carrying out work, we are guided by a certain procedure, which allows us to achieve the best result of waterproofing the bathroom floor. Let's take a closer look at each of the stages.
Materials and tools
To perform installation we use the following:
- waterproofing material;
- sealant for sealing cracks and voids;
- means to protect wood from moisture and dampness (if installed on a wooden floor);
- fire retardant;
- wood primer;
- rubber or caoutchouc.
You will also need a tape measure, a vacuum cleaner, a knife, brushes, spatulas and much more.
Flow calculation
To calculate the insulation consumption, a special formula is used: the area of the bathroom must be multiplied by the required amount of substance per square meter and the number of layers. This is only an approximate volume and may change during the process.
For example, if you use impregnating material, you will need about a kilogram of substance per square meter. On average, it takes from one to three kilograms per square. The calculation of the amount of rolled material is more accurate: 20 cm on the walls and 10 cm overlap.
Preparatory work
The first step is to prepare the flooring for coating. First, the floor is cleaned of dirt and dust, and the boards are checked for damage. If necessary, our installers carry out floor repairs. All holes are sealed with sealant.
The walls and floor are coated with impregnation to protect against fire, after which a primer is applied. When everything is dry, we seal the joints with waterproofing tape and seal the areas with pipe joints.
Selecting the type of insulation
Now we proceed to selecting the insulation material according to the type of flooring. In any case, you can’t do without a screed.
We do not recommend using rolled products for wooden floors, as they do not adhere well. And for linoleum you can use all types. Penetrating is used only for concrete.
Insulation technology
Most often, our clients ask to install waterproofing under tiles or linoleum, as these are the most affordable and popular materials. They are resistant to moisture and have a long service life. Let's take a closer look at the installation features for each floor covering separately.
Under tiles
To lay tiles in the bathroom, you must rely on SNiP, which states that the adhesive must firmly adhere the material to the base of the floor. In this case, it is better to use plastering materials without bitumen, and you can also use a coating agent.
The work order is as follows:
- apply the insulator with a brush to the floor and lower part of the walls;
- wait until the material dries;
- re-process the corners and joints for greater reliability;
- apply a second coat if necessary;
- Sprinkle the layer, without waiting for it to dry, with sand at a rate of one and a half kilograms per square.
Now we proceed to laying the tiles in the usual way with a neat and high-quality seam.
Under linoleum
Linoleum is a cheap and easy-to-install material available in a wide range of colors and textures. It is used as a floor covering for the bathroom, as it does not allow moisture to pass through. But if there is excessive dampness, linoleum can swell, so you need to use a waterproofing layer.
The material can be laid on both wooden and concrete floors. In the first case, it is better to use coating or roll waterproofing materials. Let's look at laying the rolls.
- Calculation of the amount of insulator required. The consumption is taken into account not only on the floor, but also on the walls. Strips of rolled material are cut into strips along the entire length in accordance with the parameters of the room. We recommend adding approximately 10 centimeters of reserve.
- The cut strips are laid out on the surface of the flooring. They need to be left for about a day so that they take an even horizontal position. The strips are then folded at both ends to create two rolls. Now you need to lay them on the floor.
- Cutting a shelf with a knife. When rolling, you need to remove the film with a gentle movement. The canvas must be tightly applied to the surface and pressed for better adhesion. Don’t hesitate, otherwise air will get in and the bubbles will have to be pierced, and this will affect the tightness (to avoid this, our installers recommend rubbing the hole well).
- For a tighter adhesion, we press the canvases with a roller.
- The operation is repeated with each part. Each canvas overlaps the previous one.
Be sure to stick the roll on the walls for about half a meter so that water does not accumulate in the corners and baseboards.