To heat water in dachas or apartments, flow-through or storage devices with an electric heating element are used. Before turning on the water heater, it is necessary to connect the water supply pipes and make sure that the circuit is tight. The work is carried out by the owner himself; you can get advice on installation and purchase equipment in the online store (Tyumen).
In apartments, flow-through or storage devices with an electric heating element are used to heat water.
Electrical connection
To switch the boiler to the power supply, a separate circuit is used, equipped with an automatic fuse and a protection device. The cross-section and length of the cable are selected in accordance with the power consumption; a grounding conductor should be provided with a connection to the general circuit of the house.
The rating of the machine must correspond to the energy consumption of the equipment (for example, with a power of 3.5 kW, a device rated for a current of 16 A will be required). The socket must have a housing protected from moisture and dust in accordance with a standard of at least IP44.
When choosing a location for installing an outlet, it is necessary to take into account the radius of spray from water distribution points. Boilers are equipped with power cables with 3 stranded wires with a cross-section of 1.5 mm², covered with a double layer of elastic insulation. There is a point for grounding switching inside the terminal box; information about the location of the element is indicated by the manufacturer in the instructions. It is strictly forbidden to use extension cords or tees for connection, or to connect the ground wire to metal water or gas pipes.
System check algorithm
To test equipment mounted on a wall or floor, you must:
- supply cold water under pressure to identify and eliminate leaks;
- make sure that the product is connected correctly to the household electrical network;
- test the operation and make sure there are no leaks or spontaneous premature shutdown;
- turn on the device again to check the liquid temperature.
Starting water supply
Turning on the water heater begins with checking the tightness of the joints of the water pipes and the supply tank. To test, you will need to open the cold liquid supply tap and the mixer valve. Small drops of water are not allowed to appear at the joints of pipes or from under the casing of the device. If a leak appears from the housing, the equipment must be changed; warranty and post-warranty service or repair of heating devices is provided.
If water is supplied to the heater from a well or well, then a coarse filter must be provided in the main line. Even short-term operation of equipment on dirty liquid is not recommended. The mesh allows you to separate large particles of dirt that settle on the surface of the tank and the body of the heating element. Deposits lead to corrosion or local overheating and serve as grounds for refusal of warranty repairs.
Before starting the water supply, it is necessary to check the tightness of the joints of the water pipes and the supply tank.
System diagnostics
After checking the tightness of the water supply circuit, the electrical wiring is tested. If the boiler is connected without a socket, you should make sure that the phase and neutral wires are in the correct position, and then tighten the fastening screws. It is also necessary to check that the packet switch is connected correctly. To carry out the test, you need an indicator screwdriver or a digital device operating in voltmeter or circuit test mode.
Water heater parameters
At the parameter checking stage you must:
- Fill the tank with water and turn on the heater in different power modes.
- Rotate the regulator and press the buttons to check the functionality of the equipment.
- Open the mixer valves and make sure that heated liquid is supplied. If the house has a multi-channel water supply system, it is recommended to check the operation of each distribution point.
- Turn off the power and re-inspect the piping and housing.
Re-check functionality
During the secondary check of the equipment, it is necessary to determine the temperature of the water in the cold water supply system (with a household thermometer or thermocouple connected to a multimeter). Turn on the power and set the operating mode, and after 10-15 minutes, re-measure the water temperature at the outlet of the mixer.
Additional control is carried out after turning off the heating element; some owners check the heating time of the liquid for compliance with the passport data.
When testing equipment in winter, users experience a drop in outlet water temperature or an increase in heating time. The reason is the cold liquid, which cools in reservoirs and when supplied through pipes to a residential building. In warm weather or when the hot water supply is turned off, a drop in pressure may occur. In this case, you should check the tightness of the shut-off valve. When cracks form, part of the liquid goes into the empty mains of the central water supply.
Point 1 - installation of the boiler
Before giving advice on installation, let’s decide where it is best to install the boiler. Standard options: above the bathtub or toilet, just on the bathroom wall, as well as in the kitchen. But the last option is not always suitable; there are plenty of other household assistants out there. Therefore, we will focus on the penultimate two options.
When installing, do not forget that the mounting location also depends on the shape of the water heater (thin, cylindrical, rectangular).
Many people are interested in whether it is possible to hang a boiler above the bathroom. This option is acceptable and even popular. It’s not that it’s very convenient: taking a shower is not so comfortable, and splashes constantly fly onto the equipment. But if the boiler starts to leak, there is no risk of flooding the neighbors - all the water will flow into the bathroom. It’s even somehow scary to install it above the toilet. Not the best option to sit under such a rather large container.
A niche option would solve many problems. This is much safer; The equipment is covered and more space is freed up. Of course, if the conditions allow making a niche or one is already provided.
If you prefer to cope on your own, then do not ignore basic safety rules. When installing the boiler yourself, turn off the electricity and turn off the water supply to the room.
You should not deviate from the technical description during the entire process. Some are sure that a vertical boiler can be hung horizontally. The water heater must be installed strictly according to the manufacturer's instructions. We don’t argue, there are universal options - install either vertically or horizontally.
If you install a vertical tank horizontally, its heating element will be “in the air”, the heating element will overheat and will have to be replaced. Therefore, everything is strictly according to the factory settings, and even more thoughtfully - immediately buy a boiler that fits the chosen installation location - you will save time, money, and nerves.
Also, the installation of the water heater depends on the chosen mounting location. Are you deciding how to hang the boiler on drywall? We hasten to clarify that the plane on which such a load will be attached must withstand double weight. For example, if the volume of the unit is 50 liters, then the load will already be 100 kg.
It is possible to mount the boiler on drywall, but before doing this, be sure to prepare everything. Previously, thicker sheets are placed in the place where they plan to install the water heater. Or install wooden or metal reinforcement. They also use a fastening method where a chemical anchor is needed. But it is preferable to choose a surface that is stronger and more reliable.
You will need:
- screwdrivers;
- 2 flexible hoses (about 2 meters each);
- 2 dowel nails (there will be a hook at the end);
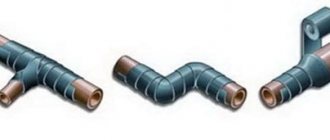
- flax for plumbing work or tape (special sealing);
- hammer drill or electric drill;
- key;
- special scissors (if you don’t have them, you can also take pruning shears);
- drills with a pobedit tip (suitable for brick walls) / feather drills (especially for ceramics);
- a simple pencil;
- roulette;
- and so on (if necessary).
So, let's mount the boiler correctly: we start from the bottom mark. We make the necessary mark with a pencil, then measure to the fastening bar. Let's make a note again.
You need to drill two holes and insert anchors there. They are hooked onto the edges of the fastening strip. When drilling, take into account what the wall is made of. If it is made of brick, concrete or wood, then a Victory drill will do. In the case of a wooden base, you can generally use a wood drill. Feathers - for ceramics.
Dowels are inserted into two drilled holes, and then the anchors are screwed in. Standard depth: 10-12 cm. All preliminary manipulations have been carried out - now you need to carefully hang the boiler. Here you can call someone for backup.
We have already written about what are the main boiler malfunctions?
Water heater startup sequence
Algorithm of actions when starting a water heater:
- Open the valve supplying water to the heat exchanger (the tap head is marked blue or light blue).
- Wait the few minutes necessary to fill the tank (the filling speed depends on the capacity of the tank and the pressure in the water supply line).
- Unscrew the heated water supply valve, and then turn the hot water tap lever on the mixer. Wait until the air stops escaping until the cold water starts flowing without interruptions or bubbles.
- Close the mixer tap and turn on the power (using the packet switch in the distribution panel or inserting the plug into the socket).
- Check the position of the heating system safety valve (if equipped). If the element is in the triggered position (for example, when the equipment was delivered from the factory), then you need to press the key or move the toggle switch.
- Turn on the unit by pressing the button or turning the temperature control knob (depending on the manufacturer).
- Select the required operating mode and heat the water. If during operation the equipment spontaneously switches off or the automatic switch in the control panel is triggered, then the reason should be found out.
- Check the supply of liquid through the mixer taps and the timely operation of the heater as the supply of hot liquid from the tank is consumed.
- Turn off the power and inspect the water supply pipes and connections; when heated, the materials expand and may allow water to pass through. If drops of water are detected, tighten the nuts or install new gaskets.
If the boiler is installed in an apartment with hot water supply, then for commissioning it is necessary:
- Shut off the hot water supply to the apartment using the shut-off valve, and then drain the heated liquid from the pipes through the mixer.
- Supply cold water to the storage tank, clean the pipes from air (similar to the procedure described above).
- Turn on the power and set the required operating mode. A device connected according to a similar scheme is used in the event of a stoppage of centralized hot water supply (for example, due to seasonal or emergency work on water pipelines). After turning off the equipment, it is necessary to drain the remaining water from the tank, otherwise, during prolonged inactivity, a layer of salt will form on the walls and heating element, which impairs heat transfer and shortens the life of the boiler.
Point 2 - connection and grounding
We've finished hanging the boiler, now we're moving on to the next stage - connecting to the water supply. Let us remember the two hoses that are on the list of necessities (they must be flexible). This, of course, is not the only option. Others are also used: metal-plastic or polypropylene pipes. The only caveat here is that the cost is higher and it takes longer to work around.
Regardless of the type of connection, there is an algorithm for how to properly connect the boiler:
- We find 2 hoses or pipes at the bottom: with a blue ring - cold comes in, with a red ring - hot comes out.
- Where cold water is supplied, we put the faucet on the fuse (either included in the kit, or purchased separately). Before screwing in the tap, you need to wrap fum tape or tow around the threads.
- We attach a hose to the safety valve at one end. The other end goes to the tube from which hot water is supplied.
- On the opposite side we connect: to the water supply - cold, and to the mixer - hot.
So as not to be tormented by the question of how high the socket for the boiler should be, we recommend installing a grounded socket at a close distance, about half a meter.
It’s good when the boiler’s connection cable already has a relay fuse installed. Otherwise, you will have to buy separately. After all, no one is immune from power surges, and if a boiler breaks down, a new purchase and re-installation will be necessary.
It is important to ground the boiler: without it, there is a risk of the boiler catching fire, and a person may receive a serious electric shock. Let's look at ways to ground a boiler:
- primitive - a wire connection between the boiler body and the metal part of the structure that goes underground;
- a more competent option (recommended) is a socket with contacts for grounding (about a meter from the floor, half a meter from the boiler). And the grounding conductor is shorted to “minus” as close as possible to the shield;
- to ground a boiler in a country house, use conductors and circuits. If they are not there, then you will have to mount and dig in a grounding frame near the switchboard (receives and distributes electricity if the voltage is less than 1000 V).
If necessary, the boiler is connected to both the shower cabin and the heated towel rail. This is most often done in the summer, when the central heating is turned off. In this case, you need to unscrew the necessary valves and disconnect the devices from the riser, and then you need to power them into the network between the water heater and the tap. You can connect a heated floor in the same way.
After all installation work, do not forget to set the temperature using the regulator (usually located at the bottom of the boiler).
Read the material: What is important to know about boilers: something that was a secret to many
Features of starting water heaters from well-known manufacturers
Regardless of the manufacturer, the commissioning procedure consists of the following steps:
- power up;
- power mode selection;
- water temperature settings.
Electrolux equipment
Start-up algorithm for storage type heaters of the Electrolux brand:
- Insert the plug into the socket or move the package switch lever to the position of closing the power circuit.
- Press the activation button on the case and wait for the indication to appear on the display.
- Using the keys, set the power of the device and the outlet water temperature.
- Confirm the changes made to the settings and begin operating the boiler.
Electrolux water heater.
Water heater Ariston
The start-up procedure consists of the following steps:
- Turn on the power and then press the start key.
- Use the buttons to set the heating temperature. During the adjustment process, the heating degree indicators are constantly on, other LEDs should flash.
- Confirm the changes, the equipment will begin to warm up the water. When the liquid is consumed or naturally cools down, the heating element turns on automatically, and light indicators flash on the control panel, indicating the number of degrees by which the water needs to be heated. The equipment is equipped with memory; when turned on again, no adjustment is required (except in cases where water with an increased temperature is required).
On some boiler models, the power of the heating element must be adjusted; mode selection is carried out using separate buttons. The company produces boilers with support for additional functions (for example, a programmable operating time interval).
If there is an antibacterial mode, the device automatically heats the liquid to a high temperature, which destroys bacteria that multiply in warm water. The setting method depends on the type of control panel; information is provided in the operating instructions.
Ariston brand equipment supports self-diagnosis mode. When faults are detected, the indicators on the control panel flash. The owner can press the start button to reboot or turn on the diagnostic mode with error codes broadcast by warning lamps. The check allows you to determine the breakdown of the electronics, temperature sensor, anode (if equipped), and heating coils. When there is no water in the tank, the equipment displays an error, preventing power from turning on and damaging components.
Thermex device
If the equipment is equipped with a mechanical control panel, then start-up is done using keys (each of the toggle switches turns on a separate heating element, regulating the heating power). To select the water temperature, turn the knob to the required position. When the regulator is rotated counterclockwise until it stops, the limit switch is activated, breaking the power circuit.
To configure Thermex models with an electronic unit and display, you must:
- Press the power button and wait until the heating temperatures and water in the tank are displayed.
- Using the buttons, select the degree of heating of the liquid (in 5°C steps) and adjust the power using the Power Selector key. The operating mode is displayed on the control indicator panel.
Thermex water heater.
Heating mode selection
Regardless of the type of heater, it is recommended to set the operating temperature to at least +40°C. When the setting is reduced, mold forms in the tank and bacteria multiply, which causes an unpleasant odor from the water. To eliminate the defect, you will need to flush the tank with an antiseptic solution. For periodic disinfection, it is necessary to turn on the boiler weekly at maximum temperature, which allows the tank to be cleaned.
For instantaneous water heater
A flow-through heater is not demanding on environmental conditions, but performance depends on the pressure and temperature of the water. After setting up and turning on the power, the equipment is ready for use. The user can adjust the degree of water heating with the mixer valve; by reducing the flow rate, it is possible to achieve an increase in temperature.
For storage device
The equipment is designed for operation at an ambient temperature not lower than +5°C, so turning on boilers in winter in houses without a heating system is not allowed. Before starting, it is necessary to check the presence of pressure in the line and tank. Some users install power stabilizers to prevent damage to electronics due to voltage surges.
Rules for using the device
If you follow all the conditions for proper operation, you can extend the life of the boiler for many years. Therefore, read carefully and use the following recommendations:
- Do not turn off the boiler at night, as this will wear it out faster.
- Before connecting it, check the presence of water. If it is missing, the device will break down.
- Clean the tank every year to descale it and check for rust.
- Monitor the anode and its performance.
- Check flow devices to ensure that the water pressure is strong.
- Turn off the boiler as soon as water appears from the city system.
The lifespan of a heater depends not only on the manufacturer and the quality of the equipment, but also on installation, proper use and regular maintenance.
Subscribe to TechnoCouncil on social networks so you don’t miss anything:
Possible malfunctions when turning on
Common breakdowns during equipment operation:
- failure or incorrect operation of the temperature sensor;
- liquid leaking from the drain valve fitting when the heating element is turned off;
- failure of the water heating system due to incorrect connection or breakdown.
Thermometer not working
The design of the boilers includes a temperature sensor that controls the operation of the heating element and allows maintaining the specified heating parameters. If scale or dirt gets on the sensitive element, normal operation is disrupted.
The water is heated above the set parameter or has insufficient temperature. It is recommended to repair the equipment in a specialized service center.
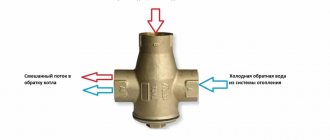
Safety valve leaking
The valve allows you to compensate for the thermal expansion of water; the fuse fitting is connected to the sewer drain with a flexible hose. If liquid flows when the equipment is turned off, you should check the pressure in the water supply system. If the pressure exceeds 4 bar, it is recommended to install a pressure reducing valve. If the pressure meets the standards, you should check the fuse; the cause of the leak is a damaged or lost elasticity spring.
Water heater does not turn on
If, when you try to turn on the heating element, it does not warm up and the control indicator does not light up, you need to check the correct connection and the automatic fuse. If the control lamp is on, you must adjust the temperature correctly by rotating the knob. An additional reason is that the thermal fuse has tripped; it is necessary to return the bimetallic strip to its original position. To restore functionality, you will need to press the button located at the bottom of the case.