Consequences of improper waterproofing
Groundwater that comes close to the soil during floods, heavy rains or snowmelt causes damage to buildings in low-lying areas. When leaking, the structure experiences a number of risks:
- the basement is filled with damp air, which reduces the quality of preservation of vegetables and preservation, and corrosion of metal parts occurs;
- mold and mildew form, wooden elements rot, toxic substances are released;
- the strength of the structure is compromised, and a large number of cracks and local sources of destruction lead to the destruction of the building.
The water that appears in the cellar affects the surfaces of the walls and floors in two ways. Pressure occurs when soil moisture rises above the floor, and non-pressure occurs when water is at the bottom of the covering. To maintain the strength of a private house with a basement, it is necessary to waterproof it.
How to waterproof a basement from the inside
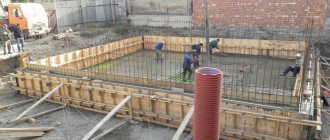
All issues regarding waterproofing the basement from the inside from groundwater are resolved at the stage of planning and laying the foundation. To avoid mistakes, it is necessary to choose the right material, taking into account all technical, climatic, hydrogeological conditions, and also consistently carry out the installation process. The full range of internal work on basement waterproofing is shown in the video:
Required Tools
The set of equipment for internal waterproofing is determined by the type of material used. In any case, the work will require tools for cleaning the surface, priming and sealing seams. The set includes:
- electric drill;
- perforator;
- construction knife;
- brushes;
- containers for mixtures;
- spray;
- putty knife;
- Master OK;
- metal brush;
- paint roller;
- blowtorch;
- construction mixer;
- heat gun.
When working with some types of materials, you will need protective clothing.
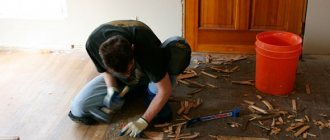
Preparing the basement and surface areas
Before starting work on internal waterproofing, it is necessary to determine from which places moisture enters the basement. Special attention is paid to these areas when sealing. It is only possible to find problem points in an empty cellar, so if there is liquid in it, it is pumped out and the room is dried. To speed up the process, you can use a heat gun.
After this, they begin to prepare the surfaces of the basement: remove dirt and repair cracks. The old mortar is removed from the cracked seams and they are buried at least 5 cm. If the walls in the cellar are made of wood, then they are sanded with sandpaper. Processing of the foundation and walls begins with the borders of abutting surfaces: the joints of walls, floors, and ceilings. Particular attention is paid to the corners. From these areas they move onto flat areas.
Padding
The prepared surfaces are treated with a fungicidal solution to protect the cellar from mold. After the walls and floor have dried, a deep penetration hydrophobic primer is applied. For better adhesion, the base is primed twice, allowing each layer to dry. Liquid solutions are sprayed with a spray bottle or coated with a wide brush.
Sealing seams and cracks
The joint between horizontal and vertical surfaces, seams and cracks are potential “gates” for water penetration. In order for the waterproofing material to cover the area of the basement without defects, these vulnerable spots are sealed. A sand-cement mixture is suitable for internal sealing. When waterproofing the basement, attention should also be paid to the staircases leading to the basement. They also check and seal seams and cracks.
Waterproofing walls and floors
The technology for creating a waterproof layer depends on the selected material. For concrete substrates, a bituminous or penetrating coating is best. Bitumen is applied in two or three layers after pre-wetting the surface. If the plans include further plastering, then it is recommended to add liquid glass to the bitumen mastic. This increases the effectiveness of waterproofing the basement from the inside.
The rolled material is glued to bitumen mastic. The tapes are laid out overlapping, and the joint is melted with a blowtorch. Any waterproofing is given time to dry completely naturally. If the basement in a private or apartment building is planned to be used not only for technical purposes, then thermal insulation material is laid on top of the waterproofing layer. Next comes pouring the concrete floor.
In a new house, in order to avoid destruction of walls due to shrinkage, a reinforcing mesh is installed before waterproofing.
We are planning work to eliminate leaks
To get rid of water in the cellar, you should protect the interior and exterior of the building. You need to start with planning:
- the process of processing joints of walls and floors, walls and ceilings;
- applying working seams to concrete or formwork;
- isolation of communication systems;
- eliminating cracks and fractures that appeared as a result of shrinkage.
After checking the condition of the room, you need to decide on the material to insulate it.
Coating waterproofing
This is a broad category of materials that can be used both cold and hot.
- mastics;
- bitumen based;
- polyurethane based;
- cement-based - popular waterproofing, which is often used together with penetrating;
- polymers.
Pasted waterproofing
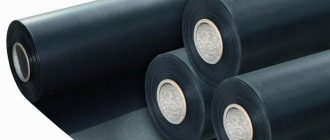
Category of roll materials. These include: roofing felt, glass roofing felt, stekloizol, glass felt, hydrobutyl, hydrostekloizol and others. These options are in no way compatible with the materials of the Penetron complex.
Regulatory requirements for waterproofing
The process of insulating underground premises, including basements, is regulated by SNiP 2.03.11-85:
- thoroughly priming the area and gluing strips of waterproofing 2 cm thick to the corners;
- mandatory surface preparation - cracks are sealed, concrete sagging is cut down, rust is removed, dirt is cleaned;
- checking the humidity of concrete surfaces before processing them - it should be equal to 4%.
The document also indicates: the main types of materials, how the technology of events is correctly implemented.
Basic options for protecting the basement from dampness
Check the intensity of moisture penetration inside and whether there is water in the room. Depending on the moisture level, the following waterproofing coating options will be relevant:
- anti-pressure is indicated when groundwater approaches the foundation at 10 m, and the foundation itself is not isolated from the outside and there is no drainage connected to it. The technique is based on pressing rubber or rolled material against the wall, but is effective at the initial stage of construction;
- You can get rid of the destruction of the damp base using the anti-capillary method. It is necessary to lay waterproof fabrics inside the basement;
- a non-pressure type of insulation, made as protection against temporary flooding, will prevent water from standing in the room. Bitumen is used as the material.
Each method of insulating the foundation and basement requires the correct choice of material.
Types of groundwater waterproofing for basements
Depending on the design features of the foundation, the following types of waterproofing coatings are distinguished:
- Vertical. This type of waterproofing from the inside is used if the basement is located below the groundwater level or there is no drainage system near the house. The material used to protect against moisture is laid along the walls.
- Horizontal. This type of basement protection is used when clay soil prevents the penetration of moisture.
Attention: it is recommended to combine vertical and horizontal waterproofing, as the level of groundwater may change.
Depending on the degree of exposure to moisture on the structural elements of the building, the following types of insulation are distinguished:
- Anti-pressure. It is used when the groundwater pressure exceeds 10 meters and in the absence of an external protective layer and drainage system. The method involves the use of strong waterproofing materials (membrane, rubber, roll seals). Basically, pressure protection is mounted on the outside of the foundation.
- Drip. This basement waterproofing technique involves installing a material that prevents small amounts of moisture from penetrating.
- Non-pressure. This type of insulation is used when basement walls leak during seasonal floods.
Protect your basement from wastewater
To protect your basement from water, the following types of insulation are used:
- Coating. The method involves applying bitumen or polymer mastics. Coating insulation is used when there is a need to eliminate leaks. The technology is ineffective against water supplied under pressure.
- Penetrating. The technology involves processing with materials that are embedded deep into the concrete.
- Guided. Roll material is used for insulation.
- Mineral coating. Involves the use of materials based on cement.
- Membrane. It involves laying a special material that does not allow moisture to pass through from the outside, but drains excess liquid from the inside.
- Waterproofing with liquid glass.
When choosing a means to create a protective layer, it is necessary to take into account the level of water in the soil, the average amount of precipitation and the presence/absence of drainage and the purpose of the basement.
Injection
One of the types of penetrating waterproofing. The technique involves the use of a special gel, which is injected into pre-prepared holes in the walls and foundation. As part of this technology, the following materials are used for basement waterproofing:
- epoxy resin;
- polyurethane;
- acrylate;
- microcement.
Injection waterproofing allows you to reduce the cost of organizing basement water protection. The technology is recommended for treating hard-to-reach areas. Acrylate and other types of gel are introduced at any temperature and humidity level.
The main disadvantage of this technology is that in the absence of specialized tools (pressure pump and others), it is impossible to waterproof basements with your own hands.
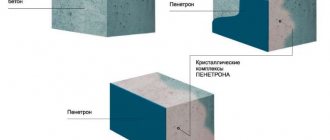
Penetrating
As part of penetrating waterproofing of the basement from the inside, materials are used that fill microscopic pores (up to 0.4 mm) of concrete. After this, chemical processes are started, which leads to crystallization of the applied composition.
Waterproofing with Penetron (the name comes from the reagents that make up the insulating material) is performed using:
- alkali metal carbonates;
- aluminum oxide;
- silica.
Penetron increases the waterproofing properties of concrete, since during the processing process even microscopic holes through which water can penetrate are clogged. The material can withstand exposure to sub-zero temperatures and maintains the vapor permeability of the foundation.
Pasting
Pasting technology involves the use of various roll materials:
- glass ruberoid;
- hydroisol;
- folgoizol;
- brizol.
Materials are fixed to walls and floors by fusing or hot or cold gluing. This method is suitable for waterproofing a basement from the inside with your own hands.
Attention: if the foundation lies in a zone of soil freezing, it is recommended to use other techniques.
Coating
The coating technique involves applying a polymer composition based on cement to the walls.
Such materials have a relatively low price. However, they are characterized by a short service life. If the foundation is exposed to ultraviolet radiation, temperature changes and there is a possibility of damage by bacteria and fungi, it is recommended to use bitumen or liquid glass as insulation.
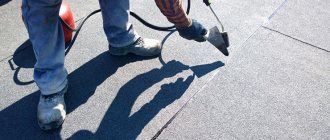
Sprayable
This technique involves applying liquid rubber (bitumen) to the foundation using specialized equipment, resulting in seamless insulation. The method is used on any surface, including hard-to-reach and complex areas.
Liquid rubber can withstand sudden and severe temperature changes and does not lose its original properties for many years. An important advantage of this technique is that it is possible to carry out waterproofing once, and then (in case of defects) carry out local repairs by applying bitumen to individual areas.
Use a Different Material to Provide the Best Basement Waterproofing
Types of waterproofing compounds
How to get rid of water that is destroying your basement? Start by studying the soil and foundation features. Before purchasing waterproofing compounds, determine the approximate depth of groundwater, the increase in soil during frost, the type of soil in your place of residence, and the purpose of the building. Modern manufacturers offer several types of compositions to prevent moisture in the cellar. Let's look at the most popular ones.
Use of bitumen resin
Waterproofing a cellar with bitumen is a budget option for eliminating a damp environment. The material consists of small bars that are applied to the surface in liquid form:
- bitumen resin and machine oil are placed in a large container in proportions of 3:1.
- the reservoir is heated and the mixture is brought to a liquid state.
- apply the mass onto a previously leveled surface with repaired cracks using a brush or roller.
- work from the bottom of the surface at a distance of no more than 20 cm from the soil.
- The optimal thickness for a cellar is 5 cm, i.e. 3 coats will be required.
The composition must be maintained in heating mode for ease of application. The bitumen shell blocks the appearance of moisture and protects the foundation from destruction for 5 years.
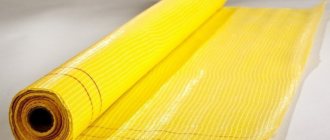
Roll types of materials
Roll materials are used with liquid formulations or separately. Owners of private houses and summer cottages can purchase roofing felt, TechnoNIKOL, Technoelast, Stekloizol, Rubitex and Gidrostekloizol. An inexpensive but high-quality option for independent use is roofing felt. To properly protect your basement from destruction, work like this:
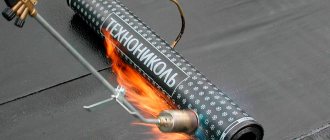
- fix the material on a flat surface and apply bitumen mastic to it, heat the canvas with a burner and place it overlapping on the plane.
- the second option is fastening with liquid mastic. Coat the foundation with the heated mixture, and lay the rolled material on top of it. Coat the roofing material with bitumen and place another layer on top.
The combination of mastic and base material promotes good penetration into the concrete foundation and reliable waterproofing.
Advantages of liquid rubber
If water accumulates regularly in the cellar, use liquid rubber. The compositions adhere perfectly to surfaces, are protected from fire and form a continuous coating. Experts advise working with single-component rubber, choosing from two types of compounds:
- mixture for application in one layer. They dry within 2 hours after application, but can harden quickly in an open container;
- compositions that are applied in one layer. Sets within 24 hours.
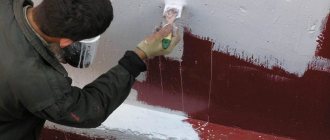
Before the start of the event, the concrete base is cleaned of dust and primed. It is recommended to apply liquid rubber with a brush or spatula.
We arrange vertical waterproofing
The cellar in the house can be protected from water that appears after rain or melting snow, using the vertical technique of applying an insulating coating. Before starting work, it is appropriate to prepare the surface and surrounding area. To do this, the walls, floor and ceiling are cleaned, and a drainage system is created. Do-it-yourself waterproofing of the cellar is carried out in several versions.
Possibilities of the injection method
What should you do when water gets into the basement under your house or garage? Use a progressive but expensive injection technique. The work is carried out by creating a curtain of filter elements and installing a special membrane to protect against moisture. Injection waterproofing technique has a number of advantages:
- finishing materials and cladding from the base of the building are not removed;
- the underground room remains protected for several years thanks to the quality of acrylate gels and polymer resins.
One of the disadvantages of the technique is the strict sequence of work technology, which is difficult for inexperienced craftsmen to achieve.
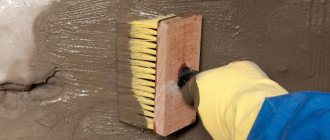
Coating type of insulation
You can protect the cellar from the inside from groundwater, as well as perform external manipulations, using cement-polymer compositions. The waterproofing material with a flexible and rigid structure is vapor permeable and adheres well to the surface. The affordability of the composition, plasticity and ease of DIY work make coating a priority for home construction. Foundation waterproofing is carried out using fiberglass, brushes, rollers, spatulas and liquid mastic. To ensure the quality of the coating, proceed in stages:
- Clean the surface of the walls from dirt, round corners, and seal protrusions and crevices. Smooth porous areas with cement mixture;
- Operate on a minimally damp surface, which can be checked using polyethylene film. Place the sheet over a shaded area and inspect for fumes after 24 hours.
- Apply a thick coat of primer primer. Cover the joints and seams with a second layer.
- After the primer has dried, apply liquid bitumen mastic using a roller or brush. Maintain parallelism and direction of movements, trying to evenly distribute the material along the wall.
- The cement mixture with polymer additives is applied to the moistened wall surface with a brush, spatula or roller.
Wait for the composition to dry, rub the surface.
Welded method of vertical waterproofing
It is advisable to treat an underground room from the inside with your own hands using rolled materials when the foundation is deeply buried. Pasting the inside of the building will protect the base from damage for a long time if you follow the construction algorithm:
- Purchase bitumen-polymer roll fabric or roofing felt. It is better to refuse fiberglass or fiberglass - in aggressive environments the foundation will leak again.
- Prepare the surface, prime it with primer.
- Using a special burner, melt the bottom layer of mastic.
- Glue the rolls from top to bottom, maintaining an overlap of 10 cm. It is most convenient to work with material 150-200 cm long.
- Pay attention to corners and transitions. Pre-reinforce them with a 30 cm long piece of base material.
- The number of layers of glued insulation depends on the location of the foundation. Shallow structures require a 2 mm thick membrane. At an average depth, the layer thickness increases by 4-8 mm.
It is recommended to install waterproofing for the cellar 30-50 cm above the soil and fix it with a metal strip.
Waterproofing methods
What waterproofing materials are on the market?
- Coatings. A relatively thick layer of a viscous, water-impermeable coating is applied to the surface to be waterproofed and dries or cures.
- Rolled. The surface is covered with rolled material with overlapping strips.
- Penetrating. They, as you can easily guess from the name of this category, penetrate inside the walls to a considerable depth and fill their pores.
And now - the bad news. The first two types of materials are ideal only for external waterproofing, which is usually carried out during the construction stage.
Why?
The reason is the limited adhesion of these coatings to the wall material. Waterproofing basements from the inside means that the walls and floor of the basement will be moistened throughout their entire thickness; Moreover, with a high groundwater level and a deep basement, there will always be quite tangible excess pressure on the side of the wall.
The consequences will not be long in coming: the rolled or coating coating will gradually begin to peel off with the inevitable loss of tightness.
What's in the bottom line? Penetrating waterproofing of basement walls from the inside.
Coating waterproofing of the floor. Unfortunately, this solution often turns out to be ineffective.
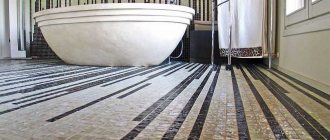
Features of horizontal insulation
Waterproofing the cellar from the inside using a horizontal method is carried out at the initial stage of construction. It is impossible to equip it in a finished house. To ensure that there is no water on the ground floor, it is advisable to adhere to the following technology for performing tasks:
- The first level of protection is laying and compacting a cushion based on sand and gravel. It is placed under the base in the form of blocks or under a solid monolith.
- During the concrete screed, roofing material or PVC membranes are laid in the basement, which help protect the foundation from the inside from soil water or capillary rise of liquid.
- Rolled materials are laid on a surface treated with a primer. The sheets must have an overlap of 10-15 cm. When combining layers, the overlaps should be increased to 25-30 cm.
- The waterproofing coating is steamed with a gas burner - this improves the adhesion of the sheets.
The protruding ground part is processed according to a similar principle.
Principles of waterproofing
Waterproofing a strip foundation without a basement is done in almost the same way as with a basement. Let's see what suits you best and only then will we make a decision.
Waterproofing scheme
Coating waterproofing
Waterproofing basements and foundations can also be done using the coating method. This option has its positive and negative sides.
Carrying out coating waterproofing
| Advantages |
|
| Flaws |
|
Pasted waterproofing
The technology for installing adhesive waterproofing involves the use of built-up or rolled materials (roofing felt, waterproofing).
We use the pasting method of waterproofing
So:
- First, the material, heated by a gas burner, is glued to the foundation walls in such a way that the overlap of one sheet on another is 10-15 cm. Next, the insulation is laid, and a sand-cement screed is made.
- Pasted waterproofing will not take much time and effort, but the joints between the sheets over time can become a problem area and cause moisture to penetrate into the basement.
| Advantages |
|
| Flaws |
|
Waterproofing with plaster
The considered methods are good in terms of speed of work completion. True, many are not looking for easy ways and low-cost solutions; they opt for plaster waterproofing, thereby preferring quality and durability. It is difficult to challenge such a decision, because the house is not built for one dozen years and not for one generation.
Applying plaster as insulation
Waterproofing by plastering is carried out by qualified craftsmen who know their business using polymer-cement compounds. In principle, this is a great thing to do with your own hands. Then the price of the work will be significantly lower, and you won’t have to worry about the quality. So:
- A special additive achieves reliable sealing of all defective areas, cavities and microcracks in pads and concrete blocks. The thickness of the plaster layer should not be less than 15 mm.
| Advantages |
|
| Flaws |
|
Self-leveling waterproofing
Self-leveling horizontal waterproofing made of polymers, cement and sand is ideally suited for the basement floor, which is a reinforced concrete slab located on a bed of compacted gravel and sand.
Self-leveling waterproofing
So:
- The floor is poured with the prepared solution (see also Concreting the floor in the basement: how to do it correctly).
- The operation is repeated twice with a time interval of six hours to half a day.
- The thickness of the waterproofing layer should be at least 2-3 mm.
Attention: The thickness of the waterproofing is checked by measuring a 20 by 20 mm square randomly cut with a sharp knife using a micrometer. Before application, the instructions must be fully studied, this is important.
Is drainage necessary?
Special communications installed in the yard are a reliable method to protect your cellar from water ingress. The drainage system enhances the effect of insulating materials. Drains are arranged in two ways - external and internal.
External drainage technology
The system involves the redirection of water flows from the basement and is installed at the stage of construction work. For an existing building, drainage is done as follows:
- A pit is dug with a width and depth of 40 cm;
- Wells are formed to the level of the sand layer at a distance of 2 m.
- A metal grating is laid over the dug holes.
- A plastic pipeline is being installed. The minimum diameter of pipes that are wrapped in geofabric is 40 cm.
- At the bottom of the pit, geotextiles are laid, and gravel with medium fractions is placed on it.
- The pipe is installed by extending the upper part beyond the lower part of the basement wall.
External drainage is covered with removed soil, carefully compacting each layer.
Creation of an internal drainage system
You can eliminate water standing in an underground basement using internal drains. The system is installed after the flooring has been laid:
- A trench is dug throughout the cellar, deepening it by 50 cm;
- Pour crushed stone into a 20 cm layer at the bottom of the pit and compact it.
- Lay a pipeline wrapped with geomaterial and fill it with material with fractions of no more than 20 mm.
The trench is filled with sand. It is advisable to install a drainage well at a low point in the basement. Water will flow there. If necessary, a sediment system for pumping water is installed in the containers.
What you need to know about self-waterproofing?
Independent installation of a waterproofing coating requires compliance with the basic rules:
- Materials are applied only to a dry surface;
- Seams, undried plaster layers or damp walls are painted with a liquid primer - a bitumen-based emulsion. The next layers will be made with thick compounds;
- When purchasing insulation products, consider their effect on reinforcing elements, joints and seams;
- For brick surfaces, it is worth using cement mortar reinforced with polymers or liquid glass;
- Floor surfaces are waterproofed with self-leveling polymers;
- For the walls, floors and ceiling to completely dry before work, 5 days are enough.
Follow the work technology and the requirements for the insulation procedure for the basement floor - this will reliably protect the structure from water in the cellar and destruction.
Article Rating