Why do you need a vapor barrier?
Each house has a certain microclimate. Comfortable living means having a bathroom or shower, a kitchen and other rooms with different humidity levels. During the cleaning process, the floors are washed.
Vapors and moisture generated indoors every day settle on the surface of walls and floors. Condensation causes the deterioration of flooring, subfloors, and other decking materials. The floor on the first floors in private sector houses is additionally exposed to moisture coming from below (from the ground).
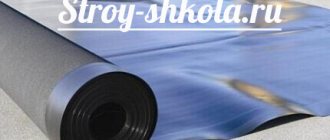
A vapor barrier film (membrane) is used to create a protective barrier against steam and moisture. With its help, it is possible to neutralize negative factors affecting the microclimate of the home. At the same time, the floor will remain breathable.
Wooden buildings especially need vapor barrier. In houses made of concrete, a protective layer is also appropriate. This will reduce the humidity level in the room.
Difference from waterproofing
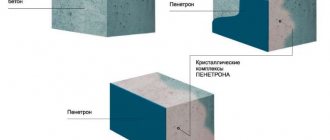
A vapor barrier membrane for a floor is different from pure waterproofing. The first is laid inside the room, the second - outside (a layer of insulating cake). The main purpose of the latter is protection from moisture penetration from the outside: from underground and flood waters, rain and evaporation from the soil. Its structure is such that it is capable of allowing steam to pass through. In the first case, the material does not allow steam or moisture in, but in the case of a more advanced structure, it brings them out.
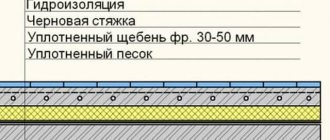
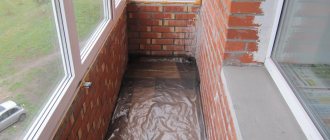
Structure of the floor pie Source izba.spb.ru
There is also an intermediate option - water vapor barrier for the floor. Thanks to the perforated structure and the displacement of the layers, it ensures reliable gas and vapor exchange (discharges them outside), but does not conduct water to the inside. Moreover, it can be laid directly on the base, while the usual modification requires an air gap.
Vapor barrier materials
The selection of vapor barrier materials for flooring is impressive. In order not to make a mistake in choosing, it is worth considering the characteristics of each option.
Ordinary polyethylene film
This is a solution for those cases when it is not possible to purchase a special insulator. On the one hand, it creates a hydro- and vapor barrier. On the other hand, before using film, it is worth considering all the disadvantages of this option:
- polyethylene provides a greenhouse effect (this prevents natural air circulation);
- When installing a vapor barrier, it is necessary to leave a technical gap to drain condensate (due to the smoothness of the film surface, moisture rolls onto the insulation, which shortens its service life).
Vapor barrier film made of polyethylene
One side of the material remains smooth, the other has small fibers that retain condensation. This is an affordable insulator, but a significant disadvantage is the obstruction of the natural circulation of air masses, which is why the floor or wall stops breathing. Manufacturers solved this drawback by producing perforated film.
Polypropylene film
Unlike its polyethylene counterpart, a polypropylene product is more durable and resistant to atmospheric factors. The material itself has the ability to form condensation. Therefore, during its manufacture, a layer of viscose with cellulose is rolled. During installation, the anti-condensation side is laid down on the work surface. A ventilation gap is left between the heat insulator and the vapor barrier.
Diffuse membrane
This type is used when arranging residential premises or utility rooms. This is the best vapor barrier option. It perfectly retains vapors, thereby preventing premature destruction of the thermal insulation layer.
Depending on the number of layers and additives used, membranes are divided into several types. Among them there are multifunctional films that provide steam, hydro and thermal insulation.
- Membranes with a foil layer are produced to retain heat in baths and saunas.
- Perforated insulators provide increased steam permeability during operation under special conditions.
- A two-layer material is created by connecting smooth and rough layers with self-adhesive foil tape. The insulator has no punctures, cracks, breaks or other defects.
- Three-layer material is intended for baths and saunas. It is attached under the lining or finishing panels using a stapler or special tape.
The performance characteristics of the building and the service life of the floor depend on the correct choice of vapor barrier film.
Liquid rubber
Another option is liquid rubber. It covers the entire surface without leaving any gaps. The material is made from polymer substances and bitumen. Among the advantages: high elasticity, seamless coating of the working surface, universal purpose (steam, hydro, sound insulation).
Rubber is applied over large areas using an automated method. In small rooms, it is advisable to process the floor manually.
Selecting the installation side
In order for the structure to fully function and the materials to retain their original characteristics, it is very important to know which side to lay the vapor barrier on the floor in a wooden house. However, not all manufacturing companies provide products with information about installation technology. There are the following signs of determining the desired side of the layer in practice in each specific case for its further correct installation:
- The double-sided material is lined with the smooth side facing the heat insulator, and the fleecy side facing out. The micro-relief surface is designed to absorb and retain moisture.
- The polypropylene film is laid with a flat surface inward, and with a mesh - outward.
- Vapor barrier rolls with foil are always lined with a metallized layer inside the house.
- Roll material is usually wound so that the outer part always faces inward.
- The side, according to the technology intended for laying outside, has a darker shade than the inside.
- Polyethylene films can be lined on either side.
Laying vapor barrier on the floor
The vapor barrier layer is an integral part of the pie, which includes: joists, waterproofing, subfloor, insulation and finished floor. Before laying the vapor barrier, the surface is prepared. If it is wood from a new building, then it is impregnated with an antiseptic and coated with a layer of protective varnish.
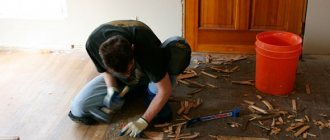
When preparing the surface of a house in use, it is necessary to remove the old coating from the floors and other materials used previously. Before you start laying the pie, you need to check the strength of the joists and the rough foundation. They should not sag or show signs of destruction of the wood structure.
The vapor barrier is laid on a flat surface, previously cleared of debris. There should be no nails or other sharp objects on it that could damage the film. Before laying the material, check which side it should be laid on. If it is ordinary plastic film, then there is no difference. Izospan is placed with the light side to the insulation. The fleecy part of the insulator is placed towards the room. The foil material is laid with the shiny side facing the room.
If the floor structure is non-standard and has hard-to-reach places, it is advisable to coat them with additional bitumen vapor barrier.
When laying film sheets, an overlap is observed on the previous strip with an overlap of 15-20 cm. To create a strong connection, the joint is glued with foil tape.
When insulating the floor, a vapor barrier film is laid before and on top of the heat insulator. The role of insulation is assigned to mineral wool, polystyrene foam or polystyrene foam.
One of the technology requirements for laying vapor barriers is compliance with the sequence of formation of the cake.
- Lay waterproofing material on top of the subfloor.
- Lay a vapor barrier over the joists. The film is fixed with galvanized nails, adhesive tape or a stapler.
- Insulate the space between the joists using the selected type of heat insulator. The material should fit tightly to the joists, leaving no chance for the formation of cold bridges.
- Apply adhesive tape around the perimeter of the room at the bottom of the walls.
- Lay a vapor barrier membrane. The canvases are laid across the joists. The connections are made overlapping and the joints are sealed with foil tape. It is considered normal if the film sags slightly in the center.
- Secure the vapor barrier using a stapler.
- Secure the edges of the membrane extending onto the wall with adhesive tape.
The work is completed by installing the floor.
Basic mistakes when performing work
Despite the simplicity of the process, when performing floor vapor barrier, home craftsmen often make mistakes that lead to loss of functionality of the vapor barrier layer. Condensation accumulates on the film, the insulation and joists begin to rot.
- Insufficient overlap between the sheets of vapor barrier material. If it is less than 15 cm, when the panels are fixed to the joists, they will “spread apart”, forming gaps between themselves. The tightness of the layer will be broken, and the condensate will be given a green light.
- No overlap on walls. When laying the flooring, the narrow gap between the wall and the vapor barrier layer remains unprotected and condensation will accumulate under the baseboards.
Condensation will accumulate under the baseboards if there is no overlap on the wall - The front and back sides of the material are mixed up. The lower part of the diffuse membranes is made up of a special layer that prevents drops of moisture from falling down onto the insulation. If you lay the material with this layer up, its functionality will be lost.
- Poor sealing of joints. Some craftsmen use ordinary stationery tape for sealing. It costs much less than sealing tape, but has significant disadvantages. Firstly, it is difficult to stick it exactly along the entire length of the canvas, and secondly, its adhesive characteristics are an order of magnitude lower.
Vapor barrier with liquid rubber
The process of applying liquid rubber to create a vapor barrier layer takes place in several stages. The working surface is cleaned of debris and loose fragments. Next, open the container with the polymer-bitumen material and mix it thoroughly. Using a brush or roller, the composition is applied to the subfloor. The liquid vapor barrier has a thick consistency, so it is quite possible to use a spatula for the work.
The treated floors are dried. After drying, a film forms on the surface, which, thanks to its high adhesion, firmly adheres to the base. It does not allow moisture to pass through either from below or from above.
The average consumption of liquid rubber is 1-1.5 kg/1 m2. The thickness of the layer is 0.7 mm. To create a vapor barrier for a floor in a room of 10 m2, 10 liters of bitumen composition is sufficient.
When using liquid rubber, it is worth taking into account the type of finishing. The polymer-bitumen material is black in color and should not make undesirable changes to the finish.
FAQ
What is the difference between hydro and vapor barrier?
The main difference between materials is their functionality. Vapor barriers play the role of a protective barrier against the effects of steam accumulating indoors. The task of waterproofing comes down to preventing water from entering the room from inside, which is typical during precipitation. Externally, the materials are very similar, but their technical characteristics are different. Waterproofing must be moisture-proof, but still breathable. The vapor barrier membrane is completely water- and air-tight.
Is there a need for a ventilation gap between the vapor barrier and the floor?
A ventilation gap is left between the insulation material and the vapor barrier. In the case of the buffer zone between the vapor barrier and the finished floor, not everything is clear. Taking into account the principle of creating a pie, it turns out that a ventilation gap is necessary. It is possible to create it in a roof structure or in a wall. With gender it’s more difficult. Experts express the opinion that even when arranging a space, there is no guarantee that it will be sufficient for normal air circulation (if air flow can move there at all). Therefore, the finished floor is laid directly on the vapor barrier layer if a material that is inert to microbiological processes is used for the arrangement. Wood and other finishes with low moisture resistance are kept away from the insulator to prevent the development of mold when collecting condensate. The decision to create a ventilation gap is also influenced by the type of vapor barrier. Polypropylene and polyethylene films require space through which condensate is drained. When using liquid rubber there is no such need. Before you start laying the film, it is recommended that you read the instructions for the product, which prescribe the procedure for laying the vapor barrier.
How and with what to fasten
If a vapor barrier is used in a floor pie along joists, there are options for its installation.
- If the material is laid before installing the lag, it is simply rolled out, leaving it in the corners of the fold, connecting the sheets as indicated above. There will be logs on top that will hold the material. It does not require additional fixation. You just need to start it and fix it on the walls.
- If the logs are already installed, we wrap each of them with material, leaving a small fold so as not to tear. We attach it to the wood using staples and a construction stapler. Staples are needed with a leg of 8-10 mm. We place the fasteners along the joists (from above) in increments of 50 cm. But the staples make holes. Although they are small, they are there and break the seal. They are closed using wooden planks, which are mounted on self-tapping screws. Self-tapping screws are placed so that they do not fall into the brackets.
If the logs are installed, carefully wrap each one, leaving a small fold at the bottom so as not to tear when laying the insulation - If the film has to be attached from below, the situation is similar to that described above, only there is no need to wrap the logs. We stretch the film and fix it with staples. When all the canvases are secured and glued, we nail the strips covering the brackets along the joists.
To be sure that no steam will pass through the holes near the brackets, foamed polyethylene or polypropylene can be laid between the film and the fixing bar. These materials are often used as a backing for laminate flooring. The material also does not allow steam to pass through, and due to its “foaming” it has considerable elasticity. It will definitely block the steam access.
How and with what to attach vapor barrier to walls? Any more or less serious manufacturer of vapor barrier films has specialized connecting tapes. They are available for different wall materials, so choosing is easy. These tapes themselves have double-sided adhesive. The gluing procedure is as follows:
- We glue the tape to the walls around the perimeter at the required level. In this case, we remove only one layer of the protective film. On the side that we will glue to the wall.
How to properly attach vapor barrier to walls - We roll out and fix the films on the floor, so that the edges overlap the walls and there is room for folding.
- When everything has already been laid, the joints have been taped, secured, we begin to glue the vapor barrier of the floor to the walls. We lay a fold at the base of the wall, remove the protective film from the adhesive tape pasted, and glue the canvas.
It's that simple. Once glued, the excess can be cut off. And finally, you know not only which side to lay the vapor barrier on, how to lay it correctly, but also how and with what to fasten it.
Video description
This video shows how to properly install a vapor barrier:
In the interfloor ceiling, installation is carried out in a similar way. However, if the upper room is not heated - an attic or attic - then a vapor barrier is laid on the ceiling side, and wind and moisture protection is placed on the floor from the floor above. In addition, the finishing of the lower tier can serve as a subfloor for the upper tier. It could be plywood, chipboard, etc.
Important! To ensure that the assembled floor pie does not become damp, has good thermal insulation and does not collapse, it is necessary to have an idea of how to correctly lay a vapor barrier on the floor - not only from the point of view of proper placement of its layers, but also sealing the entire system. To do this, the material must be laid end-to-end, and the points of contact with the house structure must be securely connected with adhesive tape.
Floor arrangement diagram
The modern design of flooring involves a multi-layered combination of building materials.
From bottom to top, the layers are arranged in the following order:
- plank cladding;
- waterproofing;
- insulation;
- logs;
- vapor barrier;
- substrate;
- flooring.
When laying laminate flooring, an underlay is used. This is considered a building code and is mandatory. The need to use film is considered separately for different types of substrate.
Underlay for laminate
Laying - methods, features
There are two main options for laying a vapor barrier on the floor - above the earthen floor and in the interfloor ceiling. Let's briefly consider the technology of both methods.
Laying in the floor above the ground is carried out according to the following algorithm:
- On the sides of the joists and walls, bars are placed to secure the subfloor.
- All wood elements are pre-treated with antiseptic compounds.
- Boards for the lower floor are being installed.
- They are lined with wind and moisture insulation protection.
- Next, the thermal insulation material is laid.
- A vapor barrier layer is laid on top of it.
- Finished floor boards are being installed.
Vapor barrier film under laminate - for warranty service
The inserts in the packages with the material happily announce that they provide a 10-25 year warranty. If you take a little time and find the manufacturer’s website on the Internet, you can find conditions that the obligations apply exclusively to damage to the panels due to wear. Moreover, coverage with scuffs along the edges of the boards, where, in general, the deterioration of the material begins, is not subject to warranty service.
It turns out that the warranty obligations of the Classen plant, for example, extend only to the surface of the laminated floor and not the entire surface. Not a word is said about the vapor barrier film; it is only mentioned that when laying the laminate, all the conditions described in the instructions must be observed. And the manual states that it is necessary to lay a waterproofing film with a thickness of 200 microns.
The use of film under the laminate to maintain the manufacturer's warranty is a complete fiction and is only one of the additional necessary conditions. It makes no sense to use a vapor barrier just for this purpose.
There are no cases known to me of warranty replacement of laminate by the manufacturer. During my career, I have never encountered flooring film on orders where old flooring was dismantled, including in new buildings.
In my apartment, one room is covered with laminate laid on a regular foam base. In the second room, a locking plug was laid directly on the concrete base of a multi-story building. The cork was once replaced after 3 years, this was due to wear on the surface from the legs of the sofa. Accordingly, I paid attention to the back of the coating - no problems were found.