A subfloor (underground) is a separate useful space in a country house, located below floor level. Its depth ranges from 0.5 to 1 meter. It is limited by the ground below, the wooden floor on top and the foundation walls along the perimeter. That is why it is very important to pay special attention to waterproofing the underground in a wooden house.
Such an underground performs a number of useful tasks, such as:
- simplifying the leveling of the foundation during its installation, especially when groundwater is shallow;
- location of housing communication nodes;
- use as an auxiliary utility room for storing preserves or equipment.
By leaving this area of your home without proper attention, you can not only lose useful space, but also jeopardize the integrity of the house itself. After all, flooding the underground with groundwater will ultimately lead to rotting and destruction of the load-bearing beams, and behind them the floorboards.
Reasons for water appearing in the basement of a house
The most common cause of water appearing under floors is groundwater that is too high.
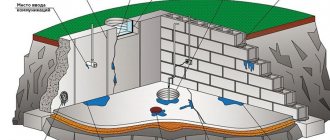
Or rather, the lack of a competent drainage system capable of draining water from the foundation. This problem is especially relevant in autumn and spring, when groundwater is replenished by floods and, rising upward, floods the underground. Therefore, it is important in advance (before pouring the foundation) to eliminate the threat posed by groundwater and take care of the drainage system. Another common cause of flooding may be the absence or poorly constructed foundation area of a building. In this regard, rainwater or water formed as a result of melting snow seeps through the walls of the foundation, accumulating at its base. This occurs when the vertical waterproofing of the subfloor in a wooden house is of poor quality and leads to flooding of the space under the floors.
The third reason for the appearance of harmful dampness in the underground is a temperature difference, leading to the formation of condensation. Warm air coming from the upper rooms settles on the cold walls of the foundation, forming drops of water. Which also leads to the destruction of load-bearing structures and floor covering materials. This can happen in the absence of a ventilation system, when there is no natural drying of the air in the room. Let's consider step by step how to waterproof the subfloor in a log house as competently as possible in order to avoid all of the above problems.
Additional recommendations
- Complete general basement waterproofing work is a combination of using the described materials and installing a ventilation system. Without the latter, condensation will accumulate in the room.
- Part of the basement is the staircase leading into it. It should also be isolated from water. The principle of operation is the same.
The more practical the use of an underground room, the better the waterproofing of the basement floor should be done. If you have doubts about the guaranteed result, we recommend that you contact a specialist. BAZIS-Pro employees have extensive experience in protecting structures from water - this is the key to ensuring that your basement will be completely protected. Call and get comprehensive advice.
Types of underground
In country houses there are two types of underground - cold and warm. For unheated dachas, the cold type is most common. As the name implies, the temperature in such a room will not rise to the level of temperature above the floor covering, but will depend on the external environment. This is due to the lack of air exchange with the upper rooms, insulated floors and vents in the basement of the foundation. In unheated areas of the home, it is more profitable to install just such an underground floor, since at low air temperatures outside, the soil will freeze, which can lead to deformation of the floor covering.
In contrast to the cold underground, the warm one has vents in the floor surface, so that air circulates freely between the upper rooms and the underground. The base, on the contrary, is insulated and does not have holes for air exchange. To reduce heat loss, the warm subfloor is made very shallow (up to 25 centimeters). A deeper space will be difficult to warm up, and a small one will disrupt the natural ventilation of the floor. It is in such rooms that communication nodes are most often located. But regardless of whether the space below is cold or warm, maximum attention must be paid to waterproofing in the basement of the house.
Waterproofing the underground in a wooden house
The process of moisture insulation of the underground is inextricably linked with the installation of the foundation and begins at the foundation pit stage.
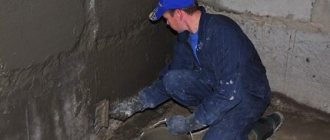
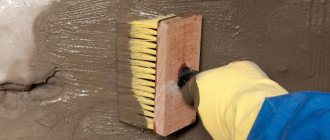
A sand and crushed stone cushion is poured into the open pit. Sheets of roofing felt on a bitumen base are rolled out on it. Ruberoid is applied with an overlap of 5 centimeters, the seams are covered with bitumen. The edges of the canvas should extend onto the foundation walls to facilitate the junction of the horizontal waterproofing with the vertical. Then a concrete screed is applied to it, which will subsequently serve as the floor in the underground. A budget alternative to horizontal waterproofing is a layer of fatty clay, which is applied to a sand-crushed stone bed. Most often, this method is used when waterproofing an underground in a wooden house with your own hands. The clay is carefully compacted and serves as no less reliable protection against groundwater than concrete. The walls of the underground also need to be insulated from moisture using the same sheets of roofing material, covering them with several layers of bitumen mastic. Also common is the method of so-called penetrating waterproofing, when a liquid composition is applied to a concrete surface, penetrating deep into its structure. Here it is important not only to thoroughly coat the entire surface without leaving gaps, but also to pay special attention to the vent holes.
If waterproofing the underground space in a wooden house is carried out for a warm underground, then the foundation walls must be insulated from the cold outside. For this purpose, any type of insulation is used, which is attached to the waterproofing coating. If desired, the insulation can then be covered with any finishing materials. It is clear that when waterproofing the underground space in a wooden house for a warm underground floor, no vents are provided to the outside of the room. The vents here are made indoors.
Load-bearing pillars are installed on the prepared base. The pillars are either laid out of brick or special ones (concrete or iron) are used. A budget option are wooden posts with a diameter of 20-30 centimeters. However, they must be treated with an antiseptic or burned before installation. The ends of brick or concrete columns are also treated with bitumen to protect the wooden floor parts lying on them from water. It is also useful to place boards soaked in antiseptic between the end of the column and the joists.
The device of a multilayer “pie”
If you pour bitumen mastic on the floors over a clay base, and then stick on roofing felt, roofing felt, waterproofing or other protective material, then such a coating will be external, it will be the first to stand in the way of water. Depending on the pressure of the aquifer, such coverage may not be sufficient. Therefore, concrete coverings and, if necessary, additional insulating layers are placed on top in various variations.
This is interesting: how to waterproof a basement against groundwater.
A more reliable option for all types of basements can be considered the construction of a multi-layer “pie” of:
- preparatory crushed stone-sand lower layers;
- concrete coverings;
- mortar screeds;
- water-repellent substances in concrete or mortar mixtures;
- waterproofing roll and coating layers.
There are several methods of waterproofing.
The number and thickness of individual layers of such anti-pressure waterproofing of basement floors depend on:
- proximity to groundwater;
- purpose of the basement, operation options;
- the presence or absence of protection from water in the walls of the structure;
- soil categories of the basement location;
- climatic conditions.
As the best option for most basement floors, we can recommend a simple and not very expensive option for multi-layer protection of the floor in the basement, which is understandable and can be done with your own hands.
The layers of the “pie” are made on a leveled and compacted clay base:
- The surface is covered with a concrete mixture 5-7 cm thick, you can use low grade lean concrete.
- The mixture is leveled and compacted. For compaction, you can use a piece of log about 30 cm in diameter with a strip nailed on top in the center for easy lifting.
- After 7-10 days, after the mixture has hardened and dried, the surface is covered with a continuous layer of bitumen mastic. For leveling, it is convenient to use a device in the form of a regular mop.
- A carpet made of inexpensive rolled insulating material, roofing felt or roofing felt is rolled out and pressed tightly on top of the bitumen.
- The procedure of spreading bitumen is repeated, but on the first layer of insulating coating.
- The first layer of roofing material is laid with an overlap of at least 15 cm. The top coating is made perpendicular to the bottom with the same overlap.
- Next, a layer of concrete mixture is laid on top in the same way as the underlying concrete layer.
- The last top covering can be a cement-sand screed with surface reinforcement with dry cement. Alternatively, the final floors can be constructed from wild flat stone or inexpensive floor tiles.
- The walls of the basement are erected directly on the top floor covering.
One of the inexpensive but extremely effective methods of waterproofing can be considered the preparation of a concrete mixture using liquid glass. Everyone is familiar with the material: it is silicate office glue with a thinner consistency. By reacting with cement, liquid glass creates a monolithic waterproof layer. This method was recently used to construct concrete water tanks and protect swimming pools.
Underfloor ventilation
Another point when waterproofing a cold underground in a dacha will be the timely installation of ventilation vents in the base of the foundation.
They also need to be made at the stage of pouring the foundation, placing the holes so that they are at a height of at least 20 centimeters above the ground level. This will make it more difficult for snow or melt water to get into them. Ideally, you need to make at least eight holes (two on each side of the foundation). For more efficient ventilation of the underground, special turbines with blades powered by wind can be installed in the openings. And in order to protect the space from litter and rodents, it is recommended to cover the vents with mesh plugs. During the winter, the vents in the foundation can be closed so as not to freeze the subfloor. However, care must be taken that this does not lead to condensation.
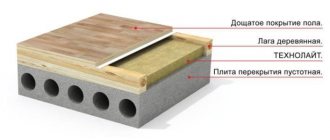
Logs are mounted on leveled posts using metal corners. If waterproofing is carried out for a cold underground, subfloor boards are first laid perpendicularly on them. Minor gaps are allowed between them. A vapor barrier film is laid over the subfloor, and then a sheathing of timber for laying the finished floor. The insulation in the sheathing cells must be laid in such a way that there are no gaps between the edge of the insulation and the joists. At the final stage, the finishing floor is laid.
When waterproofing a warm underground, a subfloor is not needed - a floor board is immediately laid on the load-bearing joists (as a rule, tongue and groove is chosen). During installation, it is necessary to ensure that its elements are tightly fitted to each other. Since a warm underground requires air circulation from the upper rooms, several ventilation holes are made in the floor. Often, to ventilate a warm underground floor in a wooden house when waterproofing, they resort to the following method - instead of holes in the floor, they make a small gap under the baseboard. And since a technical gap is left between the edge of the floor and the wall, this ensures air exchange between the lower and upper rooms. However, experts advise not to do this.
Waterproofing technology
As an example, let's look at the technology for making earthen floors with a detailed description of the stages and possible waterproofing options.
Step 1. Preparatory stage. Make a plan of your actions, prepare materials. Flooring should be laid from the furthest room; keep in mind that transporting building materials over ready-made earthen surfaces is strictly prohibited. You will have to remove and supply materials through windows, and this significantly complicates the construction process.
Decide on the range of waterproofing materials and their quantity. Professional builders recommend using sand with plastic film or roofing felt when installing earthen floors for waterproofing. The thickness of the film is at least 200 microns, it must be laid in at least two layers. Ruberoid can be used both ordinary cheap and expensive on non-woven materials coated with modified bitumen.
Polyethylene film
Calculate the volume of sand and clay; if the earthen floor will be prepared from adobe, then you need to prepare the fillers used: sawdust, straw, etc. Recommendations for the thickness of each layer of the earthen floor will be given in step-by-step instructions. To make a floor you will need straw, sand, clay, natural linseed oil, natural wax, mineral solvent, paint. The earthen floor consists of the following layers.
- Earth . Serves as a base and requires leveling and compaction. Groundwater must be located below ground level.
- Crushed stone or gravel . The thickness of the pillow is 15–20 cm, the material cannot contain impurities. The fraction sizes are average.
- Waterproofing barrier. You can use roofing felt; polyethylene film requires additional layers of sand.
Ruberoid
- Sand . The layer thickness is 15–20 cm. The sand must be dry and washed. The insignificant thickness is explained by the presence of special water protection.
- Clay or adobe . The layer thickness is approximately 10 cm, the horizontal spread should not exceed one centimeter per linear meter and two centimeters in the corners of the room.
- Final decorative layer . Consists of natural oil, paints, natural wax. The thickness of the finishing layer is approximately 2–3 mm.
The dimensions of the layers can be adjusted at your discretion, but it is not recommended to reduce the thickness of the clay.
Manual tamping. Owners of private houses can also make a similar tool themselves from one fairly thick log 1 m long and several boards
Step 2. Remove excess soil from the room: fertile layer and organic deposits. Mark a zero level around the perimeter of the room’s foundation.
To reach the required initial floor level, you need to remove the top layer of soil
Zero level is the location of the upper surface of the floor. From the zero level, marks should be made downwards, each point should indicate the thickness of the corresponding layer of the floor cake. Horizontal lines along the perimeter of the foundation are made using a rope with blue, the thickness of the cake is determined by a laser or water level. If you do not have a laser device, then you can make a hydraulic level yourself from an ordinary plastic transparent flexible hose with a diameter of about 5 mm. The length of the hose should be several meters longer than the diagonal of the room.
Important! When filling the hose with water, make sure that no air pockets form. If they are, then the hydraulic level readings will be distorted.
How to make markings using a hydraulic level
Horizontal lines along the perimeter of the foundation should be drawn in the following sequence:
- using a tape measure, mark off vertical dots indicating the thickness of each layer of the pie;
- attach one end of a flexible plastic hose to the first mark;
- step back a few steps and place the second end of the hose against the foundation;
- lower/raise it until the water level at the second end is equal to the first mark;
- Use a pencil to place a new mark on the foundation. It should be located exactly at the water level at the second end.
Hydraulic level
Using the same algorithm, make markings along the entire perimeter, and then connect points located at the same height with horizontal lines. Such simple markings will allow you to control the height of the layers during work.
Step 3. Level the ground. The difference in height at the extreme points of the room should be ±2 cm. On a linear meter, this value cannot exceed one centimeter. It is recommended to check the parameters using a rule or a long level. Remove loose soil from the pit.
Step 4. Bring in crushed stone; the thickness of the layer may vary by several centimeters. Compact the crushed stone thoroughly; this can be done with a hand tool or a mechanical compactor. The second option greatly simplifies and speeds up the process; in addition, it makes it possible to obtain high-quality compaction.
Compacting crushed stone
On a note! If you compact crushed stone manually, then this should be done in at least two stages. The thickness of each layer is no more than 10 cm, the second is poured only after the final compaction and leveling of the first.
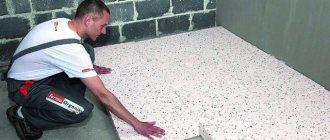
Step 5. If you live in regions with a cold climate, we strongly recommend insulation. To do this, you can use fairly durable polyurethane sheets with a thermal insulation thickness of at least 10 cm. Of course, such a floor can hardly be called natural, but health should come first. By the way, you can lay any waterproofing, including polyethylene film, on even sheets of insulation without any fear or additional construction measures. And another advantage of polyurethane foam is that it effectively interrupts the capillary supply of moisture and itself serves as an excellent water barrier. For this option, there is often no need to use additional materials to waterproof the earthen floor.
Polyurethane foam is produced in thicknesses from 20 to 100 mm
Step 6. If you do not want to insulate the floor, then apply a layer of sifted dry sand over the gravel. The material must also be compacted in two stages.
Sand needs to be evenly distributed
The sand is compacted
Important! The better the base is compacted, the better the quality and durability of the earthen floor. Remember that insufficiently compacted layers will certainly shrink naturally over time. Air chambers are formed between the clay top layer and the base. As a result, the floor will bend a little or crack. You will have to repair the surface, and this is not easy to do. This is not just replacing two boards; it is necessary to perform many preparatory construction operations and re-restore the front surface of the earthen floor.
Step 7. If you do not have waterproof insulation, then waterproofing should be installed over the sand. You can use rolled modern materials or plastic film. There is no need to coat the joints of rolled materials with mastics and glue them together - the task of waterproofing is to interrupt the capillary rise of water, and not to restrain direct contact. The bottom layer of the earthen pie should lie above the groundwater level, we have already mentioned this.
Groundwater map
On a note! It is much more profitable to use polyethylene film for waterproofing; it is cheaper and allows you to waterproof the entire room in one whole piece. In terms of reliability, the film is in no way inferior to rolled materials, and in terms of service life it even surpasses them. Why? The fact is that the main “enemy” of polyethylene is hard ultraviolet radiation. Under its influence, the intermolecular bonds of polymers are gradually destroyed, they lose their plasticity and become brittle. Under the influence of minor bending forces, the film cracks into small pieces. Several layers of earthen floor completely exclude the penetration of ultraviolet rays, the film works in ideal conditions. Bitumen, on the basis of which most roll waterproofing materials are made, loses its original properties as a result of slow chemical reactions with oxygen. And this chemical element is present in all layers of the pie; the process of bitumen decomposition occurs in a continuous mode, albeit slowly.
Step 8. Prepare the first base layer of adobe, it requires 25% clay of the total volume and 75% sand. For reinforcement, you can add chopped straw (the traditional old version) or plastic fiber (the modern version of adobe). The components must be thoroughly mixed with the addition of water until a homogeneous mass is obtained. The consistency of the solution should resemble rich sour cream. Bring the prepared mixture into the room in portions and pour it onto the waterproofing. Level the mass using the rule and grout. If desired, a water or electric heating system can be installed under the floor. But we have already mentioned that cracks can form on the earthen floor.
Applying the first layer of clay
Distribution of the first layer of clay
The thickness of the base layer of adobe is approximately 10 cm. After a day, deep cracks will appear on it; they must be repaired with clay.
Step 9. After the first layer has dried, add the second, and after it dries, add the third. In natural houses, the horizontality of the floor does not play a big role; the parameter is controlled by eye. If you are not confident in your practical skills in leveling the mass or want to have a smooth earthen floor, then you need to level the mixture along the beacons.
Applying a second layer of clay
The surface should be smooth
In the old days, thick boards served as beacons; after the clay hardened, they were not removed. If you want to remove the beacons, then the boards need to be temporarily wrapped in plastic wrap. Clay does not stick to it, removing the beacons will not be a big problem. In the future, the grooves should be thoroughly rubbed with adobe or clean clay. Remember that the surface of an earthen floor will never be perfectly flat; during grouting, just try to hide the adobe fillers. Small depressions will always occur due to different densities of the material and, as a result, different shrinkage during drying.
The principle of laying a clay floor along guides
For the final surface coating, flaxseed is used, the number of coating layers is at least seven. Each layer should dry for 12-18 hours, the specific time depends on the ambient temperature and the effectiveness of natural ventilation. You can speed up the drying process of the oil. To do this, place it in the sun for about a month, cover the container with gauze. Otherwise, various insects will get into the container. Due to natural weathering, the oil will become thick; before use, it must be diluted with an organic solvent.
Treating clay floors with oil and wax
To improve the appearance, after the oil has dried, the floor can be rubbed with natural wax.
Video - Clay floor in the house
Additional measures
But what if the moment of construction was missed, and the waterproofing of the subfloor in an old wooden house was not carried out?
Here we will have to deal with the consequences of flooding. First of all, you need to wait until the groundwater drops and thoroughly dry the subfloor. To do this, you can use electric fans or air conditioners. Then the soil is leveled and waterproof material is laid on it as a continuous sheet. The best choice for these purposes is thick polyethylene film, which is carefully fixed to the ground. The film will prevent moisture from rising and seeping through, which will reduce the humidity level in the underground. However, it is worth remembering that this method is used only as a last resort. And for high-quality waterproofing it is better to use the methods described above.