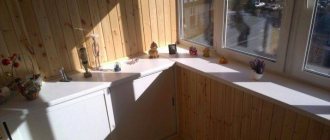
Features of insulating the balcony floor with penoplex
It makes sense to insulate the floor if the entire balcony has been insulated. Without this requirement, the process will not bring any results.
Thermal insulation of the floor is done after insulation of the balcony
In general terms, insulating the floor on a balcony with penoplex and penofol follows the same rules as when using polystyrene foam. The materials have a related composition. However, penoplex differs in structure. A special feature of the material is its cellular body, like a foam sponge. Due to this, performance characteristics are improved, in particular, resistance to mechanical loads.
To insulate the balcony floor, it is not necessary to lay logs. Thermal insulation can be placed directly on top of the screed. It is secured with special glue. However, the finishing floor covering is not immediately laid on top of the foam. Despite its resistance to mechanical stress, linoleum, laminate or other material will be pressed into indentations by feet while walking or by the legs of heavy furniture.
A hard covering, such as plywood, is laid over the thermal insulation. You can pour a concrete screed. Only after this the finishing coating is laid on top of the solid base.
Advice! To insulate the floor, it is optimal to use penoplex with a locking connection.
Preparatory work
Do-it-yourself insulation of the floor on the balcony begins with preparatory work. They include the following steps:
- revision of the base of the balcony slab;
- repairing the slab, sealing existing cracks;
- floor waterproofing.
Important: the article a priori assumes that the following work was completed before the floor was insulated: the slab was reinforced, the balcony (loggia) was glazed.
Assessment of the condition of the balcony slab
Before starting work on floor insulation, the condition of the balcony slab is assessed. It makes it possible, firstly, to decide on the type of insulation and calculate its weight load on the balcony, secondly, to assess the quality of the subfloor and draw up a list of works to eliminate the identified deficiencies, thirdly, to calculate the height of the sheathing with the condition that the floor The balcony was no higher than the flooring in the adjacent room.
Repair work
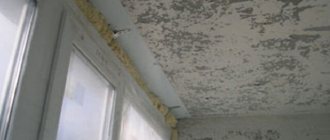
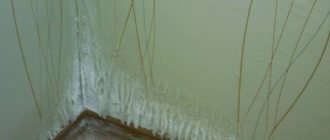
Work on preparing the floor on the balcony for insulation begins with sealing all types of cracks. First of all, it is necessary to seal the joints between the panels. No, heat will not escape through them, it will not come through. The problem is different: the appearance of dampness due to condensation moisture. And this means wetting of the insulation, mold and erosion of building materials.
Wide gaps between the plates are sealed with long rollers made of foam rubber or polyethylene foam of suitable diameter. There are two embedding technologies:
- A little polyurethane foam is applied into the gap, after which the insulation bead is immediately laid. As it expands, the foam will tightly close the smallest cracks and crevices, while at the same time firmly adhering the laid roller to the wall.
- The insulation is driven into the gap and then sealed with plaster mortar.
Small gaps can be sealed with acrylic sealant.
At the next stage, cracks and potholes are repaired at the base of the balcony slab. The work algorithm is as follows:
- small cracks are filled with a hammer drill or grinder with a circle on the concrete. This operation will allow you to push the repair solution to the entire depth of the flaw;
- damaged areas are cleaned of dust and dirt, after which they are primed;
- cracks and potholes are sealed with repair mortar.
You can read more about repairing a concrete subfloor in the article “Preparing the floor for pouring screed.”
Waterproofing
The last stage of preparatory work should be waterproofing the base of the floor and the lower part of the wall. Refusal of a technological operation in order to save money is justified only when installing a short-lived floor covering or using Penofol as insulation, which itself is a good waterproofing material.
In all other cases, it is imperative to carry out work to protect the insulation, sheathing and laminate, if you plan to lay this floor covering, from moisture. Roll materials are laid overlapping. The seams are sealed with waterproof tape or bitumen mastic (for roofing felt).
You can read more about waterproofing work on a balcony or loggia on our website.
Pros and cons of insulating the floor on the loggia with penoplex
Like any action, floor insulation has its positive and negative sides. They are mainly related to the properties of the material itself.
To improve the performance characteristics of the insulating layer, penoplex is covered with foil foamed polyethylene on top
Advantages:
- Penoplex has good soundproofing properties. To improve the thermal insulation characteristics, it can be additionally covered with foil-foamed polyethylene foam.
- Resistance to mechanical stress makes it possible to use slabs for floor insulation without laying joists. This will not work with polystyrene foam. Soft material under the floor covering can only be laid using logs. A subfloor made of boards or particle boards is laid on top.
- Penoplex is resistant to moisture, is not destroyed by fungus, and retains its performance characteristics in close contact with dampness.
- Thermal insulation is considered fireproof and can withstand temperatures from - 50 oC to + 75 oC.
- If it is necessary to insulate the floor, penoplex can be laid on a surface made of any material, the main thing is that it is level.
The disadvantage is the destruction of the structure of the material from prolonged exposure to sunlight. However, the insulation on the balcony is hidden under the subfloor and finishing coating, so this minus should not be taken into account. For many, the high cost may seem like a disadvantage, but it is justified by the service life. It is better to invest once than to repeat the procedure every 5-7 years, using cheap thermal insulation with worse performance characteristics.
The only important disadvantage is poor fire resistance. Penoplex does not support combustion. However, when exposed to fire, it begins to melt and emit suffocating smoke, which is dangerous in the event of a fire. For this reason, it is still better to lay the material under a concrete screed.
Floor construction
The insulated covering should be constructed at a level close to the floor of the adjacent room. More often it is made equal or slightly lower. If it is necessary to raise the balcony floor relative to the general one in the apartment, it is better to provide a small recess-pocket near the door to prevent moisture from penetrating into the room.
To work you will need tools and materials
- Roulette.
- Jigsaw or wood saw.
- A wooden beam of the required section (approximately half the lifting height) or logs of appropriate thickness.
- Insulation.
- Material for the floor surface: board, sheets of thick plywood, chipboard (with a thickness of 16-18 mm, you can lay it directly on the logs).
- A container of construction foam.
10 mm sheets are laid on a pre-created “grid” of boards or low-quality covering. Typically, thin chipboard or plywood serve only as a means of leveling the surface.
The work is carried out in several stages.
Timber cutting
Timber cutting
The timber is cut to the required size for laying across the balcony. The gap to the walls should be about 5 cm.
Fastening the timber
Fastening the timber
Fastening the timber
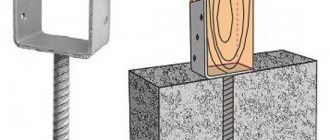
The cut parts are placed at a distance of half a meter. They need to be attached to the surface of the balcony slab. The most convenient way to do this is with the help of “new settlers” - self-tapping screws with a plastic plug that is inserted into the concrete. To avoid splitting, the distance from the edge of the beam to the first screw is left 7-10 cm. At this stage, you can almost not monitor the final floor level - this task will be performed by subsequent work.
Laying insulation
Laying insulation
When polystyrene foam or polystyrene foam is used, the material is cut into the required pieces to fill the gaps between the beams. Another recommendation: the level of insulation should be level or slightly below the surface of the beam. Gaps should be minimal. Wherever necessary, the gaps are foamed. When using mineral wool, the insulation is tightly placed in the free space.
Penofol is easier to install. A long strip is cut to a size 40 cm larger than the length of the balcony. It is simply laid on top, so that there is approximately 200 mm of “extra” insulation around the perimeter. If it is necessary to connect the pieces, the laying is done with an overlap and sizing with aluminum tape.
Level leveling
The level for laying the surface is finally leveled and an air gap is created for thermal protection. To do this, beams are cut for longitudinal laying. In size - the length of the balcony minus 5 cm. The blanks are stacked, while the final level is carefully controlled. Linings are used on a base of cross beams.
Creating a Floor Surface
Creating a Floor Surface
Boards or other material are sewn on - chipboard, plywood, etc.
As a result, a flat surface is formed on the balcony, which has complex properties. It combines insulation, an air layer to absorb heat transfer and prevent moisture condensation. Ceramic tiles, linoleum or laminate can be laid on such a coating.
Balcony floor
To simplify the work, you can lay the timber in one layer, forming a grid and filling the gaps with insulation. This is not so convenient, since you will have to carefully control the level of each piece of timber, of which there will be many and of a smaller size. The overall thermal insulation of the coating will be worse. However, this approach allows you to save the height of the balcony floor.
How to choose penoplex for floor insulation on a balcony
Penoplex slabs are produced in different sizes. Selecting this option will not cause any difficulty. It is enough to measure the floor of the balcony and calculate how much material is needed. The second nuance is the shape of the ends. It can be smooth and with locks. For thermal insulation of the floor, it is optimal to use the second option.
The main choice of the appropriate type of penoplex is made based on physical and mechanical properties
When choosing insulation, it is more important to pay attention not to its size, but to its physical and mechanical properties. Penoplex is produced in different brands. The slabs differ in density and thickness. Thermal conductivity, sound insulation, and resistance to mechanical loads depend on these parameters. The softest slabs are those marked 31C. They are used to insulate walls, ceilings, but not floors.
Type 45 has improved physical and mechanical properties, but it is unwise to use such slabs for balconies. The impact of a huge load is not expected here. It is optimal to lay the type of slabs marked 35 on the floor. This material does not deform even under furniture legs.
How to insulate a balcony correctly: work technology
Work begins with careful measurement of the dimensions of the balcony and preparation of its structures and surfaces. At this stage, the balcony is cleared of all foreign objects, glazed and sealed if necessary. To fill cracks, high-quality sealants for external use, cement-polymer mixtures and similar moisture-resistant materials are used. Excess polyurethane foam (if any) is cut off with a knife immediately after it hardens, the resulting seams are coated with silicone or puttied.
Particular attention is paid to the overlap. The condition of this structure is assessed in advance - by tapping and visual inspection
Any cracks, voids and holes are filled with sand concrete; if necessary, the ceiling is strengthened with a thin reinforced screed over the entire area of the balcony. Structures in good condition are simply covered with 2-3 layers of antiseptic primer and protected from moisture using roll or coating waterproofing.
Waterproofing materials are installed on exclusively dry, smooth and clean balcony surfaces. Good results are achieved by completely covering the floor and 10-15 cm of walls with penetrating waterproofing such as Penetron or Aquatron (relevant when working with concrete structures) or coating the coatings with bitumen or polymer mastics. If this is not possible, the floor and walls of the balcony are covered with penofol, specialized roll materials, laid on the floor in at least 2 layers with the obligatory covering of the joints with tape or tape.
When insulating the floor with compacted polystyrene foam under the screed, the procedure may change. In such cases, dry subfloors can be covered with ordinary polyethylene film with the slabs tightly fitting to each other. After this, the insulation is filled with a thin (no more than 3-5 cm) cement-based screed using modern self-leveling mixtures. If possible, these works are combined with the installation of heated floor elements; upon completion of the work, tiles or another type of floor covering are laid on the balcony floor.
In other cases, the requirements for the reliability of floor waterproofing remain unchanged. Mineral wool, expanded clay, and ordinary types of polystyrene foam are placed between pieces of timber impregnated with antiseptics, fixed using roofing screws or similar long hardware with a bolt head.
At this stage, special attention is paid to the level of the sheathing and filling any resulting gaps with foam. The laid slab or granular insulation is covered with a thick film and floor materials with a mandatory ventilation gap of 1-2 cm
Now let's look at how to insulate a balcony correctly. The technology for insulating balcony walls depends on the type of thermal insulation layer chosen. At this stage, you can use sprayed polyurethane foam or slabs fixed with glue and plastic dowels, but the final decision is made by the owner. If the areas adjacent to the windows are sufficiently sealed, there is no need to place a vapor barrier layer between the cold wall and the insulation (when using a number of fibrous varieties, such actions are considered a violation). The outer wall, on the contrary, is almost always insulated from steam and condensation. The stage of wall insulation is completed by covering the layer with finishing materials.
Ceiling insulation is carried out according to a similar scheme with the addition of a mandatory layer of waterproofing. Thermal insulating materials are fixed with glue or fixed in the sheathing and covered with a vapor barrier. If possible, wires and other communications (both autonomous and leading to the apartment) are hidden in the ceiling system.
Work on insulation and arrangement of the balcony is completed with interior decoration. After completion, the balcony is well ventilated and warmed up to remove construction moisture. During the first winter of operation, the owner monitors areas where condensation appears and eliminates possible shortcomings.
Penoplex thickness for floor insulation on the balcony
An important parameter is thickness. Here you need to choose the right material by performing several calculations. The slabs are produced with a thickness of 20-100 mm. The thicker they are, the better the insulation and sound insulation, but the free space is hidden. If in the case of walls and ceilings this threatens to reduce the usable area, then more complex problems may arise with the floor.
Important! The 20 mm thick slabs have smooth edges. During docking, they are filled with foam. Penoplex of greater thickness is produced with a locking connection, which simplifies installation.
Penoplex thickness varies from 20 to 100 mm
According to this parameter, penoplex for the floor is calculated taking into account the thickness of all layers: screed, rough and finishing coating, additional thermal insulation. The finished balcony floor should not rise above the threshold, otherwise it will create discomfort.
Finishing work
After the insulation work has been completed, it is necessary to lay out the subfloor.
To do this, use ordinary boards, fiberboard, plywood or special drywall. It must be laid in such a way that there is a gap of several millimeters between the subfloor and the wall so that the floor can freely expand as the temperature changes.
Next, you can lay the material you like on the finished floor. Most often, tiles or laminate are used. It all depends on your preferences.
How to prepare a loggia floor for insulation with penoplex
The thermal insulation process involves preparation. This implies taking comprehensive measures. They prepare not only the floor, but also the entire balcony.
Preparing the floor for insulation requires complex measures
The preparatory process consists of several steps:
- If the balcony is not yet insulated and there is no glazing, this deficiency needs to be corrected. Otherwise, the floor insulation procedure itself is meaningless. Glazing is optimally performed with double-glazed windows with at least 2 chambers. On the balcony itself the walls and ceiling are insulated.
- After all work, the balcony is cleared of debris and dust.
- The concrete base is being repaired. Small cracks are sealed with putty. When potholes are large, it is wise to pour new screed and let it dry. If tiles are laid on a concrete base, they are first removed with a hammer drill, and then repairs begin.
- With the installation of thermal insulation, the floor will rise slightly. For this reason, during preparation for the process, the location of the socket, switch, and heating radiator is provided if the balcony is residential.
After the preparatory process, the main work begins.
Important! By the time thermal insulation work begins, the balcony floor should be perfectly dry.
How to insulate a balcony floor with penoplex
Methods of insulation largely depend on what finishing coating is chosen. The procedure is carried out using two technologies: the slabs are laid along the joists and under the screed. However, it is precisely because of the chosen finishing coating that each technology has its own nuances.
Insulation of the floor with penoplex on the loggia along the logs
The method is considered the most difficult and costly. It is most often used if the floor needs to be raised high. The logs allow you to do this with a minimum load on the balcony slab. If you lift with a thick concrete screed, the structure may not withstand heavy weight.
With the help of logs you can raise the floor high without creating a large load on the balcony slab
The process consists of the following steps:
- The concrete slab is covered with waterproofing. The choice of material is at the discretion of the owner. A film, roofing felt, a special membrane or bitumen mastic will be suitable. The edges of the waterproofing should extend onto the walls.
- Using a laser and water level, markings are made. The level of laying the logs is calculated so that the finishing floor covering of the balcony does not protrude above the threshold and floor of the adjacent room.
- For the logs, dry, even pine beams with a side size of 50x50 mm are used. The elements are laid in increments of 30-40 cm. The outermost logs are laid from the walls with a distance of 10 cm. A gap of 3 cm is left between the ends of each beam and the walls. Each log is anchored to the balcony slab.
- Penoplex slabs are cut to the required size and inserted inside the cells between the joists so that they fit tightly. The gaps are filled with foam.
- After laying all the slabs, they are covered with a vapor barrier film or foil insulation made of foamed polyethylene.
The insulation process is complete. All that remains is to lay a subfloor made of boards or particle boards on the joists and lay the finishing coating. You can simply paint the boards.
Insulation of the floor on the balcony with penoplex without logs
The simplest way to thermally insulate a balcony floor is to glue penoplex to a concrete slab without using joists. Surface preparation requires thorough cleaning of dust. The base is treated with deep penetration soil. A membrane or mastic is used as waterproofing.
When laying without joists, the thermal insulation is glued to the balcony slab
The slabs are cut to the required size. In a bucket, glue is mixed with a drill with an attachment. Any will do, for example, Ceresit CT-83. The finished glue is applied with a notched trowel to the concrete base and a thin layer on the slab itself. Penoplex is pressed tightly to the floor, pressed down with a heavy load.
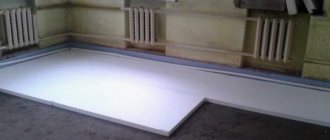
When all the elements are glued, the joints are covered with foam. The weights are removed after the glue has completely hardened. A floor made of plywood, particle boards is laid directly on top of the thermal insulation, or a concrete screed is poured.
Insulation of the floor on the balcony with penoplex under the screed
Filling the screed over the thermal insulation is most often carried out when installing a “warm floor” system on the balcony. Initially, the technology requires the implementation of similar actions taken for the method without lag. When the penoplex is glued, the joints are foamed, begin laying the heating circuit.
For strength, the screed must be reinforced with mesh.
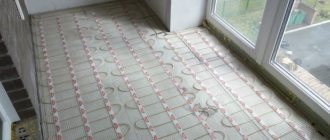
First, the entire floor area is covered with a vapor barrier. Place the foil heat reflector with the mirror surface facing up. The contour of the “warm floor” system is distributed over the floor. The first layer of screed 2-5 cm thick is poured with concrete mortar. After the mortar has set, a reinforcing mesh is laid and beacons are placed. The final layer of floor screed on the balcony is poured onto polystyrene foam with a thickness of 4 cm. It is ideally leveled along the beacons, since the finishing coating will already be laid on this surface.
Important! If it is not planned to lay the heating circuit of the “warm floor” system on the balcony, the total thickness of the screed is reduced, but not less than 4 cm.
Insulation of the floor on the balcony with penoplex under the laminate
A special feature of laminate flooring is the need to lay it on a hard surface. Despite the elasticity of penoplex, it still remains a soft material. Laminate flooring cannot be laid directly over thermal insulation. A point squeeze effect will occur. That is, dents will remain at the load points.
A rigid base is installed on top of the penoplex under the laminate.
To organize a rigid condition, insulation is done using the technologies discussed above: under screed or joists. You can simply glue penoplex without lag. Plywood or particle boards are laid on top. Such a rigid base is sufficient for laying laminate flooring.
Selection of floor material and design
Do-it-yourself insulation of a loggia floor begins with the question: Which insulation should I choose?
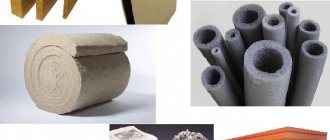
The most popular thermal insulation materials are:
- Styrofoam. The most popular material for thermal insulation, due to its low price and ease of use, 50% of all balconies and loggias in the country are insulated with it. Its advantages include low thermal conductivity, excellent moisture resistance and low weight, while its disadvantages include fragility.
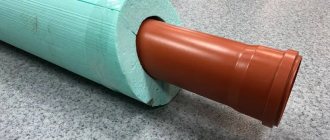
- Penoplex. Extruded polystyrene foam, a “relative” of polystyrene foam, which differs from it in increased strength, durability, ease of installation and, as a result, higher cost, is presented in the following photo.
USEFUL INFORMATION: How to lay parquet on a concrete floor: laying on a screed, all options
- Mineral wool. It is considered one of the best insulation materials in terms of technical and operational characteristics. It is durable, does not burn, and is a vapor-permeable material. The main disadvantage is the fear of moisture, due to which mineral wool loses its properties, so when using it, high-quality vapor and waterproofing is required.
- Expanded clay. Bulk insulation with good thermal insulation properties and affordable cost. For high-quality insulation, a large layer is required - from 15 cm. Disadvantages include high hygroscopicity.
- Penofol (isolon). Foamed polyethylene with foil coating (photo). To insulate a balcony, its thickness will not be enough, but it is successfully used as a heat reflector and vapor barrier in combination with other insulation, such as mineral wool, making thermal insulation ideal.
You can insulate the floor on the loggia with your own hands in two ways:
- Insulation by joists. A simple and quick method of installing an insulated floor; any of the above insulation materials can be used for its implementation. Thermal insulating material is placed in the spaces between the joists, and a flooring of boards or plywood sheets is placed on top, as in the following photo.
- Laying insulation under the screed. When choosing this method, you can insulate the floor on the loggia with expanded polystyrene (foam plastic, penoplex) or expanded clay. Screed is the best choice when installing a “warm floor” on a loggia, but you need to take into account that you will have to wait a long time for it to dry.
Important! Laying a heat insulator under the screed is possible when insulating a loggia that has a reliable ceiling. In the case of a balcony, it is better to immediately choose a lag floor structure, since the balcony slab may not withstand the weight of the screed.
Advice from professionals
A few simple tips from experienced builders will help you avoid mistakes when thermally insulating a loggia. They are worth learning before starting work.
Do not use a lot of foam when blowing joints
In the video, insulation of the floor with penoplex on the balcony and other useful information:
Excess foam at the joints will not do any good. As it dries, it expands greatly. If there is a lot of foam, the slab will begin to deform. It is enough to apply a thin layer to the edges, and reliable adhesion will be ensured.
The film will help prevent the accumulation of moisture under the thermal insulation. It is spread on the base before laying the slabs. This action is especially important if you plan to install joists and wooden floors.
Technological methods for creating an “all-weather” balcony
Some masters go further. They want to get not just an additional room, but also to provide all living conditions there. The optimal temperature comes first.
A heating system is created on the balcony. It should immediately be noted that branches from the central heating system of the house are unacceptable. An autonomous structure is being built. The norm for ensuring a standard temperature of 18°C is a heat transfer power of 150 W/sq.m.
"Film" heating
Warm floors on balconies and loggias
Modern technologies have made it possible to create a means for fairly economical electric heating. Structurally, it is a film made of a carbon-based resistive element. When voltage is applied, the material heats up, and the temperature can be easily controlled by adjusting the input parameter. When constructing heating on the balcony, passive insulation is done according to the method described above. The next step is to cover the floor with a special heat insulator for film heating.
Film blocks are placed on top and electrical connections are made. The parts are secured with double-sided tape. Linoleum, carpet or laminate is laid on top, which are designed to work in conjunction with a “warm floor”. The work is simple and the heating is quite efficient and easily controlled using a simple input rheostat.
Electric cable heaters
Warm floor on the balcony
The technology used is the same as that of film elements, just a different design. The cable is flexible, it is easy to lay it in one piece, without resorting to connecting different pieces. In addition, you can “wall up” it in concrete or adhesive on which ceramic tiles are laid.
If you don't mind electricity, you can go the minimal route. A primary leveling screed is made on the balcony, as described above. The false floor covering is not constructed. The heating thermal insulator is immediately laid, the welded reinforcing mesh is laid and the heating cable is installed. A laying layer is formed on top. This can be a thin three- or five-centimeter concrete screed or just a layer of adhesive. The tiles are laid at the same time.
The work gets done easier. However, this approach will require more energy consumption for heating. If the floor is covered with ceramics, it must be operationally compatible with “warm floors”.
Video - Warm floor on the balcony
Mini water heating systems
Warm floor on the balcony
Today, ready-made electrical solutions in the “warm baseboard” format, also known as the “contour system,” are spreading quite quickly. Structurally it is:
- a small electric water boiler, the size of a kettle;
- small-sized bleed pump;
- temperature control and control unit.
The coolant circulates through a thin tube. This structure is laid in the same way as a classic heated floor or electric cable, as described above.
The volume of coolant in the structure is minimal, about 3-5 liters. The system takes little power, the water circulates very quickly, so the floor surface will be evenly warm. Unlike cable or film, this solution has thermal inertia, that is, the system does not cool down immediately. However, the application is fraught with danger - if the temperature drops to sub-zero, the water will freeze and damage the tubes. Frost-resistant mixtures should be used as a coolant where the climate poses a risk of the balcony cooling below zero.