Repair and decoration
06/03/2018 Anastasia Prozheva
In order for a residential building to be warm and comfortable, a heating system should be installed in it. The power and wiring diagram may be different, since it all depends on the area of the house and the equipment used. What could be the heating system of a three-story private house, how to calculate its power?
Home heating system
Gravity and forced heating systems
To heat a house, you can use gravity or forced systems, which differ in their characteristics.
In gravity heating, non-freezing liquids, such as antifreeze, are used as a coolant, but hot water can also be used.
The coolant circulates without a pump; this occurs only due to the occurrence of a temperature difference at the outlet and inlet of the boiler.
Today, this system is considered outdated; a more advanced forced system is increasingly being used, where the coolant moves using an installed pump. This option is more reliable and is preferred for installation in private residential buildings.
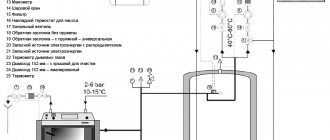
Water heating device in a three-story house
The installation of this type of gas heating in a house with three floors has its own specifics.
Mainly, it lies in the fact that for its operation it is necessary to use a heat carrier with forced circulation.
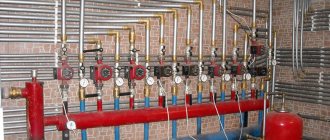
The system itself in this case will consist of the following components:
- Heating boiler;
- Expansion tank;
- Collector device;
- Pipelines;
- Heating device.
The water itself circulates thanks to the action of a circular pump. And in order to heat the boiler, various fuels can be used. This includes coal, firewood, kerosene, and gas.
Electricity is often used, as well as other alternative methods of generating energy, which are becoming more popular every day. But, most often, for our region, gas is used, of course.
Boilers for heating systems
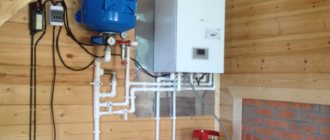
The heating system of a private house necessarily includes a boiler for heating water. Most often these are modern gas boilers, which are easy to install with your own hands, although it is recommended that the connection be carried out with the participation of specialists. There are two types of such boilers:
- floor-standing gas boilers can have atmospheric, combined burners. During operation, the equipment does not create much noise; pipes from a common gas pipeline can be connected to it or cylinders can be connected. Some combined models have the ability to operate not only on gas, but also on diesel fuel. A similar installation is most often used for the heating system of a large house;
- The wall-mounted gas boiler is small in size; it is designed to heat a three-story house; it can be installed in any convenient place in the building, most often in the kitchen or utility rooms. The heating power is small; for a small house of 3 floors it is quite enough. The boiler is mounted on the wall, the necessary wiring already extends from it.
Heating pipe options
The heating system is not only a boiler and radiators, but also pipes through which the coolant moves under pressure. To install a heating junction for a private three-story house, you can use pipes from the following materials:
Related article: Anyone can do sewing curtains and lambrequins with their own hands
House heating system diagram.
- steel pipes (galvanized, stainless). When installing such pipes, it is necessary to take into account that a welding machine is required for the connection. This material is durable and its service life is quite long. But there are also disadvantages, which include the need to use welding and experience working with metal threaded connections. Today, steel heating pipes are used less and less, as there are cheaper, but no less high-quality materials;
- Heating can also be carried out using copper pipelines, which today are considered the highest quality and most reliable. They can withstand high pressure and are not subject to corrosion, but the cost of such pipes is high; today they are used only for exclusive construction. For connection, special high-temperature soldering using silver is used. After work, all joints are carefully sealed;
- polymer pipes are a large group that includes polyethylene, metal-plastic, polypropylene with aluminum reinforcement. The products are easy to install, they are of high quality, some can be mounted inside the wall, which has a positive effect on the interior of the house. The heating system is installed quickly; various methods are used for connection, including pressing, the use of a special apparatus for welding, and temperature connection of pipes.
When choosing pipes, you need to take into account how complex the system will be, whether it is possible to lay the pipeline in the walls, and what requirements apply to the connections.
Types of heating systems and factors influencing the choice in favor of each of them
Before you start designing a heating system, you should decide on its type, because all subsequent work, including installation, depends on this. At the moment, there are several of the most popular and popular types of heating systems. The most popular now is the water heating system, which is quite affordable in price and makes it possible to use various types of fuel, from gas to electricity. The air heating system has also become very widespread, which, by the way, is also distinguished by the fact that the design of this system is the cheapest of all.
It does not require laying pipes or installing radiators, but raises questions due to its efficiency, level of efficiency and certain difficulties in maintaining the desired and constant temperature. Electric and infrared heating systems are less widespread, which is caused by the rather high costs of their maintenance and operation.
The choice in favor of one type of heating system or another should be based on a number of clear factors that the home owner must take into account:
- the type of fuel relative to its availability, because given the existing opportunity to connect to the central gas supply, it would be logical to organize water heating using this coolant, for example;
- volume of heated area: the larger the house, the more powerful the heating system should be; in this case, it is perfectly clear that a three-story mansion cannot be heated with wood and a conventional stove;
- what tasks should the heating system of the house solve: if the house is lived in on a permanent basis, then the choice of heating should correspond to the needs of all residents.
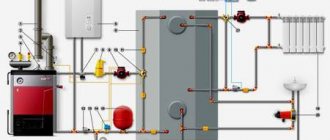
An example of organizing a heating system
You should consider an example of a heating scheme for a three-story house, made in accordance with all rules, regulations and requirements.
Common data:
- air temperature outside the house -28 degrees;
- the total duration of the heating season is 214 days a year;
- the calculated temperature for individual rooms does not exceed +25 degrees.
Diagram of the heating system of a three-story house.
The coolant will be hot water, heated to a temperature of 70-90 degrees.
The entire heating system of a three-story house includes manifold wiring and side connections of heating devices (that is, radiators). The following materials are accepted for the heating system of a three-story house:
- collector wiring;
- metal-plastic or polypropylene pipes;
- liners, risers that go to the collectors;
- special heating pipes made of metal-plastic with insulation.
Related article: DIY crafts from old jeans: simple ideas and ready-made step-by-step master classes (38 photos)
Laying of pipelines is carried out as follows:
- for basements - in the open state;
- vertical risers of the system are in a special groove;
- for floor-to-floor distribution - in floor structures.
To compensate for temperature extensions, it is necessary to use self-compensation of individual sections, such as bends, turns, etc. The house's pipeline system must be divided into separate sections by fixed fasteners.
An example of a heating system.
The heating system of a three-story house includes drawing up a project and its approval. After this, you can install the boiler of the selected type and wire it according to the drawn up project. It should not be forgotten that pipelines and all equipment must be grounded in accordance with the standards. In the boiler room itself, where most of the equipment is located, it is necessary to ensure the presence of supply ventilation to ensure air supply and exhaust of combustion products.
In this case, the following calculations are taken into account: for every 1.16 kW of heating power, five cubic meters of air supply are required, but not less than 150 sq.cm. The ventilation hole should be located no lower than 30 cm from the floor level. For exhaust ventilation, the following value is taken into account: for every 17 kW of heating power in a house, one square decimeter of air is required. All ventilation pipes must be wrapped in a layer of thermal insulation material.
The boiler room where the heating system will be located requires lighting. The calculation is as follows: for each cubic meter there should be at least 0.03 sq.m of natural light. Electricity must be supplied to the boiler via a 3 * 1.5 sq. mm cable.
When venting a chimney to the roof, the following conditions must be observed:
- at the same level with the ridge of the roof of the house, if it is located three meters from it;
- above the wind zone on the roof, but not lower than half a meter horizontally.
Water supply for the heating system of a three-story house is carried out by connecting it to a general water supply system from a well or by any convenient method according to the project.
Heating diagram for a three-story house with radiators and heated floors
When connecting a water floor to a boiler, a problem arises: different temperature conditions. If the coolant heats a regular boiler, and not a low-temperature one, then its output temperature is 70°C-85°C. Sometimes higher, sometimes lower - it depends on the situation and the boiler settings, but, in any case, the temperatures for a heated floor are unacceptable. Even taking into account the thermal inertia of the cement screed, it is impossible to apply more than 50 ° C: this will threaten overheating. The most optimal option at the entrance to the water floor pipes is 40-45°C.
The heated floor must be connected to the boiler in such a way that coolant at a lower temperature is supplied to the circuit. In a closed system, which is a heated floor, the temperature can only be lowered by mixing the cooled coolant from the “return” with the heated coolant. This is what the mixing unit or mixing unit does.
A schematic diagram for connecting a warm water floor can be depicted as follows:
If there are several underfloor heating circuits, a collector unit is installed (or assembled) after the mixing unit. This is a comb with several inputs and outputs (from 2 to 20), to which the heated floor circuits are connected. In its simplest form, it is a unit for parallel connection of underfloor heating loops.
In more “advanced” collector models, various devices are installed at each input. There are often bleed valves on the manifold to remove trapped air from the system. An air lock can block the movement of the coolant along the circuit, therefore the use of air vents is advisable.
In collector groups there are shut-off valves on each circuit. They can be controlled manually or using servomotors. Servomotors receive commands from automation, but such devices are already called collector groups or devices. They can also contain a mixing group and a circulation pump, and are then called collector stations. Naturally, the more complex and functional the device, the higher its cost.
This is what a connection diagram with a two-way valve might look like
You can save money if you wish. Assemble the mixing unit yourself and install a pump in the system. You can also make a collector group yourself, or you can buy a ready-made, but not very expensive, collector.
Let's look at the structure of the mixing unit. It can be implemented in two ways:
- using two valves: two-way and balancing;
- three-way valve.
Both schemes have advantages and disadvantages. The first scheme is good in that a constant temperature coolant is supplied to the collector. But its use is limited due to the fact that the heating area should not exceed 200 m2 (due to limited valve capacity). The system assembled according to the second option can pass larger volumes, but the temperature regulation occurs spasmodically. You can come to terms with this, since the inertia of the screed is great and these jumps are not felt. But in such a scheme, sometimes situations arise when hot water is constantly supplied without mixing (in the event of automatic failures and valve malfunctions). Let's take a closer look at how both schemes work.
Factory version of the mixing unit from Valtec
The operation and capacity of the two-way valve is adjusted depending on the readings of the remote sensor. High-temperature coolant from the boiler is supplied through it. Cooled water flows from the return pipeline through the balancing valve. At the junction point the two streams mix. Coolant with a reduced temperature is pumped through a circulation pump and supplied to the collector. The temperature of the mixed flow is controlled by a sensor, adjusting the gap (and hot water supply) on the two-way valve.
Detailed wiring diagram for a heated floor boiler (with a two-way valve)
To prevent backflow, you need to install two check valves on the “return”. As mentioned earlier, this scheme is good because the adjustment is smooth (due to the low throughput of the valve). In addition, in this scheme the addition of cold water is constant. And therefore the possibility of supplying only hot water from the boiler is excluded.
The operation of the three-way valve can be controlled by a servomotor or an external temperature sensor (depending on the configuration you choose). The difference here is that the flows are mixed inside the valve, and the accuracy of maintaining the temperature depends on its operation. And this device has a large throughput, so that minor measurements in the position of the valves lead to quite sharp temperature changes. But when using weather-compensated automation and with large water floor contours, such a system is the only option.
Two options for mixing unit or mixing unit (click to enlarge size)
If the temperature of the coolant at the boiler outlet can be set at your discretion (in systems without radiators), then the collector unit is connected directly to the boiler. This is the simplest option for connecting a water heated floor, but, unfortunately, not always possible.
If the boiler can produce a coolant temperature of 40-45 ° C, then it is connected directly to the collector group
The complexity of the connection diagram may vary and depends on the organization of the heating system as a whole. In the case of a complex heating system “radiators + water heated floor”, a mixing unit is needed that will lower the temperature of the coolant. To connect several underfloor heating circuits, a manifold is required.
Heating a private home is one of its most important systems. To accomplish its tasks, it must be efficient, economical and well-designed. Today, several varieties of such systems are used, and each of them has pros and cons.
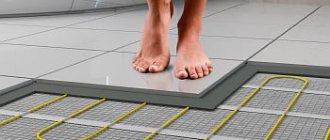
Warm floor
The heating system of a two-story house consists of the following components:
- A boiler is a source of heat; it runs on gas, coal, wood, electricity or solid fuel. However, gas boilers are most often used, because they are beneficial from an economic point of view. Their power is calculated based on the area of the room; 100 W of power is required for each square meter, taking into account 15-20% of the reserve.
- The coolant is a filler in heating lines, most often it is water, but sometimes antifreeze is used. This is justified when the house is rarely used, because this liquid does not freeze.
- Pipeline – pipe distribution serves as a pipeline for connecting radiators to the boiler. Plastic is most often used, but some systems, such as gravity systems, use metal.
- Radiators are the main elements of heating rooms. They consist of sections and are made of aluminum, metal or cast iron. Aluminum has the highest heat transfer coefficient.
- Pump – provides forced circulation of coolant in the system.
Heating battery
According to its type, the circuit can be single-circuit or double-circuit. In the first case, the boiler is used only for heating. And in the second it also provides hot water supply.
Important! For effective operation, the heating project must be calculated by specialists.
There are several heating systems in use today, each with pros and cons. Their main difference is in the implementation of connecting radiators to the boiler. In addition, many schemes include the use of underfloor heating, which increases comfort and heating efficiency.
Leningradka
Another name for such a scheme is Leningradka. Its main feature is the use of one pipe to connect the batteries. The supply passes through each of the elements, which are connected in series, and then one solid pipe returns the coolant to the boiler.
- ease of implementation;
- saving materials;
- It is possible to realize natural circulation of the carrier.
However, Leningrad also has disadvantages:
- uneven heating of radiators;
- difficulties with connecting underfloor heating;
- difficulties with adjustment;
- not recommended for use in two-story houses.
In addition, if it is necessary to repair individual radiators, you will have to stop and bleed the entire system, and this is not very convenient.
Battery connection
This project is considered the most optimal and effective. In this case, two lines are used to organize heating of two-story buildings:
- supply - through it the coolant is supplied from the boiler to the batteries;
- return – through this pipe the cooled water returns back.
Radiators are connected to pipes in parallel. The only disadvantage of this scheme is the high consumption of materials compared to a single-pipe one.
Advantages of the two-pipe option:
- the ability to adjust each radiator separately;
- high efficiency;
- the ability to use any pipes and radiators;
- easy connection of underfloor heating.
In addition, when using a two-pipe circuit, the temperature of all batteries is equalized. And this increases the heating efficiency.
Using two pipes
The principle of using gravitational systems is based on the natural laws of physics. The pipes are laid out in such a way that the coolant moves naturally in them, without the use of a pump.
- energy independence;
- ease of installation.
- Large diameter pipes are required;
- difficulties connecting the heated floor;
- difficulties with adjusting the system;
- low efficiency.
Since this connection scheme has a lot of disadvantages, it is used extremely rarely. Most often, preference is given to two-pipe wiring with forced circulation. This heating scheme for a two-story house with connected heated floors and radiators ensures high heating efficiency and ease of use.
Average score of ratings is more than 0
Let's consider the heating scheme of a two-story country house. We will have heated floors installed on the first floor, and radiators with manifold wiring on the second floor. The house has a size of 9 x 9 m, but the heated area is 110 m2, so we do not take into account the porch, balcony and subtract the thickness of the walls, taking only the heated area for calculation.
On the 1st floor we have the following premises: boiler room, storage room, toilet, sauna, living room, kitchen and hallway.
On the 1st floor we will install only heated floors without radiators, since the house is planned for permanent residence. Now, if it was planned that the house was designed only for weekends, then it would be necessary to install radiators, because the heated floor itself has great inertia (it takes a long time to heat up and cool down for a long time), the heated floor simply will not have time to warm up to operating temperature (so that it can it is enough to give off heat), this takes 2-3 days.
We begin the installation with the boiler room, install the boiler and connect the main pipes. All the necessary components are already installed in our boiler: a safety group, an expansion tank, a circulation pump and we do not need to install them. But before entering the boiler, do not forget to install a filter; in our case, there is a 1” oblique filter, although it was possible to install 3/4, there would be no difference.
Let's pay attention to the collector for radiators (the radiators will be installed on the 2nd floor). A total of 6 radiators are planned, but we are installing a collector with 7 outputs, one more than our radiators. This is necessary in order to fill and drain coolant. The coolant drain and fill unit is usually placed at the lowest point in order to be able to easily drain all of it from the system, but in our case this is not suitable, since the lowest point is a warm floor. Thus, we have the opportunity to easily drain all the coolant only from the radiators, but if we want to drain it from the heated floor or from the entire system, then we will have to vent the system. Next, we install a pumping and mixing unit for the heated floors. This unit is needed to ensure circulation of the coolant through the heated floor at a predetermined low temperature. Since the coolant we receive from the boiler is 60-70 °C, and the heated floor should receive a temperature of 40 °C, the mixing group, as a result of mixing, dilutes the cooled and hot coolant to the desired temperature.
If you do not install a mixing group, this will lead to the fact that the floor will be hot and you will not be able to walk on it, and due to the increased temperature, the deformation of the pipes will increase and they will grind into concrete, which will lead to their further destruction.
Next, we install a manifold for the heated floor; it differs from the usual one in that it has the ability to visually correct and equalize the flow rates on different lines.
After we have assembled all the necessary components, we begin to prepare the floor for laying pipes.
- We lay polystyrene foam insulation 50 mm thick. You can buy it at the Petrovich construction hypermarket.
- We install the heat reflector.
- We lay down the reinforcing mesh. It is needed to attach pipes to it. Previously, clips were used for this purpose, but now it is much easier and faster to install a mesh and attach pipes to it using clamps or wire.
The pipe for the heated floor is a 20 mm metal-plastic pipe. The maximum length of one line is 100 m. The distance between the pipes is 20 cm.
The pipes can be laid as you wish, using a snake or a snail.
Let's move on to the second floor. We will install radiators in all rooms. And then we'll connect them. We lay pipes to the radiators and connect them to the collector.
To connect the radiator we use the lower side connection unit. This unit allows you to give and take away coolant from one connection point, and can also be used as a bypass. That is, even when the radiator is turned off, the coolant, bypassing the radiator itself, will circulate through this unit.
To connect pipes to this unit, you do not need to use press fittings; a crimping system is used here, but it is not entirely simple. The fact is that you cannot use standard crimps in country houses, they begin to leak over time, but in this case a special design is used with sleeves that fit very tightly and are assembled once.
Once everything is assembled, you can pour the floor. But before this, it is necessary to install a 1 cm thick damper tape around the perimeter of all walls. Then you can pour concrete.
- Video author: Marat Ishmuratov
- Author's channel: https://www.youtube.com/channel/UCyrdKMbXbRXONaCrEY0rnPg
- Video:
We will talk about how you can connect another radiator circuit to the boiler, say, the circuit of the second floor of a building, and we will also look at how to connect a heated floor circuit.
- Radiator circuit connection
After the boiler, the two circuits are separated using manifolds on the supply and return, and the radiator circuits of the first and second floors are connected to the collectors.
Do not forget to install shut-off valves directly in the collectors themselves.
We recommend installing not ball valves, but the following valves:
Since we have two radiator circuits on the first and second floors, these valves can be used for balancing without any problems.
Usually you have to squeeze the second floor. Let's take a closer look at what scheme needs to be used there.
Let's say there is an attic in the house, and you need to install heating there, but you can only connect two or four radiators. In this case, there is no point in building a Tichelman circuit; it is enough to carry out the supply and return from the first floor and use a conventional two-pipe system.
The result was two small contours. With this connection everything will work fine. But if there is a full second floor and there are many radiators located along the entire perimeter of the floor, then in this case it is worth connecting the radiators according to the Tichelman scheme.
We get the same connection diagram as on the first floor.
The entire coolant moves in one direction - both supply and return. In this case, there is no need to perform balancing on the radiators themselves.
All radiators heat equally at 100% of their power.
- How to connect a heated floor to the system
The warm floor is connected by a separate third circuit, and the collector will have to be installed on three outputs.
To piping a heated floor, you will also need a manifold, a separate circulation pump and a mixing unit. The result is the following diagram for connecting three separate circuits.
If the house is large enough, the first floor has an area of more than 100 m², there is a possibility that the built-in circulation pump in the boiler will not cope and will not provide normal circulation for the entire heating system.
Then you will have to replace the boiler piping. See how best to do this. To do this, you will need distribution manifolds on the supply and return. First, we connect the underfloor heating circuit with its own mixing unit to the collector.
Then a second circulation pump is installed on the manifold; we install a manifold with two outlets on the supply side.
We connect the circuits of the first and second floors to these collectors.
Thus, we connected two radiator circuits to a separate circulation pump. Next we connect them to the boiler. This turns out to be the following diagram:
It turned out to be three circulation pumps - two on the distribution manifold and one in the boiler. A conflict may arise between them. They can interfere with the normal operation of the system, so it is worth installing a bypass between the boiler and the distribution manifold.
Due to the built-in bypass, a zero pressure difference between supply and return is obtained. Do not forget to install valves on the collectors to balance the system and additional automatic air vents on the collectors themselves.
If the area of the second floor is also more than 100 m², then it is better to connect the second floor to a separate circulation pump.
If a bypass was previously installed between the boiler and the distribution manifold, it is better to install a small hydraulic arrow.
We connect everything back to the boiler, install ball valves with union nuts and filters on the return line, as well as an automatic air vent on the hydraulic valve itself.
In some cases, an automatic air vent must also be installed on the circuits themselves after the distribution manifold. If your pipes go straight up after the distribution manifold, you don’t have to install an air vent, but if the pipes go straight down, it’s better to install automatic air vents on the supply and return lines.
They can be installed using regular tees.
Don't forget about the drain valve on the hydraulic arrow. Thus, with this scheme with a hydraulic arrow, all pumps operate independently of each other. For example, in early autumn, you can turn on only the underfloor heating circuit, the rest of the circuits will be turned off. Then you can additionally turn on the radiator circuit of the first floor. You can additionally install a thermostat in the radiator circuit pump on the second floor, and the pump will turn on and off itself depending on the set temperature.
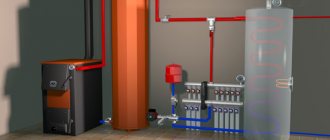
This scheme uses a wall-mounted boiler, but sometimes you have to install a floor-standing one.
- Connection option for this circuit with a floor-standing boiler
Typically, floor-standing boilers are single-circuit, for heating only, without a hot water supply circuit. These boilers additionally have to be equipped with a circulation pump and an expansion tank.
In 90% of cases, an indirect heating storage boiler for hot water has to be installed in conjunction with a floor-standing boiler.
In this case, a hydraulic arrow and a distribution manifold with separate pumps are required.
It can be added that some kind of backup boiler can be connected to the finished circuit. There are quite a large number of such schemes.
Many engineering companies already offer ready-made solutions, and you can also find some suitable scheme for yourself.
For comfortable living in the private sector, it is necessary to have communications, among which the heating system occupies one of the important places. The optimal temperature regime, the safety of housing construction and comfort depend on it. When designing construction plans, specialists include precisely a scheme with forced circulation of heating for a two-story house. This is due to the need to raise the coolant in the system to an additional height.
A detailed heating diagram for a 2-story private house with forced circulation is a complex of elements consisting of pipelines, a boiler, fittings, temperature sensors and other components. With proper selection and installation, the cost of heating a home will be significantly reduced, and residents will be satisfied with a cozy microclimate. Currently, the heating system of a two-story house can be performed in different ways:
- single-pipe and double-pipe;
- with top and bottom wiring;
- with gravitational circulation and forced;
- with risers in horizontal and vertical positions;
- with the option of main coolant movement;
- dead-end scheme.
The owner of the cottage chooses the most acceptable and effective system, which would ensure maintaining the desired temperature in the house for a certain period of time, be equipped with simple, functional and convenient controls, and make it possible to perform heating using the “warm floor” type. The optimal heating option is when all system devices operate using automation.
The simplest is the diagram of a single-pipe heating system for a two-story house. It is also called “Leningradka”. You can do this heating scheme for a two-story private house with your own hands without much difficulty. It is economical, operating on a gas or electric boiler, using a brick oven heated with peat briquettes, wood, and coal. By choosing Leningradka, you can save money, since the pipes required to install space heating will require 2 times less when compared with a two-pipe system. It is also characterized by the following positive aspects:
- low labor intensity during installation and its “budget”;
- ease of repair;
- does not violate the concept of the interior of the house (with a small number of pipes);
- possibility of manufacturing a “warm floor” circuit (if certain requirements are met).
A single-pipe circuit can be “hidden” under the floor or placed above it. When installing, pipes can be placed in a horizontal or vertical position.
However, such a gravity heating system can only be used in a one-story building. In a two-story house, a single-pipe heating system can only function if there is a circulation pump.
There are also disadvantages:
- impossibility of producing a “warm floor” with a horizontal contour;
- requires welding and necessary checking of connections;
- uneven heat transfer from batteries located in different rooms.
The diagram of a single-pipe system consists of a pipe with all heating radiators connected to it. The water heated by the boiler is distributed through all the batteries in turn, giving off a certain amount of heat in each. Therefore, the one closest to the boiler will be hot, and the last one will be slightly warm.
A two-pipe heating system can create truly comfortable conditions. Manufacturing will require a larger number of pipes and other additional materials, but efficient and high-quality heating of a private home is much more important.
Externally, the circuit looks like two pipes - for supply and return, located in parallel. The batteries communicate through pipes with both one and the other. Heated water enters each radiator, then cooled water exits directly into the return line. Hot coolant and cold coolant go through different pipelines. With this heating scheme, the heating temperature of the radiators is approximately the same.
Passing through pipes and radiators, the water flow follows an “easier” path. If you come across a branch where one section has greater hydrodynamic resistance than the other, then the coolant liquid will flow into the second, which has less resistance. Consequently, it will be difficult to immediately predict which area will be heated more strongly and which less.
To regulate the flow of water through heating installations, it is necessary that a balancing throttle be installed on each of them. Using this device, homeowners can control the flow of heat and adjust the heating in a double-circuit system. All radiators must be equipped with special Mayevsky valves to eliminate air. The universal scheme can be supplemented with any heat exchange devices: radiators, heated floors, convectors. They will allow you to properly heat a two-story house.
The efficiency of a two-pipe system can be increased by collector or radial wiring. This scheme is called combined. There is a dead-end type of two-pipe system when the supply and return lines of the circuit end at the last heat exchanger. In fact, the water flow changes direction, returning to the boiler. The use of a separate associated heating circuit for each floor will make it easier to configure the circuit and ensure optimal heating of the entire house. But to increase the effect, it is necessary to insert a balancing valve for each floor.
Example of heating power calculation
Now we need to consider an example of calculating heating power for a three-story private house. To properly heat a room with an area of 10 square meters, you need to use 1 kW of heating power. To calculate the power, you need to divide the total area of the room by ten, but this is the average value; correction factors should also be taken into account:
Related article: Dimensions of corner shower cabins - nuances of choice
Table of the main options for calculating boiler power.
- for rooms in a house with two windows facing north - 1.3;
- for rooms with two windows facing east and south - 1.2;
- for rooms with one window facing west or north - 1.1.
That is, the resulting value must simply be multiplied by the appropriate coefficient.
For example, it is necessary to calculate the heating power of a house for an area of 10 by 10 meters with four rooms, each of which has two windows. In this case, you need to prepare a single-circuit boiler, the power of which will be 25 kW, running on gas, or a double-circuit boiler with 28 kW, designed for heating water.
It is better to prefer steel heating radiators as radiators; for the first floor you can take eight pieces, for each window there will be 2 pieces with a section size of 500 by 800 mm and with a power of 1645 W. For the second and third floors, you can use four pieces for each window. Under each window there is one radiator with dimensions of 600 by 1000 mm and a power of 2353 W. You will also need polypropylene pipes, brackets for hanging radiators, taps, corners, and other fasteners.
To arrange heating for a three-story house, you will not only have to install a boiler and hang radiators, you must correctly calculate the entire system and take into account the installation features. There may be several options for the heating system. The calculations themselves are not very complicated, the main thing is not to forget about the coefficients, the value of which depends on which side the windows of the house face.
The best posts
- DIY button painting: master class for children with photos
- Painting trays: master class step by step with photos and videos on the technique
- White crocheted shawl with tassels: diagram and description with video tutorials
- Citric acid dissolves scale in a kettle in seconds
- Review about interior doors on rails and rollers
- Crochet napkins - knitting patterns
- Correct reupholstery of chairs with your own hands
- Do-it-yourself drip irrigation in the greenhouse and garden