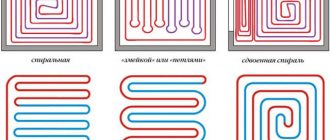
How to make adobe and burn bricks
The production of adobe is almost no different from how raw adobe is made. The ratio of clay and sand is selected in the same way, but you need to add more straw, which must first be finely chopped.
For mixing, it is recommended to dig a pit approximately 30-50 cm deep. The walls must be made vertical and the bottom level. Cover everything below with material that is water resistant. For example, a tarpaulin or plastic film will do. Fill the hole one third with clean water and pour the composition into it. After this, mix thoroughly. You need to be very careful not to slip. As a result, the solution should be liquid and homogeneous. After this, you can gradually add straw to it and stir constantly. A thick and plastic mass comes out.
After this, a solid brick is formed and dried. The technology will be the same as described above. You need to try to calculate the volume of the kneading mass so that you can use it all at once. If you repeatedly mix the mortar, the bricks will not be very strong.
By the way, this material does not tolerate moisture well, so when building houses, the roof should overhang no less than 0.6 m. Window and door openings should be located no closer than 150 cm in relation to the corners.
In addition to adobe and adobe, there is a third option - ceramic brick (that is, baked). In industry, special furnaces are used for this process. They are heated to a temperature of 1200 °C - this is enough for the clay to turn into ceramics. Of course, such production is not available at home, so you won’t be able to make a large number of similar bricks on your own site. But if about 40-50 pieces are missing somewhere, then it’s quite possible to cope with it yourself.
To do this you need to prepare an iron barrel. One bottom needs to be cut out. Dig a pit with a depth of 50-60 cm. Lower the barrel itself there. You just need to place it so that there is a fire under the bottom. It is best to place it on stones, channels, or simply attach iron legs. The barrel should be located in the pit so that its bottom is 25 cm from the bottom of the pit. Now the container remains to be filled with bricks. You need to lay them so that there is a small gap. This is required for even heating. Then cover with a lid. It cannot be lifted until the material has cooled, so that cold air does not get inside. It will take about 20 hours to heat up, so you need to stock up on firewood and peat in advance. Then the barrel should cool on its own, without forced cooling. You will have to wait approximately 5 hours.
Clay brick is a cheap and environmentally friendly material. Walls, foundations, wells, fireplaces, etc. are made from it. You can do it yourself, although you will have to spend a lot of time and effort on it. At home you can get not only raw materials, but also adobe and ceramic bricks.
Sand and water
The mixture will contain three components:
- Clay.
- Water.
- Sand.
Many people are interested in the proportions of clay and sand for laying a furnace. No one can say in what proportions to mix these components in your case, since the quality of clay in different places is completely different.
The finished composition should be plastic, but not too greasy, and not too dry (skinny, with too much sand). The greasy solution, when dried, decreases in volume and cracks. Skinny can crumble, it is not strong enough.
The properties of clay are determined by its proportional composition (sand, SiO2, Al2O3 and other impurities).
The fat content of the clay and how much sand will need to be added are determined experimentally.
The test is very simple.
Take a lump smaller than your fist, knead it with wet hands and roll it into a ball.
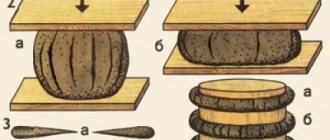
The ball is placed between two smooth boards (metal or planed boards) and begins to be slowly compressed.
This is done until cracks appear.
Ideally, cracking should appear when the ball is compressed by no less than 1/3 of its diameter. After a couple more tests, which also show a positive result, you can lay bricks on such clay! However, such luck does not happen often.
If the clay ball cracks almost immediately, it contains a lot of sand. If it smoothly shrinks by more than half, the clay is too oily.
At what depth should I take clay for the stove mortar? The upper layers usually contain loam. Skinny raw materials with a large proportion of sand. Clay, as a rule, is located lower and the deeper it is, the more its fat content increases.
Flagella
The thickness of the bundle is 15-20 mm thick and 200-250 mm long. A freshly rolled rope is wrapped around a stick 40 - 50 mm in diameter. The normal result is that small cracks will appear on the surface. It won’t crack at all – it’s oily. And it will crack with deep cracks - skinny.
A ball is rolled and a small flat cake (4–5 cm in diameter) is made. Both samples are completely dried, this will take 2 – 3 days.
If during this time the edges of the cake become very cracked, the clay is oily (add a little sand and repeat). A sign of a thin composition will also be the fact that the cake crumbles when pressed.
Methods for testing clay mortars
The ball is dropped to the floor from a height of 1 m. If it completely falls apart, there is a lot of sand in the raw material (skinny). The best samples do not break at all (an acceptable result is if the sample breaks into 2-3 large pieces).
Skinny clay is the most inconvenient material to work with. Making it fat is quite difficult. To do this, the raw materials need to be tortured. The procedure involves stirring in water repeatedly and draining after the solids have settled. Sometimes stove makers mix several clays. By mixing clay with normal or high fat content to a lean sample, you can obtain a satisfactory composition.
So, let's look at how to prepare clay for laying a stove. Cooking steps:
- Soak.
- Straining.
- Kneading
It is best to soak and mix the composition in a large tub using a wooden paddle.
For straining, a sieve with a wire mesh is used (the total mass is collected in buckets and delivered to the work site). Large impurities remaining on the sieve are removed. The viscous mass is pressed through with your fingers.
The water that is best suited for this work is soft (artesian, rain or snow).
A large amount of clay raw material is mixed with a paddle. It is inconvenient to use a trowel, and it is not recommended to use mechanization methods (such as a concrete mixer), since vibration can cause small spaces filled with liquid to form in the solution, and uniformity is very important for stove masonry.
You can, of course, buy sand. It is usually sold divided into fractions. You will need at least two - 0.7-0.9 mm and 0.15-0.25 mm. They are required in a ratio of 1:2.
To save money, sand can also be found in the same places where there are clay deposits. If you are lucky to find white - quartz, it can be used for any solution, and yellow - crushed feldspar, not suitable for masonry of the firebox, but suitable for other parts.
The best clay for laying a stove is white or kaolin. Sand can also be found between layers of clay.
You need soft or completely desalted, purified water. You can collect and settle rainwater ahead of time, or you can buy/collect purified water. It is important that it be soft or medium hard (hardness no more than 10 points). A large amount of salts greatly degrades the quality of the solution.
Sand preparation
If you mined the sand yourself, you must first sift it through a sieve with a fine mesh (1-1.5 mm). This separates large impurities and debris. Screened sand contains a lot of living creatures and alumina impurities, which can significantly deteriorate the quality of the solution. You can get rid of them by washing. A special apparatus is made for this.
Sand washing device
Take a pipe with a diameter of 150-200 mm. Its length is three times the diameter (450-600 mm). A drain is formed in the upper part, water is supplied from below. The container is filled 1/3 with sand, the water pressure is adjusted so that the sand swirls in the upper part, but does not drain. Rinse until clean water begins to drain, waiting another 5-10 minutes to be sure.
The washed sand is laid out on oilcloth, tarpaulin or other dense material, in some container. You can dry it, you can use it wet, but when kneading it is necessary to take into account its moisture content.
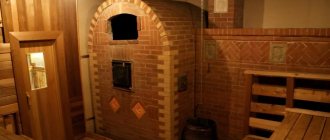
As has already been said, to lay a good sauna brick stove, in addition to clay, you will need two more mortars: with fireclay for the firebox and with cement or lime. for pipe and base.
To prepare the mortar for laying the firebox of a sauna stove, you need to choose clay from the lowest layers - very fatty. It is usually almost white, light gray or slightly yellowish. Fireclay sand or mortar is added to the soaked and rubbed clay (must be purchased at the store). You will need a lot of sand, and it costs a lot. To save money, it can be mixed with quartz (white) in a 1:1 ratio.
Fireclay mortar is sold in stores
Since the clay is obviously oily, test batches are made by adding a large amount of sand at once - from 3/4 or more. When mixing this solution, high demands are placed on the quality of water - it must have a hardness of no higher than 8 points. When preparing fireclay mortar, you only need to determine the required amount of sand. Strength tests are unnecessary - fireclay is a guarantor of the required qualities.
Is it possible to use a ready-made mortar for laying a firebox with fireclay? It is possible, but it costs a lot of money, and you will need quite a lot of it.
The base of the furnace and the fluff of the chimney are made from a solution with increased mechanical strength - with the addition of lime and/or cement.
To prepare a solution using lime, you need lime dough. Not self-slaked fluff, but a paste-like mass made by professionals. This is the material on which it is better not to skimp. It is advisable to buy it ready-made, packaged in airtight containers (check the expiration date).
Lime dough does not have to be bought in buckets, you can buy it in bags
To prepare lime mortar, self-extracted sand, sifted through a sieve with a mesh size of 1 mm, is suitable. There is no need to rinse it, since lime will destroy all microscopic living creatures, and alumina impurities will not affect the strength of the solution either. If the sand is purchased, then its fraction is 0.7-0.9 mm.
Open the container and knead the dough using a smoothly planed wooden paddle. You begin to add sand in portions, achieving its uniform distribution throughout the entire mass. The “starting” amount of sand is 1/2 of the volume of lime. After mixing everything, look at the fun. A solution is considered normal if the layer of solution on the surface is 2-3 mm, with possible small tubercles and streaks.
Veselko, which is used to determine the fat content of a solution
Lime mortar can be kneaded using a drill, but the fat content must be tested using planed wood. This is how fat content is determined most accurately.
When determining the proportions of lime mortar, we take more sand, but the plasticity rate remains. Experts first bring the solution to a slight “fattiness” by adding up to 5 parts of sand to 1 part of the dough, and then bring it up to standard by adding clean paste. In this case, the strength of the seam is ensured precisely by the grains of sand, and the lime only glues them together.
We check the viscosity (amount of water) using two bricks. We lay about 3-4 mm of mortar on one, the second brick on top, tapping lightly with the handle of a trowel, we level it. A bead of mortar about 1-2 mm thick should form on the sides. If it stands and does not drain, everything is fine. The solution was mixed properly.
The proportion of cement in this solution is very small. For one part of cement, take at least 9 parts of lime paste (and no more than 15). Cement grade - from M200 to M600. The higher it is, the less this component is required, but the strength of the mortar increases when using high-quality cement. You can use a ready-made adhesive composition for ovens as an additive. Its main component is high-quality cement.
The whole difficulty is that this solution has a short shelf life - it must be used within 45 minutes from the start of mixing. Therefore, it is necessary to conduct experiments with the amount of sand and water on a test batch (all actions are similar to determining the lime composition). When mixing the working cement-lime mortar for laying the furnace, all pre-measured components are quickly mixed in a certain order. The finished material is immediately taken to work.
Lime-cement mortar must be used quickly
Clay brick
In home brick production, presses, machines and other specialized equipment for molding and compacting products are very rarely used. Such practices are possible due to the qualities of the raw materials - natural clay, sand and other fillers (straw, etc.). Natural materials plus new technical techniques based on methods of making bricks that have been tested for decades, as well as a responsible approach - and artisanal bricks will not let you down. To strengthen and increase the thermal insulation properties, special polymers are added to modern bricks; for good molding, the mixtures are plasticized.
Bricks, simply put, refer to artificial stones of rectangular shapes. It is this block geometry - a rectangle measuring 250 * 120 * 65 mm - that is convenient for masonry. All standard sizes of bricks are accepted in home production, since they have been tested for centuries, and are guaranteed to ensure stability and good load-bearing capacity of prefabricated structures. In addition, rectangular bricks are more convenient to mold, stack, carry and store.
One of the main points when making bricks by hand is high-quality clay. There are many types of clays in nature, and their differences are very significant (and not only in colors - this is a separate extensive topic). Deposits of clays of suitable fat content are not uncommon, and if the required clay is available in the area of the site, this is an excellent saving. If not, then they buy clay from bases, factories, construction markets, depending on the situation. The radiation background, the purity of the clay, the number and types of inclusions can be examined either independently or by ordering an analysis in a construction laboratory. But you can and should always check the basic qualities of clay, regardless of the source of extraction or purchase. The first test is for fat content (as well as for sandiness); stove makers are excellent at it, and once upon a time potters and sculptors kept the secrets of selecting clay. A sample of clay, or rather 2-3 sample portions, is soaked in clean water until it sticks to your hands, so that you can knead, roll and sculpt a clay ball. A large sample size is not needed; 50-80 mm in diameter is sufficient. In addition to the ball, a second shape is rolled out - a flat cake no thicker than 10 mm and about 100 mm in diameter. These samples are laid out in a place protected from direct sun and wind, at normal temperature, and after drying, on the third day the samples are tested for strength.
The clay cake and ball are cracked - a good sign indicating the fat content of the clay. In this case, the recipe must include fine sand, river or quarry, without dust impurities. If cracks do not appear on the ball sample, then the strength is tested in a simple way - the balls are thrown without effort onto concrete, asphalt, paving stones or any hard surface from a height of about one meter. If the clay balls do not break, the clay is excellent, almost ideal for homemade brick molding. Clay plasticity and fat content are checked using both established and individual tests.
If the dried kolobok samples did not show any cracks at all, most likely the original clay was not fat enough. Dry clays often look great immediately after drying - smooth, even, but they are not suitable for brick. The finished products will be fragile and will not withstand even mild impacts. Dry clays, however, are suitable and quite in demand; they are diluted with fatty compounds, and special professional additives are also widely used (for the rheology of the mixture, to increase impact strength, for plastics, etc.). The selection of composition is experimental and requires intuition and skill. To determine the formulation of the solution, a series of test samples are made from the available components (which are always individual, like any natural raw material). Knead and soak the clay to a creamy consistency, add fine river sand and fatty clays (most often purchased, with exact characteristics). Preliminary calculations: for one part of very oily clay, 4-5 parts of sand by weight; for clay of medium fat content - 1-2 parts of sand. The exact composition is selected without haste, and must be adjusted for each new batch of raw materials. In the future, all the time spent on empirical research will pay off handsomely.
Fillers for homemade bricks - sawdust, straw, pine needles, etc. - are in demand today more than ever. The effects of natural additives are an increase in the insulating qualities of bricks, sufficient for the use of adobe in hydro- and heat-insulating protective walls, including below zero, in the foundations and foundations of buildings.
About the composition, characteristics of clays and the selection of clay for bricks, see the article Composition of clay.
About the production of baked and adobe bricks - see the article Clay Brick.
Properties of clay
In general terms, clay is divided according to its technological properties.
To determine the quality characteristics of clay, you need to take a small piece of clay, knead it well with your hands, then roll it into a sausage. Remember how in childhood?!
Bend the sausage into an arc and now look carefully. If there are no obvious cracks on the arc, this is normal clay, and if there are many cracks on the test sample, then the clay is thin. But real fatty clay is difficult to bend into an arc; it will break.
The benefits of cosmetic clay for oily skin
We are all well informed that on oily skin the first signs of aging appear later than in those with other types of epidermis. At the same time, owners of such skin do not consider themselves happy, since they face a huge amount of hassle while caring for it. This is a constant shine against the background of hypersecretion of the sebaceous glands, because of which you have to constantly monitor your makeup, these are inflammatory processes that provoke the occurrence of acne, and enlarged pores. In addition to daily basic care (cleansing, toning, mattifying, nourishing and moisturizing), additional use of mattifying and cleansing products is required. Cosmetic clay is a highly effective product that is used in the form of face masks. Clay masks perfectly mattify and dry oily skin, cleanse while exfoliating dead epidermal cells, tighten pores, control sebum production, reducing the risk of pimples and acne, and also supply useful microelements.
There are quite a few types of cosmetic clay, but green, white and blue clay are considered the most useful and effective for oily skin. Reviews of the white clay mask are here.
Cosmetic clay: how to use
Despite the simplicity of “preparing” a clay mask, for maximum effectiveness it is better to follow a certain algorithm of actions:
- Cleanse the skin of cosmetic residues with foam or another similar product;
- Treat with scrub or peeling (only gently so as not to injure the skin);
- Even better is to steam the skin for about 15 minutes. The better the cleansing, the brighter the effect of the mask will be;
- Dilute the powder with the liquid to the consistency of sour cream;
- Stir thoroughly, there should be no lumps or air bubbles;
- Apply the mixture to the skin in an even layer;
- Leave for about 15 minutes, but do not let the clay dry out! Spray your face with tonic or plain warm water from time to time;
- After the time has passed, rinse off the mask with warm water and pat your face dry with a paper towel;
- Apply a light moisturizer to seal the result.
Now you know how to use cosmetic clay for your face and body. This is a great beauty product because it is easy to find, cheap and very effective. Several colors can be mixed with each other and they will retain their benefits! The effect is cumulative, make masks from cosmetic clay several times a week and the results will not be long in coming!
Proportions and mixing of the solution
You don’t need to add sand to medium-fat clay - it contains the correct proportions of components 1:1
In addition to cleaning before mixing, the clay for laying the stove must be prepared. The material is laid out in a metal-lined box or barrel, filled with water so that the liquid covers it entirely. If there are large lumps, they need to be broken into smaller fragments in advance. Everything is mixed thoroughly and left for a couple of days. The clay is aged for at least five days with constant addition of water. After this, the solution must be mixed again and poured through a sieve into another container.
The clay composition should have a paste-like consistency, without impurities. If, after 48 hours, small lumps appear in the mass, it must be mixed again, all seals broken and kept for another day.
After preparation, you can begin preparing the solution. If clay and sand are mixed, the latter is poured into a prepared container, then plastic material is laid out, and a sand layer is again poured on top of it. A shovel is used to mix the components. If moisture appears at the top, add a little sand. If the mixture is too dry, add water. The solution can be considered ready if it begins to slowly slide off the shovel and becomes homogeneous.
If the base is medium fat, you don’t need to add the sand component. Step-by-step instructions for diluting clay without sand for a stove with your own hands:
- The material is laid out on a wooden platform in layers, each layer is wetted.
- Upon reaching a height of 30–35 cm, the mass is mixed. For this purpose, you need to slap the top layer with the back of the shovel.
- The kneading continues until a homogeneous substance is formed.
You can check whether the masonry clay for the stove is prepared correctly: apply a thin layer on the red brick, place another block on top and leave for an hour or two. If, when lifting the top brick, the bottom one does not fall off, you can use the composition to build a stove. The clay takes a long time to set, so you can immediately mix the required volume of the binder composition. Laying out a 50-brick stove for a bathhouse will require approximately 20 liters, and to build a Russian stove it will take 15–20 percent more.
Failure to comply with the proportions of the components of the solution leads to cracking of the structure
How to dilute clay to putty a stove:
- The dry base is ground and soaked.
- Sand with lime or cement is added. The proportions of medium-fat clay with sand and lime are 1:2:1. When including cement powder, you need to proceed from the amount of sand component in a ratio of 1:3.
- To make the plaster layer stronger, you can add asbestos, fiberglass, hemp or straw in a ratio of 1: 2: 0.1 (clay/sand/additives).
When additional ingredients are included in the clay solution, they are first mixed with each other, and only then with the pre-soaked clay.
Features of preparing solutions for other parts of the furnace
To install a stove in a house or in a bathhouse, you need to prepare a mortar that holds the bricks together. It is usually made from clay. Inexpensive material that is available in abundance anywhere. Clay and loam make up half of all sedimentary rocks on earth. Along the roads, in low-lying areas of the forest and in treeless areas it lies under the boundary; near the coast it can be found in the open.
How to make a high-quality solution? You need to know not only where to get the material, but also what it is. Properties of clay:
- Quickly absorbs water, the ripened clay mixture is waterproof - does not allow water to pass through;
- Plastic, will take any shape, close any gap;
- After drying, it becomes durable and retains its shape for a long time;
- Good adhesion holds the bricks together firmly;
- High gas density prevents smoke leakage.
The disadvantage is water permeability (hygroscopicity), which appears after drying the solution. Therefore, it is not advisable to use a mixture of it outdoors.
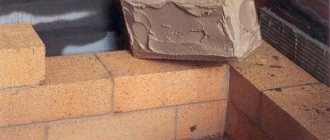
To build a brick kiln, plastic clay mortar is used. In most cases, this mixture is prepared in equal proportions. That is, 1 part of clay is mixed with an equal proportion of sand. In this case, a small amount of water is poured into such a solution - approximately a quarter of the volume of clay.
I would like to note that if the solution is properly prepared, it will have good plasticity and a normal percentage of fat content. At the same time, the bricklaying with such a mortar will be of high quality, and the seams between the rows will be thin. Thanks to thin seams, they will not crack, and the stove will last a very long time. A well-prepared building mixture will not spill out at the joints in the future and can easily withstand high temperatures.
According to the advice of experienced stove builders, it is very important to use high-quality water. So, when using hard water, the quality of the clay solution greatly deteriorates. River or rain water is considered ideal for mixing mortar for laying a stove. And as it turned out, in practice, this point significantly affects the quality of the building mixture.
After the quality of the clay has been checked by any convenient of the previously discussed methods, you need to understand the features of preparing the mortar for laying the furnace. Many stove makers claim that it is the process of preparing sand-clay mortar that is technologically the most difficult. I would like to note that in this process it is important to take into account the individual characteristics of the stove structure being built. So, for example, an adobe oven is made from a mortar that is completely different from the mixture for laying bricks.
Most mortars used in the construction of furnaces are prepared in either a 1:1 or 1:2 ratio of clay and sand, respectively. At the same time, in order to bring this composition to the ideal consistency, it is diluted with the required amount of water. The amount of water is calculated in accordance with the volume of clay - add 1/4 part of water to one part of clay.
I would like to note that today, stove makers use several methods for preparing clay-sand mortar to build a stove with their own hands.
The folk version of making clay involves preparing a wooden box that is lined with tin. After this, the clay is soaked in it for 3 days. After this period, sand is added to the resulting mixture. At the same time, depending on the volume of the solution being prepared, it is kneaded with hands (if the volume is small) or with feet in rubber boots if a lot of solution is needed.
There is a simpler option, for which normal clay is used. This composition is mixed without the use of sand. To prepare such a solution, use a special shield, onto which a thin layer of clay is poured, which is constantly watered with water. So, one row is poured onto another until a height of 300 mm is reached.
There is another option for relatively quickly preparing a clay solution for building a furnace, which involves laying clay in layers in a barrel, while wetting each layer with water. After a certain period of time, the material will become soft and will be ready for further kneading.
But to remove excess impurities and lumps from such a solution, use a special sieve with small cells. In order for the solution to acquire the necessary plasticity, water is added during the mixing process. But this only applies to clay with normal fat content. If the material is too greasy, then you need to sift the sand that will be added when preparing the solution.
Naturally, progress does not stand still and additives are constantly appearing that can significantly improve the quality of such solutions. Therefore, building any stove, barbecue or fireplace with your own hands should not pose many problems. But you still need to know all the basic nuances of carrying out work of this kind before erecting a stove device in a country house or on a summer cottage.
Features of dry mixtures for laying stoves and fireplaces Fireclay brick and its sizes Brick for the stove: which one is better to use and how to choose it
To build a brick sauna stove, you need three different mortars.
As has already been said, to lay a good brick sauna stove, in addition to clay, you will need two more mortars: with fireclay for the firebox and with cement or lime. for pipe and base.
We invite you to familiarize yourself with Fireclay clay instructions for use for masonry
To prepare the mortar for laying the firebox of a sauna stove, you need to choose clay from the lowest layers - very fatty. It is usually almost white, light gray or slightly yellowish. Fireclay sand or mortar is added to the soaked and rubbed clay (must be purchased at the store). You will need a lot of sand, and it costs a lot. To save money, it can be mixed with quartz (white) in a 1:1 ratio.
Fireclay mortar is sold in stores
Since the clay is obviously oily, test batches are made by adding a large amount of sand at once - from 3/4 or more. When mixing this solution, high demands are placed on the quality of water - it must have a hardness of no higher than 8 points. When preparing fireclay mortar, you only need to determine the required amount of sand. Strength tests are unnecessary - fireclay is a guarantor of the required qualities.
Is it possible to use a ready-made mortar for laying a firebox with fireclay? It is possible, but it costs a lot of money, and you will need quite a lot of it.
The base of the furnace and the fluff of the chimney are made from a solution with increased mechanical strength - with the addition of lime and/or cement.
To prepare a solution using lime, you need lime dough. Not self-slaked fluff, but a paste-like mass made by professionals. This is the material on which it is better not to skimp. It is advisable to buy it ready-made, packaged in airtight containers (check the expiration date).
Lime dough does not have to be bought in buckets, you can buy it in bags
To prepare lime mortar, self-extracted sand, sifted through a sieve with a mesh size of 1 mm, is suitable. There is no need to rinse it, since lime will destroy all microscopic living creatures, and alumina impurities will not affect the strength of the solution either. If the sand is purchased, then its fraction is 0.7-0.9 mm.
Open the container and knead the dough using a smoothly planed wooden paddle. You begin to add sand in portions, achieving its uniform distribution throughout the entire mass. The “starting” amount of sand is 1/2 of the volume of lime. After mixing everything, look at the fun. A solution is considered normal if the layer of solution on the surface is 2-3 mm, with possible small tubercles and streaks.
Veselko, which is used to determine the fat content of a solution
Lime mortar can be kneaded using a drill, but the fat content must be tested using planed wood. This is how fat content is determined most accurately.
When determining the proportions of lime mortar, we take more sand, but the plasticity rate remains. Experts first bring the solution to a slight “fattiness” by adding up to 5 parts of sand to 1 part of the dough, and then bring it up to standard by adding clean paste. In this case, the strength of the seam is ensured precisely by the grains of sand, and the lime only glues them together.
We check the viscosity (amount of water) using two bricks. We lay about 3-4 mm of mortar on one, the second brick on top, tapping lightly with the handle of a trowel, we level it. A bead of mortar about 1-2 mm thick should form on the sides. If it stands and does not drain, everything is fine. The solution was mixed properly.
The proportion of cement in this solution is very small. For one part of cement, take at least 9 parts of lime paste (and no more than 15). Cement grade - from M200 to M600. The higher it is, the less this component is required, but the strength of the mortar increases when using high-quality cement. You can use a ready-made adhesive composition for ovens as an additive. Its main component is high-quality cement.
A variety of clay bricks
Brick is one of the universal building materials, which has been widely used for the construction of structures of any purpose and architectural complexity for many centuries.
Production line at a brick factory
The reliability and durability of this material has been tested for centuries. It is worth noting that there were no significant changes in the geometric parameters and technology of brick production. It is still a ceramic product, made from clay and gone through certain stages of production.
Depending on the purpose for which the brick will be used in the future, it is divided into several types: construction, facing and special purpose. Of course, pricing policies are also different.
So, building brick is the most popular of all types in this category. It is widely used in the construction of any property: houses, cottages, brick fences. However, often the resulting surface requires additional processing - cladding. In ordinary bricks, uneven color, a certain degree of roughness, small corner chips, and the like are allowed. But facing bricks are produced using strict technology; all kinds of inclusions and cracks, and heterogeneity of shade are strictly unacceptable. The presence of all of the above indicates a defect in the finished product.
Brick pressing process at a factory
At the same time, if domestic manufacturers allow minor deviations in the production process, then foreign ones strictly adhere to the recipe. Under no circumstances are any deviations in geometric parameters allowed.
Modern technologies and improved equipment allow brick manufacturers to produce quite a variety of types of products, which provides the opportunity for masons to erect various buildings according to unique designs. The use of rounded bricks with non-standard geometric parameters allows you to lay out not only original drawings on the wall, but also to erect independent structures.
Special brick has a specific area of application, for example, use in the process of laying a structure around a stove or fireplace, where direct contact with an open fire is expected. This type can easily be classified as fire-resistant fireclay brick or high-alumina brick, which is particularly resistant to various environmental influences.
But silicate blocks are recommended for use in cases where constant contact with moisture is not provided. It is quite dense and durable, which makes it possible to erect walls of varying complexity with its subsequent cladding with other building materials. The laying technique of this block is practically no different from the classic one.
White
This is the main type of rock used in cosmetology to treat oily and problem skin.
White clay consists almost entirely of kaolinite, which includes aluminum oxide, silicon dioxide, and water. It looks like a white powder with a milky yellowish or creamy tint.
Kaolin produces the following effects:
- absorbs sebum;
- dries;
- cleanses pores;
- mattifies;
- additionally - tones, nourishes, smoothes.
Morning cleansing soap
- clay (hereinafter we mean the drug in powder form) - 100 g;
- soda, pharmaceutical boric acid (powder) - 1 tsp of each ingredient.
The products are mixed and transferred to a dry container. In the morning, take a pinch of the mixture, add water, stir to form a paste. Moisten and lather your face with clay, leave for 2 minutes. Then they wash their face, use a toner, then a moisturizing cream for oily skin. This will normalize fat secretion, cleanse pores, and reduce inflammation.
Clay mask for oily skin for nutrition and whitening
To prepare the mask take:
- kaolin - 2 tbsp. l.;
- egg white - 1 pc.;
- water - 3 tbsp. l.;
- lemon juice - 0.5 tsp;
- honey - 1 tsp.
Beat the egg white into a foam, dilute the clay with water, then mix all the ingredients. The mask is smeared on the face and left on for a quarter of an hour.
Mask against inflammation, shine
Includes:
- white clay - 2 tbsp. l.;
- aloe juice - 1 tbsp. l. (or 1 ampoule of extract);
- water - 1 tbsp. l.
A paste of mixed ingredients is applied to the face and left for 15 minutes.
Answers from experts
Elina Linberg:
clay-sand mortar when laying a furnace is very dependent on the quality of local clay and sand. The proportions are easy to figure out. you take a lump of mortar and flatten it on the wall. If it cracks when it dries, it means there is a lot of clay. if it crumbles easily, then sand :))))
Victor Spirin:
The consistency should be like medium sour cream. I lifted it with a shovel, tilted it, and the solution flowed, but not quickly and did not fall off.
Sheva:
There is a special Masonry Mix for Stoves and Fireplaces from the company Starateli (Designed for laying fireplaces and stoves in interior spaces, withstands temperatures up to 1000 C. Used for laying all types of refractory bricks.)
Yuri Antonov:
In order to determine whether the mortar is good or not for laying a stove, you must first prepare the mortar correctly and then lay several bricks on the mortar. After two to three days, you should carefully examine the seams in the masonry. At the same time, there should be no cracks, there should be no cracks in the seams, and the masonry itself should be strong, that is, the mortar should firmly adhere to the bricks. In order to correctly prepare a mortar for laying stoves, you must first determine the fat content of the clay, then dissolve the clay in water and let it pass through a fine sieve. Next, combine the measured portion of the clay with a precisely measured amount of sand and mix well. The composition of the solution depends on the fat content of the clay: usually take from 2 to 4 parts of sand for 1 part of clay. Add enough water to obtain a solution of the desired consistency. In this case, clay mortar with a ratio of 1: 2 or 1: 4 is used only for above-ground masonry of buildings or furnaces that will be operated in a dry environment with a relative indoor humidity of up to 60%.
If there is a need for this, the strength of the clay solution can be increased by adding table salt to it in the amount of 100-150 g per bucket of solution. Also, the strength of the clay mortar can be increased with Portland cement in the amount of 0.5-1 kg per bucket of clay mortar by first dissolving it in water or mixing it dry. Another important factor when making clay mortar is the use of sand with different grain sizes. In other words, it would be a good idea to mix sand with larger particles with sand that has smaller grain particles, in proportions of 2 x 1. That is, for two buckets of sand with large grains, add one bucket of fine grains. This solution is stronger and more balanced. More details here: stroivagon /pechi/rastvor-dlya-kladki-pechi
Sergei Kireev:
Soak the clay for 2-3 days, then add sand little by little, mixing well! You need to check the mixture like this: clench it into a fist and unclench it and count to three at the count of 3, should the lump fall off your palm, if this happens? This means the mixture is ready! This is an old but very good way of cooking! Good luck !!!
Julia Tray:
more clay than sand!!!
Draftsman:
depends on the fat content of the clay. sifted Sand through a sieve no larger than 1.5 mm. the mixed solution is plastic, if it is possible to add merkel, soak it a day beforehand, pour 7-8 parts of fatty clay with hot water and knead. if you have a drill with an attachment, or by hand. It took me about 1 hour for 6-8 buckets of solution. open specialized literature in more detail, and more on the skill
ANDREY Fomin:
I would advise you to buy a ready-made oven mixture, it already contains clay and sand and special additives so that the solution does not crack. At one time they rebuilt the stove for me, so the master immediately said that it was better to buy a ready-made mixture. only, for example, here (Pskov region) there are 2 types, cheaper and more expensive, but here it’s up to you to decide which one to take.
kpacota.at/:
for stove masonry, you need to mix 9 parts of (pre-soaked) fireclay clay, one part of washed river sand (without clay filler) and one part of grade 400 cement, this solution is an ideal composition that meets all requirements. The question arises: why wash clay out of sand if we do we mix it with clay? Because the clay in that sand is different and, accordingly, the filler is different
Igor Iskandarov:
Both sand and clay are different everywhere, you need to ask local stove makers.
Methods for testing clay
Before directly laying the furnace, you need to find out how the fat content of the clay can affect the solution and how, if necessary, you can change its characteristics. First of all, the fat content of clay depends on the presence of sand in it. Oily clay contains a small amount of sand. In turn, if it contains a large amount of sand, it will be skinny. It is these qualities that affect the plasticity of mortar for stoves.
I would like to note that upon contact with water, clay absorbs it like a sponge, while becoming plastic and significantly increasing in volume. In turn, under the influence of high temperature it quickly loses liquid and, if the water completely evaporates, its structure will become porous. With further heating, the clay will begin to melt and simply bake, turning into a solid material resembling stone. These properties of such a useful substance are very important when building a stove.
Checking the quality of clay by drying
Our ancestors also used various clay products and solutions when building furnaces. Moreover, as it became known from history, when building a clay stove, a person independently made not only mortar, but also bricks, which were a solid basis for laying the chimney. But in our time, such a binding component is used only as a building mixture for fastening various materials together.
- Take half a liter of clay and add a small amount of water to it, after which everything is thoroughly kneaded with your hands until the mixture stops absorbing moisture.
- After preparing the stiff dough, a ball with a diameter of up to 5 cm is rolled, from which a flat cake is subsequently made twice as large.
- Under natural conditions, it dries for 3 days. If cracks form on the cake, the clay has a high fat content and in order to prepare a high-quality mortar for laying the stove, it must be diluted with sand.
- If during the drying process no cracks appeared on the cake and it did not disintegrate when dropped from a height of 1 meter onto a hard surface, then such a binding material is completely ready for preparing a solution.
I would like to note that skinny clay will not crack, but it will not have the required strength. It is necessary to add fattier analogues to it. Clay or sand, depending on what is missing in the mortar, is added in several stages, while controlling the consistency of the mortar.
Testing clay with a paddle
As it has become known from practice, a stove device built with your own hands from clay is in no way inferior to its brick counterparts. Recently, clay has been used as a binder to hold masonry elements together. Nobody builds a stove entirely from clay mortar anymore. At the same time, the quality of the binder material is still checked for fat content.
- 3 liters of clay are placed in a convenient container and filled with water. The lumps are kneaded with your hands, and the resulting composition is stirred with a paddle. If the solution begins to stick strongly to the paddle, it means that the clay has a high fat content and therefore you need to add sand to it.
- If the funnel is covered with separate clots, then the binding material for the solution is normal and there is no need to add sand to it.
- In the case when the veselka is evenly covered with a thin clay composition, the clay is considered thin and must be diluted with a fattier analogue.
I would also like to note that there is no need to rush into adding certain components to the solution, so as not to achieve the opposite effect. Make a fat solution from a lean solution or vice versa.
Checking the consistency of the solution using planks
This method can be called the most accurate for determining the quality of clay, and it consists of a number of simple manipulations.
- Half a liter of clay is mixed with water to a consistency reminiscent of tight dough and kneaded with your hands until the lumps are completely dissolved. A ball with a diameter of 5 cm is rolled from the resulting solution.
- The resulting ball is placed between two smooth boards, on which slow pressure is applied, gradually squeezing the clay.
- Compression occurs until cracks form on the ball. With this method of testing, the fat content of the clay is determined by the nature of the cracks formed and the degree of compression of the ball.
If a thin clay composition was used to make the ball, then at the slightest impact on it, it breaks into pieces. A ball of clay with a fatty consistency, when exposed to external influences, begins to crack when it decreases by 1/5 from the initial volume. Normal clay, rolled into a ball, begins to crack when squeezed to 1/3 of the initial diameter. But a clay ball that is too fat cracks slightly when it loses more than half of its original volume.
Clay is an earthy, soft rock that, when water gets into it, becomes plastic and homogeneous and can take on any shape. And when fired, such material becomes hard like stone.
Other ways to test clay for fat content and plasticity
If you roll a flagellum from clay with a high fat content, when it is smoothly stretched, it will become thinner, and after breaking, pointed ends will form in its place, and when bent, cracks will not form.
Normal clay, when rolled into a flagellum and stretched, begins to gradually stretch and, at the moment of losing 20% of its thickness, breaks off abruptly. At the same time, when bent, the flagellum becomes covered with minor cracks.
In turn, if skinny clay is used for the flagellum, it breaks off at the initial stage of stretching. Moreover, if you start to bend such a flagellum, it immediately cracks or breaks.
If you repeat the procedure of squeezing the ball or stretching the flagellum repeatedly, you can determine with sufficient accuracy the quality of the clay, on which the service life of the furnace will depend. During testing, you need to experiment with different types of clay, diluting it with sand. Only the selection method can correctly determine the consistency of the clay mortar for laying the stove.
I would like to note that, according to experts in the kiln industry, if the mortar for laying bricks is thicker, then this will not greatly affect the quality of the final building. If the solution, on the contrary, is oversaturated with sand, then everything is much more serious. If the solution is too thin, the stove laid on it will simply fall apart during operation.
Scope of application of brick clay
Solid clay brick has been known for many centuries, but still remains a very popular material in construction. Not only ceramic bricks are created from brick clay, but also clinker bricks. Such natural material is also used for other purposes. For example, this is the production of panels for ventilation facades, slotted blocks, facing tiles, tiles and other things. In addition, ceramic fillers for concrete are also produced, which are distinguished by their lightness. For example, these are expanded clay and agloporite, which are obtained by firing (it should only be short in time) clay granules in rotary kilns.
Brick clay is used as an additive during the production of pozzolanic and clay-lime type cements. If the mass contains a large amount of ferrous oxides and it has a bright shade, then it is used as part of mineral paints. Brick clay can be used as a binder in plastering and masonry mortars, either alone or mixed with cement.
Clay bricks also receive this material. You can make them yourself. And in appearance they will not be inferior to the factory ones, and the strength indicator will be much higher, so this material is perfect for building a stove or even an entire house. Brick clay is also used for masonry. But if this is not a stove, but external walls, then it is best to use a mortar with cement.
If the masonry is built from unfired brick, and even made with clay mortar, then it is best to additionally cover such a wall with tiles or bricks. You can cover it with a polymer-cement type plaster, or you can simply use siding or clapboard (before this, the wall must be covered with a roll-type waterproofing material). Clay-based coating is excellent only for areas where hot and dry climatic conditions prevail. Due to constant dampness, the clay can become limp.
Which clay is right for your skin and hair.
Dear readers of my page! I continue to share simple and effective self-care products for your loved one at home. Personally, I have been using clay in face masks for a long time, about three years to be exact. I really like soap with GS clay, added at the very end of preparation, which allows you to preserve the properties of the clay as much as possible. And I thought that it would be nice if other girls and women were also inspired by the wonderful natural properties of clay and began to use it for their own benefit for health and beauty.
Clay is a wonderful remedy for all kinds of problems and is very widely used in cosmetology. Depending on its mineral composition, clay comes in different colors. The most famous and popular in cosmetology is white clay or kaolin. White clay has the property of deep, gentle cleansing and a whitening effect. Is an excellent antiseptic. It perfectly cleanses not only the skin, but also the hair, absorbing excess sebum and sweat gland secretions, dries the skin and tightens pores, kills bacteria and evens out the complexion. Kaolin masks are more suitable for women of Balzac age since white clay stimulates the production of collagen, a substance responsible for youth (elasticity) of the skin and therefore prevents the formation of wrinkles. Attention! All clay masks are prepared in non-metallic containers and mixed either with wooden, glass spatulas or fingertips. Prepare a face mask as follows. Dilute the required amount of clay 1:1 with water, apply to the skin of the face, body or head. Wash off the mask from your face with warm water after 15-20 minutes without using soap. This mask will delicately cleanse the skin of dead cells, stimulating regeneration, relieve inflammation and irritation, improve blood circulation, and whiten the skin. With regular use, it increases skin elasticity and prevents the appearance of wrinkles. For hair, the mask is prepared in the same way and applied to dry hair, wrapped in a terry towel and thoroughly washed off with water after 30-40 minutes. With regular use, the hair structure is restored, the roots are strengthened and hair loss is prevented. The hair becomes healthy and well-groomed.
Green clay owes its color to the iron oxide present in its composition. In addition to iron, it contains silver, calcium, magnesium, manganese, zinc, copper, phosphorus, molybdenum, cobalt. Green clay is used in masks for oily and combination skin of the face and head as it effectively cleanses the skin, acting as a gentle peeling, tightens pores, leaving the skin soft and velvety. Here are a few recipes that you can use yourself at home if you have combination skin. For a face mask, the clay is diluted to a mushy state and applied to the skin of the face, avoiding the area around the lips and eyes. After 15-20 minutes, wash off with water. If necessary, use nourishing cream. This mask will effectively cleanse oily skin of dead cells, speed up the regeneration process, and have a tonic, brightening effect. The mask nourishes the skin with minerals and active substances, stimulates metabolic processes. With regular use, it increases the firmness and elasticity of the skin and prevents the appearance of wrinkles. For a scalp mask, dilute a small amount of clay with water approximately 1:1, spread on dry hair and wrap in a terry towel, after 30-40 minutes, rinse thoroughly with water. Shampoo may not be needed. With regular use, sebum production is normalized, hair becomes healthier and hair roots are strengthened.
Blue clay is mainly mined in the Rhodope Mountains in Bulgaria. It contains a lot of cobalt and cadmium salts. The composition contains silicon, nitrogen, phosphorus, magnesium, calcium and potassium. Blue clay, like all its varieties, cleanses and disinfects the skin, fights acne, and activates blood circulation. To combat cellulite, use its properties in the form of wrapping problem areas for 30-40 minutes until dry, then rinse with massage movements. There is also a variety of blue clay - Cambrian. Masks made from such clay significantly tighten sagging skin prone to wrinkles. There is a third type of blue Onega clay. It is extracted from deposits created by ancient glaciers and is characterized by a high content of minerals and environmental cleanliness. Possessing powerful biologically active substances and microelements, masks made from Onega blue clay can quickly achieve a smooth, velvety and tightening effect for the skin. A face mask is prepared in the same way as above. The clay applied to the face is distributed over the face and lightly massaged for 2-3 minutes with your fingertips. After 10-15 minutes, rinse with warm water.
Red clay owes its color to a combination of iron and copper oxide, has all the properties of all clays, but is more suitable for sensitive skin and hair prone to redness and irritation. With regular use of a face mask in the manner described above, it prevents the appearance of irritation, comedones and acne, and normalizes the functioning of the sebaceous glands.
Pink clay is so called due to the large amount of silicon in its composition. Can be recommended for use for young girls with thin and delicate skin, girls and women with blond hair. Pink clay has a very delicate texture and effortlessly cleanses and smoothes the skin. For the face and hair, apply in the same way as other clays.
Yellow clay, like all clays, has absorbent properties, but has the ability to remove toxins from the skin and saturates the skin with oxygen, which significantly improves the appearance and heals the skin.
Gray clay is the rarest type. Its difference from all clays is its ability to retain moisture in the deep layers of the skin. Gray clay is suitable for those people who suffer from dehydration and peeling of the epidermis, i.e. the upper layer of the skin. Using this clay, masks are made not only for the facial skin, but also for the rough skin of the elbows, knees, and heels.
Black clay contains biologically active substances that can normalize fat metabolism in cells. This clay is perfect for fighting cellulite and can burn fat. This property of black clay can be used in body wraps and in soap after sports. Numerous reviews from my Anti-Cellulite Soap customers confirm this. Dead Sea black clay is a unique mineral complex that is precious for our skin; it helps restore and regulate the skin’s metabolic processes and prevents the appearance of acne, protects against moisture loss and environmental influences.
Brown clay: A variety of yellow clay is brown clay, from which almost all aquifers of the Non-Black Earth Region are composed. Such clays get their color due to the inclusion of iron compounds (goethites, hematites) in their composition. Brown clays are rarely used in medicine because they have a poorer mineral composition and often contain impurities that are unsafe for human health. The exception is medicinal or cosmetic brown clays, such as brown clays mined in eastern Morocco. In the markets of Marrakesh you can see sellers of such clays. In Marrakech, clay is bought for going to the bathhouse - it is not customary there to use soap for washing. They wash in Marrakech like this: that’s it; the body is rubbed and coated with brown clay, only the eyes are left untouched. Not only the skin, but also the hair is generously lubricated with clay. And in this form, the residents of Marrakech stay for about half an hour, then they wash off the clay with hot water. Both brown and green clays are sold for baths in Marrakesh, but brown is considered the best. After using it, the skin becomes soft and velvety, and the hair is strong and beautiful. But ordinary brown clays must be used very carefully for this purpose. First, thoroughly find out the composition, and then think about whether it’s worth the risk.
Clay Gassul
One of the most ancient clays - Ghassoul (there are several synonyms for the name) is an indispensable natural product for caring for the body, face and hair, especially in the East. Ghassoul clay has the ability to foam when mixed with water (soap properties), the ability to absorb fats, toxins and odors.
The properties of Ghassoul clay are used in cosmetics to reduce inflammation, redness and flaking of the skin. Cleanses, increases elasticity and firmness of the skin, cleanses pores. Smoothes the surface of the skin by removing dead cells. Suitable for any skin type, including sensitive. When used on hair (as part of masks and shampoos), it makes hair soft, shiny and silky. An excellent anti-cellulite product.
In facial care, it tightens and cleanses pores, smooths out fine wrinkles, strengthens the contours of the face, and normalizes fat balance. Masks are used for hair to strengthen the hair follicle and prevent hair loss. Clay contains components that can strengthen the hair scales, thereby giving shine and silkiness to the hair. Perfectly cleanses the scalp without disturbing the lipid balance.
This is what natural clay is like. There is one for every skin type. I never tire of repeating that nature has everything for our health and beauty, we just need to be able to use it.
I will be glad if you, my dear readers, need this short article.
Take care of yourself because everything in a person should be perfect...
There are no ugly women, only unkempt ones!
I wish everyone health, beauty and good mood! See you on the pages of YAM!
Properties of brick clay
There are several types of clay bricks:
- Raw. This material is unfired.
- Red clay brick, unfired and using straw. It is known as adobe.
- Burnt red brick. This is done to obtain ceramic material.
Not any clay is suitable for the production of ceramic stones. The one that is used in this case is called brick. There are several suitable types of material that differ in composition and parameters.
Clay suitable for the production of ordinary bricks must have the following properties:
- connectivity indicator - not less than 3 kgf/cm2. This indicates the compressive strength of the material;
- tensile strength - not less than 0.8 kg/cm2;
- flexibility;
- smoothness;
- ability to swell, that is, the initial volume must increase by no less than 4%.
- ability to form a viscous composition;
- stickiness;
- the ability to maintain the given shape after the firing process;
- fire resistance index - no less than 1.1 thousand °C;
- sintering rate - from 1 thousand °C.
When choosing a material for the production of ordinary clay bricks, you must also pay attention to its composition. The main component is kaolinite
In addition, there must be other ingredients:
- montmorillonite (a mineral that can swell greatly);
- hydromica (silicate type minerals);
- iron oxides, which affect the shade of clay;
- quartz.
As for material fractions, there are 3 main categories. The first category includes clay particles with a dispersion index of at least 0.005 mm. The second group includes dust-type particles that have fractions in the range of 0.05-0.065 mm. The third category is sand particles, whose fractions should be from 0.05 to 2 mm.
The ratio of such particles can be anything, but if you need a material for making bricks, then only that product is suitable whose modulus of clay particles is at least 0.11. This amount is the percentage of clay compounds to the total amount of dust and sand. If there is less clay itself than dust, then such material is called loam. If the composition contains more sand, then such a product is called sandy loam.
How to get raw
To get a raw material, you need to prepare in advance clay (low-fat and greasy), sand (river sand is best; it must be clean), cement (needed to sprinkle the molds). For adobe you will need more straw. You will need screws or nails, plywood, boards (their thickness should be approximately 2.5 cm) and water. Tools include a hacksaw, shovel, sieve, hammer, trowel and mixing container.
First you need to make molds for the bricks. It is necessary to take into account the size of the clay brick that will be needed in the construction of the planned facility. They can be anything. As a rule, the height is 65 mm, the width is 120 mm and the length is 250 mm. But it must be taken into account that during drying the product decreases by approximately 15% in volume.
First you need to cut out the side walls of the mold from the board with a hacksaw. The bottom and lid will be made of plywood. Secure the parts with self-tapping screws. The lid must remain removable. This form is great if you need a solid brick. If you need a void to remain inside the product, you can nail bars in the form of a rectangle or cylinder to the bottom. This option is not only more economical, but also more reliable: adhesion to the mortar during laying will be much better. You need to prepare several forms in advance or one, but there should be a lot of cells in it. The latter option will speed up the production process.
Now you can start molding the bricks. You need to take a small piece of clay and add water, kneading with your hands, like dough in the kitchen. As soon as the mass begins to stick to your hands, you need to stop adding water. After this, pour out the saucer and a small ball and leave to dry in the shade for several days. If, over time, cracks appear in them, this means that oily clay is used. Then you should add a small amount of sand to the composition and experiment again with a new ball and saucer. If the ball is thrown on the ground and it crumbles, this will mean that the clay is thin and needs to be added with a fatter mass.
When forming, the walls are moistened with water. Additionally, you can crush them with a small amount of cement. After this, fill the form with dough and shake. The mass should fill all empty spaces. Remove excess with a trowel. Press the lid on. Now leave the mixture for a while to harden. Then remove the lid and turn the mold over. The finished bricks just need to be dried. This will take 1-2 weeks. To check if everything is done correctly, one brick needs to be broken. It should have the same color throughout its entire thickness.
Methods for removing impurities
From the natural clay stored for oven laying, the first step is to remove foreign impurities. Various methods are used for this.
Dry punching
You can rub the clay through a sieve in dry or soaked form
. The most primitive method. Use your hands to pick out everything unnecessary - grass, pebbles, garbage, crush large clods. After this, the plastic material must be ground through a metal sieve with cells of approximately 3 mm.
The method can be made a little less labor intensive if the clay is dried. To do this, clay lumps are laid out on a wooden sheet and dried in the sun. In winter, this is done in the cold, laying it under a canopy so as not to be covered with snow. If the volume of material is small, it is placed indoors, on a heated stove or on a heating radiator. The drying speed depends on the size of the lumps: the smaller they are, the faster they dry.
Pour the dried clay into a box with thick walls and crush it with a tamper. After grinding, clay dust is sifted through a sieve with small mesh to remove various inclusions from it: pebbles, splinters, and other debris.
Soaking and elutriation
“Dry punching” is a rather labor-intensive task, so it is more advisable to soak the clay for 2-3 days after manual cleaning.
- Place the material in a large basin in layers of 12–15 cm, with plenty of wetting.
- Pour water in an approximate ratio of one to four with clay.
- When the mass softens, mix with a concrete mixer or other means.
- Wipe through a grid with 2–2.5 mm mesh.
The bottom layer - sand and stones - is not suitable for holding bricks together
There is also a more ancient method of excruciation:
- Several holes are drilled vertically in a wooden container with a small distance between them.
- Each of them, before filling the tub with liquid clay mass, is plugged with a wooden stopper.
- Grains of sand and various small stones precipitate first due to their greater weight.
- Subsequently, after settling, clay particles settle to the bottom.
- The top layer of water gradually becomes lighter, but you need to wait until the liquid becomes transparent. As soon as the boundary of the clarified moisture drops slightly below the first hole from above, the plug is removed. The settled water flows out of the container.
- After the next level of settled liquid appears, pull out the next plug.
This process is repeated until all clarified water is completely drained. To speed up the precipitation, after loading the solution into the tub, you will need to add bitter Epsom salt - approximately one pinch per bucket. If you don’t have a wooden barrel at hand, it can be successfully replaced by a metal container of suitable height and volume. The principle of operation is the same with one difference - first short pieces of tubes are soldered into the holes, and plugs are installed in them.
When all the settled liquid has been drained, the liquid clay is transferred to a wide box and left in the sun to evaporate excess moisture. After the dried material ceases to be fluid, stir it periodically with a shovel. As soon as the mass becomes similar in texture to thick dough and stops sticking to the palms, it is covered with polyethylene or oilcloth and stored until baking begins.