Floor technology
A well-equipped floor covering in a private house is a structure consisting of several layers.
Each of them has its own purpose:
- protection from moisture;
- insulation from the penetration of cold or excessive overheating;
- preventing the appearance of fungal infections and insect colonies;
- ensuring a long service life of structural elements.
Expert opinion
Konstantin Alexandrovich
In addition, a properly equipped structure must certainly have a ventilation gap, which will be responsible for the effective circulation of air masses. Depending on which floor of the wooden house will undergo the insulation procedure, the design of the “pie” in the floor covering can vary significantly.
In addition to the number of floors, the list of requirements for floor coverings is also influenced by the level of air humidity in the room and the purpose of the building as a whole. The demands on the floors of a country house will probably be lower than on the flooring of a private mansion built from wood. The principle of arranging floors for premises on the first, second floor or attic has its own characteristics. The general concept of arranging a floor covering is comparable to preparing a multi-layer cake for a pastry chef. The thermal insulation layer is the main thing here, but does not detract from the importance of the wooden floor, insulating layers, concrete floor, etc.
Floor insulation process
Floor insulation with mineral wool occurs in several stages:
- Preparing the subfloor surface.
- Directly laying the insulation.
- Installation of pre-finishing coating.
Let's look at the whole process step by step.
Preparing the rough foundation
It is very important to repair the rough foundation and install waterproofing
If you are going to insulate old floors, then before doing this you will have to completely remove all the floor covering from them, exposing the floors right down to the concrete floor slabs or rough wooden floors.
Then we carefully examine their surface for cracks, holes, crevices, etc. All discovered holes and problem areas should be sealed using putty, plaster or sealant.
Article on the topic: Dutch style in the interior
Next, you should check the load-bearing surface for horizontal slope, dips and bumps. If the defects are not so significant, they can be corrected using putty or plaster.
If the height differences are too large, then you will have to resort to a more radical method - pouring a leveling concrete screed. To do this, you can use ready-made dry mixtures sold in construction stores, or prepare a sand-concrete solution with your own hands.
If the maximum thickness of the screed is expected to be less than 3 cm, then coarse sand should be used as a solution filler.
To add strength, you can add gravel to the mixture.
If the leveling layer of the concrete screed is more than 3 cm, then it is recommended to use fine gravel or crushed stone to increase strength.
The table shows the proportions that should be observed when mixing M-100 grade concrete mortar, which is most often used for floor screed.
M100 concrete proportions:
| Brand of cement used | Mass composition*, kg | Volume composition*, l |
| M400 | 1 : 4,6 : 7,0 | 1 : 4,1 : 6,1 |
| M500 | 1 : 5,8 : 8,1 | 1 : 5,3 : 7,1 |
*Values are given in order - cement : sand : crushed stone
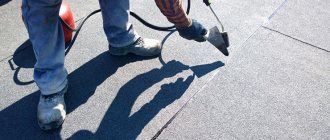
Waterproofing
Ruberoid and its analogues are glued with special mastics
The installation of a moisture-vapor barrier layer is a very important stage of work. The fact is that mineral wool is extremely afraid of moisture. When wet, it loses its thermal insulation properties and no longer restores them. Moreover, moisture that gets inside remains inside for a long time, causing the proliferation of mold and fungi that spread to the floors and walls.
Coating waterproofing is applied with a brush or roller
To do this, you can use rolled waterproofing - roofing felt or its modern analogues. Sheets of roofing felt are glued to the floor surface using polymer or bitumen mastics.
There are also self-adhesive types of waterproofing on the modern market, for example, TechnoNIKOL. The canvases are laid with an overlap of at least 10 cm, and the seams are carefully coated with mastic. For greater reliability, you can lay waterproofing in two or three layers, so that the joints of the sheets of different layers do not coincide.
For concrete subfloors, coating waterproofing can be used. It is a polymer or bitumen mastic with increased fluidity. To apply them, paint rollers or brushes are used. For more information about the materials, watch this video:
Mastics fill all the smallest cracks and pores of concrete, blocking access to moisture particles from the lower room.
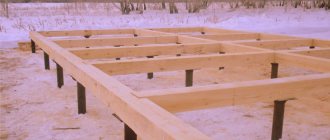
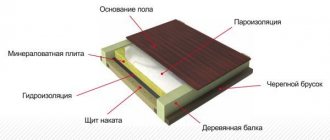
Installation of logs
Mineral wool must be laid between wooden logs, which will protect the material from creasing
Related article: How to sew curtains for a dacha with your own hands: from measuring to hanging
Since mineral wool cannot be wrinkled, care should be taken to create a protective barrier between it and the finishing coating.
To prevent the floor covering from putting pressure on the insulation, we install wooden logs over the entire surface of the subfloors, which will serve as support for the finishing flooring.
To do this, we take blocks with a cross-section of 5 x 6 cm and fasten them to the concrete base using dowel nails, and to the wooden base with nails or self-tapping screws.
The pitch between the joists depends on what material you are going to use for laying the top floor covering.
For a plank floor made of “fives” or “forties”, a distance between the logs of 80 cm will be sufficient.
For plywood, OSB or inch boards, the distance should be reduced to 40 - 60 cm.
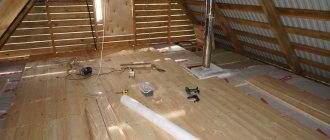
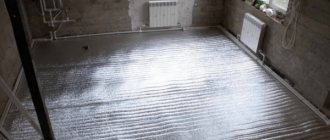
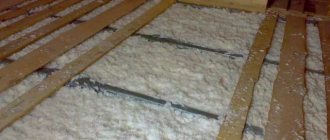
Mineral wool flooring
After installing the waterproofing, you can proceed directly to laying the mineral insulation. We fill all the gaps between the joists with it, so that there are no gaps or holes left between the insulation and the joists. For detailed instructions on mineral wool insulation, see this video:
When laying the mineral wool, it is permissible to slightly crush it so that it does not rise too much above the level of the log, but it is not recommended to compact it excessively - this will not give a special increase in thermal conductivity, but will significantly increase the consumption of material.
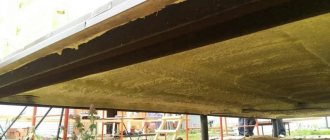
Vapor barrier will protect the insulation from moisture penetration
After all the cavities between the joists are filled with insulation, a vapor barrier should be laid over it. This may be isospan or similar materials.
It will allow moisture particles to escape, while at the same time preventing moisture from entering the insulation from the outside.
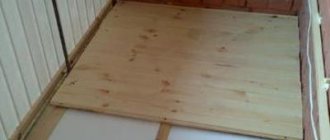
The joints of the vapor barrier sheets should be carefully taped after installation. The last stage of all work will be laying a finishing flooring made of the material of your choice on top of the insulated floor. The material of the top flooring (boards, sheets of chipboard, OSB, plywood) is attached from above to the joists, finally covering the insulation from the influence of the external environment.
The best posts
- How to beautifully decorate walls with curtains
- Origami swan from paper: how to make it step by step with photos and videos
- Do-it-yourself wooden windows: expert advice
- DIY bottle decor
- Kaliningradskaya shares the secrets of success with readers
- Storage Secrets: How to Organize School Textbooks and Supplies?
- Oriental style gazebo - construction features
- How to make a staircase to the basement: the main stages of manufacturing using three examples
Advantages and disadvantages of thermal insulation of floors with mineral wool
The list of benefits is as follows:
- High degree of fire resistance of the coating. The material can withstand temperatures up to 1000 degrees Celsius. All positive properties remain unchanged.
- Mineral wool slabs can be successfully used for soundproofing rooms.
- The material is relatively low cost compared to other types of insulation.
- Mineral wool does not require dismantling and replacement throughout its entire service life.
- The installation process is quite simple.
But you should not think that mineral wool has exclusively positive qualities. Just like other types of heat insulators used for working with floors, it also has negative characteristics. The most important of them is the increased ability to absorb moisture. Because of this nuance, professionals do not use mineral wool when insulating rooms with high levels of humidity - kitchens and bathrooms. But there are ways to deal with this problem.
Conclusions and useful video on the topic
You can visually familiarize yourself with the process of floor insulation using joists from this video:
It can be seen that the process of floor insulation using joists is not as costly and labor-intensive as it seems at first glance. The choice of insulation is always at the discretion of the owner. In addition to sawdust and expanded clay, any of the listed materials will be optimal. With the exception, perhaps, of polystyrene foam, the cutting of which will require a lot of tinkering.
Do you have a different opinion about floor insulation? Please share it with people who are encountering this issue for the first time. Leave your comments in the communication block located below the article.
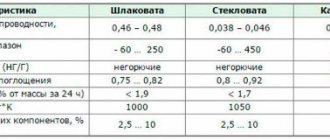
Main characteristics of glass wool
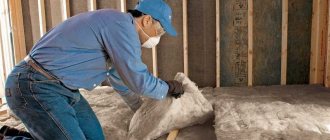
The following types of raw materials are used to make glass wool: lime, sodium bicarbonate, sand and borax. Broken glass is used as the main component. In the process of combining and processing all these components, a fibrous substance is formed, which is used as the basis for creating mats that are characterized by high elasticity and strength. Mineral wool insulation of this type has one noticeable flaw. When installing it on an insulated surface, the fibers are easily damaged. Their smallest particles can penetrate through the fabric of clothing, getting on the skin and leading to unbearable itching.
Therefore, when working with glass wool, special protective clothing is used, consisting of a thick suit, gloves, goggles and a respirator to protect the respiratory system. Reuse of such clothing is not intended.
Basalt (stone) wool
The raw materials for the production of mineral basalt wool are gabbro-basalt rocks. This material has gained popularity both among private craftsmen and among developers of large real estate properties. It is not caustic and is not aggressive towards metals. Basalt wool is sensitive to wetness, but at the same time has a high coefficient of vapor permeability.
This type of material is sold in both slab and roll versions.
Characteristics of slag
Slag wool is produced by processing waste from metallurgical production. Among all types of mineral wool, it has the lowest thermal conductivity index. In addition, the material gets wet easily and can absorb a significant amount of moisture. Professionals advise against using it when insulating walls outside the building and communication pipes connected to water. This is due to another of its disadvantages - when slag wool gets wet, it can easily oxidize the metal with which it comes into contact.
The degree of causticity of slag wool is comparable to that of glass wool.
Advantages of mineral wool
What is the reason for the high demand for the material? Mineral wool has the following advantages:
- non-flammability (made from basalt rocks, slag or a mixture of glass with coarse fabric fibers, it blocks the path of spreading fire; the minimum temperature resistance of most manufacturers is 1000 0 C);
- low thermal conductivity coefficient - from 0.025 to 0.045 (the lower it is, the better heat is retained in the room);
- sound insulation as an additional plus (although it is not as important when insulating the floor as when covering walls);
- frost resistance;
- moderate vapor permeability (allows moisture to be removed from the surface in a timely manner);
- ease of installation (preference is given to mineral wool slabs, but it is also easy to install roll insulation);
- absence of odors (does not attract birds, rodents, insects);
- resistance to most harmful chemical compounds;
- low degree of deformability (under normal conditions and without mechanical stress, mineral wool retains its shape perfectly);
- financial benefits (the most suitable floor insulation costs less than revolutionary new products like polyurethane foam, which also requires additional equipment).
Alas, mineral wool is not without a couple of disadvantages. One of them is the width of the slabs (roll), which reduces the volume of the insulated room. Another disadvantage is the change in shape (compression) when interacting with a liquid. This disadvantage is eliminated by laying additional layers of vapor and waterproofing.
In addition, if moisture ingress occurs under specific conditions (the house is built in a lowland or swampy area, precipitation often falls), you should simply choose fiberglass over slag and basalt - it absorbs half as much moisture and removes it faster without losing its properties .
Having made sure that minor deficiencies can be easily eliminated, it’s time to start choosing the material and get acquainted with the installation technology.
Soundproofing of interior partitions
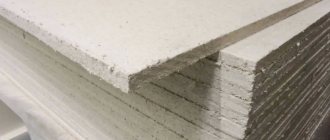
We use Technoacoustic slabs 50 mm thick with double-sided plasterboard sheathing on a metal or wooden frame.
- We install the wall frame (wooden beams or metal profile) with a distance between the beams inside of 580-590 mm.
- On one side we cover the wall with OSB sheets, fiberboard or plasterboard.
- We lay stone wool.
- We lay the second layer of insulation with a seam spacing of 150 mm.
- We cover the insulation with sheets for finishing. We fix the sheets to the frame.
Details
Preparing the room for insulation
The first stage is cleansing. That is, the loggia or balcony must be cleared of absolutely all things. If there are old wooden frames with single-type glass, it is also important to remove them, because such glazing will not generate heat in the room. Old frames need to be replaced with new two-chamber and three-chamber double-glazed windows.
The degree of thermal insulation in the room will depend on them. If you carry out comprehensive insulation, then you can do everything not only inside, but also outside. To prevent condensation and moisture accumulation, the loggia is insulated only from the outside, but sometimes this is impossible due to the architectural design of the building. Here, as an alternative option, you can insulate the loggia from the inside. Insulating a loggia yourself using mineral wool is not a difficult job, but in addition to the insulating material, you need a building level, an adhesive composition, a stapler and roofing felt.
Insulating walls and ceilings
Before you begin insulation work, you need to check all corners and walls for cracks and crevices, and if there are any, you need to seal them with sealant, and if they are small, then with polyurethane foam. After drying, cut off the remaining foam and cover it with cement mortar or seal it with sealant tape. Do the same on the walls and check if the plaster is crumbling. If you have neighbors above you, you need to find out from them whether their floor is insulated, and if so, you should not bother with insulating the ceiling. For peace of mind that heat will be retained in the room, experts advise covering the balcony on its own side. Balcony walls are mainly covered with double-glazed windows that are not insulated. Window insulation will depend on the thickness. The lower part is usually made by builders either from iron or from a balcony.
Next, we will proceed to insulating the ceiling and walls. It is important to attach a wooden beam with a size of 4*5 cm from the ceiling border. After this, attach the beam to the walls along the total length in increments of 0.5 meters. If you wish to carry out new electrical wiring and sockets, then all electrical work must be carried out in the next working step. Only external switches and sockets need to be installed.
Mineral wool for floor insulation can be laid between the beams, and it needs to be cut into pieces the size of the areas between the beams. It is necessary to start insulation from the ceiling, and to attach sheets of min. cotton wool, use a special adhesive composition. It must be applied extremely carefully, and after application the sheets must be pressed lightly so that there is no pressing on the insulation.
Once all the work is completed, you can begin insulating the walls. if the walls are thick, you can install additional fastening elements in it, which make it possible not only to securely fasten the overall system, but also to extend its service life. Depending on the climate conditions, determine what the thickness of the materials should be (from 5 to 15 cm). It is important to install all additional fastening elements after the glue has dried. Since mineral wool does not have high strength, but performs excellent functions, it is important to carry out all work with it carefully, without damage.
Please note that when working with insulation, you must wear a respirator mask, because small particles that can cause allergic reactions can fly off the sheets.
Wool slabs must be laid close to each other. The adhesive composition must be applied identically on all sheets. After completing the installation of the insulation, you can safely proceed to the installation of the reinforcing layer. Upon completion of the latter, begin finishing work. When creating an adhesive composition for installing mineral wool, you need to make it with a thick and homogeneous mass. If you make the adhesive very thick, you will need to achieve excellent adhesion to the surface. Very liquid also adds problems because it will not have the necessary density for adhesion. For this reason, it is important to ensure that everything does not drip off the spatula.
It is worth remembering that you should never push mineral wool when fixing it to the surface; it is important to work with insulation carefully, because it is a very fragile material. For perfect adhesion, attach the mineral wool using a binding wire; fix the mineral wool using a construction stapler. As for the walls that separate the area of the room and the balcony, it does not need to be insulated, because it is already warm. You can display and attach sockets, lamps and switches to it.
Floor insulation
Before you start insulating the floor, you need to clean it as best as possible from debris, and then lay down roofing material. In the places where the sheets of roofing felt are fastened, go over it with sealant tape, and install logs on top in increments of 0.5 meters. Calculate the thickness of the bars as follows: the height from the floor to the balcony door minus the thickness of the floor covering, rough materials and roofing felt. Before installing the logs, they require a special composition that protects the material from rotting.
After this, install the logs using a building level and connection bars. In the cells that are formed by lags, it is necessary to lay cut pieces of mineral wool that are equal to their sizes.
It is better to carry out work with mineral wool to insulate the floor material while wearing a protective mask/bandage to prevent small particles from entering the respiratory organs. After fastening and laying pieces of mineral wool on the joists, the subfloor is attached using self-tapping screws.
Laying vapor insulation
After installing the mineral wool, the next stage in thermal insulation of the balcony will be vapor insulation. This stage of work is required to ensure that the insulation material does not deteriorate from moisture, and the bars do not rot. Polyethylene can be used as vapor insulation, which is first applied to the ceiling surface, and then overlapped to the walls and at joints.
In places where sockets and switches are mounted, the film must be cut in order to easily insert electrical products. This vapor insulated option can also be done on the floor. In addition, in addition to film, there are also penofol and isolon on the market. After completing the vapor insulation work, you can safely begin finishing the loggia. For the technology of floor insulation with mineral wool, you can choose lining, plasterboard for painting or gluing wallpaper, decorative plaster as finishing materials - it all depends on preferences and finances. Afterwards, you can lay linoleum, laminate, tiles and even carpet on the floor. If you plan to lay a “warm floor”, then it is laid on thermal insulation, and then you need to move on to the floor covering.
Wall finishing needs to be done as a last resort. When the wall decoration is finished, you can attach the baseboards. In the role of heating the room, an excellent solution would be to install a heated floor, as described above. If you do not want to make this choice, then an alternative could be an air conditioner with a winter heating mode or a convector, which will maintain a pleasant temperature in the winter.