Why doesn't the boiler turn on?
Boiler Termex
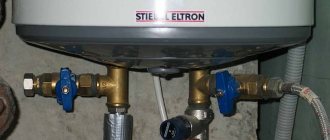
One of the Termex models
Probable sources of problems:
- Triggered RCD (residual current device). First, check the serviceability of the RCD itself; this is done by pressing the “test” button on the device. When in good condition it will turn off.
- The mounting of the heating element (tubular electric heater) or the heating element itself is not in order.
- The water purification filter is faulty. Needs to be replaced with a new one.
- The temperature sensor is broken.
- No electricity. This is the most common cause of breakdown. Great care must be taken with the cable running from the shield to the mechanism.
- The pressure measuring device has failed. Frequently changing pressure wears it out. You'll have to buy a new one and install it in the boiler.
- Broken socket.
Important! If the power of electrical appliances is more than 3 kW, it is necessary to have a cable with a cross-section of more than 3.5 mm². Only such a cable will withstand the load, and the device will function without interruption.
Once a year, the boiler owner needs to do routine cleaning and replace worn parts. This will extend the life of the boiler.
Boiler Ariston
One of the Ariston models
Water heaters of this brand do not turn on for similar reasons:
- No power supply. You need to check the quality of the cable using a tester.
- Broken socket.
- RCD failure. To check its operation, you need to press the RESET button on the device. If the indicator lights up, then there is power. Then you need to press the TEST button, the indicator will go out, and RESET again. The indicator lights up - the RCD is working properly. If the RCD is working correctly, then it has responded to another serious problem in the electrical network.
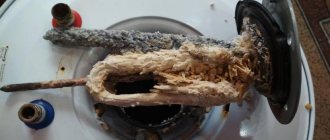
- Faulty heating element. It breaks down due to a thick layer of scale that appears if the magnesium anode is not changed on time. This must be done at least once every two years.
Causes of problems
Electronics are quite sensitive even to minor external influences. Malfunctions occur as a result of the following actions:
- Unstable voltage in the electrical network. To protect all electrical appliances, you need to install a special relay to limit the voltage.
- Mistakes of owners who do not carry out regular preventive maintenance.
- Incorrect installation of the boiler leads to early failures. Because of them, even a high-quality device quickly breaks down.
- A deposit of scale and salt has formed on the surface of the storage tank on the thermal elements. This is due to the high temperature, no higher than 60 degrees is considered acceptable. If the water is hard, it is better to install a filter to purify the water at the inlet. Manufacturing defects are very rare, and even more rarely they appear immediately.
- Small damaged and consumable parts were not replaced with new ones. This caused even bigger problems.
How to fix a breakdown
Termex and Ariston boilers are repaired using the same methods.
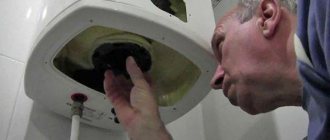
In most cases, the boiler does not turn on due to problems with the heating element. It is secured with 6 bolts, they need to be unscrewed and the heating element removed. It is possible that he has become slightly stuck and will not give in immediately. Once it is disconnected, you need to thoroughly clean the device. Now you can check its operation with a tester. Instructions for verification are given in the next section. All repairs consist of replacing the old heating element with a new one.
Next you need to clean and wash the boiler tank. As soon as it dries, you can begin installing a new heating element and magnesium anode. To make the element last longer, it is recommended to add a water filter to the water heating system. Also, you should not heat the water more than 45 degrees.
There is no power supply to the water heater. A connecting cable runs from the shield to the mechanism. You can find out whether the cable is damaged or not using a tester. If it is normal, then the device will not show phase and zero. The faulty wiring must be replaced with a new one and routed from the switchboard.
Pressure and/or temperature sensors are broken. Can be checked using a tester. In case of malfunction, replace with a new one.
Pressure sensor and temperature sensor
Water pressure too low. Each Thermex device has its own operating pressure specified in the instructions. The owner needs to buy a pump and install it in the boiler. You can also hang the water heater lower than it is currently located on the wall. It is possible that some contacts have come loose, burned or oxidized. They either need to be tightened or cleaned. If they still don't work, they will have to be replaced completely.
Faulty socket. You can connect another device to it to check its operation. A broken socket must be replaced with a new one. It must be selected in accordance with the power of the boiler. It is also worth making sure that the ground is properly connected to the power outlet. If the connection is incorrect, the RCD may not work, causing the boiler to break. A residual current device is necessary in case of increased voltage in the network and burnout: it will turn off the water heater in time.
A broken RCD can also cause a malfunction.
Detailed instructions for checking and repairing heating elements and RCDs can be found in the following sections.
Types of malfunctions and their causes
There are many reasons why boilers fail. Most of them can be fixed on your own. Main problems:
- The device does not heat water. The reason may be a failure of the heating element or the electrical system. If the heating procedure takes longer than usual, this indicates multiple scale that needs to be removed. In addition, due to deposits, the boiler may turn on/off more often.
- Overheating of water is a consequence of a broken thermostat.
- A leak from under the flange indicates damage to the container due to mechanical action or metal corrosion.
- If the device is constantly noisy, there may be a lot of scale on the heating element, or the check valve is broken.
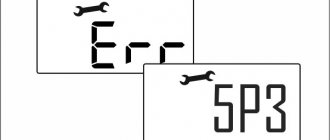
- The display shows an error. Some devices are equipped with an electronic system that may malfunction due to power surges or module failure.
- Lack of hot water supply indicates a breakdown of the heating element or thermostat.
- Dark-colored hot water indicates the presence of corrosion, which can be caused by hard water. If the tank is damaged, you will likely need to purchase a new unit.
- The heater produces an electric current. This situation can happen due to damage to the cable or rupture of the heating element.
- The device does not turn on or off - the reason is burnt out contacts or melted buttons.
- Constant burnout of heating elements is caused by a large amount of scale or improper installation of the device.
- If air appears in the water heater, it means the gaskets are worn out or the check valve is broken.
To identify the cause of malfunctions and eliminate them, it is necessary to carry out a number of standard procedures, namely: turning off the device and the network, draining the water and dismantling the product.
Replacing the heating element or anode
If the temperature sensor or heating element has burned out, it is time to replace the magnesium anode. First you need to disconnect the device from the power supply, then:
- Remove the plastic cover and disconnect the wires.
- Turn off the cold water supply and disconnect the pipes.
- Unscrew the mounting screws and remove the protective cover.
- Remove the temperature sensor and flange.
- Remove the heating element carefully so as not to damage the rubber gasket.
- Remove the appliance from the wall, place it in the bathtub, and then run a water hose inside to remove any remaining scale. To clean the heating element, stir 50 g of citric acid in 2 liters of water. Keep the heating element in the resulting solution until the deposits dissolve (10-12 hours).
- Unscrew the magnesium anode and assess its condition. If one pin remains, replace the part.
- After cleaning, return the parts to their place. If necessary, install a new temperature sensor.
- Reassemble the structure in reverse order. Particular attention should be paid to the condition of the rubber gaskets. If they become unusable, it is recommended to replace them with new ones to avoid leaks of the product after assembly.
- The product must be connected to the electrical network after it is completely filled with water.
Repairing leaks
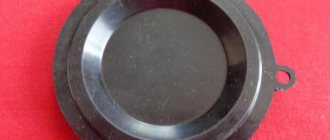
If water drips from the device, the reason may be worn sealing gaskets or damage to the container. In the latter case, repairing heating tanks does not make sense; the purchase of a new device is required. If the problem is in the rubber seals, you need to replace them with new ones.
During installation of the water heater, specialists install shut-off elements. A check valve is installed at the cold water inlet, which is adjusted during operation of the system.
The safety valve is placed on the cold water supply pipe, following certain recommendations:
- It is forbidden to install shut-off valves between the valve and the boiler.
- For a flexible hose, you need to make a special hole in the sewer pipe.
- To quickly drain water from the device, it is permissible to install a ball valve with a tee.
- A leaking valve may indicate its failure. Complete replacement of components will help correct the situation.
- Another cause of leakage can be excessive water pressure. To prevent this, it is optimal to install a regulator that reduces the readings to normal.
How to check electrical elements and heating elements
Heating element of the Termex boiler
One of the most common reasons why the boiler does not turn on is a broken electric heater. It fails in the following cases:
- the filament inside the heating element has burned out;
- there was a short circuit in the incandescent wire, so the electric boiler received an electric shock;
- a thick layer of scale has appeared on the heating element, so heat exchange is impossible, and the water heats up less and less with each use.
To check the heating element, you must remove it from the water heater. Then the device needs to be descaled. Now you can carry out a full inspection for cracks, holes, swelling and other defects. If there is such damage, then repairs will cost more than buying a new heating element. If there are no visual defects, you need to ring it using a tester.
Checking the heating element using a multimeter
Checking for serviceability is carried out in two ways:
- It is necessary to check the nichrome thread, which creates the glowing process. The tester is set to circuit test mode. It is necessary to check whether the nichrome thread, which ensures the incandescence process, has failed. To do this at home, the tester must be set to circuit test mode. The terminals of the device must be connected to the contacts at the base of the heating element. If the arrow is at zero, the thread is fine. If the arrow is not at zero, then the thread has broken and the heating element will have to be completely replaced.
- It is necessary to check the closure of the spiral. You only need to connect one terminal of the tester to the heating element. The other contact must be attached to the water heater tank. If the device shows a target, it means that the coil is resisting the boiler insulation. Therefore, the spiral touches the body. The heating element needs to be changed.
Is repair possible?
In some cases, it is possible to repair the water heater yourself. However, the process is not as easy as it might initially seem.
The first step is to understand the cause of the problem. To do this, you should prepare and take tools that may be useful during the inspection:
- hoses (needed to drain liquid);
- screwdriver;
- wrenches (socket, tubular, adjustable);
- multimeter
Afterwards, be sure to disconnect the device from the power supply and drain the liquid. The device tank must be empty. Only after these manipulations do they proceed to inspection, identifying the causes of breakdown or leakage.
In some cases, the problem can be solved with minor repairs. In others, you will need to completely replace the water heater with a new one. It is advisable to do this before the warranty expires.
Here's what to look for during your inspection:
- Water leaks appear in the joint areas of the pipes. The cause of the malfunction is a leak in the water heater tank. Repair is not possible. The boiler will have to be replaced.
- Leakage is observed in the upper part. If the device has been properly maintained on a regular basis, the magnesium rod has been replaced on time, but there is still a leak, repairs will not help. You'll have to buy a new boiler. Also, the entire water heater must be replaced if it has an old magnesium rod that has not been replaced during prolonged use. This provokes rotting of the tank (in the case of a non-enamelled inner surface).
- The tank cap is leaking. In these circumstances, a new heater is installed.
- Leaking directly in the tank. The most unpleasant situation is that the leak comes from the bottom of the tank. The most likely scenario is that sediment builds up and eats away at the bottom of the tank. Repair is not possible. The fact is that the water heater is a complete device with a single body and enameled internal walls. Once the enamel surface is damaged, it cannot be repaired.
The first place a plumber will check is the drain valve. It is located at the bottom of the tank. Responsible for draining sediment from the water heater. The valve is easily replaceable, so this situation is the simplest.
It is important to remember that not every small puddle of water found at the base of a water heater is due to a leak. Condensation can form on the pipes and fixtures that surround the water heater. As condensation accumulates, liquid will begin to drip, accumulating on the floor. This is especially true in basements or in damp weather.
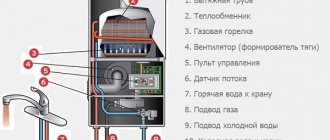
Boiler design and operating system are more complex than one might think. For this reason, the best way is to order repairs from specialists or purchase a new device.
