Design of a simple clamp
Without exception, all pipe clamps consist of a bandage - a crimping material made by manufacturers from steel, and an internal seal called a cuff. As a sealing material that ensures sealing of the damaged area, special corrugated rubber is usually used, which helps prevent deformation of the pipe when the fastening screws are tightly tightened. The presence of a rubber gasket in the design of the product also helps reduce vibration and noise.
When choosing clamps, pay attention to such product characteristics as:
- internal diameter; width of bandage; thickness of steel strip.
The tightening range of the clamp varies depending on the size of the fastener. The main indicators that determine the scope of its application are the strength of the connection and the level of permissible load.
Metal clamps for fastening and repairing pipes of different diameters consist of a steel frame and a seal made of corrugated rubber
Clamp design for large diameter pipes
Pipes of large and small diameters have a bandage in their design - a special crimping material. It is made of steel and an internal seal called a cuff. The seal is corrugated rubber. It guarantees a seal and prevents deformation of the pipes if the fastening screws are tightly tightened. Rubber also reduces vibration and noise.
Important characteristics of clamps when purchasing:
- Diameter of the inner part;
- Width of crimping material;
- Bandage thickness.
When choosing a clamp for large diameter pipes, you need to pay attention to the thickness of the bandage
The tightening force of the clamp depends on its size. The purpose of using the element depends on the strength of the connection. It is also important to consider the level of possible load.
The design of metal clamps is quite simple. The element consists of a steel crimp and a rubber seal.
Clamps are widely used to fix leaks in water pipes. In case of unexpected breakdowns, you can make the connection element yourself. Factory options have a wide range of uses: heating, gas, water, sewer pipes.
DIY clamp
If you don’t have the opportunity to go to the store, and the plumbing requires urgent repairs, then you can fix the problem yourself:
- Find around the house some adhesive tape or electrical tape, wire and a rubber band that can be cut from a bicycle inner tube;
- Apply a tourniquet to the damaged section of the pipe;
- Tighten the harness by wrapping it with wire. When making the winding, pay special attention to the edges of the clamp;
- Wrap the resulting structure with tape or tape. Next, the result can be painted over.
Making a clamp from scrap materials
Find a strip of galvanized sheet metal, the thickness of which does not exceed one millimeter, and a piece of three-millimeter rubber. Look in your supplies for a couple of bolts (M6, M8 or M10), as well as matching nuts and washers. Tools that will be useful:
- hammer; calipers; wrenches; vice or pliers; metal scissors, which can be replaced if available with a jigsaw or grinder equipped with appropriate cutting elements; drill and bits (M7, M9 or M10, M12).
Use a caliper to determine the pipe diameter. If the pipe diameter is large, then take the necessary measurements using an angle and a ruler.
Next, cut out the tin frame of the clamp in the form of a strip, the width of which should be 4-8 cm, and the length will have to be calculated. To do this, determine the circumference of the pipe by multiplying its diameter by 3.14 (the number Pi, familiar to everyone from a school geometry course). 3-4 cm are added to the result obtained, from which “ears” are subsequently made with drilled holes for fastening bolts.
Algorithm for installing a clamp on a pipe
Before installing the clamp, the ears are moved apart so that they can easily wrap around the pipe.
In this case, the rubber gasket should well cover the area of the pipe defect. If everything was measured correctly, then there should be no more than three centimeters between the ears. This distance will necessarily decrease as the clamp is tightened with bolts, and this process continues until the rubber seal can be pressed as tightly as possible to the pipe.
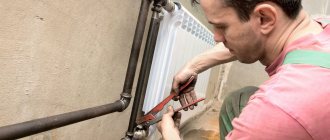
A clamp for eliminating a leak in a pipe of a water supply or heating system at home can be installed at the site of damage with your own hands within a few minutes
In most cases, clamps are installed on a leaking pipe. The supply of water, coolant or wastewater is not shut off.
Therefore, the effectiveness of the repairs performed will be immediately visible. After wiping the pipe and bandage dry, wait about five minutes and make sure that the leak has been fixed. If necessary, bolts that are too long can be easily cut with a grinder or a hacksaw.
A properly installed clamp can last for several years, protecting the facility from flooding. However, it is advisable to weld breaks in water supply and heating systems or replace defective areas with new pipes.
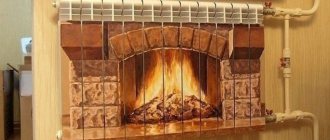
Methods for eliminating leaks in a straight heating pipe
A local leak of a metal pipe in its straight section (fistula) is the easiest option for self-remediation. There are several ways to deal with the problem without draining the water.
Mechanical method for eliminating leaks
The classic way to seal a leak is to install a crimping device on a rubber gasket while the heating system is running.
The methods are as follows:
- The damaged section of the pipe is wrapped in soft rubber (for example, a bicycle inner tube). Secure the patch with metal wire, tightening it well in several turns along the length of the rubber.
- The rubber patch is secured with two narrow crimp clamps of the appropriate diameter.
- If there are several leaks, they are localized in close proximity to each other, then you can seal the leak in the heating pipe by installing a metal clip. This is a wide clamp with a built-in rubber gasket that tightens in two places.
Note! In this way, the leak is sealed temporarily, eliminating the problem for the period until a repair specialist is called or until the end of the heating season.
If the fistula has formed in a thick-walled pipe, then it can be repaired by installing a special self-tapping screw with a rubber seal in front of the cap. To do this, clean the leak area and screw in a self-tapping screw using a hand drill.
Note! You can use an electric drill only if there is no coolant in the system. Otherwise, you risk getting electrocuted if water comes out of the pipe.
Chemical methods for eliminating leaks
Manufacturers of repair sealants offer a lot of materials for sealing leaks in heating systems with metal or polypropylene pipes.
We recommend that you read: How to make a table from a metal profile pipe with your own hands
From available means, you can use automotive sealants for high-temperature operating conditions. The fabric is impregnated with this composition and the pipe is wrapped where the damaged area of the heating circuit is found.
This method of eliminating leaks is used not only in straight sections, but also in places of threaded connections or joining pipes of different diameters. This is justified if it is impossible to turn off the heating at the time of repairing the joint.
To seal leaks in heating pipes, the following chemically active substances are used:
- Two-component sealing resins based on epoxy.
- Adhesive silicone mixtures that quickly “set” (cold welding).
- Heat-resistant mixtures based on rubber.
Note! It is possible to seal a leak in a heating pipe using chemical sealants only when the heating is turned off and the system is empty.
The algorithm of actions is as follows:
- The damaged section of the pipe is degreased, dried and a thin layer of sealant is applied to it.
- Wrap the repaired area with a special fiberglass tape. It serves as a reinforcing element in the mass of hermetic coating.
- The chemical composition is again applied to the serpyanka. The action is repeated.
As a result, a sealing layer is formed on the pipe body, which reliably protects it from leaks.
Note! Silicone sealant adheres to a smooth surface much better than to a rough one. Contrary to habit and popular belief, the damaged section of the pipe should not be sanded with abrasives (for example, sanded with sandpaper).
How to make a wire clamp - step by step diagram
Step 1: Measure the required wire length
First of all, let's cut off as many wires as the diameter of our connection requires. We don’t need measuring instruments, just wrap the edge of the wire around the pipe and estimate the ends for twisting by eye, usually 50-60 millimeters is enough. Then fold the wire in half and use pliers to bite off the excess. We bring the ends together so that they are on the same level.
Article on the topic: How to make a plasterboard ceiling with lighting with your own hands in the kitchen
Step 2: Correct clamp arrangement
Now that you have a wire bent in half in your hands, you need to make the correct “eye” at the bend, and the diameter of the “ear” should coincide with the screwdriver, which should fit freely into it. To maintain this size, just straighten the ends, insert a screwdriver between them and bring them together again. Of course, a Phillips screwdriver is best suited for such purposes; it is even along its entire length and does not have an extension, unlike a flat one. Next, you need to bend the resulting “ear” to the side, relative to the length of the wire, it will serve as a lock.
Insertion into the main water supply
When connecting the water supply of a private house to the central water supply system, a mortise pipe clamp is used, which allows work to be carried out under pressure in a short time using specialized professional equipment.
A clamp for tapping into a pipe without pressure is installed by a simple mechanic using a milling cutter and a pair of wrenches. This does not involve the use of a welding machine. In any case, this work is carried out by employees of services servicing the main water supply in a populated area, provided that the client has all the permits.
Stages of installing a mortise pipe clamp in a main pipeline. Clamps for inserting into pipes simplify work on connecting the facility to central water supply systems
Now you know how to make and install a clamp on a water pipe. If the pipeline is damaged, you will be able to fix the problem yourself, at least for a while before professional plumbers arrive.
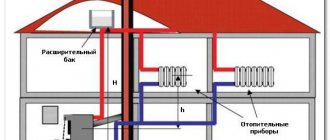
The proper functioning of heating and water supply systems is one of the primary tasks that every home owner must ensure.
In the case of laying new communication lines and high-quality work, this issue may not worry for a long time. However, time is inexorable, and sooner or later, under the influence of external factors or the influence of water, the pipes will begin to leak. In this regard, let's find out how to install a clamp on a pipe. The technology for carrying out the mentioned work will be discussed further.
Installation sequence
After selecting and purchasing a repair product of the required diameter, work is carried out in the following order:
- The fastening elements must be unscrewed and removed from the holes, and the ends of the clamp must be spread apart so that it can be easily put on the damaged pipe.
- After this, you need to check that the rubber sealing gasket is located exactly above the damage to the pipeline. In this case, its edges must overlap the entire section of the pipe by at least 3 cm on each side.
- After this, we insert the fasteners that come with it into the holes on the edges of the product. We tighten the bolts with nuts so that the clamp fits snugly to the pipe along the entire plane.
- Now all that remains is to check that the leak has completely stopped.
Important: this method of repairing pipes is considered temporary, so it is better to replace the damaged section of the pipeline. However, after installing such a repair product, you can use the pipeline for at least 5 years without replacing the pipes.
Definition and applications
Before moving on to directly considering the issue of installing a clamp on a pipe, it is necessary to understand what this auxiliary element of plumbing is.
A clamp is usually called a special device designed to seal holes in pipes and eliminate leaks. Clamps can also be additionally equipped at the joints of pipeline segments for additional sealing. As for application cases, we can note: The appearance of fistulas in the pipe wall. This can occur as a result of the effects of corrosion on the walls. The appearance of cracks in pipes. They occur both when installation rules are violated and as a result of manufacturing defects. The appearance of fractures in pipes.
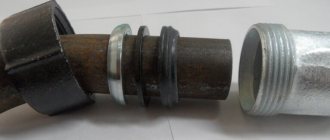
This can occur if the pipe installation technology is violated. Leaks occur at the joints. It can occur as a result of improper installation or natural wear of the seal. As for the structure of the element, the clamp consists of two metal half-rings connected to each other with bolts and nuts. A rubber seal is usually attached along the inner radius of the clamp, having a width slightly larger than the metal part.
Causes and localization of leaks in the heating system
Leaks in the heating system occur for various reasons and in different places in the circuit: in straight sections or at pipe joints.
Leaks on straight sections
The cause of leaks in metal heating pipes that have been in use for more than one year in more than 95% of cases is corrosion (rusting) of the metal.
Even thick-walled galvanized pipes in heating circuits are eaten away by rust over time. The destruction of metal upon contact with water is a natural process that has not yet been completely overcome.
The trigger for metal destruction can be:
- mechanical, chemical internal damage to the pipe;
- changes in temperature or pressure;
- damage to the protective outer layer.
Note! If a leak occurs in an old heating pipe, then most likely this is a warning about total wear and tear of the entire system.
In autonomous heating systems, which are installed from modern polymer materials, leaks are caused by the wrong choice of pipes.
When the owner, out of ignorance or for reasons of saving money, purchases pipes for cold water or pipes not intended for use under pressure for hot water supply systems or a heating system. In this case, simply sealing the leak is not enough; often a complete replacement of communications is required.
Leaks at connections
Leaks in the connection area occur if the thread has become unusable (for example, it has become stuck and was torn off).
We recommend that you read: How to correctly make the transition from a brick chimney to a sandwich?
If there is a leak at the fitting installation sites, the prognosis for effective local repair is more favorable. Here you can fix a leak in the heating system by replacing a worn gasket that has lost its elasticity.
In more serious cases, it may be necessary to replace the connecting (adjustable) fitting or valve.
Installation process
As for the process of installing a clamp, for example, on a heating pipe, everything is quite simple. For maximum efficiency, it is best to carry out actions in stages: First, it is necessary to shut off the flow of water (in this case, acting as a coolant) into the pipe. Next, the installation site of the clamp must be cleaned and leveled for maximum sealing in the future.
For these purposes, sandpaper is suitable, with which you need to remove the top layer of paint. Thus, not only will the surface be leveled, but the location of the damage will become more clearly visible. After this, a clamp is installed. To do this, the fastener is untwisted on one side, and the half rings are moved slightly in different directions so that the element can be put on the pipe. In this case, the rubber seal should be positioned so that the place where the leak occurs is located in the middle of the rubber part. Next, the fastening elements of the clamp are inserted into the ear holes, and the element is tightened using keys.
If all stages of work were carried out correctly, the leak will be eliminated. This will be most clearly noticeable if the water was not shut off. In addition, it should be added that for additional sealing of the joint, the inner surface of the rubber seal of the clamp can be treated with silicone sealant, which, after polymerization, will give almost complete confidence in the tightness of the joint.
Butt connection
If you need to connect fragments of polypropylene pipes, you can use the shrink properties of a regular plastic bottle. To carry out repairs, epoxy, polyurethane, or hot melt adhesive is applied to parts of the pipe. Then the fragments are installed in a “sleeve” cut from a bottle. When heating the repair site with a hairdryer, the “sleeve” will tightly compress the area, welding into the body of the pipe. This will ensure the strength and tightness of the connection.
If you own a soldering machine, know that repairing polypropylene pipes with your own hands using the methods described above will take you exactly the same amount of time as completely replacing the defective area. Only in this case will you have one hundred percent confidence in the result. So is it worth spending time on repairs if you have a soldering machine and a pair of butt joints at hand?
It must be remembered that most of the described methods are a temporary measure, so to carry out major repairs you need to contact specialists.
We recommend Plastic pipes for well construction: types and installation features
Basic rules on how to install a clamp on a heating pipe
A bandage clamp is used when fistulas have occurred in the pipe. This occurs when metal walls are exposed to corrosion. Clamps are also used when cracks, fractures, or leaks occur in the water pipeline.
Bandage installation sequence:
- First, turn off the water supply. It acts as a coolant in the heating system.
- The installation site is cleaned and leveled. The top layer of paint is removed with sandpaper.
- Next, install the clamp. The nuts are loosened a little to position the part correctly. The rubber seal should be placed in the middle of the break.
- All that remains is to tighten the clamp. Keys are used for this.
Making a clamp
If for some reason it is impossible to purchase a clamp in a specialized store, the issue can be resolved by making the element yourself.
To do this, do the following: You need to take a strip of galvanized sheet of the required width and thickness of about 1 mm. Using a flexible tape measure, measure the circumference of the pipe and add 3-4 cm to this indicator on each side of the strip necessary for making the ears for fastening. The strip obtained Previously, the length is cut off from the sheet and divided into two parts (you can make a one-piece clamp from one strip). The blanks are bent to the required shape. The work can be carried out either directly on site or using a piece of pipe of the same diameter as a model. On each side of the resulting half-rings, the ears necessary for fastening are bent using pliers. Holes are drilled into them. Simple rubber with a thickness of 3 mm or more can be used as a seal. The resulting clamp and seal are mounted in place similarly to the factory version. It is worth noting that this option, if manufactured and installed correctly and with high quality, will differ little from the factory analogue, and therefore can be successfully used for installation, for example, on a water pipe. Sometimes a type of clamp can be used to seal the connection of pipes used in gardening work.
For example, the use of irrigation systems of varying complexity is impossible without a tight connection of the elements. Such clamps are generally similar in design to the parts mentioned above, but lack a sealing element. Regarding how much a water clamp costs, it should be said that the price can vary quite a lot depending on the complexity of the design, material of manufacture, manufacturer and many other factors. As you can see From the above, installing a clamp on a water pipe is too difficult a task to do on your own. It is important to understand that this is a temporary measure, which is not a panacea, but is quite suitable as a measure to quickly solve the problem.
Purpose
The repair clamp can be used in the following situations:
- To seal a pipe that has been damaged by corrosion.
- To seal leaks due to the formation of holes and fistulas. In this case, you need a repair clamp with a special sealing gasket. It presses tightly against the defect and reliably protects against leaks.
- If a pipe bursts in the transverse or longitudinal direction, it can be repaired using this product. If such a breakdown occurs on a moving section of the pipeline, then it is better to use a clamp that will not only close the leak, but also allow you to fix the pipe to the wall or floor.
- In the case when you urgently need to prevent a leak, but there is no way to turn off the water or drain it from the system.
- The repair clamp is suitable for repairing leaks in the event of a leak in the socket connection of sewerage pipelines.
Repair clamps can be used on both vertical and horizontal sections of pipelines. Essentially, this is a bandage that is firmly fixed to the pipe. It can be mounted on pipes made of different materials - plastic, steel, asbestos cement, cast iron, copper and metal-plastic.
Important: these products are not suitable for eliminating leaks in curved sections of pipes, in the area of bends, or at intersections.
The conditions for using repair products are as follows:
- The outer diameter of the pipes cannot be greater than the diameter or length of the repair clamp.
- When installed on pipes with a diameter of 350 mm, the length of the bandage should be 15 cm greater than the size of the damage.
- For pipes of significant dimensions, the length of the repair product should be 20 cm longer than the damaged area.
- For PVC pipelines, the length of the clamp should be 1.5 times greater than the defect being repaired.
- If it is necessary to repair a broken pipeline or join two sections, then the distance between the edges of the pipes should not be more than 10 mm, and the permissible deviation angle is 2-3 degrees.
- The repair product will function effectively only if the area of the damage being repaired is no more than 60 percent of the working surface area of the clamp.
- If the size of the defect significantly exceeds the working surface of the repair band, a section of the pipeline is cut out and replaced with a new pipeline, which is fixed using two clamps or couplings.
Tools
Repair pipe clamps are used to repair defects in the pipeline body. Therefore, in this article we will consider their characteristics with the features of fastening for water pipes.
Table of contents:
- Where are clamps used?
- What are clamps for?
- Advantages and features of a repair clamp
- Manufacturers of clamps
- Typical clamps - overview of varieties
- How does the installation process of a repair clamp take place?
- Metal, plastic and other clamps as a mounting element
- Homemade clamps
- Limitations and advantages of homemade clamps
Where are clamps used?
Using a clamp, you can repair minor damage, block an “unnecessary” tie-in, neutralize the effects of through corrosion, and connect a broken area. In short, a repair product is quite effective, and in many cases, the only way to solve a problem with pipe integrity.
Pipe clamps are designed for installation on horizontal and vertical sections of the pipeline. In areas that are curved or connected, for example, in bends, crosses, the installation process is not effective. There are no restrictions regarding the material of the product. The repair clamp is mounted both on fragile cast iron pipes and plastic pipelines made of copper. It is worth noting that there is even a special clamp made from asbestos cement. You can also purchase repair products for composite or polymer pipelines in stores.
What are clamps for?
Using a repair clamp for pipelines, you can get rid of a number of defects:
1. Cracks in the body of the pipeline. Moreover, of arbitrary size - from the smallest to quite extended.
2. Fractures in the structure of the water supply system. In this option, a pipe clamp is used, with which you can not only get rid of the defect, but also secure the fracture to the supporting surface (wall or ceiling).
3. Fistulas in the body of the pipe. In this case, a clamp with an elastic lining is used, which is pressed into the fistula. Moreover, to transport the aggressive environment of pipelines, a repair product is selected, made of stainless materials, which is resistant to chemical elements.
4. Corrosive damage to the pipe body.
Advantages and features of a repair clamp
1. Used for pipes made of different materials: reinforced concrete, plastic, cast iron, steel, which determines the versatility of the repair clamp.
2. The clamp installation process is a cheap and reliable option for most workers and plumbers. In any case, anyone can independently carry out repair work on fastening the clamp, following clear instructions and recommendations. This allows you to save money and time on the process of welding the pipeline or on paying a plumber.
3. During the operation, you can connect the pipe with different axes.
4. The main feature is the process of manufacturing pipes from stainless materials, which allows you to increase the service life of pipes from rye, rotting areas, and so on. Therefore, most builders prefer to use plastic and polypropylene pipes.
5. Installing repair clamps does not require special knowledge and skills, which justifies the situation with a sudden pipe leak or other damage.
6. Ability to withstand high temperatures, up to approximately one hundred degrees.
7. Clamps from a trusted manufacturer and made from quality materials have a long service life.
Manufacturers of clamps
In the modern world, it is important to take into account not only the parameters or characteristics of clamps, but also pay attention to the manufacturer and country. Repair kits based on clamps are produced all over the world, but the following companies are the most popular among plumbers:
- Romacon is a company from Holland that produces repair and other forms of clamps.
- Melcher and Frenzen Armaturen are companies from Germany engaged in the plumbing market and produce clamps for outsiders and their own pipes.
- Domex - repair elements from Poland, where luxury products are offered on the market.
- IDRA is a fairly high-quality product from China.
Among domestic manufacturers, it has a good reputation, which offers the buyer quality products with European production technology.
Typical clamps - overview of varieties
The use of different clamps to remove defects or cracks in pipelines depends on the degree of damage, the material of the pipe, and its purpose. Many workers prefer to buy kits of materials and components for repairs, which narrows the task of the work performed. Typical clamp designs include the following types of repair kits:
Types and their characteristics:
- The clamp is double-sided, which consists of two elements that are connected with screws. The repair kit is selected for a specific pipe diameter.
- A one-sided clamp, which has a U-shape, with perforation in the highest area (suitable for threaded installation). Such repair products are used on small-diameter pipes (for example, a one-sided repair clamp for pipes, model DN50).
- Multi-component, which is used to protect the body of pipes of significant diameter. It consists of three or more elements. Accordingly, such clamps are mounted on several threaded pairs (approximately one per arbitrary joint between the elements).
- A pipe clamp is the same one-sided or double-sided repair kit, in the lower part of which a self-tapping screw is screwed in, passed through a special perforation. At the beginning of work, the lower area is fastened to the wall using screws. After this, a pipe is inserted into the lower connector and secured with the upper element of the clamp.
Types of clamps
We said above that clamps can be used for various purposes, so now it is necessary to clarify the specific types of clamps and their purpose:
- The double-sided repair clamp is one of the most common models, the focus of which is quite wide. This clamp consists of two halves, which are secured around the pipe with bolts. When choosing such a clamp, do not forget to check the diameter of your pipe;
- The one-sided clamp is U-shaped . Such clamps are only suitable for pipes with a small diameter (up to 5 cm). Fastening is also done with bolts, usually from the top of the pipe;
- A fastening clamp for a pipe against leakage allows you not only to get rid of a defect in the pipe, but also to secure it to the wall. Outwardly, it is similar to the two previous options, but has a distinctive method of fastening: first, the lower part is attached to the wall, then a pipe is inserted into it, after which the upper and lower parts of the clamp are securely tightened with bolts;
- Clamps for large diameter pipes have more than two components. Each part is superimposed on the pipe and attached to the adjacent component with a threaded pair.
Sewer pipe clamp
Although the liquid pressure in sewer pipes is much less, a leak that occurs can also cause a lot of trouble. In this case, you can purchase and install clamps for sewer pipes.
For thin-walled plastic sewer pipes, it is better not to use homemade clamps, since they do not have the correct shape and, instead of solving the problem of elimination, leaks will bring even bigger problems, in the form of a crack or complete failure of the pipeline.
Source
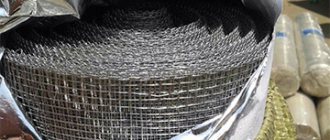
Bandage
One of the fastest ways is to apply a bandage made of cement mortar and bandage. Do-it-yourself pipe repair is carried out in the following order:
- mix cement with water until a homogeneous mass is obtained with the consistency of thick sour cream;
- soak the bandage in this solution;
- Wrap the problem area with a bandage several times. In this case, each new turn should overlap the previous one by a quarter;
- the procedure is repeated, achieving 3-4 layers of bandage.
After 24 hours, the sewer can be used again. This solution creates a very strong connection, so this method can also be used for steel water pipes. Just do not use it in places of threaded connections, which will be problematic to disassemble after the composition has completely set. The bandage-cement combination can be replaced with epoxy glue and fiberglass, in which case careful preparation of the surface is necessary.