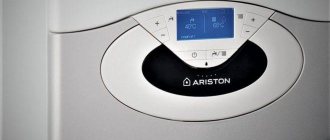
Modern people find it difficult to imagine their life without boilers. In specialized retail outlets you can purchase devices from world famous companies. One of them is Ariston. Despite the reliability declared by the manufacturer, any equipment can fail for some reason. You can contact a service center or repair the Ariston water heater yourself.
You can repair this water heater yourself
The most vulnerable parts
Today, Ariston is the top three world leader in the production of equipment. The kitchens of this company are equipped with a range of household appliances - from a refrigerator to a dishwasher. In Russia, the brand gained popularity in the late nineties; its service centers can be found in all major cities.
In this video you will learn how to drain water from a water heater:
The peculiarity of electric boilers is their modern design, functionality and affordable price compared to analogues. The developers place special emphasis on the safety of their products during operation: the devices are equipped with various protections that turn off the device in the event of power surges, overheating, or lack of water supply.
Despite their reliability, water heaters are vulnerable to hard water and power failures . According to experienced experts, the weak points of Ariston water heating devices are tubular elements, magnesium anode and check valve. You can fix these simple faults yourself with a minimal set of tools. The products are characterized by a standard assembly scheme, so repair and maintenance work is not particularly difficult.
The owner must monitor the integrity of the internal coating of the tank, the processing of which uses modern materials containing glass ceramics, titanium, strengthening enamels, silver, and other high-tech additives.
Repair of electric water heaters
An electric water heater requires repair if:
- when connecting the plug to the socket, the voltage indicator on the boiler does not light up;
- the light comes on, but the protection is triggered;
- The water in the tank does not heat up;
- The device does not respond correctly to commands.
If you have a heater with an electronic control system, if there is a power outage, the unit will lose the program. Only a specialist can restore it. The service center carries out any repairs to storage water heaters if the device is under warranty. Unauthorized intervention will void your warranty!
First you need to ring the feed pattern. Make sure there is mains voltage, the fuses are in working position, the cord and plug are working. There you also need to check the serviceability of the RCD, the device is located in front of the plug.
You can descale heating elements using acetic, citric, oxalic acid or Antiscale by leaving the element in warm water for several hours. But at this time the sealing gasket must be removed; it loses its elasticity in the solution.
Afterwards you need to open the panel for installing the heating element and electrical connection. Check the serviceability of the element by ringing the terminals. The resistance should be 13.5 ohms for a kilowatt generator; for higher power, the value is directly proportional to the given one. If the heating element passes an electric charge, then you need to check the thermostat. It is tested for contact activation at room temperature and at 600 C. But in order to check the thermostat, it is necessary to dismantle the unit. Step by step it looks like this:
- record the position of the connected wires on paper or in a camera;
- disconnect the wiring;
- remove thermoelements;
- remove the magnetic anode, inspect it, clean it of loose build-up, if the material is badly worn, replace it;
- unscrew the bolts and remove the flange with the installed heating element, release the heating element, clean it and inspect it for cracks;
- check the condition of the thermostat;
- clean the tank and flange connection;
- After repairing the water heater with your own hands, replacing the unit, reassemble and fasten the parts in the reverse order.
The connection of any flange on any device with bolts is carried out with sequential tightening of the opposite nuts. Then the tightening occurs smoothly and there will be no leakage through the seal.
In order to avoid electrochemical corrosion of the tank, in addition to the magnesium electrode, it is necessary to have a complete grounding circuit, which is also necessary for your own safety. RCD and grounding have different tasks.
Typical faults and preparation for repairs
Before you begin repairing an Ariston water heater, you need to understand the structure of the device, prepare the necessary tools and other devices. To eliminate mechanical damage, such as leaks, you will need:
- adjustable wrench;
- set of adapters;
- check valve
If you detect breakdowns related to the electrical part, you need to arm yourself with a multimeter. The preparatory steps include disconnecting the device from the power supply and draining the liquid from the tank.
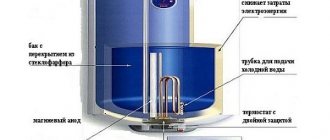
Inside the Ariston boiler there are the following elements:
- heating element;
- A thermostat is needed to control the temperature and adjust the heating mode;
- a relay that is responsible for turning the heating element on or off;
- magnesium anode protects the tank from corrosion;
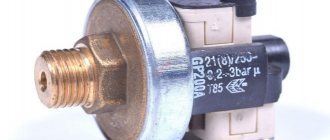
- a safety valve regulates pressure during water heating;
- The warning lights turn on when electricity is supplied, as well as when the device is heating up (such a system is present in cheaper models; expensive devices are equipped with electronics).
For repairs, you will need an adjustable wrench.
Before you begin repairs, you need to study the operating instructions for the product in detail. According to statistics, problems may occur during operation of the boiler. Typical malfunctions of an Ariston water heater:
- The water does not heat up - this means that the heating element has burned out.
- Another reason could be a thermostat failure.
- The magnesium anode has used up its life and requires replacement.
- A large amount of scale has formed on the heating elements.
The thermostat is located outside the device, so it can be replaced without additional manipulations. In all other cases, draining the water and disassembling the product is required. The volume of the water heater does not matter; the dismantling process is the same for any capacity.
Repair of storage boilers Ariston (Ariston)
The Domotechnik company repairs Ariston electric water heaters in Moscow and the Moscow region . Our specialists travel to all areas of the Moscow region; you can find out more about service areas in the corresponding section. Ariston boiler repairs are carried out at home, at a time convenient for you. A guarantee is provided for the work performed and installed spare parts (on receipt). Call right now and call an Ariston water heater repair specialist:
8
8
Repair prices
More details on the prices for repairing water heaters are indicated in the corresponding section, however, you should remember that the exact repair price will be given to you by the technician before leaving.
| Diagnostics | free/500 rubles |
| Repair without draining water | from 1200 to 1800 rubles |
| Repair with water drain | from 1500 to 1800 rubles |
Troubleshooting instructions
Ariston boiler repair consists of a series of actions that must be performed sequentially. First of all, before carrying out manipulations, it is necessary to determine the specific problem. For example, if you need to replace a safety valve, thermostat or relay, there is no need to dismantle the device. It is necessary to disassemble the device and drain the water during maintenance or replacement of a burnt heating element. Disassembly is carried out in several stages:
- First you need to disconnect the product from the network;
- drain the water;
- dismantle the flanges to get to the inside.
These are standard manipulations that should not be neglected. There have been numerous cases when home craftsmen, having forgotten to disconnect the device from the power supply, received electric shocks of varying severity. Having de-energized the device, you can begin dismantling it:
- Unscrew the cover secured with screws.
- Take photographs of the location of the wires and bolts so that nothing gets mixed up during assembly.
- Carefully disconnect the three-core cable. The first two wires - phase and zero - are connected to the thermostat. Then the latter must be carefully removed.
- Then you can start draining the liquid.
How to connect an Ariston water heater
To connect the Ariston boiler correctly, you must follow the manufacturer's instructions.
First, the water heater is mounted on a wall or supporting surface and the outlet (cold water) is provided from the water pipe. It is most beneficial to install the device as close as possible to the source of water supply - this allows you to minimize heat loss.
If there is a collector in the system, a separate cold water supply pipe is transferred to the installation site of the water heater. If there is no collector, the nearest section of the water pipe is cut, and a standard tee is installed at the cut site.
The method of installing the tee depends on the material from which the pipes are made. Plastic fasteners are fastened using a special soldering iron, and metal ones are fastened with threads.
A ball valve is installed in a separate section of the water supply system, designed to shut off the cold water supply.
Wiring diagram for an Ariston electric storage water heater.
To connect the water heater to the water supply:
- Pay attention to the hot and cold water pipes - it is important not to confuse them. A check valve is installed on the cold side; it can be included in the standard kit. Hot water is connected using a pipe. First, a cold water pipe is installed, then a hot one.
- A special tape is wound onto the threads as a sealant and sealant; this is recommended by the manufacturer.
- A tee is installed on the cold water pipe, at the bottom of which there is a relief valve. A tap is attached to the side to completely drain the water from the tank in case of an emergency, possibly due to abnormal pressure or heating. A shut-off valve and adapter are installed at a short distance under the tee. The next step is connecting to the water supply.
- Connection to hot water is also made by installing a shut-off valve.
- When connecting different metals, adapters should be used.
Connection to the electrical network is carried out as follows:
- A separate circuit breaker (RCD) is installed in the distribution panel; it is connected to the central automatic fuse. A three-core cable is pulled from a separate RCD to the boiler, which is placed in an external cable channel (or a special groove is punched into the wall).
- It is recommended to install a 16 A fuse as a switch, since the socket and plug are subject to heat and moisture. In addition, the cost of waterproof electrical equipment is higher than the cost of a machine. The “switch” is closed in a compact cabinet with a removable panel.
- A separate RCD and the “switch” are connected by wire.
- A three-wire wire is connected to the heating element; for this, the bottom panel is removed from the water heater.
- Then the output of the machine is connected to the boiler.
- At the next stage, the ground, phase and zero lines are wired to the corresponding connectors.
Diagram for connecting an Ariston water heater to the electrical network.
Before turning on the device, you must make sure that there are no leaks and that the flange is in the correct position (strictly in the middle). Then fill the tank with cold water and open the hot water tap to release the air. After bleeding the air, the valve is closed and a test operation is performed.
More detailed advice and instructions for operation and installation can be obtained from the KVANTA+ company in Tyumen.
Under what conditions should the device not be installed?
Electrical appliances, in particular an electric water heater, must be installed in conditions that correspond to those specified in the instruction manual.
The following are stated in the instructions for Ariston boilers as unacceptable factors for installation:
- frost - this is associated with the risk of freezing water in the tank and pipes;
- sunlight - do not expose the electric heater to direct sunlight;
- power outages - the voltage in the network to which the device is connected must be stable;
- vapors, dust or gas - the water heater must not be installed in a room with a high concentration of dust and toxic or acidic gases/vapors in the air;
- dampness - it is not recommended to install the device in conditions of constant dampness and in long-term unventilated rooms (this item depends on the degree of moisture resistance of the selected water heater model).
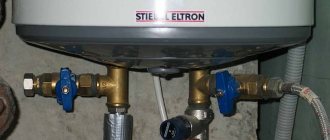
Draining the water and opening the device
If the initial installation of the boiler was carried out by a technician from the service center, the latter must have install a drain valve and then screw a fitting into it. This is a rather convenient and necessary device; with its help, you can attach a hose to the faucet and easily drain the water.
If there is no tee, the hose should be connected to the device pipe. In order to balance the pressure during draining, you need to open the hot water tap. With a water heater capacity of up to 50 liters, the procedure will take a few minutes; if the boiler volume is 80 liters or more, the process will last at least half an hour.
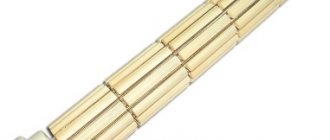
All modifications of Ariston water heaters are equipped with an oval flange on which a heating element, a magnesium anode and a tube with a thermostat are located. A rubber gasket is placed on the bottom of the flange, which ensures the product is sealed. The part is fixed on a U-shaped bar, which is secured with a nut.
After draining the water, the latter should be unscrewed, carefully push the flange inside, then turn it and remove it. After disassembling the device, you need to replace worn parts and clean the surfaces from scale . Do not use aggressive substances to clean the internal surface of the device. This is explained by the fact that the coating becomes thinner over time due to corrosion, so it is not recommended to clean off thin scale during maintenance work. To rinse the tank, just turn on the water and hold a basin or other container of suitable size underneath. When the liquid coming out of the device becomes clear, turn off its supply. Make sure there is no debris at the bottom of the tank by carefully running your hand over the surface. Carefully inspect the rubber seal - if everything is in order with it, you should not change it: a new product is not so easy to find, and its cost is high. Subsequent assembly of the product is carried out in the reverse order.
To avoid having to repair Ariston storage water heaters, it is necessary to ensure preventive inspections and cleaning of the device every 6 months. Particular attention must be paid to the magnesium anode - regular replacement of this part significantly increases the service life of the tank.
Cold or insufficiently hot water flows from the boiler
The cause of a malfunction of this nature may be a breakdown of the heating element, thermostat and a large layer of scale on these devices. Before determining the cause of the malfunction of the Ariston 80-liter water heater and doing the repair yourself, you should turn off the power supply and drain the water.
Then, using a 13 mm wrench and a Phillips screwdriver, remove the protective box and unscrew the bolts on the mounting plate. Carefully remove the flange on which the heating element and thermostat are attached. Now you need to descale these 2 devices.
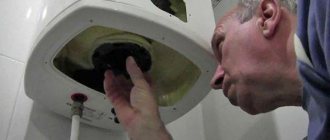
Boiler protective cover
The thermostat should be unscrewed, cleaning the attachment points to the flange from sediment, then carefully, using a screwdriver, free the thermostat from scale. You can check the functionality using a tester; the absence of a signal on its contacts indicates a malfunction and the need for replacement, since the thermostat cannot be repaired.
You can also check the heating element for functionality using a tester by connecting the ends of the tester to the contacts of the heating element. If there is voltage, the heating element is working, but it needs to be cleaned. The heating element can be cleaned using a screwdriver, carefully removing pieces of deposits.
Then you need to prepare a solution of citric acid - 100 g per 1 liter of water and immerse the heating element in the solution. The effect of the solution on the device will be indicated by air bubbles that appear as a result of the reaction. If this action is not enough for complete cleansing, you can put the vessel with the solution and heating element on low heat.
After cleaning the heating element, you need to descale the tank. Be careful not to damage the inner surface of the tank. If it is possible to remove the heater from the wall, cleaning can be done using a solution of citric acid, pouring it into the tank.
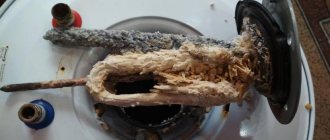
There may be a lot of debris in the tank
After these manipulations, assemble all the parts in the order in which they were disassembled and carefully insert and secure the flange. Make sure that during assembly there are no distortions of parts, do not overtighten the bolts, change the gasket between the body of your storage boiler and the flange, since the flange gasket was also exposed to salts.