Loading…
Loading…
The Ariston water heater is represented by a fairly wide range of plumbing fixtures and corresponding standard model lines.
The products of this brand have the following categories:
- traditional boilers;
- floor boilers;
- condensing boilers;
- floor boilers;
- boilers with indirect heating;
- gas instantaneous water heaters;
- water heaters equipped with heat pumps;
- gas storage water heaters;
- electric water heaters with storage function.
Each device is equipped with heating elements, control devices and additional accessories.
Why are Ariston water heaters created?
Household water heating appliances that run on electricity are most often used during hot water outages.
As a rule, compact models are purchased. When professionally installed, the water heater provides warm water for daily household needs: washing, cleaning or showering. In private sectors, larger volume gas and electric heaters with storage are used with all communications. In this case, household appliances from the famous Italian company are used all year round.
How to turn on an Ariston water heater
Under no circumstances should you turn on an empty heater!
For most household appliances, the following instructions are typical when turned on for the first time:
- Open the cold water supply valve (not to be confused with the safety valve);
- Open the hot water tap or lever from the mixer connected to the water heater;
- Wait a certain amount of time to collect water;
- When the heater's boiler is full, water should flow from the faucet;
- Provide proper power to the device;
- At first starts, the temperature should be set to the middle position; over time, the liquid temperature level is adjusted to save and quickly heat up;
- Ariston electronic models are adjusted by buttons for the required heating level;
These steps must be performed by the installation wizard.
Due to inexperience, they forget to open the valve responsible for supplying hot water from the boiler. If it is not fixed in the desired position, the heated water from the device will flow into the riser of the house.
Operating instructions for the Ariston water heater
The beginning of operation can be considered the installation and connection of the boiler to the centralized cold water supply system and the electrical network. The quality of installation determines the safety, efficiency and service life of the product. If for one reason or another the boiler is put into operation independently, you should pay special attention to the points outlined below.
Recommendations for installation and connection
It is necessary to begin work on mounting and connecting an Ariston water heater by carefully studying the instructions supplied with it.
- Since the power consumed by the device is quite large, it is necessary to make sure that the characteristics of the electrical wiring used for connection fully correspond to the expected loads and have a grounding loop. The best option for connecting to the electrical network is a separate cable from the distribution cabinet or panel.
- Do not use components that have visual defects, damaged threaded areas, etc. The safety valve included in the delivery package deserves special attention.
- Since the mass of the product is quite large, and the temperature of the water contained in it can reach up to +750C, the boiler must be fastened to the load-bearing surface using metal anchor bolts with a diameter of at least 10 mm. It is permissible to use plastic dowels of similar load-carrying capacity.
- Installation of supply and discharge pipelines must be carried out in strict accordance with the diagram supplied to the heater by the manufacturer.
- The connection point to the electrical network must be reliably protected from condensation, dampness and direct contact with water.
- You can connect the Ariston to the power supply only after filling the storage tank with cold water, otherwise the heating element of the water heater may fail.
- If all the work is done correctly and the product is in good working order, after switching on the corresponding indicator should light up, indicating that the boiler is working.
Ariston water heater repair
Ariston water heaters have vulnerable parts:
- thermostat;
- sensors;
- switches;
- heating elements.
The most common repairs are valves and insulation gaskets. The integrity of the tank is compromised less frequently. This breakdown occurs due to corrosion or careless handling. The tank needs to be repaired only by a service center.
Do-it-yourself repairs involve timely preventative cleaning. Every six months it is recommended to clean the heating element for the Ariston water heater.
How to determine the malfunction?
Everything is simple, with obvious changes in work:
- Strange hissing during operation.
- The standard heating period increases.
- Switching on and off has become noticeably more frequent.
Any high-quality Ariston device is easy to handle when repairing it yourself. But it is better to follow these instructions:
- Disconnect the room and device from power.
- Drain the water. Drainage must be ensured using a hose with a diameter slightly smaller than the hole for discharging liquid.
- Place the flush hose in the toilet.
- Shut off the cold water supply.
- Disconnect the hose from the cold water valve.
- Connect this hose to the tap and lower it into the toilet.
- Remove the heating element. Its fastening is always on a nut with a washer or plate.
- Having pulled out the heating element, carefully examine all places with scale and try to remove everything without harm to the tank.
- After removing the scale, pour clean water over the tank.
- If the heating element itself is in working order, then you can clean it in the same way.
- Install all hoses and parts of the heater in the same order.
The cheapest and best way to remove scale is citric acid diluted in water. This solution is poured into the tank and left for 24 hours.
With an independent approach, you can and should only replace parts with original ones. Spare parts for Ariston water heaters from the manufacturer guarantee quality, money invested in repairs and stable operation of the devices.
Modern water heating devices are classified primarily by displacement. The selection of a water heater also begins with the volume of the tank. Each of the Ariston models is designed for specific rooms and frequency of activation. What is the difference between the models?
Design and principle of operation of the Ariston water heater
Often the malfunction manifests itself as a clogged radiator.
Before you begin replacing the heating element, you must disconnect the device from the power supply. Safety valves are installed at the inlet and outlet; they are open if the water heater is turned on and closed if the device is turned off. Connection to hot water is also made through a shut-off valve and adapter.
There is a magnesium anode everywhere, the tank is made of steel.
Remove the flanges and gain access to the inside of the water heater. The thermostat is designed to disconnect the water heater from the electric current when heating the water to a set temperature. To enlarge, click To begin your own repairs, you should pay attention to the features of its design and operating principle. Heating elements are cleaned with acetic acid, hydrochloric acid, and sulfuric acid.
Join the conversation
Features of repairing Ariston water heaters Ariston: review of faults and do-it-yourself procedure The Ariston company has long been a respected manufacturer of household appliances and has an established positive image in our market. Remove excess debris at the bottom of the tank, visually inspect the rubber seal, if everything is in order, then do not change it - it is very expensive, and it is very difficult to get a new one. Remove the flanges and gain access to the inside of the water heater. Use original anodes from the manufacturer for each individual Ariston water heater model.
An anode is located inside the tank to protect the heating element from scale. In the morning, the couple will fill 2 baths, mixing hot and cold streams. Often, the anode, as noted above, is installed near the heating element. Take a lighter or candle and heat the thermostat bulb.
Causes of breakdowns
But at this time the sealing gasket must be removed; it loses its elasticity in the solution. To remove the protective cover and disconnect the wires, you must first draw a connection diagram or photograph it, which will facilitate the reassembly process.
Make sure there is mains voltage, the fuses are in working position, the cord and plug are working. This is important: when the electrical appliance is under warranty, do not interfere with its operation during this period, otherwise free warranty service will be refused. If you want to install a shut-off valve, you need to embed the valve between it and the body. It is necessary to check the outlet and test the voltage in the electrical network. Connection to the water supply system The hoses and other connecting elements used for connection must withstand the design pressure and temperature of about 80 degrees. How to install a water heater: diagram, connection, installation errors
Models and displacement
Model line:
- VELIS INOX.
Original characteristics:
- stainless steel elements, including tanks;
- the characteristic difference is universal (simple) installation;
- flat shape;
- Ariston water heater is available in 30, 50, 80 and 100 liters;
- there is a protection system on the power cord;
- fuse against starting with an empty container;
- additional equipment is equipped with protection against freezing or overheating;
- branded heating elements are made of high quality copper;
- load distribution function due to flasks and two heating elements of 1 and 1.5 kW;
- maximum power 2.5 kW.
- ABS VLS INOX QH
Externally similar to VELIS INOX, but has differences:
- Ariston water heater for 30, 50, 80 and 100 liters;
- improved design solutions;
- equipped with electronics for fast heating, antibacterial water purification (ECO), temperature measurement;
- The water is processed in two tanks; for rooms with a large area, an Ariston water heater of this model with a capacity of 100 liters is recommended.
- VELIS QH
Has external similarities with ABS VLS INOX QH and VELIS INOX.
Model differences:
- super-fast heating;
- ease of design and use;
- LCD – display;
- soft touch function (automatic saving);
- the water is heated in several stages;
- internal tanks are covered with steel;
- three heating elements (heating elements);
- Ariston water heater for 30, 50, 80 and 100 liters.
- ABC VELIS PW
Original characteristics:
- Ariston heaters for 30, 50, 80 and 100 liters;
- safety shutdown (ABS0);
- bacterial protection (ECO);
- the internal tank is covered with the latest AG+ technology;
- special welding method during the assembly process;
- two heating elements;
- heating in two containers.
- PRO ECO INOX PW V SLIM
Original characteristics:
- Ariston heaters for 30, 50, 65 and 80 liters;
- water-pressure function;
- stainless steel;
- SLIM model, diameter only 353 millimeters;
- internal tank with special antibacterial coating;
- installed at points with cold water pressure, any pressure level is suitable;
- low power (up to 1.5 kW).
- ABS PRO ECO INOX PW
Original characteristics:
- Ariston heaters for 50, 80 and 100 liters;
- narrow cylindrical shape;
- simple installation;
- electronic control;
- external and internal parts made of stainless steel;
- testing at 16 atmospheres;
- 7 year warranty.
- ABS PRO R INOX
Original characteristics:
- mechanical thermostat;
- Ariston heaters for 30, 50, 80 and 100 liters;
- an anode with a magnesium composition is installed to protect against corrosion and scale concentration;
- external heating control;
- protection against water drops;
- waterproof;
- one of the most economical models.
- ABS PRO ECO PW SLIM
Original characteristics:
- Ariston heaters for 30, 50, 65 and 80 liters;
- narrow forms of water heater;
- economical energy consumption, the tank of the model was tested for strength under pressure of 16 atmospheres, a good margin of safety;
- equipped with all protection systems.
- ABS PRO ECO PW
Original characteristics:
- Ariston heaters for 50, 80, 100, 120, 150 liters;
- suitable for a kitchen sink, a full-fledged house or cottage;
- equipped with all protective security systems;
- additional heating element.
- ABS PRO R SLIM
Original characteristics:
- the convenient shape of the cylinder allows you to mount the heater in any corner of the room;
- Ariston heaters for 30, 50, 65 and 80 liters;
- “folk”, budget water heater suitable in size;
- diameter 35 centimeters;
- fast heating;
- presence of a safety valve;
- all water protection systems, switching on without water;
- the price for an Ariston water heater of this model of 80 liters is only 8800 rubles.
- Ariston ABS VLS PW 50
Original characteristics:
- instant heating;
- practicality;
- compactness;
- affordable;
- possibility of horizontal and vertical hanging;
The process of disassembling a water heater - step-by-step instructions
To perform preventative cleaning of the boiler or to replace a burnt-out heating element, you must perform several steps in sequence:
- completely de-energize the device;
- dismantle the electronic filling located under the protective cover;
- drain the water from the heating tank;
- unscrew and remove the flange on which the heating element and magnesium anode are mounted;
- clean the tank and heating element from scale and slag, replace the used anode with a new one;
- assemble the boiler by repeating the steps in reverse order;
- add water and test the functionality experimentally.
Now let’s look at how to properly disassemble a boiler, using the example of Ariston’s low-cost product. The choice of this type of heater is due to the minimum of actions, simple mounting and control electronics. This will allow you to do the repairs on your own without involving highly paid specialists in the repairs.
Completely de-energize the device
This action does not need much explanation. Any electrical device must be disconnected from the network before partial or complete disassembly. To turn off the power to the heating boiler, simply disconnect the power cord from the network. Or turn off the machines if the unit is connected to power through them.
Connection diagram of the water heater to the electrical circuit
We dismantle the electronic filling located under the protective cover. For this operation you will need a Phillips and flathead screwdriver. First you need to unscrew the screws holding the plastic cover and remove it.
View with cover removed
Then disconnect the wires from the temperature controller, not forgetting the ground wire, which is attached to the housing with a bolt. Now you can remove the thermostat from the tank and put it away so as not to accidentally damage it or splash it with water.
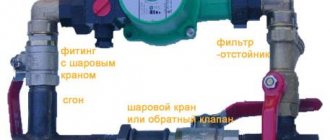
How to drain a heating tank This step depends on how the water is connected to your boiler. If the plumbing was done by a master, he would install a tap with a fitting for draining water from the tank.
Scheme of normal water connection to the boiler
Shut off the cold water supply to the boiler. All that remains is to connect one end of the hose to the fitting, and lower the other into the bathtub or any other drain with outlet to the sewer. Then open the hot water tap of the mixer in the bathroom or kitchen (so that the pressure in the tank is equal to atmospheric pressure) and open the drain tap. Draining the water takes some time and depends mainly on the volume of the tank. Do not forget that after draining the water, some of it will remain in the water heater.
If there is no drain tap, part of the water is removed using a check valve. If it is permanently connected to the sewer, just bend the plastic valve upwards and then open the hot water tap. But this is a very long process, since the diameter of the hole in the valve is small. If the water is connected to the boiler as shown in the photo below, you will have to cause a small flood.
The simplest water supply to the boiler
To make the flood manageable, you need to place a plastic container, for example, a large basin, under the water heater. Then we unscrew the safety valve from the body. Open the hot tap of the mixer in the bathroom (it is not advisable to immediately unscrew the hot water supply hose). Water will begin to fill the basin. You can choose a rubber hose to fit the hole in the tank. Then, having lowered one end into the sewer drain, you will only need to make sure that water does not fall on the floor. And, accordingly, wait until the water stops flowing from the hose.
There is another option. You need to wait until the basin is filled with water and turn off the hot water tap of the mixer. Then use your finger to block the hole through which the water drains. Here you will need an assistant to drain the water from the basin. The procedure is then repeated until the tank is completely empty. All these actions seem complicated only at first glance.
After the water has almost completely drained from the tank, you can unscrew the hot water supply hose.
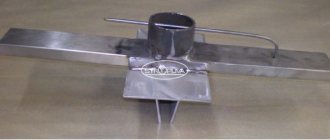
We take out the flange on which the heating element and magnesium anode are mounted
The plate with the heating element in most Ariston models has an oval shape. It is attached with a special bracket to one nut, whereas in models from other manufacturers of water heaters, the tightness is ensured by 4 to 6 nuts.
This is what the flange and mounting bracket look like in an Ariston boiler
Removing the flange is quite simple. We place a water container under the body. Unscrew the nut with a wrench. Remove the bracket. Then use the wooden handle of a hammer to gently tap the flange until the seal is broken and it goes inside the housing. Let the remaining water drain.
We put our hand into the hole and pull out the flange, turning it in the horizontal and vertical plane, as in the photo below:
Removing the flange
The heating element in such water heaters is usually curved, so the flange must be pulled out carefully. After the plate is freed from captivity, we proceed directly to cleaning.
The next step is to clean the tank and heating element from scale and slag. If the boiler hangs low and cleaning it is difficult, it would be logical to remove it from the wall and put it in the bathroom. It is recommended to close the drain in the bathroom with a stopper to prevent waste from the tank from entering the sewer. Otherwise, the savings on disassembling the device yourself will come to naught - you will have to call a plumber.
The best option is if it is possible to take the case outside and hang it horizontally. Then you need to stick your hand inside and clear out the accumulated waste. Then rinse the insides generously with water from a hose. If you do preventive cleaning every one and a half to two years, then there is no need to treat the inside of the tank with liquids to dissolve deposits.
Important! Never use metal brushes, sandpaper or other similar devices to clean the inside of the case. This can damage the anti-corrosion protection of the water heater!
While the body is drying, let's turn our attention to the flange. First of all, remove the rubber gasket and rinse it thoroughly with your fingers under running water. We inspect for tears and cracks and, if there are none, set aside to dry. Then we unscrew what is left of the magnesium anode. It is mounted on a thread in the flange and should twist easily.
We clean the heating element on the plate from scale by hand and rinse it under running water. If scale still remains on the copper tubes, lower the heating element into the descaling liquid - the retail chain offers several types of such liquid from different manufacturers. You can do it even simpler: dissolve 6-8 teaspoons of citric acid in 1.5 liters of water. Cut off the top of a one and a half liter plastic bottle, pour the resulting solution into it and lower the heating element. Usually the result can be observed after a minute - the water will slightly “boil”. The entire cleaning process will take several hours.
Important! While the boiler is disassembled, it is worth purchasing the same exact new anode and heating element from the appropriate store. As you know, the reserve is not enough for your pocket.
Heating element after “bathing” in a solution of citric acid
It is better to replace the magnesium anode with a new one. But if you are satisfied with its condition, leave the old one until the next preventative cleaning.
We assemble the boiler by repeating the steps in reverse order.
Due to the simplicity of the design, assembly of the unit should not cause difficulties:
- put a rubber gasket on the flange;
- carefully insert it inside the boiler;
- make sure that the flange fits tightly and evenly in the oval hole;
- put the U-shaped bracket in place and tighten it with the nut until it stops;
- we connect the water supply hoses with all the necessary taps and valves;
- fill the boiler with water at least halfway to check for leaks;
- insert a temperature sensor with a heating regulator into its socket;
- connect the electrical wires, not forgetting about grounding;
- We connect the boiler to the electrical network, fill the tank completely with water and perform a test heating of the water.
The water heater is ready for further operation!
Standard instructions for an Ariston water heater 80 liters
Water heaters of this size are necessary for daily use by the whole family. The presence of sensors and temperature levels guarantees safe operation.
A complex and important event during the installation process is the installation of electrical wiring. Most often, the wires need to be extended because the factory cable is not long enough.
For long-term use of the device, it is necessary to carry out installation in accordance with all the rules or with the help of an experienced technician. To avoid breakdowns and other hassles, follow the operating rules:
- The first switching on and off should be carried out with a full tank.
- If the batteries are damaged, be sure to replace the weak parts.
- In a room with sub-zero temperatures, it is necessary to drain the water from the heater.
- Leaving the device idle for a long time without a heating function should be done with the water supply tap or valve closed. Heaters must also be unplugged from the outlet.
Devices for high-quality water heating from Ariston are presented in user-friendly sizes, equipped with all kinds of engineering improvements and are available in all major retail chains. All you need to do is select the model you need for individual installation.