Making a simple potbelly stove with your own hands
The basic design of a homemade potbelly stove consists of 4 parts:
- A fuel tank of any shape with a hole in the center, the diameter of which is equal to the corresponding size of the attached pipe. This is where the combustion of the waste begins. The metal for the manufacture of this structural element must have a thickness of at least 3 mm.
- A combustion chamber or injector, which is a vertical cylindrical container with a number of holes, connected through an opening to the tank. As a result of air feeding through the perforated walls of the injector, the fuel entering the chamber burns completely.
- A heat exchanger in the form of a tank located above the combustion chamber. A heated gas mixture enters it. The design can have any size and shape. Ideally, this is a tank with a hollow platform on which food can be heated.
- Pipes for smoke removal, providing effective draft.
To make a potbelly stove yourself, you need to have good welding skills. Welded seams must ensure tightness.
Making a waste tank
An alternative to a welded tank can be an unusable gas cylinder or a canister with thick walls, but in any case, 3 basic requirements are mandatory:
- The design must be at least partially collapsible to allow for periodic cleaning.
- The hole for connecting the injector must be located in the center.
- The hatch for pouring waste should be equipped with an adjusting valve on a bolted connection. With its help, the intensity of combustion is controlled.
The easiest way to make a tank is from large diameter pipes. The bottom and legs are welded to one piece of pipe with a diameter of about 35 cm. In order to close the tank, take a small piece of pipe with a slightly larger diameter, weld a lid to it, then make 2 holes in it - one control hole with a diameter of approximately 60 mm, and the other for the injector.
The height of the side of the 2nd part should be 1/3 of the height of the lower container. The total height of the tank, measured from its bottom to the central hole on the lid, is 10 - 15 cm.
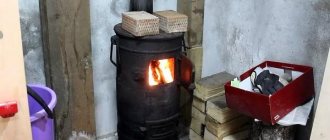
Light the fuel in the tank using paper or cloth soaked in kerosene. They are set on fire and lowered into the container through the control hole. The waste will have to be constantly added to maintain the level of 2/3 of the tank height.
How to make an injector?
The optimal pipe diameter for making an injector is 10 cm, the minimum wall thickness is 0.8 cm. To calculate its height, take the length of the chimney pipe, divide it by 10. Subtract five percent from the result and get the required value. It should be between 36 and 38 cm. This is a condition for normal traction.
The holes made in the walls of the pipe in a checkerboard pattern or simply evenly distributed over the surface have a diameter of 0.9 - 0.95 cm. Indentations of 2 - 2.5 cm and 5.5 - 6 cm are made at the bottom and top of the pipe, respectively.
Basic heat exchanger option
The minimum thickness of the walls of the heat exchange tank is 0.3 cm. It is manufactured using the same technology as the fuel tank. It is better to make the top flat, and the hole for the chimney needs to be moved, then it will be possible, if necessary, to place a frying pan or kettle on the stove.
A partition is made inside the hollow vessel, creating a labyrinth for better heat transfer. Moreover, the thicker this part is, the hotter the surface of the potbelly stove will be. In order to clean the heat exchanger from carbon deposits, a special hatch is made on the side and closed with a lid.
A channel is welded onto the hole intended for the chimney - a pipe with a height of 5 to 10 cm and a diameter of 10 cm.
What is a chimney made of?
In order for the combustion products exiting through the pipe to have the lowest possible temperature, the part of the pipe that is located in the room must be made of steel. Due to this, the smoke transfers its temperature to the walls of the chimney and cools, increasing the residual heat transfer.
An ordinary tin pipe can serve as a continuation of the chimney from the outside, but it will have to be insulated to prevent the accumulation of soot during the cold period. Thermally insulated pipe is the best option, but more expensive. It is not necessary to seal the joints of pipe sections.
The pipes themselves can be of different diameters, but the one with the smaller diameter is connected directly to the furnace. Read on to learn how to make a chimney for a potbelly stove yourself.
Operation and working principle
Do-it-yourself potbelly stove is the most affordable, easy-to-assemble and inexpensive to operate option, which is practically no different from the classic and well-known variation. A stove, for which only used oil will be used, will thereby allow you to save a lot of money, and in order for such a heating unit to start working, the oil must be poured into a special compartment shaped like a pipe. Here it will burn out and be converted into gas, which will pass further into the combustion chamber and mix with the air masses.
The combustion chamber of the gas formed during the combustion process is located in the upper part of the pipe, which such a heating device must be equipped with, and the speed and quality of heating directly depends on the dimensions of the combustion chamber of your potbelly stove. If the chamber is very large, you will need many times more fuel, but the intensity and speed of heating in this case will be at the highest level.
A potbelly stove, with which the garage will be heated intensively, quickly and evenly, allows the oil to initially burn out at fairly low temperatures, which increase significantly at the time of repeated burning, already being gases and mixing with air. The maximum temperature of the exhaust gases in the second chamber can reach about 750-85 degrees, due to which the garage is heated, and additional thermal energy comes from the mounted chimney, the surface of which also warms up well and gives off heat.
A waste oil furnace consists of three main structural components, which you can learn more about below:
- The lowest compartment of the design of a potbelly stove operating on waste oil consists of a round tank into which oil is poured; the optimal dimensions of this element will be a diameter of 3.5-4.5 centimeters. These dimensions are enough for the poured oil to burn intensely and evenly release heat to heat the garage;
- The second structural element of a potbelly stove using waste oil is a tank in which re-burning takes place, not of the oil, but of the resulting gases mixed with oxygen. The dimensions of this element are selected individually and can be equal to the first compartment; in the upper part of the second tank it is necessary to leave a slot, a hole that will go into the chimney;
- The third structural element of a potbelly stove furnace in exhaust is a pipe that connects to the second chamber and has a diameter of only 1.5-2 centimeters, and in order for the exhaust gases to be saturated with oxygen, it is necessary to drill many small holes in such a pipe.
A potbelly stove, the drawing of which was thought out independently or found on a specialized resource, will serve you for many years and will not fail if, at the initial stage, you become familiar with the basic requirements and rules for the operation of such a heating unit. Used oil must be poured into the reservoir to the ½-1/3 mark, but not completely, since during the heating process it will boil and splash, which can lead to its contact with flammable surfaces and fire. Also, after the oil has been used, before using it in a potbelly stove, it is necessary to let it sit well for at least several hours.
It is better to initially make the top of such a design removable so that, if necessary, it is possible to simply clean the internal surface of the heating unit from combustion and decay products deposited on the walls. In order to remove decay products from a narrow chimney, you can use a special brush with a long handle, and also tap, which will allow the accumulated soot to fall away.
Also, in order to extend the service life of the potbelly stove using waste oil, it is necessary to paint it after assembly with a special heat-resistant paint, which in the future will not allow the body to rot, deform, or form rust and corrosion.
Features of work
The principle of operation of a potbelly stove in mining is based on the pyrolysis reaction (thermal destruction of waste with oxygen limitation and the resulting carbon residue and pyrolysis gas with high heat transfer).
This is much safer and more economical than traditional combustion (additional savings come from the fact that there is no need to specially purchase fuel, since residual machine oil is used in the potbelly stove).
Design example
In 40-60 minutes, a drip stove consumes from 0.5 to 2.5 liters of waste oil (depending on the size of the tank). During fuel processing, an oil-air mixture of moderate temperature (less than 100 degrees) is formed in the lower chamber, and heat of up to 800 degrees is created in the upper part.
The thermal power of a potbelly stove is limited to 16 kW (ready-made modified models, such as the GeKKon stove with a dripper, have increased power - up to 100 kW). The principle of operation of the stove using waste oil makes it possible to obtain a high efficiency coefficient of 75-80%. A small potbelly stove is suitable for heating rooms with an area of 60-100 square meters.
Features of furnaces using waste oil, their advantages and disadvantages
The exhaust furnace is a compact, economical unit
Stoves that use used engine oil as fuel are practically no different from other potbelly stoves in terms of simplicity of design and unpretentiousness in manufacturing materials. As for the method of burning fuel, the processes that occur are associated with the characteristics of the fuel used.
First of all, it should be noted that modern engine oil is a multicomponent substance with a high content of chemical compounds. During use, the lubricating fluid is additionally saturated with decay products of automobile fuel, as a result of which it becomes extremely hazardous to the environment.
Simply burning waste in an open flame is ineffective and unacceptable - it burns poorly, forming acrid smoke, which, in addition to soot, also contains various carcinogenic compounds. A completely different situation occurs with volatile hydrocarbons, into which automobile oil heated to a high temperature breaks down.
Gaseous substances are highly flammable and, when burned, release large amounts of thermal energy.
You can borrow work from friends or buy it at a car service center.
Depending on the method of supplying waste oil to the combustion zone, potbelly stoves are divided into several types:
- with pyrolysis combustion;
- using supercharging and fuel atomization;
- with drip feed.
A potbelly stove should not be perceived as a stove intended exclusively for installation in small technical and utility rooms. Using heating devices equipped with an air collector or a water jacket, it is possible to build complete heating systems for residential buildings.
Scheme of a furnace with drip feed of waste oil
A wide range of homemade liquid fuel stoves, which begins with simple mobile stoves and ends with stationary heat generators, determines their use both in the home and in industry. Today, equipment operating on waste lubricants is heated by:
- residential buildings;
- auto repair shops and garages;
- small production workshops;
- workshops;
- warehouses;
- vegetable stores and greenhouses.
Of course, the ideal option is to install liquid heat generators in auto repair shops. This will not only allow you to heat the premises for free, but also additionally save money on the disposal of drained oil. Nevertheless, such a potbelly stove will also be useful in a small private garage - the cost of working out is much cheaper than other types of fuel.
Like any other homemade heat generator, a waste furnace has its advantages and disadvantages. The advantages of these designs include:
- low cost of fuel. You can drain the waste from your own car, take it from friends, or literally buy it for next to nothing at car service stations;
- high heat transfer, which promotes rapid heating of the room immediately after ignition;
- Efficiency up to 90%;
- autonomy;
- work for a long time when installing large fuel tanks;
- undemanding to manufacturing materials;
- possibility of equipping with a water circuit or an air heat exchanger;
- ease of operation;
- recycling of fuel without the risk of environmental pollution.
If we talk about the disadvantages of units operating during mining, they are inherent in all potbelly stoves. Firstly, this is the low heat capacity of the structure. The temperature in the room will begin to drop immediately after the flame goes out. Secondly, you will need to install a long chimney, which means that you will need to clean it much more often. Thirdly, the hot walls of the diffuser and heat exchanger do not allow installing the device directly in the house - a special extension will be required. It should also be noted that the use of liquid fuel increases the requirements for operational safety - you will need to be extremely careful and attentive.
Making a drip heater
Most often, craftsmen use old oxygen and propane cylinders with a diameter of 220 and 300 mm, respectively, to assemble droppers. The former are preferable because of their powerful thick walls that can last a long time and not burn out. A pipe made of low-carbon steel (St 3-10) with a wall thickness of 5 mm or more is also suitable.
Advice. The ideal option for a durable housing is a pipe made of heat-resistant stainless steel alloyed with chromium, molybdenum or nickel (for example, 15X1MF or 12X18H12T) with a wall no more than 3 mm. Perhaps you or a neighbor has one in your garage. There is no need to buy it specially - it will cost too much.
Select rolled metal for other parts according to the drawing of the furnace with top feed of waste into the combustion zone. The blower fan is a “snail” from a VAZ 2108 cabin heater or its Chinese equivalent, the fuel line is a stainless tube with a diameter of 8-10 mm.
- Make a fire bowl from a piece of pipe or take a ready-made steel container. It must be removed through the inspection hatch, so do not make the tray too large.
- Cut openings in the body for the chimney pipe and cleanout hatch. In the latter, make a frame and install the door (possibly bolted).
- Make an afterburner. Take your time to drill all the holes indicated on the drawing; do the bottom 2 rows first. You will complete the rest while setting up the oven.
- Weld a cover and an air duct with a flange for mounting the fan to the afterburner. Attach the fuel supply device as shown in the photo.
- Assemble the heating unit and connect it to the chimney.
Advice. For greater stability to the body, it would not hurt to weld a frame from a steel profile or angle according to the example shown in the photo.
The afterburner in the photo is close-up - side and end views
To regulate the heating power, it is necessary to provide control of the fan speed and a device for dosing the fuel supply (as a rule, an automatic drinker with a jet break is used). According to reviews from craftsmen on a popular forum where heat extraction issues are discussed, fuel consumption in the furnace can be monitored visually. The trend is this: if the oil flows in drops at the break in the stream, then less than 1 liter per hour burns, and when a thin stream flows, more than 1 liter per hour.
Recommendation. Control the fan performance using a cheap Chinese PWM controller (price: about 8 USD).
Different designs of dropper bowls
After ignition and warming up of the heater, it is necessary to set the optimal operating mode. The procedure is carried out according to the same scheme as with the miracle stove: you need to achieve the most transparent smoke from the chimney by drilling additional holes in the afterburner. The ideal flame color is blue, normal is yellow, and reddish is unsatisfactory. In the latter case, low heat transfer, high consumption and soot formation are observed. For details about the design and assembly of the furnace, see the video:
Potbelly stove plus water circuit
Any home could benefit from having an emergency heat source. Its role can be played by an ordinary, but slightly modernized, potbelly stove. You can improve the stove in two ways - put a water jacket on the burner pipe or wrap its body with a coil of copper tubes.
The coil turns are placed at a distance of about 5 cm from the perforated body of the potbelly stove and connected to the general heating system. A reflective screen is installed around the coil. For its manufacture, sheet aluminum, galvanized steel, and tin are used.
The water jacket is a tank on the upper chamber of the potbelly stove. There should be 2 fittings in its body - one for water supply and the other for drainage. In general, the design resembles a samovar. The volume of the water jacket depends on the length of the heating system and the method of circulation of the coolant.
If a pump is built into the system, the volume of the tank is small, but with natural circulation it has impressive dimensions. To control water parameters, a pressure gauge and thermometer are installed on the tank.
How to convert a wood-burning stove to run on liquid fuel
Often there is no need to make a new heating device, because a simple wood-burning stove is already installed in the room. In order to be able to burn waste in it from time to time, the unit should be slightly altered. In this case, do this:
- a thick-walled metal bowl is attached to the bottom of the fuel chamber - it will serve as an evaporator;
- a hole is made in the side wall through which a nozzle is inserted into the firebox;
- At a short distance from the stove, a container for oil is attached. Its height from the firebox level must be at least 1 m;
- A hose is passed from the nozzle to the waste container, onto which a ball valve is mounted. It will regulate the supply of fuel to the combustion chamber.
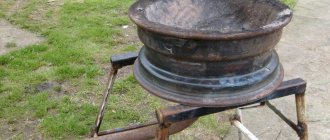
You can use a brake disc from a passenger car as an evaporator for a potbelly stove if you first weld the existing holes.
Wood-burning stove converted to run on used motor oil
When starting to ignite, place a rag soaked in kerosene into the bowl. After this, the mining supply is opened and the fill is set on fire. The oil will flow by gravity to the nozzle and drip onto the surface of the metal disk, gradually warming it up to operating temperature. As soon as the bowl warms up to 400–450 °C, the waste droplets will instantly turn into gas, burning and releasing a large amount of heat.
Operating principle of a potbelly stove
The operation of a potbelly stove is based on the phenomenon of pyrolysis. Such a furnace, where the fuel is waste oil, has 2 main compartments: a tank and a combustion chamber, located at different levels. The first is intended for pouring waste and burning it.
In another compartment, located above, combustion products of waste mixed with air are burned. At the first stage, the temperature is relatively moderate, and at the second stage it is much higher - up to 800⁰.
When making such a stove, the main task is to ensure that air flows into both compartments. It enters the first chamber through an opening designed for loading liquid fuel. The hole is equipped with a special damper, through which the volume of air supply is regulated.
Air access to the second tank is provided by holes with a diameter of about 9 mm. The efficiency of a properly assembled potbelly stove reaches 90%. Visually, different potbelly stoves may differ from each other in both shape and size, but the principle of operation is the same.
The power of a potbelly stove is proportional to the volume of the lower tank. The larger it is, the less often you will have to add mining. Sometimes this container is made very massive, holding about 30 liters of used oil.
Types of homemade stoves in development
Engine oil contaminated with impurities will not ignite itself. Therefore, the operating principle of any oil stove is based on the thermal decomposition of fuel - pyrolysis. Simply put, to obtain heat, the waste must be heated, evaporated and burned in the furnace firebox, supplying air in excess. There are 3 types of devices where this principle is implemented in different ways:
- The simplest and most popular direct combustion design with afterburning of oil vapors in an open perforated pipe (the so-called miracle stove).
- Drip furnace using waste oil with a closed afterburner;
- Babington burner. How it works and how to make it yourself is described in detail in our other publication.
Note. Serious craftsmen, who have ate the dog when it comes to using liquid fuel, have become keen on making single copies of torch burners based on factory samples. But due to the complexity of execution, such designs are inaccessible to a wide range of home and garage craftsmen, so they will not be considered here.
The efficiency of heating potbelly stoves is low and amounts to a maximum of 70%. Note that the heating costs indicated at the beginning of the article are calculated based on the indicators of factory heat generators with an efficiency of 85% (to get acquainted with the full picture and compare oil with firewood, you can go here). Accordingly, fuel consumption in home-made heaters is much higher - from 0.8 to 1.5 liters per hour versus 0.7 liters for diesel boilers per 100 m² of area. Take this fact into account when starting to manufacture a furnace for testing.
Design and disadvantages of an open-type potbelly stove
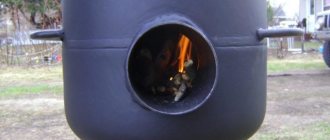
The pyrolysis stove shown in the photo is a cylindrical or square container, one-quarter filled with used oil or diesel fuel and equipped with an air damper. A pipe with holes is welded on top, through which secondary air is sucked in due to the chimney draft. Even higher is an afterburning chamber with a partition for collecting heat from combustion products.
Reference. It is not necessary to make the upper chamber of the potbelly stove. There is a more effective solution for heat extraction - to make an afterburner with a 90° rotation and direct it into an inclined chimney, an economizer heat exchanger, or inside a conventional wood-burning stove.
The principle of operation is as follows: the fuel must be ignited using a flammable liquid, after which the evaporation of the waste and its primary combustion will begin, causing pyrolysis. Combustible gases entering the perforated pipe flare up upon contact with the oxygen flow and are completely burned. The intensity of the flame in the firebox is controlled by an air damper.
This stove has only two advantages during testing: simplicity and low cost and independence from electricity. The rest is all downsides:
- stable natural draft is required for operation; without it, the unit begins to smoke into the room and die out;
- water or antifreeze that gets into the oil causes mini-explosions in the firebox, causing fiery drops to splash from the afterburner in all directions and the owner has to put out the fire;
- high fuel consumption - up to 2 l/hour with low heat transfer (the lion's share of the energy flies into the chimney);
- The one-piece housing is difficult to clean from soot.
Although the potbelly stoves are different in appearance, they operate on the same principle; in the right photo, fuel vapors burn out inside the wood-burning stove.
Some of these shortcomings can be leveled out with the help of successful technical solutions, which will be discussed below. During operation, you should adhere to fire safety rules and prepare used oil - settle and filter.
Pros and cons of IV drips
The cardinal difference of this furnace is the following:
- a perforated pipe is placed inside a steel casing made from a gas cylinder or pipe;
- fuel enters the combustion zone in the form of drops falling to the bottom of a bowl located under the afterburner;
- To increase efficiency, the unit is equipped with air pressurization using a fan, as shown in the diagram.
Diagram of a dropper with bottom supply of fuel from the fuel tank by gravity
Note. A potbelly stove can also operate using the natural draft of a chimney, but then the diameter and number of holes in the afterburner must be increased.
The real drawback of the drip stove is the difficulty of execution for a beginner. The fact is that you cannot rely entirely on other people’s drawings and calculations; the heater must be manufactured and configured to suit your operating conditions and the fuel supply must be properly organized. That is, repeated improvements will be required.
The flame heats the body of the heating unit in one zone around the burner
The second negative point is typical for supercharged stoves. In them, a jet of flame constantly hits one place in the body, which is why the latter will burn out quite quickly if it is not made of thick metal or stainless steel. But the listed disadvantages are more than offset by the advantages:
- The unit is safe to use because the combustion zone is completely enclosed by an iron casing.
- Acceptable waste oil consumption. In practice, a well-tuned potbelly stove with a water circuit burns up to 1.5 liters in 1 hour to heat 100 m² of area.
- It is possible to wrap the body with a water jacket and convert the exhaust furnace into a boiler.
- The fuel supply and power of the unit can be adjusted.
- Undemanding to the height of the chimney and ease of cleaning.
Boiler with pressurized air, burning waste engine oil and diesel fuel
Lyrical digression. Since turbocharged oil heaters operate virtually smoke-free, soot accumulates in small quantities only in the bowl. A smart craftsman will ensure that it can be easily removed.
Main design features
Products using oil are, first of all, attractive because this type of fuel is incredibly accessible and cheap. It accumulates in large quantities in the garage of almost every car owner. Therefore, it is often possible to obtain the required amount of fuel completely free of charge.
A potbelly stove can be purchased or created independently. Most often, people who already have this wood-burning stove want to improve it with their own hands, as a result of which the waste itself will act as fuel, or the joint use of these types of fuel is allowed.
In an oil stove, you can regulate the combustion intensity, for which you use the neck cover located at the bottom of the structure. If there is a need to quickly warm up a cold room, this lid must be opened completely. To maintain the optimal temperature in the room, the lid must be opened a few millimeters.
A product operating in mining requires a specialized chimney, which has quite a lot of requirements. This is due to the fact that its height should be approximately 4 meters, and its diameter cannot be less than 10 cm. It is desirable that the pipe completely lack horizontal parts. To get good draft and prevent condensation from forming on the chimney, you need to insulate it outdoors with your own hands.
The device of the future design
A potbelly stove operating in mining is quite compact. It is easy to carry (the drip stove is a little larger). The largest part is the chimney, which must be at least 4 meters long (a large pipe ensures good exhaust).
There are only two compartments in a potbelly stove using waste oil - the unit consists of:
- Fuel tank. Used oil is placed here and primary destruction occurs here.
- Injector. In the upper chamber, fuel combustion products are burned at the highest temperature.
Design and principle of operation
Making a potbelly stove from a gas cylinder
Another design option for a waste furnace is a self-made potbelly stove based on a 50-liter gas cylinder. In addition to this main element, you need to prepare 2 steel pipes with a wall of about 4 mm and a diameter of 10 cm. One of them will remove burning gases, and the second will act as a heat exchanger.
To this should be added a 4 mm steel sheet for the hood above the heat exchanger and the partition separating the evaporator and the combustion chamber. For the evaporation chamber itself, you will need a brake disc from a car with such a diameter that it fits into the cylinder without effort. A piece of 0.5-inch pipe is needed to transport oil to the combustion chamber.
In addition, you should have in stock an equilateral steel angle with a shelf of 50 mm and a length of more than 1 m, a 0.5-inch valve, clamps for sealing - 2 pcs., a hose, any cylinder equipped with a needle valve.
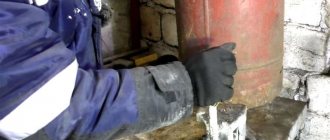
The work of creating a potbelly stove is carried out in a certain order. First, the container is turned upside down and a small hole is drilled in it. A measure such as wetting the drill and the drilling site with oil will prevent sparking.
Empty the container from gas condensate
Drain it carefully away from your home, because... its unpleasant odor lingers for a long time
Then the workpiece is filled with water, after which it is drained again, thus removing any remaining gas. Since the mixture is explosive, there should be no open flame nearby.
Cut out 2 rectangles of the same width in the cylinder body, equal to 1/3 of the diameter of the workpiece. The height of the lower rectangle is 20 cm, the second, located 5 cm above the first, is 40 cm. To separate the chambers, a circle with a diameter equal to the internal diameter of the vessel is cut out of a sheet.
In its middle, a hole is made for a pipe with a diameter of 10 cm. This part will separate the combustion chamber from the heat exchanger.
A burner is made from a pipe 20 cm long and 10 cm in diameter. Its lower part is perforated by making holes with a diameter of about 2 cm. The inside is cleaned of burrs, otherwise they will collect soot on themselves, which will significantly narrow the hole later.
Place the previously cut circle on the burner, placing it exactly in the middle, and weld it. The structure is placed inside the stove and a weld is made around the circumference of the cylinder.
Weld the bottom and cover onto the brake disc. This will be the evaporator pan or bowl. To supply fuel, an opening is left in the lid through which air will flow into the stove. The opening is made quite wide, otherwise the draft will decrease and the oil will not get into the bowl.
Weld the pipe onto the top of the lid. A coupling is made from a pipe with a diameter of 10 cm that will connect the bowl to the burner.
Assemble the fuel supply system, for which:
- make a receiving hole in the pan;
- insert a 0.5-inch piece of water pipe into it at an angle of about 40⁰;
- weld the pipe to the furnace body;
- screw an emergency backup valve to the pipe, the role of which is played by an ordinary water tap.
A heat exchanger is made from a pipe with a cross-section of 10 cm. It is cut horizontally into the body of the potbelly stove, and a reflector is mounted at the end. Inflating is achieved by installing a duct fan at the end of the heat exchanger. The air driven through the heat exchanger with its help has a high speed.
An air swirler consisting of triangular teeth connected by welding is placed inside the heat exchanger. A chimney is made from a pipe with a cross-section of 10 cm.
It is welded into a hole located in the upper part of the furnace body and brought out through the wall to the roof of the building.
Next they are making the oil tank. If you have a freon-free cylinder with a working needle valve, then it is quite suitable for this purpose. The vessel and the potbelly stove are connected with a hose connected to the valve. To fill the used oil, a hole is made in the tank body.
To ensure air access to the burner and the evaporator bowl, a groove is selected in the door of the lower compartment. Thrust plates are attached to the upper chamber door opening, which ensures reliable sealing of the combustion chamber. For the same purpose, the door is additionally equipped with a lock.
Now, even if the potbelly stove body is deformed as a result of strong heating, the tightness of the combustion chamber will not be compromised.
All that remains is to weld the legs from the angle pieces to the body and place the stove vertically. In addition to vertical potbelly stoves, horizontal stoves are also made from cylinders. Their structure is similar.
Instructions for making a furnace for testing with a drawing
Let's take the drawing below as a basis.
Required:
- sheet steel 4 mm and 6 mm (sheet sizes depend on the selected dimensions of the furnace, check according to the drawing), steel pipe with a diameter of 100 mm and a length of 400 mm;
- grinder with a disc for cutting metal;
- welding machine;
- metal drills and drill;
- a sheet bending machine or other device that allows you to bend a sheet into a cylinder;
- studs or bolts with a thread of at least M12, corresponding nuts and washers.
Sequencing:
- Reveal the details. We cut out the elements according to the dimensions shown in the drawing. For rings, strips are used, the width of which is equal to the height of the ring, the length is equal to the circumference with a margin for welding. For example, for a ring with a diameter of 352 mm and a height of 60 mm, a strip of 60x1105 mm will be required. Welding margin is 1…1.5 cm, butt welding is possible.
- Holes of the appropriate size and shape are cut in the finished parts. We take into account the tolerances of the parts - it is better to try on the size of the hole “in situ”. Holes in the pipe are drilled based on the planned combustion intensity and strength conditions: the more holes, the stronger the draft, but the less strong the pipe. Usually holes are drilled in increments of 7…10 cm.
- We first assemble two blocks - the fuel chamber and the afterburner, then fasten them to the pipe. At the same time, to maintain the possibility of disassembly, we do not use welding, we only tightly insert the parts into one another! You can sand or trim the edges a little to make it fit.
- Lastly, the legs are welded and the valves and lids are secured in place - always with bolted connections so that there is access to the containers for cleaning. It is also advisable to weld spacers between the fuel tank and the afterburner chamber. For spacers, you can use reinforcement or any suitable rod.
- The chimney is installed and secured to the structure with bolted or stud connections.
Below is another version of the diagram and drawings of the furnace for do-it-yourself testing. Cylindrical compartments are also used here, but the axes of the cylinders are turned parallel to the ground.
This video shows the assembly of such a stove and the process of its operation.