Europeans are amazingly creative when it comes to saving money. One of these devices is a bottom valve, which allows you to use much less water and not overpay your utility providers. The product has an ingeniously simple design, and at the same time it is very practical and easy to use.
Although the device first appeared in England, our compatriots also highly appreciated it and are using it more and more often.
We suggest you understand the design and operating principle of plugs, their advantages and disadvantages. The answers to the above questions are described in detail in the article. In addition, we have provided tips on choosing a foot valve and prepared step-by-step instructions for installing it.
Convenient savings with bottom valve
These are small shut-off devices that are installed in sink drains to retain water. They were originally intended for water supply systems in which hot and cold water are drawn from different taps. This is how bathrooms are equipped in some European countries.
In our country, this function is performed by different types of faucets, so shut-off valves for sinks have found other uses. They are used if you need to wash, shave, or manually wash children's clothes or underwear.
The devices eliminate the need to pour running water or collect it in a basin. Simply lower the valve and the sink will be filled in literally a minute.
For the device to work, you need to press the lid. The spring of the mechanism will open and move the plug blocking the sink drain hole
There are two main types of valves:
- With mixer . Devices included. Their installation is provided for by the model of the plumbing fixture. To control the operation of such a bottom valve, a small lever is used, which is located behind the tap or on the side of it.
- Push Open . These models are sold separately from the faucets. They are less popular than devices of the first type. They are often bought by people who are already accustomed to using a locking product, but the old one has worn out and needs to be replaced.
The devices would hardly have found widespread use in the post-Soviet space if they had not been included in some faucet models. Quite quickly, the benefits of their use became obvious, and now shut-off valves for sinks are in demand among buyers.
Another plus: installation does not require any fundamental changes to the water supply or sewerage systems.
Most of the design details are located under the sink: the connecting rod, the threaded connection and the siphon. They are not conspicuous and do not spoil the interior
Designs can be with or without overflow. Externally they differ little, but the difference in functions is noticeable.
Valves of the first type are safe: if the water pressure suddenly increases or the owner moves away for a minute, the excess liquid will drain into the drain and not onto the floor.
It is better to purchase a model with an overflow. This will protect the bathroom from flooding if the valve wears out and stops performing its functions.
If the device does not have an overflow, the slightest carelessness can result in trouble.
Installing a foot valve
Siphon design with overflow
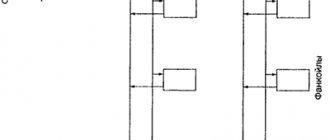
The automatic design consists of a valve, which is a plug, a lever and a connecting rod. Installation of a mechanical or automatic product is quite simple. The mechanical one is inserted into the drain hole, and the automatic one is placed together with the mixer:
- Insert the lever into the hole along with the hoses.
- Install the gaskets, then place the faucet on the sealants and secure.
- After fixing the mixer, connect the hoses to the pipes.
- Insert the valve into the drain hole.
- Fix the two valve spokes in the form of a cross.
- Connect the ends of the spokes to the lever and valve loop.
Check the strength of the installed system: turn on the faucet for a few minutes and see if there are any leaks. If there is, turn off the water, dismantle the pipes, reassemble, if not, check the valve. To do this, close the drain, fill the sink with water to the brim, and leave for 40-50 minutes. An unchanged fluid level indicates excellent installation. If changes occur, even minor ones, check the valve fit.
Design and principle of operation
Lever (automatic) models consist of several functional elements:
- Cork . This is the valve that closes the drain hole in the sink.
- lever (spoke). It is used to raise and lower the cork. This is convenient - you don’t have to put your hand in a sink filled with water.
- Rod . It connects the control lever and the plug.
- Carving . The device is screwed to the siphon using a threaded connection.
- Siphon . The entire assembly is an integral structure for controlling water drainage.
Push Open valves are push-type mechanisms in which the plug is controlled by a spring.
The design is simpler than a lever one, but less convenient to use. To press the plug, you have to put your hand in the water. Many people find this unpleasant, especially if they washed or washed dirty clothes in the sink.
Click-clack system models are very compact and beautiful. Some designer valves are true works of art, but are also quite functional.
A significant advantage of Push Open models is their aesthetic appearance. A compact stopper at the bottom of the sink looks much more attractive than a complex design with a lever. From the outside, only a round lid is visible, the color of brass, bronze or chrome.
Installation of a water shut-off device
A complete siphon, equipped with an outlet pipe that leads to a drain hole at the bottom of the sink, allows the installation of a washbasin faucet in a set with a pop-up valve. A semi-siphon for a sink with a bottom valve, which does not have an outlet, allows you to install a Click-Clack system valve of your choice.
Note! To avoid scratching chrome surfaces, use tools with sponges. If these are not available, it is possible to use gaskets made of cardboard, copper or brass.
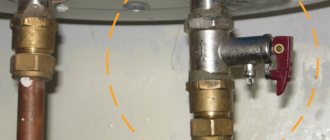
Because the hydraulic lock is often supplied together with the mixer, consideration of installation work will include the installation of both of these components.
- A valve lever and flexible hoses extend from the mixer - all this is discharged into the hole below.
- The faucet body is secured with a clamp nut above the corresponding hole on the sink pedestal . Rubber gaskets must be placed on both sides of the mounting hole.
Note! If the supply is made with solid tubes, you will probably need to bend them with your own hands, which requires a certain skill. If the tubes need to be shortened, then during grinding and cutting, chips can get inside and break the operation of the tap - it will not turn. It will help to wash the insides and dismantle the “aerator” with a strong stream of water.
- Connect the hoses to the warm/cold water connections with nuts and rubber gaskets . A U-shaped bend of pipes is allowed, an S-shaped bend is unacceptable, due to the fact that the movement of water flow is difficult and the pressure increases, which has a detrimental effect on the connection points.
- Place the water seal in the recess of the drain hole.
- Fold the spokes (levers) of the device crosswise and secure with a special plastic cross.
- One end of the spoke is connected to the lever and to the valve eye . By moving up and down, the lever will move the spoke, which will allow the valve to move.
- Connect the siphon or corrugation from below.
- Route the hose to the drain pipe.
- Test the assembled system as required by the instructions . First, let the water flow in a simple way, and then test the operation of the valve: close it, fill the sink and flush.
- If a leak is detected, tighten the threaded connections . It cannot be excluded that sealing tape will be useful in these places.
- If all joints are dry, you have the opportunity to congratulate yourself.
Pros and cons of using a valve
The use of new hydraulic locking devices has several advantages.
- Economic benefit . Due to rising utility tariffs, many had to think about cutting costs. The cost of devices ranges from 500-2000 rubles, depending on the model and manufacturer. It's a small price to pay to reduce bill amounts.
- Easy to use . The valve is operated with one finger. No effort is required to lower or raise it. This is accessible even to children.
- Ergonomic shape . The device is convenient and easy to clean.
- Beautiful design . A neat metal or ceramic lid looks much nicer than a hole in the sink. It also wins in comparison with the usual plastic stopper.
- Reliable fastening . Traditional bathtub and sink plugs are tied to plumbing fixtures using fishing line, which can break at any time. Metal chains improve the situation somewhat, but they are also not entirely reliable, and they also make noise when used.
- Odor protection . Unpleasant odors in the bathroom are not always the fault of the users, and cleaning does not eliminate them.
It can be difficult to deal with the stench, but it is necessary, because sewer gases contain substances hazardous to health - hydrogen sulfide, ammonia. By plugging the drain, you can simply get rid of the problem.
Bottom plugs have no serious disadvantages, but a couple of nuances are worth considering. It will take time to get used to the peculiarities of using the mechanism: you need to monitor the water level when filling the sink.
Design can play a determining role when purchasing plumbing fixtures. Click-clack system models can be selected by style and color
There are also irritating moments in the use of spring mechanisms - putting your hand in dirty, too hot or cold water. And with lever ones, it’s inconvenient to clean the parts located under the sink and behind the mixer.
Benefits of use
Installing the device has many advantages:
- The main advantage is significant water savings. The cost of cold and hot water is constantly increasing, and installing a bottom valve will help reduce costs.
- Easy to use. Even a small child can handle a small lever or button.
- The appearance of the sink becomes much more aesthetically pleasing; instead of an unsightly drain hole, a beautiful shiny valve is visible.
- The device does not require additional maintenance; the valve can be cleaned in a matter of minutes.
This device does not have any significant disadvantages . Of course, it will take some time to get used to this method of saving water; washing in this way is not always convenient at first.
In addition, you will have to carefully monitor the water level in the sink; sometimes the pressure is too strong and overflow cannot be avoided in this case.
By what criteria are plugs selected?
First of all, you should decide on the price. You need to understand well what the buyer gets for his money - quality of materials and workmanship, design or additional convenience.
An important selection criterion is the quality of the metal and threaded connection. To understand how reliable the chosen model is, you need to make sure of the strength of the material. It is advisable to check how the plug is assembled and disassembled
Let's consider several design features on which the price depends:
- presence of overflow;
- type of control;
- design;
- brand.
The model should be selected based on the type of sink. If it does not provide for the possibility of removing excess water, install a bottom valve without overflow. An option is to replace the siphon with a more practical one.
As for the management mechanism, you need to clearly define your goals. If the sink holds water for hand washing, it is unlikely to be too dirty after use. There will be no problems with lowering your hand to the spring valve.
But if you plan to wash dirty shoes or greasy objects, it is better to give in to natural disgust and buy a lever device.
The design affects the cost of the product. Taking into account the range of prices, the overpayment for a beautiful design of the bottom valve is not that great. Therefore, you should not deny yourself the pleasure of putting a beautiful plug on the sink
The role of the brand is difficult to overestimate when choosing fittings. Brand reputation is not only advertising, but also an indicator of the real quality of goods. Before purchasing, it is advisable to read user reviews and take into account their complaints about different manufacturers.
The bottom shut-off valve is a small part, but it can cause unpleasant moments if it quickly fails. It’s better to pay a couple of hundred rubles more and buy a reliable, beautiful plug that will last for several years without breaking.
Installation
When installing the foot valve yourself, no special knowledge is required. For installation, all you need is a set of wrenches and follow the manufacturer's instructions.
Installation steps:
- Pass the connecting hoses into the hole for the mixer.
- Secure the tap, securing it on the inside and outside with a gasket and a special nut (both are included in the kit from the manufacturer).
- Connect the hoses to the hot and cold water pipes.
- To better waterproof the drain hole in the sink, cover it with a thin layer of sealant.
- Insert valve.
- Carefully secure the fastening spokes of the device with a special plastic cross.
- Connect the spokes, valve and lever in such a way that when pressed, the fastening spoke opens/closes the plug.
- Connect the siphon and corrugated outlet.
Check for correct installation. Turn on the water and identify the presence or absence of a leak at the joints, fastenings, and siphon. If defects are found, dismantle the system and install it again.
Detailed installation instructions
The bottom valve, which is included with the mixer, is installed in stages. To install it, you will need simple tools and plumbing sealant, which is used to seal seams when installing plumbing fixtures. All work can be done independently.
The only caveat: the standard set contains all the tools with sharp edges that can damage the sink coating. It is advisable to prepare gaskets in advance and press metal elements through them to protect the plumbing.
Stage 1 – preparatory work
The lever and hoses lead down through the hole, under the sink. Typically, mixers are equipped with flexible tubes. If the model comes with rigid hoses, you will have to bend them yourself.
It is important to do the work very carefully so as not to damage the walls of the pipes, otherwise they will quickly rot and leak.
It is highly undesirable to file the products, because... chips can easily get into the faucet mechanism. During operation, problems will arise that will lead to premature abrasion and wear of parts.
If it is impossible to do without cutting the hard pipes, after finishing the work you need to thoroughly rinse all structural elements with a powerful stream of running water.
To ensure that the faucet is securely attached to the sink, it is placed on a sealant. You should choose a moisture-resistant composition with antiseptics (sanitary) to prevent the appearance of fungus and mold
The tap is secured with a clamping nut. If there are doubts about the reliability of the installation, you can use sealant as an additional method of fixation.
Stage 2 - assembly and connection of parts
Using nuts with rubber gaskets, the hoses are connected to the supply pipes. You need to follow the shape of the bend. If it turns out to be in the shape of the letter U, everything is fine: water will flow freely.
But an S-shaped bend is undesirable. Unnecessary obstacles will create conditions for an uneven increase in pressure in the system, which within a year or two will lead to leaks at the joints.
Any model should include a plastic connector for the spokes. When purchasing a valve, you should ensure that the part is available. If you have to buy it separately, it may be difficult to select sizes
The shut-off valve is placed in the sink drain hole and the spokes are assembled. They are laid crosswise using a special plastic connector.
The clamp itself is twisted with a screwdriver. The result is a simple but reliable cross-shaped design.
Stage 3 - installation of the lever and siphon
The spoke must be connected to the lever and attached to the eye of the device, as shown in the diagram below.
After completing this work, you should immediately make sure that when moving up and down, the lever easily raises and lowers the spoke. Sometimes you have to adjust the mount (+)
All that remains is to bring the corrugation from below and secure the siphon. It is important that the plug tightly closes the drain hole, so immediately check the quality of the system’s assembly.
It is necessary to open the tap and observe how the plumbing works for 3-5 minutes.
A sink with a bottom valve but without an overflow hole can be improved. To do this, simply buy and install the correct siphon (+)
If the water flows well into the drain and the joints remain dry, everything is in order. If signs of leakage appear, the nuts should be tightened.
If even after this the joints are wet, you will have to completely disassemble the system and redo the work, since the installation was clearly done incorrectly. Sealing tape can correct the situation, but it is unlikely to last long.
Stage 4 - checking the tightness of the plug
The work can be considered complete if the siphon does not leak and the shut-off valve tightly closes the drain hole. They check it like this: lower the plug, draw the maximum amount of water into the sink and leave it for half an hour to an hour.
A leaking plug won't do much good. If water quickly leaves the sink into the sewer, it is better to redo the work - disassemble the valve and reassemble it
The indicator of correct operation of the device is a constant level. It’s better not to rely on your own eye and make a mark on the sink with a marker.
If after an hour the water remains at the same level, the shut-off valve is installed perfectly. Minor changes are a reason to check the tightness of the lid to the bottom of the sink.
Purpose and advantages of the device
As a novelty in plumbing, the built-in valve came to us from Western European countries, where great attention is paid to saving water, as well as other resources. It involves a simple system that is inserted directly into the sink drain hole and functions as a stopper to hold a huge amount of liquid in the sink.
For example, with the help of such a device you can transform a sink into a multifunctional bathtub, namely:
- wash the child's things;
- rinse washed dishes;
- Another very feasible use case is to place the fish while the aquarium is being cleaned.
Mounting such a device has its advantages
- saving water of different pressures - the cost of services for water increases, and the bottom valve
- will provide an opportunity to reduce costs;
- very suitable pressing, which does not require effort - for example, it is quite possible to operate the lever with just one finger;
- the sink mechanism embellishes the washbasin, unlike the usual ugly plastic plugs;
- The device can be cleaned quite effortlessly, so it is one of the best options for housewives who take care of cleanliness.
Bottom valve and its types
Relatively recently, the bottom valve has proven itself in plumbing, but is already in great demand. Such a device is needed to block the drain hole when there is a need to collect a certain volume of water into the container.
The bottom valve is designed to save and conserve water resources, although previously the so-called valve served as a device for mixing cold and hot water from separate taps.
There are two key variations of foot valves:
- together with mixer, control lever;
- Push Open mechanism without mixer.
A variation with a mixer and lever is in demand, which is quite practical and convenient. So, when choosing, it is better to focus on the option of the set of the bottom valve in the mixer. A number of manufacturers prefer to place the lever nearby, and this position will not affect the operation of the device at all. Blocking the drain hole is done by changing the position of the lever. A traditional lever control valve includes the following elements:
- plug to retain water and block the hole;
- valve control lever;
- basis for combining lever and valve;
- threaded connection for installing the tube;
- siphon.
Mixer design devices are used infrequently. The process of closing the drain in this embodiment is performed by clicking the valve cover. The built-in spring acts as a valve control mechanism, preventing liquid from spilling out.
About spring type options
However, if we look at the bottom valve from the other side, the spring-type version looks quite elegant due to the fact that there are no levers. The devices are made in several styles, but the choice of colors is not too wide, since most of the devices are fixed and installed under the sink.
It might be interesting: Features of installing glass sinks yourself
So, only the convex iron plug will be noticeable. The cover model is determined by the structure of the drain hole, which also contains a round shape. Select custom sinks feature a unique valve system. Naturally, this is not displayed when the device is operating.
Installing a faucet on a sink
Installation of the system begins with the installation of the crane itself. Let's take a look at the installation guide:
- The hoses that run from the mixer and lever must be passed through the hole.
- The faucet is fixed above a special hole in the sink shelf and secured with a special clamping nut. You also need to put a gasket between the faucet and the sink (on both edges).
- When the water supplies are not straight, the hoses can be bent. Working with copper pipes is much more difficult. Such pipes will have to be bent with special tools, and this procedure requires not only strength, but also skill. If necessary, it is necessary to trim the pipes and clean the cut areas.
- Coarse surface defects must be removed very carefully. In most cases, during operation, chips end up in the middle of the system, so it is almost impossible to close or open the tap. In order to eliminate this problem, you should not make every effort, but use a more rational method - disassembling the aerator (a device where water is mixed with air). Next, you need to turn on the tap and rinse off the chips under pressure.
- The hoses must be secured to both cool and hot water pipes using nuts with rubber gaskets. Moreover, you should always ensure that the pipe does not bend. Only a U-shaped placement is allowed, but the S-shaped position is not recommended.
Valve mounting
Installing the bottom valve yourself is not difficult. However, before starting work, pay attention to the option of installing the valve together with the mixer, which is located nearby.
This type is much better, more economical, and the system is sold as a set. Thus, the option of searching for devices separately is eliminated. Let's consider important recommendations for work:
- Do not forget that installation requires maximum precision, you can simply ruin the sink, therefore, take into account all aspects when installing the bottom valve.
- Use special, non-serrated tools to avoid scratching.
- The best option for this process is to use devices with sponges and a soft surface.
- Every plumber or just a novice master can use information about installing a mixer on the Internet
- Now there are many videos, so there will be no problems in this matter.
Let's start installing the bottom valve, which is also considered a fairly simple procedure even for a beginner:
- Carefully insert the valve into the drain hole, making sure you do not scratch anything.
- The bottom valve has 2 spokes that cross each other, so fix the cross at the place where they “meet”.
- After completing the action of joining with a plastic cross, connect the lever here, as well as the small eye of the bottom valve. In a similar way, with pressure and influence on the lever, the spoke will close/open it.
- Don't forget that sinks also come in different types. For example, it is available with and without overflow. For this reason, the design and volume of the valve must be taken into account.
Installation completed. What else needs to be done after installation? Be sure to check the device for serviceability, that is, check it in operation. However, before doing this, make sure that the corrugation/siphon is connected (the choice depends on your preference), since it is necessary to ensure the drainage of running water.
It will be interesting: How to permanently defeat mold in the bathroom and shower