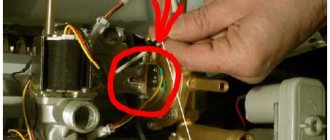
Looking for a problem area
Before solving the problem of a frozen water supply, you need to find the place where the freeze is occurring. Remember: only those pipes freeze that are either located above the freezing depth or are poorly insulated. And if we are talking about a private house, then most likely these problem areas are well known to the owners.
Either the entire main line or some localized area may freeze - it is easy to determine if the flow of water has not stopped in part of the area (for example, there is water in a barn or garage, but not in the house).
Once the freezing location has been determined, you need to prepare it to fix the problem:
- excavate a localized area of frozen water supply;
- make deep holes-grooves when a large area freezes.
Advice from experienced people
Alisher Yakupov
The tips above really work and are used by many runners. For example, Alisher Yakupov advised wrapping a bottle in foil or wearing a small running backpack under a jacket, and also reminded that there are special thermal packs for drinking systems.
Even though it’s cold outside in winter, you still want to drink during long runs. How can you prevent the water you take with you for a run from turning to ice or becoming icy? We found seven hacks to help you overcome this problem and asked avid runners which ones really work.
There is no question of what to do with replenishing water reserves while running in the warm season. Everything is simple here: take water or isotonic drink in a convenient bottle and go ahead. But what to do in winter, when the water becomes icy in just a few minutes? The same goes for running snacks: while some of them may melt slightly in the summer (chocolate and protein bars), in cold weather you risk breaking your teeth on them.
What to do with all these troubles? We decided to look for answers to all these questions on the Internet and ask other runners.
Tip #1: Drink plenty of fluids throughout the day and immediately before your run. It is not necessary to drink a whole bottle, since in the cold you will very quickly want to go to the toilet, in this case 200-300 ml will be quite enough. This applies to short runs. If you are planning to run more than 10 km, you need to take at least a small bottle with you.
Tip #2: If your water bottle is in a secret place or hanging on your belt, pour warm or even almost hot water into it - it will quickly become cold again.
Tip #3 : This is a rule for running in very, very, very cold weather! To prevent the water from freezing in the bottle, add a little salt, sugar or fruit juice. This will lower the critical freezing point.
Tip #4: Another option to keep the water warm is to wrap the bottle in foil! You just need to pour the water warm enough to keep the heat longer.
Tip #5: Use special thermal bags for baby bottles. They work no worse than a thermos.
tailorworld.ru
Tip #6: Remember when we mentioned hydration packs in our article about New Year's gifts for runners? Many manufacturers offer special winter options for skiers or winter runners, which ensure that your water will remain at the right temperature for a very long time.
Tip No. 7. If you are really thirsty, but you didn’t take water with you, you can buy a small bottle of water while running past the store. You just have time to drink it before it turns ice cold.
As for food, if you don’t want to break your teeth on an icy chocolate bar or energy bar, place them closer to your body, that is, to warmth. Place in an inside pocket or wear a running hip pack under your jacket.
Denis Tkalich
Denis Tkalich, one of the authors of the blog “Run, Lifehacker, Run” and a future ultramarathon runner, advised drinking enough water throughout the day and drinking a glass immediately before running. In the future, he plans to take water with him on winter runs in a thermos.
Tip #4: Another option to keep the water warm is to wrap the bottle in foil! You just need to pour the water warm enough to keep the heat longer.
Let's work together to make the unique material even better, and after reading it, we ask you to repost it on a social network convenient for you. net.
How to heat metal pipes?
Despite the widespread use of plastic pipes for water supply installations, many still prefer metal. To some extent, they are right - after all, even heating such a water supply is much easier than plastic:
- metal is not afraid of open fire - you can light a fire under the chimney;
- This material perfectly retains and distributes heat, so you can light a fire in one place and wait for it to thaw for a fairly long distance.
Please note: when heating a metal pipe, avoid exposing the threaded connections to the heat - they will then need to be repacked.
In addition to starting a fire near the frozen section of the pipe, you can try to defrost the pipeline using a hair dryer or blowtorch. These are not the most effective methods and can only be used when absolutely necessary. Be careful: when using a blowtorch, you should take fire safety precautions and use metal shields.
Electric current and frozen pipes
Metal is an excellent conductor of electricity, which can be used when the water supply freezes. You need to do the following:
- excavate a section of frozen water pipe;
- use a welding transformer - connect it to the pipe;
- apply electric current to the pipe.
When an electric current penetrates the metal, the latter becomes very hot, and the water in the pipe thaws. This method of thawing frozen water pipes made of metal pipes will take a lot of time - it will take several hours to thaw, but without your direct participation.
Heating cable against ice
The simplest and most affordable method of heating a frozen metal water pipe is to use. They are sold in stores and are inexpensive, so they are available to everyone.
Assembling the heating cable is very easy - there are instructions for this. But it is worth remembering some nuances in using a heating cable:
- There is no need to constantly turn on this device - it is enough to use it only at night and when severe frosts are predicted;
- be sure to ensure that the heating cable does not completely “go” to the pipes - leave a small fragment for control;
- the heating cable is capable of heating pipes up to 40 degrees;
- This device can be used to defrost water pipes and prevent further freezing for both plastic and metal water pipes.
Please note: it is advisable to use heating drops immediately when installing the pipeline. The main thing is to choose the right type of cable based on your goals (the cable can be simple or with a self-regulating system).
How to warm plastic pipes?
Traditional methods used to remove ice blockages in metal pipelines will not work on plastic pipes. You cannot light a fire near the pipe, use a welding machine, or try to insert a metal rod into the pipe (you will either not achieve any results at all or damage the pipeline). Only 2 methods are considered effective, which we will describe below.
Defrosting plastic pipes using a hair dryer
If the water supply is installed from plastic pipes, then under no circumstances should they be heated with an open fire - it is better to use a hair dryer. In this case, you should not count on a quick result, because... Plastic conducts heat very poorly.
If such a tool is not available, then you will have to resort to the old-fashioned method: the frozen pipe is wrapped in rags and boiling water is poured on them. It is necessary to achieve continuous shedding/warming of the frozen section of the pipe for 20-30 minutes.
Please note: before you start heating plastic pipes, you must open the tap - even slightly thawed water will find a way out under pressure.
Pouring hot water into pipes
If a plastic water pipe is frozen, the most effective way to solve the problem is to pour hot water inside. It is necessary to find the junction of two pipe sections closest to the place of freezing, unscrew them and insert a hollow tube into the area of ice accumulation (a gas or oxygen hose will do). You need to supply hot water through it - it will act directly on the ice and quickly defrost it.
The ice has thawed a little, but there is still no water coming out of the tap? This means you need to move further - push the tube or try to direct a stream of boiling water into the middle of the ice plug. After the water comes out of the tap, you can put the system back together. If the freezing area is located at the entrance to a house or garage, then you can insert a tube supplying boiling water into a section of the water supply that is located indoors.
You can also use an Esmarch mug to defrost water pipes. You will need a hydraulic level, steel wire with a diameter of 2-4 mm (we wrap it around the hydraulic level tube) and a medical device used for cleansing enemas (Esmarch's mug). The pipe defrosting diagram is shown below:
It will take a long time for the water supply to completely defrost: in an hour of work, you will free approximately 0.8 - 1.0 m of pipe from ice.
Determining the location of freezing
Determining the location of the freeze is the first and easiest step in defrosting the pipeline. To do this you will need a tape measure and a steel plumbing cable.
First of all, a visual inspection of the pipeline is carried out. If the outer part is frozen, then the plug can be detected by simple inspection, but if nothing can be detected visually, then a cable is passed through the open tap. The passage of the rope must be continued until it stops in the ice plug.
After this, the cable is removed, measured and compared with the approximate length of the pipeline. This way you can determine the approximate location of the plug, but the exact value is not required to defrost the pipe. To make sure that the location is determined correctly, you need to make a verification pass with a steel cable on the other side of the plug. To do this, the cable is inserted in the same way into the tap closest to the place of freezing.
The ice has been removed - what to do next?
Whatever method you choose to defrost the water supply, you need to achieve the optimal result - get rid of ice. But even when this process is completed, you cannot relax - some repair work still needs to be done.
After the ice has disappeared and the water has flowed through the pipes, you need to drain about half a liter of water and turn off all the taps. Then, for 15-20 minutes, you will have to observe the sections of the excavated water supply pipes to see if water accumulates in the holes. If there is no such phenomenon, then the system remains intact even after its expansion by ice - you are lucky. If water is present, you will have to look for damage and replace the problem area.
How to insulate a water supply: preventive measures
You also need to take care to prevent the water supply from freezing again - winter is unlikely to end overnight. To do this you need to do the following:
- remember which areas of the water supply system are most susceptible to freezing and dig them out;
- wrap them with insulation or, in extreme cases, old rags - it doesn’t matter, the task is to insulate possibly problem areas;
- You need to lay a heating cord in places of possible freezing - this is sold in stores;
- try to ensure a constant, uninterrupted outflow of water, at least with minimal intensity.
Please note: if no one permanently lives in a private house during the winter, then drain the water from the entire system and turn off the taps.
Insulation of the water supply system must be carried out before winter arrives - this way it will be possible to avoid freezing of the pipes. To do this, you need to comply with the rules for the location of pipes in the ground - find out the depth of soil freezing in your region and, in the warm season, remodel the existing water supply system, or lay a new one in accordance with all the rules.
What can and should be done to prevent water pipes from freezing in winter? Only specialists can give a competent answer to this question. It is worth listening to their advice:
- Find the shut-off valve in the house in advance and report your finding to all adults living in the house.
- If you plan to move out of your country house for the winter, then drain the water from the system, turn off the taps and collect all the hoses.
- If all drainage systems on your site are located in a garage or shed, then the doors of these rooms should always be kept closed.
- If there are unprotected water pipes, you need to block any possible access of cold air to them - for example, plug all the holes with rags.
- It is not enough to insulate pipes in the ground; you need to take care of this in other places where the water supply runs - many people also have it in the attic.
- In case of severe frosts, you need to lay a heating cable along the pipes - ideally, this should be done along the entire length of the water supply, but it will also be enough to protect the “weakest” areas.
- In the winter season, when frosts are predicted, always keep the tap slightly open - let the water drain from the system slowly. If you see that the water has stopped flowing, this means that ice has appeared in the pipes - open the water more, it will force the ice that has already formed out of the pipes.
Insulated pipes must be returned to their original position after the end of winter:
- firstly, you need to remove all heating devices and heat-insulating materials - overheating of the water supply is also harmful to the system;
- secondly, it is necessary to examine the condition of the water supply and drainage system - even with apparent prosperity, damage may be detected;
- thirdly, it is advisable to reconstruct the system and eliminate the possibility of water pipes freezing next winter.
Insulating the water supply is a direct path to joy from frost and sun. But if you haven’t taken care of this process in advance, you will have to resort to one of the methods recommended above to defrost the water supply.
A well or well in a country house is usually located a few meters from the house. Sometimes, a well is made in the underground or basement of a house, but even then measures against freezing of the pipeline will not be superfluous. As a rule, water in a pipe freezes not in the underground section of the pipeline, but at the “ground-air” boundary, then crystallization occurs along the air section of the pipe. Another “weak” section of the pipeline is located at the “underground-house” border due to the inevitable draft along the pipe contour in this place, which is quite difficult to get rid of.
I would conditionally divide all measures to combat pipe freezing into passive
and
active.
It is advisable to provide for both of them in advance, at the design stage. So:
Passive measures.
- The material of the supply pipe itself must be heat-insulating. It can be polyethylene
,
polypropylene, metal-plastic
. Metal pipes are undesirable. - It is advisable to choose a larger diameter of the supply pipe. The larger the diameter of the pipe, the greater the volume of water contained in it, the thicker the pipe wall (additional thermal insulation), the longer it will take for the water to cool to freezing temperature. Optimal diameters are from 3/4 (20mm) for polypropylene and metal-plastic (preferably 26mm) to 1½ (40mm) for polyethylene (more is possible, but it is expensive).
- The depth of the trench for the pipe should be comparable to the average freezing depth of your area, from 0.7m to 1.5m.
- The pipe must have a slope towards the well or borehole.
- The pipe must be insulated.
I conventionally call the following measures
Active:
- It is necessary to provide easily detachable pipe connections at the exit from the well (well) and at the entrance to the house or basement, for possible inspection of the mouth of the underground section of the pipe and
- The best active protection is to run the heating cable through the supply pipe. It is not necessary to buy an expensive self-regulating two-wire one. In the worst case, you will only use it a few times during the winter. A cheap single-core cable for domestically produced heated floors is quite sufficient. The only limitation in its use is that its activation time should not exceed 15 minutes. If this was not enough, simply repeat the procedure after 10-15 minutes so that the cable cools down a little. It makes no sense to turn on the cable for constant heating (this requires another cable), this is a waste of energy, and the cable may overheat. The cable is attached to the pipe using plastic clamps or tape.
- When using submersible pumps, you can make a small hole in the pipe (1-3mm) 3-5cm from the pump for a constant flow of water. Flowing water will never freeze. Unfortunately, this cannot be done when using pumping stations.
- In severe frosts, if you are at home, spill, i.e. turn on the water at least once every two hours. Then you will only need to warm the pipe and turn on the heating cable once a day - in the morning.
As practice shows, compliance only with passive measures against freezing of pipelines guarantees their trouble-free operation down to 20-25 degrees below zero. Subject to all measures - in any frost.
You may be interested in similar materials::
- Good day, dear readers of “San Samych”. A common problem when designing and operating a home water supply system based on a surface pump...
- Hello, dear readers of “San Samych”. I am happy to return to the topic of measures against freezing of pipelines, which is sore for many. Lastly...
- To be honest, I’m a little surprised that someone’s sewer system can freeze. Sewer pipes, in principle, cannot freeze, there...
- Winter is approaching its end. The frosts are subsiding. The sun is getting warmer and hotter. And I would like to “hammer the final nail” into the topic...
- If the pipe still freezes. Passive and active measures to combat water freezing in the supply pipeline are described in this article, but...
Reviews (30) on “To prevent the pipe from freezing.”
- Hello! There is a question: to supply water to the house there is a submersible water pump, a hydraulic accumulator in a closed shaft on the street. I would like to make a pipe from the shaft to the street for use in the yard. How to make sure that the pipe from the HA to the outdoor faucet does not freeze in winter?
- Hello, Ivan. Alas, there is no way to do this. But there is a standard way out for such a situation. On the “street” pipe you need to install two (!) taps and drainage (a drain with a tap). The scheme is as follows... The first (root) valve is placed in the mine, where the water is guaranteed not to freeze. Immediately after it, a tee with a drain valve and a discharge pipe (drainage) is installed. And another crane (working) is placed in the yard, in a place convenient for use. An important condition: the “street” pipe must have a constant slope from the worker to the main tap for normal and complete drainage of water from it. How to use? Summer mode
.
The main valve is open, the service valve and drain are closed. Water cannot freeze, so we only use a working tap when necessary. Winter mode
.
The main valve is closed, the service valve and drainage must be open
(this is very important!!!).
If you need water in the yard, then close the working tap and drainage, open the main one, then open the working tap and use the water. After use, close the main drain, open the drain and the working valve, draining the water from the pipe. We leave the working tap and drainage open
. Thus, there will simply be nothing in the pipe to freeze; in cold weather it will remain “dry”. But it is very important to leave the working tap open. This is even more important than open drainage. Failure to comply with this condition will lead to breakdown (rupture) of the working valve.
This article will tell you what to do if water freezes in pipes: how freezing occurs, what methods are available to eliminate freezing, and what advantages and disadvantages these methods have.
Most often, if water is frozen in the pipes, it means that the pipeline was installed incorrectly during the construction process, that is, the pipes were laid to a depth less than that at which the soil freezes. Therefore, it is very important to correctly calculate the level of freezing in a given region, since in regions with warmer winters errors may not be detected during operation, and in colder areas such miscalculations are unacceptable, since they entail dire consequences.
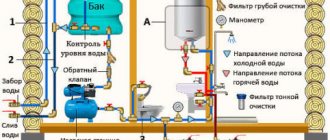
Arrangement and protection of water supply from a well for the winter ↑
The water supply from the well will not freeze if the basic rules for installing pipes are followed: laying and insertion are made at a sufficient depth and carefully insulated. The diagram shows the correct location of pipes in the ground, correct insertion through the ring wall and the depth of shaft insulation.
Well diagram
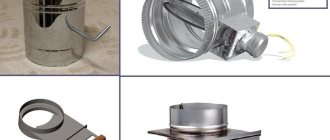
Rules for installing pipes at the mine entrance ↑
The entrance of the outlet pipe to the well wall should be below the freezing point of the soil in the most severe frost. It is advisable to install a special coupling: a short plastic pipe. The entry point is sealed.
Coupling with seals for pipe insertion
A rigid plastic shell will fix the pipe, protect it from deformation and friction against the wall, and most importantly, it will make it possible to thermally insulate the pipe. This is what the sandwich design of the pipeline insertion into the ring looks like.
There is no need to additionally insulate the pipes inside the well if the walls are thermally protected to a sufficient depth.
At the entrance to the house, careful thermal insulation is required: often it is not possible to make a deep connection; the pipeline has to be raised to the surface.
In a special coupling made of flexible polyethylene, a pipe with insulation
Insulation of underground pipeline ↑
Water will not freeze in a pipe from a well if reliable protection is provided along the entire length of the underground section. For thermal insulation, ready-made polystyrene foam cuffs and mineral wool are used. Ready-made factory insulating materials are sold in the form of a shell of two parts with a “groove” connection.
Instead of polystyrene foam cuffs, you can use any rolled material - sheets of polyurethane foam, PVC. Narrow tapes are wound diagonally around the pipe and periodically secured with clamps.
Multilayer roll insulation
In addition to the cuffs, an external protective shell is required - a flexible or rigid hollow pipe. If the pipeline is laid above the freezing point, or it is not possible to deepen the trench, an electric heating cable is used.
The cable is laid along the entire length of the problem area
The wire is connected to the pipe with plastic clamps, adhesive tape or a special fixing sticky material. The cable with the switch is taken out indoors and connected to the network.
Video: how to insulate a pipe from a well for the winter ↑
Useful video instructions about the technology of heating an underground pipe in winter.
There is nothing difficult about protecting the outside of the well from freezing on your own. And it is better to entrust the equipment of automated water supply from a home well to specialists. Errors in calculations and insufficient pipeline laying depth can lead to pipe ruptures in winter. It will not be possible to repair the system in cold weather; you will have to look for an alternative source of water for the winter. And the cost of repairs is almost equal to installing a new system.
How water freezes in pipes
In addition to accurately calculating at what level the soil freezes and at what temperature the water in the pipes freezes, the method of installing the pipeline also plays a rather important role.
For example, for the most efficient movement of drains, pipes should be installed at a slight slope in the direction of flow. If this is not done, then even correctly calculating the freezing level will not save the situation.
Important: in most regions, sewer pipes are allowed to be laid at a depth of at least 90 cm.
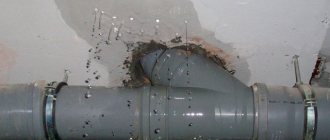
In addition, if water freezes in a pipe, this may mean a pipeline leak, since the structure, surrounded by soil with a low temperature, when water flows pass through, itself begins to cool to a negative temperature.
In this case, if larger and hotter portions follow small amounts of water, the pipe may not freeze, but with small discharges, especially in the case of a significant length of the pipe, it will be impossible to heat it up, since small portions will gradually freeze and form a frozen space in the pipeline .
What to do when freezing
If, however, the water freezes in the pipe, then today there are different ways to solve this problem.
You can use boiling water, open flame sources, etc., which can be not only unsafe, but also harmful to both health and the pipeline, so we will consider methods for defrosting pipes that do not involve the use of extreme measures.
Considering the freezing point of water in a pipe, the ideal option is to defrost the pipe using a special hydrodynamic installation that produces hot water, the temperature of which can reach 150°, and the liquid pressure at the time of supply reaches 100 atmospheres or more.
For the operation of such equipment, an electrical network with a power of 380 V is required. It should be noted that this will require additional equipment in the form of a water boiler that heats water using diesel fuel.
Useful: if the water in the pipes freezes, it can be defrosted using relatively cold water, but this method is quite time-consuming and not particularly effective.
The main disadvantages of defrosting processes
When water pipes are frozen, usually the affected areas have a number of deficiencies in the defrosting process.
These disadvantages should be taken into account in advance, and the following important points should also be taken into account:
- The simplest procedure is defrosting a sewer pipe, in which the defrosted liquid is removed naturally;
- Defrosting water pipes is more difficult because both the ice water and the hot water used for defrosting flow into a well, from which the water must subsequently be removed.
Preventing pipes from freezing
In the case of country houses, wells or boreholes are usually located a short distance from the house. The well is sometimes installed in a basement or subfloor, but even in this case, measures should be taken to prevent pipes from freezing.
Most often, water in pipes freezes not in underground sections of the pipeline, but at the boundary between earth and air, from where crystallization continues through the air sections of the pipe.
Another weak section of the pipeline is the border between the underground and the house, where drafts in any case form along the contour of the pipes, which are almost impossible to get rid of.
For this purpose, special measures should be taken, which can be divided into active and passive. It is advisable to take these measures during the design process.
Passive measures
- The supply pipe must be made of a heat-insulating material such as polypropylene, polyethylene or metal-plastic. The use of metal pipes is not recommended;
- It is advisable to choose a supply pipe with a diameter as large as possible, which allows a larger volume of water to be contained in it, and also provides additional thermal insulation due to the greater thickness of the pipe wall, which together increases the time it takes for the water to cool to freezing temperature. The optimal diameters are in the case of metal-plastic and polypropylene - ¾ (20 mm) or more, in the case of polyethylene - 1½ (40 mm) or more;
Useful: you can choose pipes of larger diameter, but this is quite expensive.
- The trench should be dug to a depth comparable to the average depth at which the soil freezes in a given area, usually the trench depth is from 70 to 150 cm;
- The pipes must have a slope towards the well or borehole;
- It definitely should.
Active measures
- The pipe connections at the exit from the well (well) and at the entrance to the house (basement) should be easily removable, which will allow you to inspect the mouth of the underground sections of the pipe and remove ice plugs;
- The best method of active protection is to lay a heating cable along the entire length of the supply pipe,
secured to the pipe with tape or plastic clamps. In this case, it is not necessary to purchase a fairly expensive two-core self-regulating cable - a cheap domestic single-core cable for heated floors will be quite sufficient. Please note that the maximum turn-on time is 15 minutes. If this is not enough, the procedure is repeated after 10-15 minutes, allowing the cable to cool slightly.
Important: you should not turn on constant cable heating, as this leads to unnecessary energy consumption and can cause overheating of the cable.
- When using submersible pumps, a small hole with a diameter of 1-3 mm can be made in the pipe at a distance of 3-5 cm from the pump, which will ensure a constant flow of water, making it impossible for it to freeze. Unfortunately, this method is not applicable when using a pumping station;
- In case of severe frosts, it is recommended to spill water, that is, turn it on every two hours. In this case, heating the pipe using a heating cable will only need to be done once a day in the morning.
Practice shows that by observing only passive measures to prevent pipes from freezing, their uninterrupted operation can be guaranteed in temperatures down to 20-25°. Compliance with both passive and active measures will ensure reliable operation of the pipes at any temperature, and the question of what to do if the water in the pipe is frozen will simply not arise.
In this article I will continue the topic of what methods can be used to prevent water pipes from freezing.
- The most reliable way to prevent water from freezing is to prevent freezing temperatures in the places where the water supply runs.
How to do it?
The simple answer is to insulate the house and close all the ventilation holes in the house for the winter.
Another option is to simply hide the pipe in the ground as much as possible.
- But it’s not always possible to insulate the house so well and hide the pipe in the ground. What to do then?
- The easiest way is to let the water flow continuously. Look, the water in the rivers never completely freezes, because it is always in motion. This method, of course, is not entirely economical, but believe me, it is probably the most reliable.
- There is another option for installing a water supply system, when the water is constantly in motion. This is an option with constantly circulating water. This method is suitable if you have your own well. To do this, when installing a water supply system, it is necessary to lay not one, but two pipes. (generally speaking, this is a good thing to do anyway). Then the second pipe is used as a return pipe, and the pump, pumping water out of the well, drains the same water into it. In order not to constantly run the pump, it can be turned on using a timer. For example, for 1-2 minutes every 20-30 minutes. During this time, the water in the pipes will not have time to freeze.
- If you have your own water supply and the water is supplied by a submersible pump, then you can use a method to prevent the water from freezing by emptying the pipeline. As they say, if there is nothing to freeze, then it will not freeze. It is enough to make a small hole in the hose (pipe) (2-3 mm) not far from the pump, and immediately after turning it off, all the water from the water supply flows back into the well. A check valve is placed at the other end of the pipe, which allows air to fill the pipe as water drains. And when the pump is turned on, the valve closes and water enters the water supply system.
- You can prevent pipes from freezing by insulating the pipe. Using thermoflex (energyflex). As a last resort, just wrap it in rags. This method of protection does not guarantee 100% protection against water freezing, but it is still better than a “bare” pipe.
- Currently, pipe heating using an electric cable has become very widely used. The cable is wound around the pipe in a spiral or laid along it. If the pipe is plastic, then it is secured with tape foil. Thermal insulation is mounted on top of the cable. The required power is calculated depending on the pipe diameter, outside temperature, and thermal insulation thickness. If the power of the cable is not enough to heat the pipe, then it is wound in a spiral or runs in several threads. The idea is very sound and workable. A branded heating cable will be quite expensive. Its distributed power should be within 10-20 W per linear meter. However, it is also possible to use a homemade heating cable made from ordinary wire. I saw the technology for making a heating cable on the website
When I decided to insulate the water supply system, my first thought was to simply put metal-plastic pipes in a “fur coat” of penofol pipes. But after consulting with heating specialists, I came to the conclusion that the pipes additionally require electrical heating. By the way, at that time I already had experience in installing “warm floors” using an electric cable and a Devi thermostat.
Reliable and inexpensive
After analyzing numerous consumer reviews, I purchased a Russian-made Spyheat heating cable, which, as it turned out, is in no way inferior to the products of the most famous foreign manufacturers, and its fluoroplastic insulation gives a head start to imported analogues at a lower cost. This cable is universal. It can be used in various heating and heating systems, both external and internal: “warm floors”, heating of staircases, paths, gutters and gutters. Moreover, the guaranteed service life of the cable is 17 years.
All that remained was to select the linear power of the heating cable. Considering that the basement (basement part) was not well insulated, I settled on a power of 15 W*m, and this turned out to be the right decision.
The thermostat, set to turn on at a temperature of +4 °C, operates 3-4 times per hour, ensuring heating of the water supply to approximately +10 °C, and again goes into standby mode.
To heat a 14 m long section of water supply, I chose a cable with a heating power of 450 W and a length of 30 m (Rbh = 104.2 Ohm). I have experimentally established that with continuous heating the maximum temperature of the cable is +57 °C.
That is, everything is in order with fire safety here, even if the thermostat fails.
Installing a heating system
The water pipeline laid in the basement of the house from the pump to the distribution points is assembled from Dyl5 metal-plastic pipes (Fig. 1). When choosing the diameter of pipes for the water supply system, I took into account that the efficiency of metal-plastic pipes is 15-20% higher (according to the manufacturer) compared to metal pipes of the same diameter due to smoother internal walls.
I wrapped the water pipes with a cable “in two wires”, fixing it with electrical tape and avoiding touching and crossing the “wires” (photo 1, 2). Moreover, the middle of the cable was secured in the form of a loop at the entrance to the basement.
When winding, I tried to comply with the requirement specified in the instructions as a separate line: the minimum permissible bending radius of the cable is 30 mm.
I paid special attention to the pump, wrapping a cable around not only the receiving and supply metal hoses, but also the metal part of its body.
The leads of the coaxial cable were connected to the terminals of the thermostat: internal, with blue insulation, to the phase, external, with white insulation, to zero.
Thanks to this connection, electromagnetic radiation from the cable is reduced. The temperature sensor was taped with electrical tape to the pipe near the pump, and the leads from the sensor were connected to the corresponding terminals of the thermostat.
The power supply to the thermostat was supplied from a separate circuit breaker (gas station), rated for a current of 10 A (photo 3). The thermostat was located on the ground floor in an accessible place at a height of 1.5 m from the floor.
Final insulation of the water supply system
After checking the electrical connections, all that remained was to put heat-insulating penofol tubes on the sections of the water supply. To do this, tubes of the appropriate diameters were first torn along the existing cuts. And then, putting them on the pipes, I fixed them with electrical tape (photo 4).
For several years now, the water supply heating system has been working perfectly; even in the most severe frosts (in the basement part of the basement the temperature dropped to -7 ° C) the water did not freeze. Isn't this an indicator?!
A steam generator will come in handy
But the water supply outside the house, which runs quite deep under the paved road, once froze for me and my neighbors. The depth of the pipes turned out to be too small when the winter began with frosts without snow. To lay a winter water supply system, it was necessary to strictly follow the rule: the depth of the pipes must be 50 cm greater than the local average depth of soil freezing.
The water supply had to be heated with a homemade steam generator (Fig. 2), whose design resembles a samovar or titanium. It was not difficult to weld such a device from sections of steel pipes.
The heat source for turning water into steam is a blowtorch. And highly heated steam, entering the frozen area through the outlet fitting and a rubber hose (for gas welding), allows you to quickly eliminate the ice plug in pipes made of any material. In our conditions, it is advisable to have such a steam generator on hand.
Why does water freeze in a well in winter: reasons ↑
The only solution to the problem of freezing of the water intake source is thermal insulation of the shaft, cover, underground part of the pipeline and the rooms where the equipment is located. But, before starting work, it is necessary to find out why the water in the well freezes.
In severe frost it is impossible to quickly get rid of the ice shell
Main reasons:
- Shallow depth of the water table. If the water is above the soil freezing level, then there is a high probability that at an air temperature below -5 - -7°C the source will become unusable.
- Lack of insulation of the shaft walls. Concrete and reinforced concrete are heat-conducting materials. In cold weather, such walls quickly cool and the water freezes.
- Open head. A wooden house protects water well from the cold, but if it is not possible to equip a full-fledged house, you can get by with a homemade insulating cover.
Natural wood has excellent thermal protective properties: water in such a well does not freeze
- Incorrect laying of pipes in the ground, shallow trench depth. Even when installing an outlet pipeline below the ground freezing level, insulation must be used.
Water will freeze in a metal pipe without insulation.
- Lack of thermal protection in places where the pipe is inserted into a mine or into a house above the ground, the position of the outlet is too high relative to the water surface.