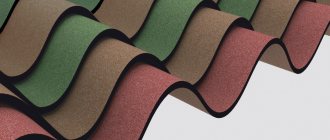
One of the most vital requirements for a roof at all times is fire safety. Of course, straw hats and wooden shingles are long gone, but not all modern roofing materials can boast of good resistance to open flames. Moreover, some of them just need to be heated well so that the wooden sheathing and roofing begin to smolder.
It is precisely for this purpose that a reliable connection of the roof to the chimney pipe of the house is installed - to create the most reliable barrier between the steel that heats up on the coldest winter days and the poorly protected roof. We will show you in detail what this design looks like for different types of coatings.
What is the difficulty of arranging the junction?
Experienced roofers know well that one of the most difficult and critical stages is the connection of the pipe to the roof and its installation.
After all, several risk factors are at work here:
- high temperature of the pipe, which can heat almost any roofing material, especially wooden sheathing, to a critical temperature;
- technological gap between the pipe and the roofing, which must be completely sealed;
- a cap of snow that always accumulates on any obstacle it encounters on its way down.
Therefore, the main requirement for a chimney bypass is to be fireproof, durable and 100% airtight.
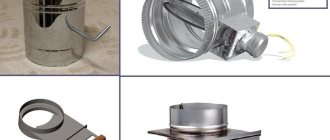
The chimney protective apron itself is made in two ways: from lead or aluminum flexible tape or steel sheet with a special coating.
The main thing is to do everything right:
The issue of the tightness of the junction of the roof to the chimney is usually solved with the help of an internal apron made of junction strips, and we will try to analyze this issue in detail with you.
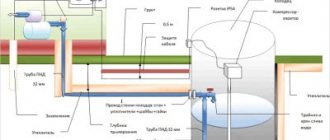
How to organize a chimney on the roof - general diagram
When installing a pipe, we must not forget that it is a potential cause of fire. Therefore, for its manufacture, a three-layer system is selected, which provides high-quality insulation. That is, there must be a layer of insulation between the outer and inner pipes.
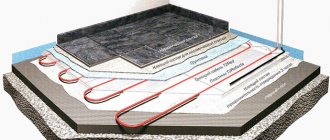
The construction of a modern roof involves the use of a variety of materials, because it consists not only of roofing material. We need lumber for the construction of the supporting structure, rafters and sheathing, insulation to provide thermal insulation, as well as hydro- and vapor barrier films, which are the obligatory layers of the roofing “pie”.
Among the listed materials there are some that are quite susceptible to fire. That is why proper organization of the chimney is the key to the protection and fire safety of the house.
Advice Considering the importance of ensuring the safety of living in the house, it is recommended to buy components and materials for organizing a chimney in special stores where you can check the available quality certificates.
Traditional galvanized steel: durable "tie"
To ensure a tight connection of the roof to the chimneys, make an internal apron from the strips:
- Step 1. Place the bar itself against the walls of the pipe and mark the level of the top edge on the wall.
- Step 2. Then carefully remove the dust after the groove and rinse the groove with water.
- Step 3: To install the inner flashing, start at the bottom of the pipe. Here the abutment strip needs to be trimmed.
- Step 4. Install the apron in other places in exactly the same way and do not forget about the 150 mm overlap to protect against leaks.
- Step 5. Next, the edge of the strip, which is inserted into the groove, needs to be sealed using a special roofing tape.
- Step 6. Now place a tie (a flat sheet with flanges) under the bottom element of the inner apron.
- Step 7. Point the tie into the valley or down, right up to the cornice.
- Step 8. Now you can proceed to the installation of the roofing.
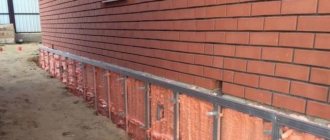
The main requirement here is to maintain sufficient distance for ventilation of the space under the roof. At the same time, so that during rain the wet brick does not crack due to overheating, it is wrapped in a steel sheet with a polymer coating. The gap for ventilation is left 20 mm.
Here is the most popular option for bypassing the pipe:
- Step 1. We extend the waterproofing 50 mm directly onto the pipe, if the membrane or film itself is heat-resistant. Glue the cut of waterproofing to the pipe with adhesive tape.
- Step 2. Create a protective line around the pipe using protective strips.
- Step 3. Make a groove in the pipe itself (but under no circumstances into the masonry seams). The depth of the groove should have a slight slope and be at least 15 mm.
- Step 4. If there is a valley on the roof, it is better to divert the water there using a “tie”; if not, then to the eaves.
Bypassing the chimney on a metal tile roof should only begin after laying the metal tiles.
To do this, external junction strips are placed on the pipe, part of which goes into the groove and is sealed with a special heat-resistant roofing sealant. And the lower part of the strip must be secured with roofing screws directly to the sheathing.
If we are talking about a roof with composite tiles, the technology for it is slightly different:
- Step 1. We will need a flat sheet of sprinkles, which will consist of 4 parts: front, back and two sides. Such a sheet is always made individually, according to the dimensions of the chimney.
- Step 2. The sheet needs to be folded upward by 5 cm.
- Step 3. Now take a block 5 cm high to support the back and front of the sheet in front of the chimney.
- Step 4: Install the front flashing piece to the closest row of shingles ahead of the chimney.
- Step 5. Attach the side abutments to the front and back single pieces and secure them into the metal lock by folding them.
Waterproofing self-adhesive tapes: a flexible approach
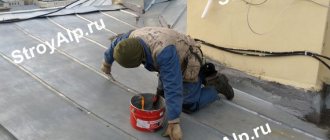
One of the most popular and proven methods for arranging the connection between the roof and the chimney pipe is the use of special waterproofing tape.
For example, it is difficult to come up with something better for a roof made of piece materials, for which a galvanized steel apron is not suitable. It is easy to work with such tapes, the main thing is to adhere to the temperature regime – from +5 to +40°C.
In this article we will look at the highest quality and most popular tapes. In general, there are many options, because each manufacturer of roofing material tries to produce its own roofing element, which will be most suitable for a specific brand.
For example, if you need to go around a round chimney, an Ecobit type tape will help you. It is good because it has a self-expanding base and can be sealed without problems.
Its lower part must be placed under the tiles, and the upper part must be placed on the roofing. Next, press both layers and glue them to the walls of the chimney and to the tiles. Next, cover the edges of the top tape with metal profiles.
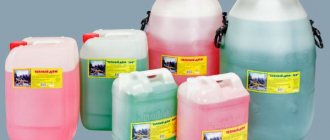
This is what these waterproofing tapes look like:
In total, today tapes are produced on two bases. Thus, butyl rubber has the highest waterproofing qualities, and aluminum allows you to hermetically fit even the most complex shapes.
Easy-Form: the strength of aluminum
Easy-Form is an aluminum tape with a butyl layer on the surface. The elongation of such a tape is 70%, and at the same time there is a rigid lining made of polyester material.
It is self-adhesive and is great for waterproofing a chimney. Does not rot, is resistant to frost and temperature changes, does not lose its properties within the temperature range from -20° to +80°C.
This tape completely replaces the use of lead sheets, and is cheaper and much easier to install. It comes with a 10-year warranty. And the work is quite simple, although the instructions look voluminous:
- Step 1. Even at the stage of construction of the sheathing, include additional elements made of timber with a section of 40x40 or 50x30 mm. Secure them along the chimney walls.
- Step 2. Cover the front of the pipe with a covering apron. Usually this is recommended by the manufacturer himself, from a specific material for each type of roof.
- Step 3. Install the apron in its place - along the lower edge of the pipe.
- Step 4. Make markings on the apron and make cuts along it. Make sure that the top of the apron is exactly the width of the pipe, and that the wavy part has one wave on each side.
- Step 5. Make markings with a pencil and cut off excess material along the lower crest of the wave with a sharp knife.
- Step 6. Press the finished apron onto the pipe and fix it to the surface with proprietary roofing nails, directly into the sheathing beam. Drive nails into the top of each wave, strictly vertically, except for the waves that extend on the sides beyond the dimensions of the pipe.
- Step 7. Now attach the cut piece to the installation site and give it the shape of a corner relief.
- Step 8. From the back of the tape, remove the protective film that covers the adhesive layer. Apply the tape to the pipe so that it covers the top and bottom of the apron by 70-80 mm. To ensure that the tape fits tightly to the roof, trim its corner.
- Step 9. Press the tape onto the entire surface with a little force. Do this on one bottom corner of the pipe, and then on the second.
- Step 10. Attach the side apron to the pipe, press it and mark the cut line. You will need to cut along the vertical boundaries of the pipe with a sharp knife. Do not press the knife itself too hard, so that it enters the apron only 2/3 of the thickness of the material. Then bend it and carefully break it off.
- Step 11. Nail the prepared side parts of the apron to the roof, three nails in each part: one in the center and one more at the bottom and top.
- Step 12. Cut a piece from the self-adhesive tape that will be 200 mm longer than the width of the pipe. This length is suitable for sealing the back of the chimney pipe.
- Step 13. Now glue the tape to the front side of the pipe. Now the length of the tape should exceed the width of the pipe by 200-300 mm. The tape itself will bend over the sides of the pipe and go under the side parts of the apron.
- Step 14. Press the top edge of the tape with the metal fixing bar and secure it to the dowels. Bend the edges of the apron away from the surface of the pipe.
- Step 15: Seal the corner between the pipe wall and the folded edge with a layer of polyurethane sealant.
- Step 16. Lay an additional piece of ondulin on the back side, from the ridge to the pipe.
Here's what it all looks like in practice. Part 1:
Part 2:
In the case of a metal roof, the whole process is as follows:
Wakaflex and Grind Line: modern waterproofing
Vakaflex is a reinforced polyisobutylene mastic, which is supplied in the form of a roll 5 meters long and 28 cm wide. On its reverse side there are strips of synthetic rubber, which are glued to the base using a stitching roller.
Let's look at the Wakaflex tape installation technology step by step:
- Step 1. Trim the waterproofing film so that there is an overlap of at least 10 cm on the pipe.
- Step 2: Make a drainage groove using waterproofing material directly above the pipe opening.
- Step 3. Trim the tiles around the pipe and lay them with a gap of 2-3 cm.
- Step 4. Now cut the Wakaflex to a length that is equal to the width of the pipe + 5 cm for each side of the pipe.
- Step 5. Bend the strip using a corner so that the resulting corner width is 15-16 cm.
- Step 6. Next, apply the wide part of the strip to the pipe, remove the protective film and press the Wakaflex to the base.
- Step 7. Stretch the tape over the surface with your hands and roll it using a roller.
- Step 8. Cut the upper part of the Wakaflex at an angle of 45°, but do not cut 1 cm to the line of the pipe and the slope. Glue with a roller.
If you did everything correctly, the side roll should start from the bottom of the glued strip and end 15 cm above the top of the pipe.
The following instructions are:
- Step 1. Remove the protective film and glue the top of the Wakaflex onto the pipe.
- Step 2. Step back 2-3 cm from the level of the pipe and cut the tape parallel to the pipe, but do not bring the cutting line to this same 2 cm point.
- Step 3: Now cut the side of the tape so that it is parallel to the water drain from the roof.
- Step 4. Using scissors, round the corners of the Wakaflex strips so that the junction has a beautiful appearance and is not torn off by the wind.
- Step 5. Next, glue the lower part of the roll to the tile and roll it with a roller.
- Step 6. Cut the top part of the roll and do not bring the cutting line to 1 cm. Glue the cut parts onto the pipe and tiles, then roll them.
- Step 7. Glue the left and right corners of the pipe with the remnants of the strip. This will protect them from sliding ice and snow. As a result, the overlap on the side of the chimney pipe should be about 2 cm.
The tape should be placed under the shingles above the row of shingles. At the same time, to protect the roof from melt water, make the top roll of tape double. To do this, cut two strips, remove the protective film and stick to the bottom strip with a 5 cm overlap and roll with a roller.
But it also happens that the tiles are not located in the best way, and the width of the double strip will not be enough. In this case, it will not be possible to install the upper waterproofing of the pipe under the roof. Then a flooring of boards is installed behind the pipe. By the way, a good alternative to Wakaflex is the tape from Grind Line:
Here's how to work with it:
- Step 1. Place the double roll with a slight slope into the groove and glue the tape to the pipe.
- Step 2: Remove the protective film and press the wood decking tape against the waves of the shingles.
- Step 3. Roll with a roller all places except the lower section - the one that is adjacent to the pipe and is not yet covered with tiles.
- Step 4. Now make a cut parallel to the pipe line to the bottom, and retreat 2-3 cm. Do not bring the cutting line to the slope line of 1 cm.
- Step 5. Cut off the excess part of the roll with scissors, round the corners.
- Step 6. To avoid leaks due to a large snow bag above the pipe, bend the top edge of the Wakaflex to a width of 2-3 cm.
- Step 7. Now lay the shingles so that they partially cover the tape above the pipe.
As soon as the junction assembly is ready, you can proceed to the installation of the ridge elements.
Vaka strips: reliable connection
So, to protect the abutment seams:
- Step 1. Install the strips and fill the top flange with sealant. In traditional units, a brick overlap is usually used, but here the plank performs exactly this function.
- Step 2. Cut the bottom strip to the required length - so that the length of the strip is the width of the pipe and 5 cm on the sides.
- Step 3. Cut the top of the strip and bend it along the line of the pipe itself.
- Step 4. Now cut the bottom part of the pipe and bend it along the line that will be 1 cm further from the corner of the pipe.
- Step 5. Cut the strips to 1 cm and bend the top flange with a hammer to the pipe.
- Step 6. On the bottom, cut a corner parallel to the slope line.
- Step 7. On the top part, drill holes in increments of up to 20 cm, for dowels 6 mm. The holes for them need to be drilled 6x40 mm.
- Step 8. Attach the strip directly to the chimney with heat-resistant dowels.
The finished chimney bypass should look like this from all sides:
Next, attach the side bar so that it is parallel to the line of the slope, and follow these instructions:
- Step 1. Mark the outline of the bottom strip on the inside surface of the plank.
- Step 2. Cut the top of the strip along the line of the pipe, and the bottom of the strip along a line that is 1 cm away from the corner of the chimney.
- Step 3. Cut the side strip along the contour of the bottom strip that is already attached.
- Step 4. Secure the plank with screws in increments of up to 20 cm, and do the same with the second plank.
- Step 5. Now cut the top strip to the width of the pipe with a 2cm overhang on both sides.
- Step 6. On the inside of the top plank, mark the contours of the already installed side strips.
- Step 7. Cut the top strip and bend it along the line of the pipe. Make the necessary cuts, drill holes in the pipe for dowels, 6x40 mm. Secure the bar.
Finally, apply sealant to the flange around the entire pipe. For convenience, take a construction syringe, and to make the seam neat, stretch it with cardboard.
Where should the pipe be placed on the roof?
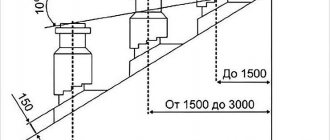
According to professionals, the place where the pipe goes to the roof should be located as high as possible. The ideal solution is the ridge, since it is the highest point on the roof. Here the traction will be maximum, and installation of waterproofing will be easier.
The next point is also important - the farther the chimney is from the ridge, the higher it needs to be made. This circumstance does not decorate the roof and at the same time complicates the design.
Chimneys can have very intricate shapes. An example is the roof of the Chateau de Chambord, located on the Loire. It is a real masterpiece, as it has a large number of incredibly beautiful chimneys.
The shape of the pipes affects the aerodynamic characteristics. The caps installed on their heads slightly reduce the traction force. Any protrusions on the lining of the pipes, located in their upper part, prevent the creation of a normal level of ventilation.
Often there is a need to install a single ventilation pipe above the roof. For example, ventilation coming from the sewer riser should be placed separately. This is necessary to prevent overlap with air flows from residential premises as a result of reverse draft.
In this case, the best solution would be to use plastic or metal ventilation outlets instead of brickwork, which are equipped with many types of new roofing systems.
- look aesthetically pleasing;
- are characterized by tightness and reliability,
- adjustable in height;
- Well protected from precipitation.