SNiP requirements
Any construction work, including the installation of heating radiators, is carried out in accordance with certain rules and regulations. The technical data sheet of each heating device contains detailed information regarding the type of battery mount. However, it would be a good idea to familiarize yourself with the requirements specified in SNiP 3.05.01-85.
Here are the main standards:
- The location of the heating device is considered optimal if its central point is as close as possible or completely coincides with the central vertical axis of the window. Deviation in one direction or another is allowed no more than 20 mm.
- The width of the heating device should be about 50-75% of the window size. This norm is not strictly mandatory and is rather advisory in nature. The fact is that the reliability of fastening for heating radiator batteries does not depend on their size - it will only affect the amount of heat transfer.
- The distance from the radiator to the floor covering must be at least 60 mm - this is a fire safety requirement.
- There must be a gap of at least 25 mm between the heating radiator and the wall, and even better - 30-50 mm.
- There must also be a gap between the window sill and the battery - at least 50 mm.
- It is important to choose the right number of support points, that is, wall mounts for heating radiators. For a radiator with 6-8 sections you will need two upper and one lower holder. For every subsequent 5-7 sections, you will need to add one more holder at the top and bottom.
- In the same way, the number of floor racks for radiators is selected. A battery of 6-8 teeth is installed on two support points, and with the addition of each subsequent 5-7 sections, another mount is installed.
- The number of heating radiator cells should not be too large. If the system operates in conditions with natural circulation of water, for example in a private house, no more than 12 teeth in a row can be installed there. If we are talking about multi-storey buildings in which the coolant circulates under constant pressure, it is permissible to install a radiator with a total number of sections of up to 24 pieces.
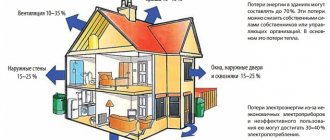
Please note that to reduce heat loss as a result of pointless heating of the external wall, it is recommended to place heat-insulating foil material behind the radiator. It will redirect heat waves indoors.
Rules for floor mounting of the battery
Radiators are rarely installed using floor mounting, and if installed, it is for the following reasons:
- There is not enough space on the wall. For example, a window that is too large does not leave space for a radiator.
- Special requests and aesthetic considerations. Some designer batteries have a special design that requires only floor mounting, or the stylistic design of the room requires mounting the radiator on legs or on a pedestal.
This installation method has the following advantages:
- 100% reliability;
- high installation speed;
- simplicity;
- can be used with all types of batteries (including cast iron).
You need to make marks on the floor, depending on how the future structure will be placed. Using fasteners, each holder is firmly fixed to the floor. If the battery weighs little, then the kit should include small legs, and not large and heavy brackets. They are attached the same way.
The last step remains - attach the radiator to the already installed elements and connect it to the pipes.
Each threaded connection should be tightened sufficiently, but applying too much force is dangerous. It is recommended to use a torque wrench; the corresponding indicator should be indicated in the radiator installation instructions.
Replacing a heating device is not only about saving money. This process requires maximum care and attention. If you do not have confidence in your own abilities, it is better to turn to professionals.
Did you manage to solve your problem using the recommendations from the article?
Yes!
58.33%
No. More answers required. I'll ask in the comments now.
25%
Partially. There are still questions. I'll write in the comments now.
16.67%
Voted: 24
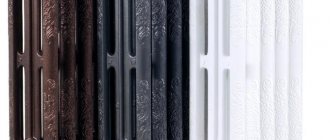
Fasteners for cast iron batteries
The currently quite popular cast iron radiators are heavy, so the stand for the cast iron radiator must be reliable enough to withstand such a load. As a rule, for cast iron radiators, metal pins are used, bent to the shape of the section.
The installation technology in this case is quite simple. First, a hole of the required diameter is drilled in the brick, then a dowel is inserted into it and the fastening pin is screwed in. If you need to fix the bracket in a reinforced concrete wall, the technology will be slightly different.
Since it is quite difficult to make a hole of great depth in a reinforced concrete slab, the fastening pin is fixed on a small metal plate. It is attached to the slab at four points, but at a shallower depth. The reliability of such fastening in both options is approximately the same.
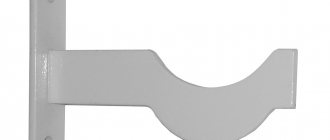
A stand for a cast iron radiator is sometimes a mounting plate with two support points. Such a fastening element is fixed to the wall in such a way that the upper and lower brackets bear approximately the same weight of the radiator. On sale you can find planks with brackets fixed at a certain distance, as well as with adjustable elements.
Quite often, floor mounting racks are used for cast iron batteries. Just like vertical slats, racks are monolithic and adjustable.
Please note that there are two ways to secure the battery to the stand. The standard option is fastening with a metal bracket. Some models use a flexible chain of several links for fastening.
It is worth noting that the markings on the mounts for cast iron radiators indicate that they are reinforced. This information must be taken into account when selecting mounting brackets.
Fastenings for steel radiators
Steel batteries are available in several configurations - they can be tubular or panel. In this regard, the holder for the heating radiator must be selected individually, based on the type of fixation.
For mounting panel heating radiators on the wall, special brackets are produced that look like metal corners. One wing of the wall bracket for a heating radiator is fixed to the wall using anchors, and the other is equipped with special hooks for hanging the battery. The panel-type radiator itself has brackets with which it is attached to hooks.
Some models of steel panel radiators do not contain mounting brackets, so they are mounted on vertical strips with clamps. Since such batteries are light in weight, this type of mounting is quite acceptable.
Tubular steel radiators are attached a little differently. Due to the low weight of the structure, only 2 upper supports are sufficient to fix it. Plastic clips are installed at the bottom of the radiator, which rest against the wall to hold the battery in a vertical position.
Functions and types of mounts for radiators
Fastening systems are designed for rigid fixation of radiators, thereby preventing damage to heating lines.
Reliable fastening maintains the functionality of heating circuits and fittings throughout the entire period of operation .
Batteries that are mounted in a vertical position will have maximum efficiency and will create a dense thermal curtain that separates the room from cold air flows from the window.
Cast iron appliances have a large mass and exert a load of 10-20 kilograms per fastener and point on the wall , so it is important to select products taking into account the intended method of installing radiators. Combined fastening systems will be an excellent option for private houses and apartment buildings.
Cast iron brackets
Solid cast iron fasteners are strong, durable and able to support very heavy weights . Brackets made of this material are in demand when installing cast iron equipment and heavy building heating systems.
Important! In addition to the fact that cast iron pins must be of high quality, they must be installed correctly on the wall to ensure reliable operation of the heating circuits.
Steel fasteners on strip and with pin reinforcement
Fasteners on a steel strip are quite easy to install and provide reliable support for radiators throughout the entire period of operation.
The strip can be attached to concrete and wooden walls . To install batteries consisting of less than 10 sections steel fastening strips will be sufficient
Steel fasteners with pin reinforcement are mounted into the wall using special dowels , which provide increased wear resistance and resistance to shape changes and sagging. Durable steel parts are perfect for mounting both lightweight batteries and cast iron radiators.
Adjustable steel mounts
These mounting systems are very easy to use and allow you to change the position of the radiator without removing it.
Important! When purchasing steel adjustable fasteners, you should consider the thickness of the metal and the expected load on them.
Fixing bimetallic and aluminum batteries
If we talk about the mass of bimetallic and aluminum radiators, then in terms of this parameter they are almost identical. Therefore, a bracket for a bimetallic radiator can be successfully used to mount an aluminum battery.
A fastening element of this type is practically no different from a stand for a heating radiator made of cast iron. The only difference is the lower load-bearing capacity. As a rule, such clamps are universal corners, one side of which is fixed to the wall, and the other contains recesses on both sides. This configuration allows such fasteners to be mounted in any direction.
It is noteworthy that bimetallic and aluminum batteries do not initially provide for the possibility of floor mounting. However, attaching radiators to surfaces such as glass, plasterboard or sandwich panels is not possible. In this case, a floor bracket for aluminum radiators is used, similar to racks for cast iron batteries.
How to install cast iron batteries yourself
Heating radiators made of cast iron were most often used in the last century; it is difficult to imagine at least a single Soviet-era room without them. Important advantages of installing cast iron heating radiators are the property of this material to resist corrosive processes, low hydraulic resistance, and high heat transfer from batteries, which makes them the most reliable, simple source of heating. If cast iron heating radiators are installed correctly, they can be used for 50 years.
Work technology
Owners of private houses can replace radiators at any time convenient for them. To do this, just turn off the boiler and drain the water from the heating circuit. But in an apartment in a multi-storey building, the replacement of the radiator will have to be previously agreed upon with the servicing utility organization.
If all installation work is carried out in the summer, when the heating is turned off, there will be fewer difficulties. However, you will still have to clarify whether water was drained from the system or not.
Please note that many experienced mechanics advise replacing radiators while the central heating is running. This is done because when the coolant is supplied to the circuit under pressure, you can immediately check the functionality of the radiator - if the installation was carried out incorrectly, leaks will occur.
The efficiency of their operation will depend on how well the radiators are mounted to the floor or to the wall. The fasteners must be installed absolutely level, since if they are skewed, problems may arise when connecting the system.
Using available means - a pencil, a level, a plumb line and a tape measure - perform the initial markings. Mark the central axis of the window, which should coincide with the middle of the radiator. A horizontal line is drawn through this point along which the upper supports will be attached.
In cases where there is only one lower support element, it is mounted on the central axis. If there are several of them, another horizontal line is drawn parallel to the top line. After marking, begin drilling holes and installing brackets.
Problems of insufficient fastening of batteries to the wall
Correct and reliable fastening of heating devices to the wall is a guarantee of peace and well-being of apartment residents. Insufficient fixation of batteries, especially in combination with the following factors, can lead to deformation of the product or depressurization of seams, which will cause leaks. That is why it is very important to install them correctly and reliably.
So, the factors that aggravate the improper fastening of batteries:
- mechanical damage to devices during their operational life;
- distortions of heating radiators when filling them with water.
(votes: 6 , average rating: 3.50 out of 5)
Results
Each type of heating radiator requires the use of special fasteners. In some cases, they come complete with a battery. However, they are often difficult to install and are not of high quality. Therefore, it is recommended to make sure that the fastenings are reliable and, if necessary, now purchase modern and high-quality products separately, even if they are more expensive.
The procedure for installing radiators does not depend on their type: the rules remain the same, only the fasteners change. If installation under a window is intended, the following distances must be observed: from the floor should be at least 80-120 mm, to the window sill at least 60-100 mm, to the wall - 30-50 mm. It is also necessary to decide on the quantity and location of fasteners.
The number of brackets (hooks) per battery depends on its length. If there are few sections - up to 8-10 pieces - then two holders are required at the top, and at least one more at the bottom. If there are more than 10 sections, install three supports on top and two below. For each next five to seven sections of cast iron radiators and ten tubular and aluminum ones, the number of fasteners increases: one holder is added at the top and one at the bottom.
Methods of using various types of fasteners for sectional radiators
General information
Not only their aesthetics, but also the degree of heat transfer depends on the quality of installation of batteries. Therefore, the installation must be carried out taking into account the requirements of SNiP:
| Options | Values |
| Distance from floor | Within 10-15 cm |
| Distance from wall | Within 2-5 cm |
| Distance to window sill | From 10 cm. |
Of course, the batteries must be fastened firmly and securely, since the durability of the device and the heat pipe depends on this.
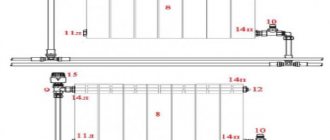
Marking for battery installation
Marking the installation locations of the brackets
Since it is better to place the radiator strictly in the middle of the window opening, find the middle on the wall and draw a vertical line. After which there are two options: with the lower wiring, draw a horizontal line that will mark the upper edge of the installed radiator. When replacing a radiator with a side connection, the location of the supply pipes is important. Therefore, in this case, we draw a horizontal line that comes from the upper (usually supply) pipe.
Measure the distances between the fasteners on the battery, and set them aside relative to the marked lines. Sometimes you have to attach fasteners and measure it this way: it depends on the type of heating device and on the type of brackets or holders used.
How to install a radiator correctly, read the article “Installing batteries with your own hands: rules and technology”
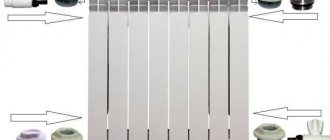
To securely fasten the radiator, it is important to choose the right fasteners. There are a large number of brackets designed for different types of radiators.
Fasteners for cast iron batteries
Since these are the heaviest heating devices, the holders for them are the most massive: they must hold considerable weight for years. These can be individual or curved pins attached to a bar. In any case, when making mounts for cast iron batteries, thicker metal is used. In price lists it usually comes with the addition of “reinforced”. Can be painted (standard color is white) or not. Some manufacturers paint it in the desired color upon request (when ordering a radiator, specify the type of fastener and its color).
The mount for a cast iron battery is made reinforced: made of thicker metal
When purchasing, you will need to take into account the dimensions: fastenings for sections of different depths are made specially, since it is necessary to ensure a distance to the wall of at least 3-5 cm.
In addition to brackets for cast iron radiators, they also produce hooks. They are sold in pairs with dowels. Installation is standard: a hole is drilled, a dowel is inserted into it, and a hook is screwed into the dowel (there is a thread on one side).
There are mounting strips for cast iron radiators that make installation easier
In addition to wall mounting, there are legs for floor installation. They come with adjustable height or not. The upper arcs that fix the section to the stop are also different: there is an arc made of steel wire, and there is a chain of movably connected links. In both cases, the batteries are fixed to the support using these arcs and bolts.
Installing Mounting Brackets
Battery mounting brackets should be selected with the greatest strength and reliability. First, you need to prepare a template from a suitable material, such as plywood, on which the dimensions of the radiator and the installation location of the mounting brackets will be marked. After applying the template to the wall on which the heating device will be installed, recesses of approximately 12 cm should be drilled at the marked locations, after which cement mortar is applied to them and brackets are installed. When the cement mortar has hardened, you can hang the product on the brackets.
Algorithm for installing a cast iron battery
The cement mortar is prepared in proportions of 1 to 2, and before applying it, the drilled holes should be moistened with water.
Methods of fastening aluminum and bimetallic radiators
Products that are very similar in shape are used. Only they are made from thinner metal. In general, brackets for sectional radiators of any type are very similar. There are universal corner brackets for aluminum and bimetallic radiators. They have a recess at the top and bottom for the collector, so they can be mounted on both the right and left.
Special corner brackets for lightweight sectional radiators
There are no floor-standing aluminum or bimetallic radiators. But there are racks that allow you to install any of them on the floor. In this case, the rack is first fixed to the floor, and then the heating device is installed and secured on it.
Floor mounting of aluminum radiators helps if the walls cannot withstand even such a small weight (if they are made of plasterboard or aerated concrete, or other similar materials).
Any sectional radiator can be mounted on such racks
You won’t be able to hang anything on the now fashionable glass wall. But then you need to pay attention to what the entire structure looks like from the reverse side. In this case, for heating it is more advisable to use convectors built into the floor, floor-standing models of tubular radiators (at the same time they can serve as a fence), and cast-iron retro radiators.
Installation of heating radiator, battery
When installing a heating system or improving it, it may be necessary to do the wall mounting of bimetallic heating radiators yourself. It is quite possible to cope with this task on your own if you know how to use an electric drill and a measuring tape. However, it should still be taken into account that this task is very responsible; it has many subtleties and nuances that must be adhered to. Otherwise, improper fastening to the wall may cause an accident.
If you are planning to install a radiator yourself, keep the following in mind:
- carrying out the work will require shutting down the system and freeing it from the coolant;
- During installation, it is necessary to ensure that all connections are properly sealed. Otherwise, coolant leakage cannot be avoided;
- It will take a lot of time even for an experienced craftsman to complete all operations. If you have no experience, it will take even more time.
Carrying out preparatory work and calculations
Before proceeding with installation, the following preparatory operations must be performed:
- deciding on the size of the device is easy to calculate if you know that a power of 1000 W is enough to heat 10 m2;
- find out what material the device is made of - the fastening material must be exactly the same;
- determining what material the wall is made of is important because you need to know whether it will support the weight of the radiator. If the wall may not be able to cope with the load, it is necessary to use additional floor fixation of the battery.
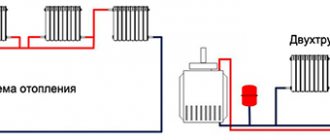
After this, we need to determine what type of heating system we are dealing with - single-pipe or double-pipe.
- The essence of a one-pipe system is that water is supplied from the upper floors to the lower ones through one pipe. The disadvantage of this type is that the water reaches the lower floors when it has cooled down significantly. In addition, such a system does not make it possible to regulate the heating temperature without additional improvements;
- In a two-pipe system, hot water is supplied through a pipe to which appliances are connected in parallel. The cooled coolant is removed through the second pipe. In such a system, you can easily regulate the heating temperature.
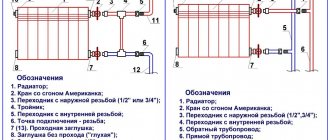
- Next, we need to determine what type of connection to the heating system we are dealing with. The following connection options are available:
- One-sided lateral connection - its essence is that the coolant enters from the side into the upper pipe, and exits from the same side from the lower pipe;
- Diagonal connection - with this type, the inlet pipe is connected to the upper hole on one side, and the outlet pipe to the lower hole on the other side. This method provides the most uniform heating of the radiator;
- Bottom connection – the device is connected through the bottom pipes. This method is used if the heating pipes are hidden in the floor. Heat loss can be up to 10%.
Before installing batteries, it is necessary to flush the system. You should know that under no circumstances should this be done using alkaline solutions - only specially designed liquids should be used.
Selecting brackets for mounting a heating radiator to the wall
When choosing fasteners, you should take into account, as mentioned above, that its material should be the same as the battery material. The bracket for a cast iron product must be able to withstand its large mass and make it possible to adjust the distance from it to the wall. If we are attaching to a wall made of plasterboard or wood, we need to be on the safe side, since the wall may not be able to withstand such a load. In this case, additional floor fixation of the device is carried out.
To attach a bimetallic or aluminum radiator to the wall, we select brackets of a fixed length. The mass of the bimetallic device is also very large and it will also require additional floor fixation. Aluminum products are quite light and floor mounting is not required here - you can only get by with wall mounting.
Principles for placing a heating radiator on the wall under the window
It is customary to mount the batteries under the window - this helps to create a thermal curtain that prevents the penetration of cold air masses from the window. There are certain principles that must be followed:
- The distance from the device to the window must be at least 10 cm;
- The distance from the floor to the battery must be at least 6 cm;
- The total width of the device should be within 50-75% of the width of the window opening;
- It is necessary to ensure a slight horizontal tilt of the device in order to avoid the accumulation of air bubbles in the upper sections of the sections.
Subject to these rules, heating will be as efficient as possible. If you ignore them, the heat exchange in the room will be incorrect, which will cause ineffective heating.
Heating radiator installation
After carrying out all the necessary preparatory operations and calculations, we can begin attaching the device to the wall. The step-by-step process is as follows:
- If we are replacing old devices, we should make sure that the dimensions at the centers of the plugs remain the same - this will avoid additional operations on connecting to the riser;
- We bring the battery to the supply pipes, combine it with them and place the attachment points on the wall where the brackets will be located. The number of points depends on the battery size. If it has no more than 6 sections, we can get by with two points on top and one on the bottom. If we are dealing with a larger device, the number of points must be increased;
- After marking, we drill holes for the dowels and fasten each bracket to the wall;
- We check the strength of each fastening, creating a load on it equal to the mass of the battery;
- We install the device;
- Using a torque wrench, we connect to the main line. All connections must be tight and must be tightened with a strictly defined force. If it is exceeded or underestimated, the tightness of the connection will be compromised, which may cause coolant leaks. Bimetallic and aluminum radiators must be equipped with shut-off valves and Mayevsky taps in order to bleed excess air from the system if it becomes airy.
After installing the radiator, the system should be turned on smoothly so as not to provoke a water hammer. Having released the coolant through the main, we carefully inspect all areas for leaks.
Installing heating radiators on the wall is a labor-intensive and responsible process. Improper or careless performance of work can lead to a serious accident. However, this work can be done with your own hands, provided you scrupulously follow all the rules and take into account all the subtleties and nuances. A careful, hardworking and savvy owner can cope with this task on his own - this will not only help save a significant amount of money, but will also make it possible to be sure that everything was done correctly and there is no reason to worry about the possibility of an accident.
Fasteners for steel heating devices
There are two different types in this group: tubular and panel radiators. They have different designs and, accordingly, different fastenings.
In panel radiators, brackets are welded on the rear wall, with the help of which they are hung on brackets. The shape of this type of fastener is different: it is designed specifically for staples.
In panel radiators, brackets are welded on the rear wall
When installing panel radiators, it is necessary to strictly monitor the vertical position of the brackets. High precision is required: four or six staples must fit exactly onto the hooks. It is also important that the wall is perfectly flat and smooth. In general, using conventional brackets, panel radiators are quite difficult to hang. It is easier to work with other types of holders.
Standard bracket for panel radiator
Since the mass of the heating device is small, it is quite enough to fix it on the upper brackets and install stops at the bottom that will give it direction in the horizontal plane. They are not attached to the wall, but are hooked onto a bracket and simply rest against the wall. For reliability, the part that faces the wall is expanded.
This is what a set of brackets for tubular steel batteries looks like: the upper collector is hung on the hooks, and plastic stops are placed below
There are also special mounting strips for easy installation. They are a strip of metal with plastic clips at the top and bottom. When using this fastener, there is no need for brackets on the rear panel. The slats are fixed to the wall, a radiator is inserted into them, which is held in place by plastic hooks.
Rail for quick installation of panel batteries
Fasteners for tubular radiators are similar to sectional ones: the same hooks, only of a different size, often equipped with plastic covers.
There is also a special fastener with SMB tube grips. This is a strip of steel with plastic clips and a shelf at the bottom that serves as a support for the radiator. This mounting plate can be used if the weight of the device filled with water does not exceed 100 kg. Installation is simple: place the battery on the shelf, bring the top edge closer to the latches. They grab the nearest tube and a click is heard. The radiator is installed, the supply pipes can be connected.
Bar for quick installation of a tubular radiator with shelf and clamps
There is a second option for quick installation: SVD fasteners. It consists of two parts. One is attached to the radiator, the second to the wall. Then they are connected to each other and secured with a steel loop.
Another type of holder for tubular models: two parts, one is attached to the wall, the second is attached to the pipe. They are held together with a wire fastener.
Floor mounting for tubular radiators can be of several types: tubular supports that are welded at the factory, or stands with hooks. Radiators are hung on such racks, and the racks themselves are attached to the floor.
Results
Brackets for radiators are of different types and types: for wall and floor installation. The standard ones that come with the kit are reliable, but they are more difficult to work with. Planks and devices for quick installation save time, but cost a lot.
The heating appliance market is striking in its diversity. But the familiar cast iron radiators are still popular due to their many advantages. They are durable, corrosion resistant, easy to use and very durable. But even the most reliable device may one day require replacement. You can solve the question of how to hang a heating radiator on brackets yourself. The main thing is to have experience, the necessary materials and take into account some installation nuances.
Modern cast iron radiators are an example of style
Attaching heating radiators to the wall - step-by-step instructions
During the construction and preparation for operation of any building intended for people to live and work in it, attaching heating radiators to the wall becomes one of the most important stages. To do the job correctly, the master must not only know how to mount a heating radiator, but also understand the types of batteries, mounting options, types of fasteners, pipeline connecting elements and other intricacies of this procedure.
What are heating radiators?
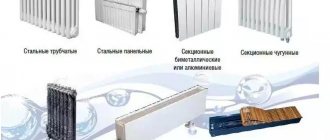
The main indicator of the quality of radiators is their heat transfer rate. It depends entirely on the material from which the heating device is made. The most popular are:
- Cast iron batteries. Advantages: huge service life due to the very thick walls of the product, high resistance to corrosion, heat transfer for some time even after the heating is turned off. Disadvantages: heavy weight and associated installation difficulties, unaesthetic appearance;
- Aluminum batteries. Advantages: the highest heat transfer coefficient, low weight, very quick installation, high permissible pressure - up to 20 bar, the ability to combine an unlimited number of sections, elegant appearance. Disadvantages: low anti-corrosion performance and rapid deterioration of aluminum in places of contact with other metals;
- Steel batteries. Advantages: relatively light weight, heat transfer begins after switching on in a very short time. Disadvantages: weak resistance to pneumatic and hydraulic shocks, low heating temperature, rapid cooling, maximum pressure - 10 bar, low service life;
- Bimetallic radiators. The most versatile variety, combining the advantages of all the above-mentioned types of batteries. The inner layer is made of steel, which protects the radiator from corrosion and increases operating pressure. The outer part - the casing - is made of aluminum, characterized by the highest heat transfer. Bimetallic radiators can easily withstand strong pressure changes and are very easy to install. A classic example of such a product is the global style plus 500 heating radiators, reviews of which are purely positive.
Radiator installation
Those who are wondering how to hang a heating radiator without the help of professional plumbers need to know what steps this process involves. So, you need:
- prepare equipment and materials;
- calculate location;
- install brackets;
- hang the radiator;
- seal or solder the joints;
- check the entire system for functionality.
We purchase the necessary materials and equipment
To begin with, it should be noted that it is not recommended to install radiators in winter. And even if you decide to install heating yourself, in any case you need to call a plumber who will disconnect your apartment from the riser. To fix the radiator on the wall, you will need such components for heating radiators as: corners, bushings, nipples, brackets, brackets, couplings, adapters, tow, valves, keys.
If you plan to install cast iron batteries, you also need to purchase Mayevsky taps, designed to bleed air from the heating system and prevent airing. Aluminum and bimetallic radiators are equipped with them initially.
Calculating the location
This stage is important to ensure that the heating device works at full capacity and does not collect air. To do this, sections of underwater pipes should be installed at a slight slope relative to the floor. The minimum slope is 0.5 cm. Here are the optimal battery location parameters:
- 3-5 centimeters from the wall;
- 10 centimeters from the floor;
- 5-10 centimeters from the windowsill.
If the selected type of battery does not have high heat dissipation, you can also install a heat-reflecting tap on the wall behind the battery. It is usually made of insulating material or a special heat-reflecting substance that is applied to the wall.
Installing brackets
Brackets are mounts for heating radiators in the form of durable metal hooks installed inside the wall. It is easy to calculate the number of brackets: 1 piece per 1 m2 of battery. Of course, even if the entire battery area does not exceed 1 square meter, you will still need two brackets, since fixing the structure on one will be very unreliable.
Now you need to mark their location: we use a tape measure and a level for this.
Then we drill holes in the wall, install special dowels in them, tighten the fasteners for the heating radiators and use our hands to make sure that the brackets sit tightly and do not wobble. If the choice fell on cast iron radiators, you may need a special mount for cast iron heating radiators - floor support elements in the form of legs. They will help distribute the weight evenly across all fastenings.
Installing the radiator
The last stage of radiator installation. We hang the battery and check how tightly it fits, whether the weight of the structure is distributed equally across all fastenings. Try to shake the radiator a little: if the fixation is strong enough, you can move on to the next step.
Connection and assembly of connections
There are three different radiator connection schemes:
- lateral one-sided. The most popular option. The inlet pipe is connected to the upper pipe, and the outlet pipe is connected to the lower pipe on the same side;
- diagonal connection. More suitable for long radiators in large rooms and ensures uniform heating of the entire battery. The inlet pipe in this scheme is connected to the upper pipe on one side, and the outlet pipe to the lower pipe on the other;
- bottom connection. It is used in cases where the heating system is hidden in the floor. Both inlet and outlet pipes are connected to the lower pipes from different sides. Heat transfer with a bottom connection is approximately 10% less than with a side connection.
Let's start assembling the connections. Regardless of which heating radiator fittings you purchase, you must carefully seal each connection.
Any leak can literally and figuratively result in additional repair costs.
Special tapes, silicone, sealant or good old tow are used as seals. If the purchased battery is protected with a special film, it is better to remove it only after thoroughly crimping each connection.
Now all that remains is to return the water supply to the heating system and carefully check all connections for leaks.
spetsotoplenie.ru
Features of selection and installation
Before starting work, you need to decide on the installation location. The heating device is placed in the area where the most significant heat losses are observed. As a rule, this is a place near the windows. Heat losses are not excluded, even if you have modern energy-saving double-glazed windows installed. There is no need to even talk about ordinary wooden frames.
If there is no heating device under the window, then the cold air falling along the wall “spreads” across the floor. Attaching cast iron radiators to the wall in this location will change the situation. Rising warm air will prevent the spread of cold currents.
Another area of heat loss is the area near the front door. But this is more often faced by owners of private houses and apartments on the ground floor. In this situation, the heating device is hung as close as possible to the entrance. When choosing a location in accordance with the layout, do not forget about sufficient space for the pipeline.
For the most effective protection, the radiator should account for at least 70% of the width of the window opening. When choosing the appropriate option, keep in mind that a small device will not provide the required comfort. A battery selected correctly in size will avoid cold areas on the sides of the window, condensation and dampness.
When looking at models for installing cast iron batteries, consider the climate of your area. Purchasing a device with high heat transfer will be justified only for very cold regions. For residents of the middle zone, batteries with average performance are sufficient; for residents of southern latitudes, low devices with a minimum number of sections are suitable.