In private houses there are always several utility or technical rooms, where the requirements for the interior are low. But you still need to heat them, and in order not to spend money on buying modern radiators, you can install a steel register welded from pipes there. And, although everyone has seen such simple heating devices with their own eyes, not everyone knows their structure. This material is to help those homeowners who want to independently manufacture, install and connect heating registers to their system.
Construction of heating registers
Despite the fact that such heaters are considered outdated and do not have a very attractive appearance, they continue to be widely used in a variety of areas, for example:
- for heating production premises of industrial enterprises;
- as an autonomous heater in garages;
- as a water heating element built into a brick oven.
Note. A stove register made of smooth heating pipes is calculated and manufactured depending on the power and design of the stove.
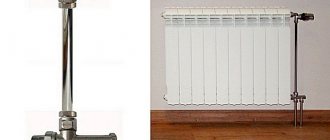
By design, heating devices are divided into 2 types: sectional and in the form of a coil. In the first case, the role of 1 section is played by each horizontal pipe, the flow of coolant through them is ensured by vertical jumpers. They are made of smaller diameter pipes in order to create artificial resistance to flow and increase heat transfer from each section. The pipes from which the sectional heating register is made are plugged at the ends, and the coolant is supplied according to the “top to bottom” scheme.
The design of the heater in the form of a coil is clear from its name. Here the diameters do not narrow; water flows freely through the entire device, changing direction several times. The heat transfer of this register is lower than that of a sectional one, but the hydraulic resistance is less and it is somewhat simpler to manufacture.
Advice. It is preferable to make sectional heaters for utility rooms or garages, where uniform heating and comfortable air temperature are important. It is better to install coils as standby heaters at the very end of a two-pipe system. They work great there because of their low resistance.
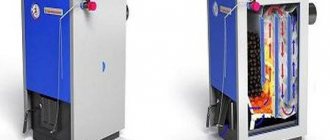
Heating registers from smooth pipes of round and rectangular cross-section are welded. However, the generally accepted design is ordinary round pipes made of low-carbon steel such as St3, St10 and even St0. If the battery is intended to work with a steam system, then St20 steel is used. It is not recommended to make sections with a rectangular cross-section; they are less washed by the convective air flow, which means they will give off less heat. For garage heating, autonomous registers are made, filled with antifreeze or transformer oil, and an electric heating element is built into the lower section at the end.
How to weld a heating register with your own hands
How to properly weld a heating register and in what cases is it recommended to install them? First you need to correctly understand their purpose. In essence, these are heating devices that must ensure maximum heat transfer from the hot water of the heating system to the room.
Before welding the heating registers, it is necessary to prepare the basic material for manufacturing:
- Main pipes. They should be relatively large in diameter - up to 100 mm. For forced systems with high temperature conditions, it is recommended to use just these. It is better that the pipe cross-section is round, since profile structures will create high hydraulic resistance, which is undesirable;
- In order to properly weld the heating register, you will need pipes of a smaller diameter, which will serve as pipes for coolant circulation between the main horizontal ones. Their cross section should be in the range of 24-30 mm.
At the first stage of work, you need to cut all the pipes according to the previously prepared drawing. Then, before welding the heating registers, it is necessary to make plugs for the ends of large pipes. They are divided into two types - blind and with inlet pipes. With the help of the latter, the coolant will move along the register contour.
The order of the work is as follows.
- In order to properly weld the register of the heating system, you must first cut all the pipes according to the drawing. For this purpose, a “grinder” is used. At the end of the work, the end parts are cleaned;
- Production of plugs. For them you need to use metal of the same thickness as the pipes. The diameter of the plugs must be larger than the cross-section of the pipe by the thickness of the metal. This is necessary for welding the fastening edging. After their manufacture, installation is carried out using the welding method;
- Before welding the heating system registers using adapter pipes, it is necessary to make holes in the pipes. It is best to do this with a welding machine, since it is impossible to cut a round hole with a grinder.
The final stage of work is connecting large pipes into a single heating device - a register.
Advantages and disadvantages
Before you start making heating registers, you need to evaluate all the pros and cons of these heaters, so that your expectations are not disappointed later. So, first about the advantages:
- low cost and ease of manufacture;
- low hydraulic resistance: thanks to this, the heater can be used in the “tail” of any system;
- reliability and durability: a register, qualitatively welded from ordinary pipes, will quietly serve for at least 20 years;
- resistance to pressure drops and water hammer;
- The smooth surface facilitates easy removal of dust when cleaning premises.
Unfortunately, a home-made heating register also has a lot of disadvantages. The main one is low heat transfer with a significant mass of the device. That is, in order to provide a comfortable temperature in a medium-sized room, the register must be of decent size. Let's give a simple example taken from technical literature. If the temperature difference between the coolant and the room is 65 ºС (DT), a register welded from 4 DN32 pipes 1 m long will deliver only 453 W, and from 4 DN100 pipes – 855 W. It turns out that, based on heat transfer per 1 m of length, any panel or sectional radiator is at least twice as powerful.
Note. The presented data were determined experimentally at a high coolant flow rate of 300 kg/h.
Other negative aspects of smooth-tube registers are not so critical, although significant:
- holds a large volume of water: the disadvantage does not play a big role if there are 1-2 such heating devices for the entire system;
- During operation, it is very difficult to increase or decrease the power of registers made of smooth pipes. You can’t do without dismantling the welding machine;
- are susceptible to corrosion and require periodic maintenance with painting;
- They have an unpresentable appearance: the defect can be corrected; if necessary, the heater is hidden behind a decorative screen.
Having analyzed the advantages and disadvantages of smooth-tube devices, we can conclude that their scope of application in private housing construction is very limited. As already mentioned, registers can be used for heating various rooms with low requirements for comfort and interior design.
Welding heating elements: production of boiler, registers and combs
Standard design of inverter welding machine
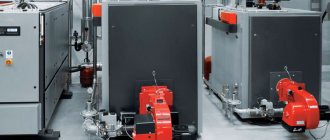
When designing a heating system, it is important to correctly select the main elements - boiler, radiators and components. The configuration offered by manufacturers does not always fit the operational parameters. And given the high cost, the question arises - how to weld heating with your own hands: boilers, registers, combs? This can only be done if you have the appropriate equipment and minimal skills in working with it.
Manufacturing recommendations
When selecting materials, you need to decide what pipe diameters to take and what their total length should be. All these parameters are arbitrary; you can make a heater from any pipes, and take its length convenient for placement in the room. But in order to supply the required amount of heat, it is necessary to ensure a sufficient heat exchange area. To do this, it is recommended to perform an approximate calculation of the register based on the surface area.
Making such a calculation is quite simple. It is necessary to calculate the outer surface area of all sections in m2 and multiply the resulting value by 330 W. Proposing this method, we proceed from the statement that 1 m2 of register surface will give off 330 W of heat at a coolant temperature of 60 ºС and room air temperature of 18 ºС.
Advice. You don’t have to do manual calculations, but use a simple EXEL program and then correctly weld the register according to the exact parameters. You can download the program in one click from the link: https://al-vo.ru/wp-content/uploads/2014/02/teplootdacha-registra-otopleniya.xls.
For a person who has welding skills, it will not be difficult to independently weld the register according to the available drawings. It is necessary to prepare and cut pipes into sections and lintels, and cut plugs from a steel sheet. The assembly sequence is arbitrary; after welding, the heater should be checked for leaks. When manufacturing and installing registers, consider the following recommendations:
- you should not take pipes with too thin or thick walls: the former will cool faster and last less, and the latter will take a long time to warm up and are difficult to adjust;
- do not forget to build a Mayevsky valve into the end of the upper section for bleeding air;
- when welding coils, the rotating section can be made from two ready-made elbows if it is not possible to use a pipe bender;
- Place a tap at the coolant inlet and a valve at the outlet;
- remember that the registers are installed with an invisible bias towards the connection of the supply pipe. Then Mayevsky's crane will be at the highest point.
How to properly weld a heating register
In private houses there are always several utility or technical rooms, where the requirements for the interior are low. But you still need to heat them, and in order not to spend money on buying modern radiators, you can install a steel register welded from pipes there. And, although everyone has seen such simple heating devices with their own eyes, not everyone knows their structure. This material is to help those homeowners who want to independently manufacture, install and connect heating registers to their system.
Register heat exchanger design
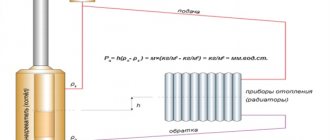
Heating register of four smooth pipes and movement diagram.
The heat exchanger consists of simple parts, and welding the register with your own hands if you have welding skills is not difficult. By independently manufacturing a heating device, you can accurately maintain its required dimensions and technical parameters necessary for the existing operating conditions. Purchasing a ready-made register can cost approximately 3 times more than the cost of materials for manufacturing the structure.
More often, carbon steel pipes are used to make a heating register. Materials made from stainless low-alloy steel and cast iron are also used. The distance between sections in the register should be 50 mm greater than their diameter. The registers are installed with a slope along the coolant movement of at least 0.05%.
To increase the heat transfer of the device, jumpers are mounted as close as possible to the ends of the horizontal parts. The coolant must enter the upper part of the device, flow through the sections and exit the lower horizontal element.
Welding of steel pipes.
Pipes in the coil type of registers are connected by arcs of the same diameter. When using an S-shaped heating device, heating efficiency increases by increasing the heat exchange area and reducing hydraulic resistance.
To install heating registers in residential premises, it is recommended to use pipes with a diameter of 3 to 8 cm to match the load on the domestic boiler. When calculating the number of sections and parameters of the workpieces, the heat transfer of the pipe per each linear meter is taken into account. For example, 1 m of pipe with an internal diameter of 60 mm is able to heat about 1 m² of room area.
Design parameters increase by 20-40% with poor thermal insulation of the room and a large number of windows.
The lower section is located 15-20 cm from the floor surface. For autonomous operation of the register heat exchanger, a heating element with a power of 1.6 to 6 kW is installed in them via a flange connection.
How to weld a heating register yourself?
A register is a heat exchanger with parallel mounted pipes with a diameter of over 32 mm, connected by jumpers from pipes of a smaller diameter. They can also be made in the form of a coil. The devices perform the same functions as radiators, but differ in the ability to manufacture them independently.
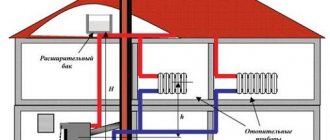
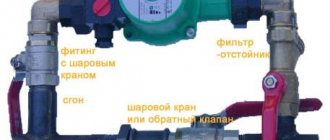
Heat exchanger installation diagram.
As a rule, registers provide heating in warehouses, utility rooms, garages, and some low-rise residential buildings, but can be equipped as part of the interior of ordinary rooms. Heat exchangers are used as elements of one- and two-pipe heating systems with increased fire and sanitary standards.