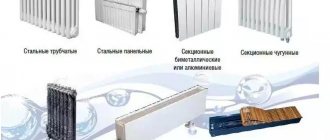
Installation of cast iron radiators
The heating appliance market is striking in its diversity. But the familiar cast iron radiators are still popular due to their many advantages. They are durable, corrosion resistant, easy to use and very durable. But even the most reliable device may one day require replacement. You can solve the question of how to hang a heating radiator on brackets yourself. The main thing is to have experience, the necessary materials and take into account some installation nuances.
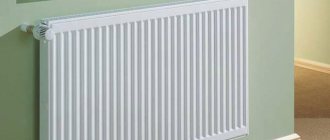
Modern cast iron radiators are an example of style
- Features of selection and installation
- Preliminary preparation
- Main stages of independent work
- Decorative design of radiators
Mounting cast iron heating radiators and how much installation costs
Cast iron batteries are devices that are familiar to all owners of houses and apartments. The impeccable long-term service of the units has earned respect and therefore they are still in demand in central heating lines. Durable and practical batteries have many advantages, but there are also some disadvantages. Let's look at how to install cast iron heating radiators with your own hands, as well as the capabilities and features of the batteries.
READ How to properly install running lights on a gazelle
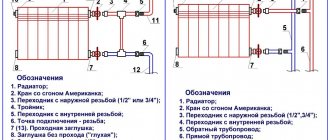
Connection sequence
The most crucial moment in installing batteries is connecting them to the heating circuit and then checking them. In order for all work to be carried out efficiently, you must follow the installation sequence of the cast iron radiator.
- The heating circuit is first turned off, the supply of coolant to the apartment is stopped, and then drained from the pipes using a circulation pump.
- The battery is hung on brackets and its horizontal and vertical position is checked with a building level.
- The plugs are unscrewed from the device.
- In the event that the side connection diagram for cast iron heating radiators is “introduced” into a single-pipe circuit, then you must first install and connect a bypass with a valve. If the system is two-pipe, then flow pipes with taps are used.
At the last stage, the Mayevsky tap is installed on cast iron radiators.
After connecting all the heating elements, a test check of the quality of work is carried out. It will show how securely the system is installed. To do this, water is introduced into it under pressure. If there are no leaks or strange noises or knocks, then all elements of the circuit are connected correctly.
The procedure for carrying out installation work
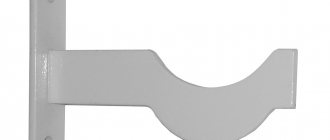
Installation of brackets for a cast iron battery
First you need to determine the required number of brackets. It depends on the area of the heating device. For 1 sq.m. The heating surface needs 1 bracket. Calculate the surface area of the radiator depending on the number of sections of the device and mark the wall for installing brackets. After marking, check the calculations again, drill holes, insert dowels into them and screw in the fasteners.
Installing a heating radiator
The heating circuit must be closed and the water must be completely removed. The remaining coolant can be pumped out with a pump. The battery is hung on supports, and a bypass is connected for a one-pipe system. Next, the radiator is connected to the system using threaded connectors. All joints must be sealed. Any sealing materials are suitable for this; tow is usually used. If you know how to use a welding machine, take the opportunity to weld the joints of the pipes and the pipeline.
After installing the device, pressure testing is required. This procedure is performed by professionals with the appropriate equipment. If you have a device, do everything yourself; if not, then buying an expensive device for the one-time installation of one or several radiators is not advisable. After installation is complete, check the operation of the system.
Theoretically, there is nothing complicated in installing cast iron heating radiators, but in practice, not everything is as easy as we would like. If you do not have the necessary experience or an assistant who has already performed similar work, it is still better to hire a team of plumbers. Of course, paying for their work will significantly increase the cost of the heating system as a whole, but you will save time, effort and nerves. The final decision is yours.
How much does it cost to connect a cast iron battery?
The cost of installing cast iron batteries in Moscow and the region is influenced by various circumstances and features. Suitable fittings and additional equipment are selected taking into account the type of system - single-pipe or two-pipe.
Cast iron radiators require the installation of a bypass, which allows, if necessary, to turn off individual sections of the system without shutting off the heating in the entire house or apartment. Installation prices vary depending on the size of the radiators, that is, the number of sections. The cost of the job may increase if the San Remo plumber has to use adapters, couplings, nipples and other fittings to connect the batteries.
How to choose the right bracket
The main rule when buying a retainer: it must withstand the weight placed on it. The maximum load is usually indicated in the included instructions. It is easiest to choose a bracket for an aluminum radiator, since it weighs little and any type is suitable for it.
For very powerful batteries, use floor stands. But if the covering in the house is wooden, then you need to make sure that the clamps are equipped with additional fasteners to the wall. This is necessary in order to reduce the load on the boards. For light heating elements that will be located in a deep niche under the window, it is better to buy a long bracket.
For cast iron radiators, it is recommended to use holders with the ability to slightly change the height, otherwise installation difficulties may arise. The price of an adjustable bracket is not so high as to give up installation convenience.
It is important that the alloy contains no toxic substances released when heated. You should not buy parts secondhand, especially without the appropriate accompanying documents.
Please note that the lightest one - the corner bracket - is intended only for aluminum and copper radiators
Fasteners for steel heating devices
There are two different types in this group: tubular and panel radiators. They have different designs and, accordingly, different fastenings.
In panel radiators, brackets are welded on the rear wall, with the help of which they are hung on brackets. The shape of this type of fastener is different: it is designed specifically for staples.
In panel radiators, brackets are welded on the rear wall
When installing panel radiators, it is necessary to strictly monitor the vertical position of the brackets. High precision required: four or six staples must fit exactly onto the hooks
It is also important that the wall is perfectly flat and smooth. In general, using conventional brackets, panel radiators are quite difficult to hang
It is easier to work with other types of holders.
Standard bracket for panel radiator
Since the mass of the heating device is small, it is quite enough to fix it on the upper brackets and install stops at the bottom that will give it direction in the horizontal plane. They are not attached to the wall, but are hooked onto a bracket and simply rest against the wall. For reliability, the part that faces the wall is expanded.
This is what a set of brackets for tubular steel batteries looks like: the upper collector is hung on the hooks, and plastic stops are placed below
There are also special mounting strips for easy installation. They are a strip of metal with plastic clips at the top and bottom. When using this fastener, there is no need for brackets on the rear panel. The slats are fixed to the wall, a radiator is inserted into them, which is held in place by plastic hooks.
Rail for quick installation of panel batteries
Fasteners for tubular radiators are similar to sectional ones: the same hooks, only of a different size, often equipped with plastic covers.
There is also a special fastener with SMB tube grips. This is a strip of steel with plastic clips and a shelf at the bottom that serves as a support for the radiator. This mounting plate can be used if the weight of the device filled with water does not exceed 100 kg. Installation is simple: place the battery on the shelf, bring the top edge closer to the latches. They grab the nearest tube and a click is heard. The radiator is installed, the supply pipes can be connected.
Bar for quick installation of a tubular radiator with shelf and clamps
There is a second option for quick installation: SVD fasteners. It consists of two parts. One is attached to the radiator, the second to the wall. Then they are connected to each other and secured with a steel loop.
Another type of holder for tubular models: two parts, one is attached to the wall, the second is attached to the pipe. They are held together with a wire fastener.
Floor mounting for tubular radiators can be of several types: tubular supports that are welded at the factory, or stands with hooks. Radiators are hung on such racks, and the racks themselves are attached to the floor.
Brackets for radiators are of different types and types: for wall and floor installation. The standard ones that come with the kit are reliable, but they are more difficult to work with. Planks and devices for quick installation save time, but cost a lot.
Fasteners for cast iron, sectional, panel radiators
The procedure for installing radiators does not depend on their type: the rules remain the same, only the fasteners change. If installation under a window is intended, the following distances must be observed: from the floor should be at least 80-120 mm, to the window sill at least 60-100 mm, to the wall - 30-50 mm. It is also necessary to decide on the quantity and location of fasteners.
The number of brackets (hooks) per battery depends on its length. If there are few sections - up to 8-10 pieces - then two holders are required at the top, and at least one more at the bottom. If there are more than 10 sections, install three supports on top and two below. For each next five to seven sections of cast iron radiators and ten tubular and aluminum ones, the number of fasteners increases: one holder is added at the top and one at the bottom.
Methods of using various types of fasteners for sectional radiators
Features of installation of cast iron radiators
The craftsmen from our staff have invaluable experience and a high level of qualifications, which helps them quickly cope with the task at hand when installing and connecting cast iron radiators. The main nuances that unscrupulous plumbers neglect, but which our company’s specialists remember, are:
- the cast iron battery should occupy no more than 70% of the width of the window opening;
- there should be no more than 10 cm from the top of the radiator to the window sill;
- a distance of 5-10 cm is maintained from the bottom of the radiator to the floor;
- there should be about 2-4 cm from the radiator to the wall.
Compliance with the listed conditions when installing a cast iron battery guarantees proper circulation of warm air flows in the room and maintaining a comfortable temperature in all its corners.
To find out prices for the installation of cast iron radiators, determine the list of materials required for connection, as well as the timing of the work, please contact our manager by phone.
We care about our clients and provide a variety of discounts on our services:
- We offer a flexible system of discounts from 5 to 20%, depending on the total cost of plumbing services ordered from us.
- Discounts for pensioners, disabled people, WWII and Labor Veterans - 10%.
- 5% discount when ordering heating radiator connections through the online form on the website.
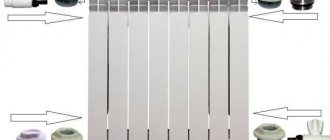
Fasteners for cast iron batteries
Since these are the heaviest heating devices, the holders for them are the most massive: they must hold considerable weight for years. These can be individual or curved pins attached to a bar. In any case, when making mounts for cast iron batteries, thicker metal is used. In price lists it usually comes with the addition of “reinforced”. Can be painted (standard color is white) or not. Some manufacturers paint it in the desired color upon request (when ordering a radiator, specify the type of fastener and its color).
The mount for a cast iron battery is made reinforced: from thicker metal
When purchasing, you will need to take into account the dimensions: fastenings for sections of different depths are made specially, since it is necessary to ensure a distance to the wall of at least 3-5 cm.
In addition to brackets for cast iron radiators, they also produce hooks. They are sold in pairs with dowels. Installation is standard: a hole is drilled, a dowel is inserted into it, and a hook is screwed into the dowel (there is a thread on one side).
There are mounting strips for cast iron radiators that make installation easier
In addition to wall mounting, there are legs for floor installation. They come with adjustable height or not. The upper arcs that fix the section to the stop are also different: there is an arc made of steel wire, and there is a chain of movably connected links. In both cases, the batteries are fixed to the support using these arcs and bolts.
Racks for floor installation of sectional radiators - any wall-mounted radiator can be installed on the floor
Advantages of cast iron batteries
For some reason, when it is necessary to replace old cast iron radiators, most consumers look for an alternative made from other types of metal. This happens for the simple reason that they do not know what modern models of cast iron batteries look like. They not only have a smooth, beautiful surface that looks stylish in almost any interior, but also new technical parameters that are significantly better than their Soviet counterparts.
Installing new generation cast iron heating radiators allows you to save money, both on products and their connection. They do not have to be adjusted to fit the existing heating system or purchase additional adapters. With all this, they have a number of advantages over old cast iron batteries:
- The weight of the new models has become two times less. If earlier the radiator section weighed about 8 kg, now it is 3.5-4 kg.
- Since their outer surface is no longer “ribbed”, but has acquired a smooth, even surface, the heat transfer of the new devices has become higher. In old models it was 110 W, and in new ones it was about 130-140 W.
- Their resistance to the quality of the coolant remains the same, and since the channels are quite wide, they will have to be cleaned much less often than the same bimetallic or aluminum sections.
- Knowing how to properly connect a cast iron battery, you can forget about the cold in your apartment for the next 20-30 years. This is exactly the warranty period that manufacturers give for their products, although the average service life is 50-60 years.
- The working pressure in new cast iron radiators is still 9-12 atmospheres (working) with a test pressure of 15 atmospheres. They are ideal for apartment buildings no higher than 6 floors.
With all their new advantages, these devices have the same disadvantages as the old “accordions”. First of all, this is their fragility. They cannot be hit, much less dropped, but connecting cast iron heating radiators of a new generation allows you to do this, if not individually, then at least without a team of builders. This did not work out with the old samples, given that the weight of one section was 7-8 kg, and there could be 12 or more of them in the battery.
Since the price of new cast iron structures is low, the heat transfer rates are higher, and the appearance is more stylish, you should pay attention to them, especially since their outdated analogues have served people well for decades.
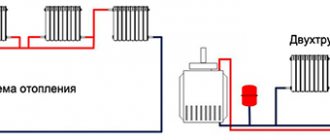
Connection diagrams
The most fault-tolerant scheme for connecting heating radiators in a private house with a bottling and boiler is a single-pipe Leningradka. Heating appliances are connected parallel to the bottling line, which is laid around the perimeter of the room.
Somewhat cheaper to install, but noticeably more problematic to operate, is a circuit that uses a series connection of batteries. Suffice it to say that their independent adjustment in this case is impossible.
A variant of a single-pipe circuit with a serial connection.
Finally, a two-pipe system involves connecting each radiator as a jumper between the supply and return lines. It is inconvenient in that it requires the already mentioned balancing - limiting the passage of the heating devices closest to the boiler.
What are the possible diagrams for connecting heating radiators to the supply line?
- One-sided. The connections are connected to the upper and lower radiator plugs on the right or left. It is compact, but makes the heating of the device uneven: the last sections will always be colder than the first.
- From bottom to bottom. In this case, the battery must be equipped with an air vent. The advantages of the solution are that the radiator with this connection does not require flushing and always heats along its entire length.
- Diagonal. Heating of sections is even more uniform; however, the lower corner of the device with a blind plug will gradually silt up.
Connection options for liners.
Which batteries should you choose?
There are many models of radiators made from various alloys on the modern market. Each has its own positive characteristics and features of use.
Aluminum batteries
Radiators made from this material are produced in two types – cast and extruded. The former are a one-piece monolithic structure, while the latter are made of aluminum parts welded together. Leaf type batteries are more durable and reliable.
Regardless of the type, aluminum radiators have common basic technical characteristics:
- section weight – from 1 to 1.47 kilograms;
- permissible maximum coolant temperature – 110 degrees;
- product power – from 82 to 212 watts;
- the maximum liquid volume of one section is 0.46 liters;
- working pressure – from 6 to 24 atmospheres.
Batteries have been made from aluminum since the eighties. These days, the products have improved quite a bit and have not lost their popularity.
Aluminum batteries
The main advantages of aluminum heating radiators include:
- light weight of the product, facilitating its quick installation and transportation;
- high level of heat transfer due to rapid heating of the metal and the intensity of heat exchange;
- the ability to adjust the temperature even with a small volume of coolant;
- relatively low price for the product;
- good strength;
- decent appearance.
Along with the advantages, aluminum batteries have some disadvantages:
- low resistance to corrosion;
- the possibility of formation of air in the system due to the chemical process.
If we take extruded models into account, we can highlight their weak point - threaded connecting fasteners. With a sharp increase in pressure in the system, the integrity of the structure may be compromised.
Radiators made of steel
The installation of such radiators is justified in private houses with a local autonomous heating system. The peculiarity of devices of this type is:
- working pressure – from 6 to 13 atmospheres;
- The maximum water temperature in the battery is 110 degrees.
Despite their relatively low technical characteristics, steel radiators are very popular. The use of devices has the following advantages:
- compact designs;
- possibility of adjusting the temperature using a thermostat;
- high heat transfer rates;
- a wide variety of models produced;
- the cost is much lower than many new types of batteries being released.
Among the disadvantages, the most significant are:
- incompatibility with an open heating system;
- susceptibility to corrosion;
- special requirements for the quality of the coolant used.
Radiators made of steel
The presence of various chemical impurities in the liquid used in a steel battery can cause destruction of the material. In this case, coolant leakage is sometimes observed due to violations of the tightness of the connections. Therefore, steel radiators are not installed in multi-storey new buildings.
Bimetallic batteries
Radiators of this type are improved models that combine all the advantages of aluminum and steel products. The devices have earned widespread use due to their high technical characteristics:
- maximum internal working pressure – 60 atmospheres;
- heat transfer – up to 190 watts;
- maximum coolant temperature 110 degrees.
There are many advantages of using bimetallic radiators:
- long service life - up to fifty years;
- high thermal output and quick heating of the room;
- good anti-corrosion properties;
- high level of strength;
- possibility of installing additional sections;
- maximum sensitivity to thermostat commands;
- Availability of models with different design solutions.
Bimetallic batteries
The material withstands high hydraulic shocks characteristic of central heating systems.
The disadvantage of bimetallic radiators is their high price. As a rule, they are more expensive than aluminum or steel products. Cheap bimetallic batteries do not have corrosion protection, so over time, rust will form on the product.
Required tools and materials
Technology for unscrewing and assembling cast iron batteries: a – nipples capture the threads of sections (2-3 threads); b – tighten the nipples, join the sections; c – install the third section; d – two radiators are grouped.
Replacing or installing various cast iron radiators can occur in several stages and in completely different ways. To carry out this installation, you will need:
- gloves;
- protective glasses;
- gas welding;
- mounting keys;
- rubber gaskets;
- screwdrivers;
- radiator keys (short and long).
If you decide to install or replace it yourself, be very careful and follow the technical and safety rules. Welding work can be harmful.
Methods of fastening aluminum and bimetallic radiators
Products that are very similar in shape are used. Only they are made from thinner metal. In general, brackets for sectional radiators of any type are very similar. There are universal corner brackets for aluminum and bimetallic radiators. They have a recess at the top and bottom for the collector, so they can be mounted on both the right and left.
Special corner brackets for lightweight sectional radiators
There are no floor-standing aluminum or bimetallic radiators. But there are racks that allow you to install any of them on the floor. In this case, the rack is first fixed to the floor, and then the heating device is installed and secured on it.
Floor mounting of aluminum radiators helps if the walls cannot withstand even such a small weight (if they are made of plasterboard or aerated concrete, or other similar materials).
Any sectional radiator can be mounted on such racks
You won’t be able to hang anything on the now fashionable glass wall.
But then you need to pay attention to what the entire structure looks like from the reverse side. In this case, it is more advisable to use convectors built into the floor for heating.
floor-standing models of tubular radiators (at the same time they can serve as fencing), cast-iron retro radiators.
Compliance with installation standards
Even knowing how to install a cast iron battery, you should remember why you need to adhere to the standards approved by SNiP. Maybe someone will consider this unnecessary, and will be wrong, since any deviations from the parameters are not just a violation of safety rules, but also a decrease in the efficiency of the system itself.
General rules for installing radiators include:
- The position of the device relative to the vertical axis of the window. The middle of the battery should coincide with it. The permissible deviation should not exceed 2 cm.
- The battery must have such a number of sections that when assembled it occupies 75% of the width of the window opening.
- SNiP indicates how to secure a cast iron battery to the wall. So the distance between it and the floor according to the standards is 60 mm, under the window sill 50 mm, and from the wall - 25 mm.
When the location has been chosen and all calculations have been made, you can begin installing cast iron heating radiators with your own hands. To do this you will need tools and the necessary fasteners.
Placement of heating devices
It is of great importance not only how to connect heating radiators to each other, but also their correct location in relation to building structures. Traditionally, heating devices are installed along the walls of rooms and locally under windows to reduce the penetration of cold air flows in the most vulnerable place.
There are clear instructions for this in SNiP for installing heating equipment:
- The gap between the floor and the bottom of the battery should not be less than 120 mm. When the distance from the device to the floor decreases, the distribution of heat flow will be uneven;
- The distance from the back surface to the wall on which the radiator is mounted should be from 30 to 50 mm, otherwise its heat transfer will be impaired;
- The gap from the top edge of the heating device to the window sill is maintained within 100-120 mm (no less). Otherwise, the movement of thermal masses may be hampered, which will weaken the heating of the room.
Bimetallic heating devices
To understand how to connect bimetallic radiators to each other, you need to know that almost all of them are suitable for any type of connection:
- They have four possible connection points - two upper and two lower;
- Equipped with plugs and a Mayevsky valve, through which you can bleed the air collected in the heating system;
A diagonal connection is considered the most effective for bimetallic batteries, especially if we are talking about a large number of sections in the device. Although it is not advisable to use very wide batteries equipped with ten or more sections.
Advice! It is better to think about the question of how to properly connect two heating radiators of 7-8 sections instead of one device of 14 or 16 sections. It will be much easier to install and more convenient to maintain.
Another question - how to connect sections of a bimetallic radiator may arise when rearranging sections of a heating device in various situations:
The place where you plan to install the heating device is also important.
- In the process of creating new heating networks;
- If it is necessary to replace a failed radiator with a new one - bimetallic;
- In case of underheating, you can expand the battery by connecting additional sections.
Aluminum batteries
Interesting! By and large, it should be noted that a diagonal connection is an excellent option for any type of battery. You don’t know how to connect aluminum radiators to each other. connect diagonally, you won’t go wrong!
For closed-type heating networks in private homes, it is advisable to install aluminum batteries, since it is easier to ensure proper water treatment before filling the system. And their cost is much lower than that of bimetallic devices.
Of course, over time, moving through the radiators, the coolant cools
Of course, you will have to try hard before connecting the sections of the aluminum radiator for regrouping.
Advice! Do not rush to remove the factory packaging (film) from installed heating devices until finishing work in the room is completed. This will protect the radiator coating from damage and contamination.
The work process itself does not take much time, you do not need any special skills or expensive equipment, you can purchase all the necessary tools at any hardware store. And don’t forget, the connection will serve you for a long time and without hassle only if you used high-quality materials in your work and followed all the rules for installing the heating system.
We are talking about exactly what is indicated in this figure.
In the video presented in this article you will find additional information on this topic.
Assembling a heating radiator with your own hands: connecting sections and fastening
The need to assemble and disassemble a heating structure arises when one of the sections leaks, even if you want to save on assembling the entire complex, and if necessary, expand sections, since you initially “missed” in counting them. As you can see, there are many reasons, they are less important than the process to which our instructions are dedicated.
The ultimate goal is warm batteries.
There are many batteries, but one assembly method
We would like to remind you that batteries can be of several types based on materials:
- Cast iron;
- Bimetallic;
- Aluminum;
- Steel.
And several types of designs:
For your information! The secret is simple: the method of assembling different radiators is the same + the method of tying the radiators is also the same.
Therefore, today's material is universal for all types of batteries.
Let's start with sections
Let's carry out the assembly using sectional batteries as an example. In order to somehow supplement the information, we will analyze the points of piping radiators, especially since they are of the same type for both sectional and panel heaters.
Let's put everything in its place.
The binding begins with the distribution of roles:
- Each radiator, regardless of type, has four threaded inlets. Our task is to determine the coolant input-output circuit for the correct placement of plugs and proper connection of the element to the network;
Assembly diagram.
Advice! If you are making a regular radiator replacement, then you don’t need to invent anything. You do everything in the same way as the previous radiator. Upper inlet, lower outlet. The opposite upper threaded hole is a pass-through plug with a Mayevsky tap.
The opposite lower threaded outlet is a blind plug.
- The roles are distributed. We assemble:
- The beginning is the connection of the Mayevsky tap and the blind plug. For these purposes, flax fiber and a special paste for sealing threaded connections are suitable;
- The fiber is wound in even strands without lumps or ridges in the direction opposite to the direction of the thread of the plugs;
For additional sealing of parts we use fiber.
- The paste then fixes this fiber in place;
- Using a wrench, the plugs are installed in place.
An adjustable wrench is a great helper.
Advice! There are special wrenches on sale with shaped recesses for the main parameters of the installation kit. An adjustable wrench is quite enough for tying the radiator, although its capabilities will not be enough for plugs for cast iron radiators.
Then you will still need a gas wrench.
- It’s a little more complicated with water inlet and drainage. Today, taps called American valves are installed in batteries; these connections with a union nut provide the most reliable connection. Their installation proceeds as follows:
- The threaded part entering the radiator is made in the same way as already described - with fiber and paste;
Recommendations! Flax and paste can be replaced with FUM tape, as many advise. Indeed, it is possible, but this must be done correctly. Such a replacement is possible in houses and apartments where there is an autonomous heating system, where the coolant pressure in the network is quite low - the circuit is closed. FUM tape in such conditions it feels very comfortable. With pressure surges, frequent guests of the general heat supply system, the tape can be destroyed.
The result is clear - leak.
- The American one is tightened not with an ordinary gas wrench, but with a hexagon.
Is replacement possible?
Advice! In many video materials you can see how an American woman is twisted with a chisel, a square pin, and even one grip from a pliers.
We won’t judge how justified this is, but the native key is still better.
Connecting sections
To do this, we will need nipples - special section connectors with a rubber sealing ring, as well as keys for tightening the nipples.
Our help! A nipple is a type of connection represented by a piece of pipe with a central transverse groove for a rubber seal. Threaded ridges extend from the groove for the right and left sides.
This design allows you to screw the connector into threaded sockets while simultaneously bringing the radiator fins closer to each other.
How to assemble sections of a heating radiator?
The assembly algorithm is simple:
- Assembling sections of aluminum radiators, as well as assembling bimetallic heating radiators with your own hands, begins with “making” nipples in threaded holes;
Photo of a nipple with a seal.
Advice! If you are connecting two sections, then the connecting windows should have: one - right-hand thread, the other - left-hand thread.
- The assembly of aluminum heating radiators, as well as the assembly of cast iron heating radiators with your own hands, occurs by uniformly tightening the threaded connections of the nipple and sections using special keys;
Keys for assembling ribs.
Observation! It is better to carry out battery installation work together.
This is both easier and the connection is easier to control.
- After joining the required number of sections, the assembly of the aluminum radiator, like any other, is carried out according to the wiring diagram, which has already been described.
DIY installation of cast iron heating radiators
- Required tools and materials
- Stages of installation work
Cast iron radiators are a fairly popular battery used for heating in multi-storey buildings. This is explained by the fact that cast iron batteries have undeniable advantages over other types of heating. In addition, most of the installed batteries in homes have already expired and now need to be replaced. That is why information on installing cast iron radiators is very relevant. Installing heating systems is not entirely simple, but for business owners it is quite feasible.
Radiator piping in a one-pipe system.
The site on which the cast iron radiators will be installed plays an important role.
The composition of the surface of the installation site will be reflected at the stages of heating installation. Installation of devices can take place on a wooden wall. In this case, you will need one strip and one stand for installation for each radiator. The batteries can also be installed on a plastered brick wall. Here you will need a bracket, a window sill and a niche.
A lightweight wall can also be used for installation. Here you will need a solid support on which the heating device will be installed. It should be noted that it is advisable to choose a place to install a cast iron battery based on convenience, not beauty. To add elements of beauty to heating devices, you can resort to simpler methods of decorating and decorating radiators, for example, using a rattan grille.
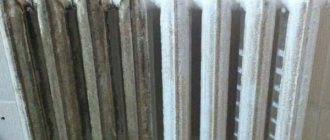
Dismantling cast iron radiators
The most common are cast iron radiators MC140. During their operation, which in some cases is 30 years or more, they have shown themselves only at their best:
- accumulates heat;
- resistant to poor quality coolant;
- ease of maintenance;
- reliable and have a long service life (from 10 years and above)
How to disassemble this grandfather? And it’s very simple, because structurally all radiators are assembled according to the same principle: using nipple nuts and gaskets for tightness. True, in those ancient times, tow with paint was screwed onto the nut and there was a rubber gasket.
Cast iron radiators in some systems last for 50 years, it is clear that disassembling them will not be easy
There are no problems disassembling the new radiator. But you’ll have to tinker with the old one:
- Over time, the joint between the sections “sticks”;
- the internal protrusions for the key are corroded by the coolant.
This is why dismantling the old “cast iron” is quite problematic.
Another difficulty in working with cast iron is its heavy weight. The weight of one “clean” section is 7.5 kg. A 10-section battery weighs 75 kg, so it’s best to carry it with two people. Before disassembling the radiator, it is best to remove and wash it. A battery that is light in weight can be washed in the bath, after laying down a rag. To do this, it is best to take a piece of hose, connect it to a cold water tap and rinse thoroughly. If you hate to dirty the bathtub, you can go out into the yard. All that matters is the presence of water, you also need a drain: there will be more than enough of any horror in the water.
Only a strong person can carry cast iron batteries alone
The place for disassembling the radiator is chosen to be level and quite spacious. If you live in a multi-story building, then this work can be done on the staircase. Tools you will need:
- radiator key;
- chisel, hammer, small sledgehammer;
- brush with metal bristles, blowtorch;
- several boards or blocks for lining under the battery;
- plumbing wrench No. 2,3 for unscrewing side plugs (footers) and plugs.
A few words about the key: you are unlikely to find something like this in a store; it’s easier to look in the market or borrow from a plumber you know.
The key is a round rod with a diameter of 18 mm. On one side it is flattened in the form of a spatula to the internal size: its width is 28x40 mm and its thickness is 6 mm. On the other hand, a ring is welded to it, into which a lever is inserted for rotation. The length of the key is defined as ½ the length of the largest radiator plus approximately 300 mm. You can make such a “miracle” from a suitable piece of half-inch pipe by flattening one end. But this option is only suitable for disassembling a new radiator.
The joint is leaking - the gasket is leaking. It is necessary to disassemble the cast iron battery and change it
To make work easier, before disassembling the joint must be heated with a hair dryer or a blowtorch. This is where you need boards: you place the radiator on them and heat it.
There are a lot of problems with “boiled” sections. They have become so close that significant physical effort does not help. Then the first “cure” is heating. Heat the metal until it glows faintly, then try to untwist it (just take thicker gloves). Another option may be suitable: unwind it after cooling, but only immediately after the temperature drops. In this case, microcracks form in the gaskets, and such a connection is destroyed more easily.
Now about the procedure. Having previously unscrewed the plugs, place the key on top of the radiator, aligning the head of the key with the place where the nipple will be unscrewed, and make a circular mark with chalk on the body of the key along the end of the section. Instead of chalk, you can use a piece of electrical tape or tape. Next, insert the key into the lower internal hole and turn it slightly along the axis to the right and left to bring it to the mark made.
Now let’s talk about which direction the section needs to be unscrewed. If there is a nipple, then we “bait” it alternately with the left or right side. We determine in which direction it twists. Then you need to unscrew the nut with a wrench in the opposite direction. If the thread is right-handed (twists clockwise), then to unscrew it we turn the key counterclockwise. For left-handed threads, unscrew clockwise.
If a miracle happens and you manage to break the thread, do not rush to unscrew it completely. Unscrew the nut one turn, then do the same with the upper nipple. And so unscrew it little by little, first from the top, then from the bottom. Cast iron does not like distortions and can simply crack. In the same way we unwind all sections.
It happens that a leaking section cannot be untwisted. Then try sawing it with a metal saw or a hacksaw. Just cut the section with extreme caution. After all, cast iron is a fragile material by nature. There is another way: the middle part of the unusable section is simply broken with a small sledgehammer on both sides, and the nipples are unscrewed with a plumber's wrench or knocked out with a hammer and chisel.
When disassembling, it is not always possible to get by with just a key. It is often necessary to heat the metal until it glows faintly, and only then will it be possible (and not always) to strip the threads from a boiled battery
Preparatory work
In order to correctly select the necessary parts and calculate their quantity, you should know the type of wiring of the heating system - one- or two-pipe. In a single-pipe system, the heated coolant rises through the riser, and the heating devices are connected to the downward line. In a two-pipe system, the coolant moves from the heater to the heating devices and back. One line is designed to supply hot water, the second - to return the cooled coolant to the boiler. There are two ways to connect system elements - horizontal and vertical.
All connection details should be clarified before work begins. Before installation, you need to drain the water from the system, dismantle the old heating devices, and remove the fasteners on which they were held. The supply of hot coolant to the system must be stopped until the work is completed.
Assembly of cast iron heating radiators
First of all, you need to group the sections. To do this you will need radiator keys. The device is mounted on a workbench; radiator keys must be inserted into the lower and upper holes so that they rest against the internal protrusions. Both nipples need to be deployed simultaneously to avoid skewing of the sections, so the manipulation is performed with an assistant. The nipples should be lubricated with drying oil and gaskets should be placed on them. The keys are rotated in the direction opposite to the thread. If it is left, then they turn to the right, and if it is right, they turn to the left. You need to screw in 1-2 thread strokes.
Hydraulic tests of the finished structure are carried out on a special stand, where a pressure of 4-8 kgf/cm2 is created using a press. The performance of the device is checked using a pressure gauge. If its performance begins to decline, it means that either defective sections are connected, or the work was performed poorly. In the first case, the elements are replaced, in the second, the nipples are tightened. If minor damage occurs, it can be repaired with epoxy glue. If the connections are not made correctly and the joints are leaking, the gaskets should be changed.
Painting the radiator after assembly
After testing, the heating device is painted and dried. To obtain a durable and even coating, it is necessary to apply two thin layers of paint. As a result, radiators must meet the following requirements:
- Heat-resistant coating of the device body. It must withstand temperatures of 80 degrees without softening or releasing harmful substances into the atmosphere.
- The painting must be of sufficient quality to protect the radiator from corrosion as much as possible.
- The selected composition should not change color.
Experts recommend using alkyd enamels as a coating, because... after drying, they are harmless and do not poison the air during operation. Option - acrylic compositions. They do not crack, do not change color and are resistant to heat. Both types of compositions have their advantages: alkyd enamels are cheaper, acrylic-based paints are more durable. You can also use water-dispersion paints, which have a manufacturer’s mark stating that they can be used for painting heating appliances.
How to correctly determine the location of the radiator
Heating devices are usually located under windows at a height of at least 6 cm from the floor and 5-10 cm from the bottom of the window sill. The distance to the wall should be at least 3-5 cm. The system pipes are placed at a slight slope, which is made in the direction of movement of the coolant. If there is no slope or distortions appear when installing a cast iron radiator, air will accumulate in the batteries, which will have to be removed manually. An “airy” radiator will not be able to warm up properly and give off heat. The center of the device should coincide with the center of the window opening plus or minus 2 cm.
Climate
72 votes
+
Vote for!
—
Vote against!
Radiators are an important part of any heating system. Nowadays, there are several main types of heating batteries: steel, aluminum, bimetallic, cast iron. But for more than half a century, cast iron batteries have been at the peak of their fame. Don’t rush to write them off, because they can live a “second life” in your home. Today we will talk about how to disassemble a cast iron battery, wash it, paint it and put it back in place.
The need to install cast iron batteries
Cast iron radiators are rightly called “legendary”. They were quite popular in the last century, if not the only ones, and were used in structures and buildings of various types and purposes. Not a single Soviet-era apartment can be imagined without such bulky and hot units.
Cast iron radiators were not just heating devices; they were used not only for heating. Housewives used them for drying wet shoes and washed clothes, heating cold things, and even defrosting meat. Modern radiators can hardly boast of the same number of functions!
The big advantage of cast iron over other materials is its ability to resist corrosion. With proper use, such a radiator can last more than 50 years. It has low hydraulic resistance and high heat transfer. Exceptional reliability and ease of operation are significant advantages of these radiators.
But the main and main advantage of cast iron radiators is not their low price and excellent heat transfer, but their ability to function well regardless of the quality of the coolant and how much water is in the cast iron battery. When installing new generation batteries, our consumers rarely think about the fact that the water entering the batteries must meet European standards in order to be harmless for European radiators.
Our coolant is in many ways inferior to the coolant used in developed countries. There are so many different “chemicals” in domestic coolants, so they are of low quality, and because of this, new-style metal batteries sometimes cannot withstand this and succumb to the destructive power of harmful substances.
The result will be the following: the batteries “break” with all the ensuing consequences. And all this happens when you least expect it, usually in bitter cold weather! It is difficult to deal with such a problem, which means that it is necessary to prevent this by installing cast iron radiators in the house.
Advantages and disadvantages of cast iron radiators
The most surprising thing is that, despite the shortcomings of this material, the installation of cast iron batteries is not a very rare occurrence. Such radiators are still very popular among our compatriots. Let's find out why:
- Availability. Cast iron radiators are one of the most inexpensive types of radiators on the market. This is the reason for the majority of such devotion to cast iron.
- Long-term heat retention. Cast iron takes a long time to heat up, but the accumulated heat is also saved for a long time, so even if the heating system in the room is turned off, the optimal temperature for a person is maintained.
- Functionality. Nowadays, housewives continue to dry clothes using radiators. And yet, no matter how funny it may look, this method makes it possible to do it as quickly as possible.
The disadvantages of cast iron batteries are as follows:
- Radiators are quite heavy. These types of radiators are difficult to install because they are heavy, so installers in most cases work in teams, and not one at a time, as is often the case when working with bimetal and aluminum. Therefore, connecting cast iron batteries requires corresponding costs.
- Significant thermal inertia. Cast iron batteries take a long time to heat up, which is why the house will remain cool for some time after connecting the system.
- Unattractive appearance. Compared to other types of batteries that are known to modern man, cast iron ones do not look aesthetically pleasing, they are not smooth and are more bulky.
- Need for special care. Installing a cast iron radiator is not the last step to be done with the batteries. After installation, it’s time to paint the batteries to prevent corrosion.
Preparation for installation of cast iron radiators
It is not yet known how long the installation of cast iron radiators will still be in demand, but nevertheless, these batteries hold the record for the time of their use, and a decrease in the level of their popularity is not yet expected. According to experts, replacing cast iron batteries with any other batteries is impractical, because cast iron is a more suitable material for heating radiators.
The preparatory stage for the installation of radiators includes the selection of batteries and their purchase, the purchase of all necessary elements (plugs, brackets, Mayevsky tap, adapters). Before we start buying the last parts, we choose a battery, because it often comes with a faucet and other parts. During this stage, the brackets are installed, as well as preparations for installing batteries.
The procedure for replacing radiators requires some preparatory work, which includes shutting off and draining water from heating risers, as well as dismantling old equipment and their fastenings. You also need to keep in mind that when replacing heating (old cast iron radiators), you should determine the time for such work and agree with the necessary services so that they turn off the hot water supply in the premises.
DIY installation of cast iron radiators
Domestic-made cast iron radiators, unlike imported heating devices, require mandatory pulling of intersection connections, as well as additional painting prior to installation. It is customary to begin installing a cast iron radiator with these works. And at the end, you can install a screen for a cast iron battery for greater decorativeness.
Grouping radiator sections
In accordance with the project, the first stage of installation of cast iron batteries is their division into sections. To do this, fix the radiator on a workbench and insert two radiator keys into the open nipple holes. On one side, the radiator key has an eyelet for the handle, and on the other side, a flat screwdriver, the width of which allows it to freely pass through the nipple hole and rest against their internal protrusions.
Both radiator keys are inserted into the lower and upper nipple holes at the appropriate depth. In order to prevent misalignment of the sections, it is necessary to unfold the nipples simultaneously, so this operation must be performed by two people. The nipples on different sides of the radiator have different threads, which, of course, affects the direction of rotation of such a radiator key.
If sections are disconnected from the side where the nipple has a left-hand thread, the key should be rotated to the right; if the radiator is disassembled from the right side of the thread, then, accordingly, the radiator key rotates to the left. The grouping of sections actually begins by placing the sections that will be connected on a workbench and lubricating the nipple with drying oil. Next, put on the gaskets and screw in the nipples onto 1-2 threads.
The final tightening of the nipples is carried out using both radiator keys simultaneously. The very direction of rotation of the keys also depends on which side the sections will be grouped on: the key on the side of the section with a left-hand thread rotates to the right, and on the side of the section with a right-hand thread - to the left.
Radiator hydraulic test
After grouping the sections and connecting the cast iron battery, it is worth doing a hydraulic test of the assembled cast iron radiator on a special stand. The radiator is connected to a hydraulic press and filled with water; before doing this, do not forget to release all the air from the device. In the radiator, under the action of a press, the required pressure is created in the range of 4 - 8 kgf/cm. sq.
If during the test the pressure gauge needle begins to fall, this means that the sections are poorly folded or have cracks. In this case, it is necessary to replace the defective sections or tighten the nipples with radiator wrenches. You can repair small cracks with epoxy glue. Small leaks where the sections connect can be eliminated by replacing the gaskets.
Radiator priming and painting
Then you can move on to painting the cast iron battery. The first thing you need to do before painting a radiator is to remove traces of flaking paint and corrosion from it. Next you need to prepare the surface. Use a remover to remove the old paint, and then sand it carefully. For this purpose, use a special attachment for a drill, grinder, or brush with metal bristles.
If there are already several layers of paint on the radiator, you may need to get rid of them, since these layers may interfere with normal heat transfer. For this purpose, you need to remove the paint thermally or use various chemicals. If the old paint is holding up smoothly and there is no tendency to peel, you can apply new paint over the previous one.
Also, before painting cast iron batteries, it is necessary to remove all dust from them and neutralize them. For this purpose, you need to take a regular solvent. Next, you need to treat the entire surface of the radiator with a primer, which is selected so that its characteristics match the characteristics of the paint to the maximum. Most often, painting cast iron batteries is done with a special curved brush designed for radiators, since it is very difficult to paint the internal surfaces of the sections with a regular brush.
If painting will be carried out in a vertical position, you need to do the work from top to bottom to avoid the formation of drips. After the primer layer has dried, you can begin painting the battery with decorative enamel. For radiators, you need to choose a special enamel. Otherwise, you risk that the paint will begin to peel off and turn yellow at the height of the heating season.
The following requirements apply to paint and varnish materials for cast iron batteries:
- Resistant to fairly high temperatures (the so-called thermal standard). It is necessary that the paint can withstand the temperature of the radiator, which heats up to 80 degrees.
- The ability to perfectly resist metal corrosion.
- No tendency to change color.
There are many different enamels on the market for radiators these days, but acrylic enamels are in greatest demand due to the fact that there is no toxic odor when painting batteries, unlike alkyd enamels. If necessary, such paints can be diluted with water, and if they get on hands, clothes or other places, they are easily washed off. In addition, acrylic compositions perfectly withstand use at high temperatures, do not crack, peel, or turn yellow.
When painting cast iron radiators, remember that it is not recommended to apply paint coatings to a hot radiator, as the risk of uneven coatings increases, as well as the strong smell of paint increases. Start painting from the top of the batteries, because, according to the law of gravity, dripping paint can damage the bottom layer.
First, the internal ceilings of the radiators are painted, and then the external ones in order to avoid the appearance of various stains on clothes and hands. There is one more rule to remember when painting cast iron batteries: two thin layers of paint are much better than one thick layer.
Installation of a cast iron radiator
Typically, cast iron radiators are installed under windows. It is recommended to adhere to certain requirements:
- It is necessary that the radiator fins are strictly vertical.
- The deviation of the center of the radiator from the center of the window opening should not be more than 2 centimeters.
- The distance from the top plane of the heating device to the window sill should not exceed 5 centimeters. This is necessary for ease of repair, dismantling and maintenance of the device.
- The distance from the floor to the battery should be at least 6 centimeters to make it convenient to clean the floor under the radiator.
- The distance between the radiator and the wall is determined depending on the material and thickness of the walls, as well as on the installation method of the heating device.
In addition, remember that in one room all heating radiators must be installed on the same level! Before hanging heating devices, we recommend marking the holes for the brackets. For this purpose, it is necessary to make a special template from thin plywood, the dimensions of which should be slightly larger than the size of the cast iron battery.
On the template itself, in the places where the brackets are attached, holes are drilled on the same line in the lower and upper rows of conditional sections. For one heating device, the number of brackets is determined based on the following calculation: for every square meter of the heating surface there should be one bracket. Next, the template is installed plumb to the place under the window where it will be necessary to install the cast iron radiator.
In place of the holes in the wall, sockets are punched with a bolt, which are subsequently drilled after removing the template. The dimensions of the nests should allow the brackets to be inserted to a depth of at least 12 centimeters and walled up with cement mortar. To ensure strong fixation of the brackets in the cement mortar, it is necessary to make a second template.
This template is made from a piece of board and steel reinforcement, then inserted in the place where the mortar brackets come out. Then, once the cement mortar has hardened, you can remove the template. The use of such a template makes it possible to prevent bending of the bracket inserts themselves after the cement mortar has hardened.
The connection to the heating system of cast iron batteries is made with the plugs turned out by means of a drive. All threaded connections must be sealed with oakum for better tightness. Next, open the valve so that the battery fills with water.
Replacing and cleaning cast iron batteries
Sometimes water starts dripping from the radiator, and then the question arises of how to fix a leak in a cast iron battery. To do this, you must first dismantle the battery by preparing a lever pipe wrench of the required size to unscrew the locknut flanges, or a pipe cutter, with which you can cut the pipe near the locknut if it is impossible to unscrew it.
The radiator should then be disconnected from the heating system and removed from the bracket. This work must be done in the summer, when the heating is not turned on. In winter, in this case, you need to leave the entire house without heating and, of course, drain all the water from the system. The procedure for disassembling and assembling cast iron radiators is a rather labor-intensive process and requires the necessary skills from the performer.
It often happens that it is necessary to change one section, or after prolonged use a cast iron radiator becomes clogged with rust, although it remains fully usable. In this case, it is necessary to disassemble and wash it. Before disassembling a cast iron battery, you need to make sure that you have the following materials and tools: pipe and battery wrench, grinder, chisel and hammer, rust removal brush, blowtorch, gaskets, tow, nipples.
Next, the cast iron battery is disassembled: first, the plugs on the batteries are heated with a blowtorch, after which they are unscrewed. Next, carefully use a grinder to cut the nipple between the sections of the radiator, then the sections must be disconnected. After this, you need to knock out the nipple with a chisel without damaging the thread, which then needs to be cleaned well.
At the last stage, the cast iron batteries are grouped and assembled. It must be remembered that on different sides of the radiator the nipples have threaded connections that differ in direction. Gaskets are installed between the sections and coated with silicone for better sealing. After this, you need to wash the cast iron batteries inside using a hose.
Thus, in almost all new houses, radiators are installed that are created using the latest technologies. Cast iron in modern realities seems quite heavy and too bulky, so the whole world is switching to more modern alternatives. Of course, these are quite important arguments, but still our country is different from Europe and the whole world. And it makes more sense for us to install cast iron batteries.
Installation of cast iron radiators
When you mention heating, the first image that comes to mind is the large cast-iron radiators that used to be found in almost all apartments.
They were all the same, roughly shaped, gray in color, and it was simply impossible to lift them. The pipes leading to them ran across the entire room. They tried to improve their appearance by painting them with white paint. But it should be noted that these particular radiators could have been around almost forever, and, perhaps, they were and remain one of the most heat-conducting radiators among existing heating devices. Modern manufacturers have not stopped producing cast iron heating radiators. It's just that their design has changed radically. Now on the market you can see radiators made in both antique and modern designs.
In most urban heating networks, the pressure is usually very high, and the coolants, on the contrary, are not of very good quality. And cast iron heating radiators fit perfectly into this heating network. Thick cast-iron walls of radiators can easily withstand high pressure for several decades; their use is possible even if steam with a temperature of about 150 degrees is used for heating. And corrosion is not terrible for cast iron radiators.
Installation diagram of a cast iron radiator
When water is drained at the end of spring for maintenance work, they tolerate airing of the system well. In the event of a power outage, cast iron radiators continue to provide heat, since they cool much more slowly than other radiators made of other materials. Installation of a cast iron heating radiator. Video
Of course, cast iron radiators have some disadvantages, but nothing is perfect. The first disadvantage of cast iron heating batteries is their weight. They weigh a lot, which means their installation will require a lot of physical effort. You cannot install such batteries yourself. Since this type of radiator is usually hung on the wall, you should make sure that the wall can support the weight of the radiator, which will also be filled with water after installation. It may be worth purchasing a radiator model with additional legs.
The larger the cast iron batteries, the higher their heat capacity, the slower they cool. If you purchase narrow cast iron batteries, then their weight, of course, may be less, but heat transfer and inertia will also decrease.
Despite the disadvantages, the advantages are still too good to refuse to install these wonderful heating devices. In addition, modern manufacturers produce radiators of different shapes and colors. The design of modern radiators is not only the accordions familiar to us; models with a smooth surface and widened gaps between sections are produced. Expanding the gaps allows you to increase heat transfer to some extent. There are also models made in the form of columns.
Cast iron batteries will remain relevant for a very long time. And thanks to the design work on their appearance, they can easily complement any interior. But the most important thing is that the house will be very, very warm.
How useful was the information for you?
Technical features of cast iron batteries
Modern cast iron batteries are largely similar in their technical characteristics to more expensive and innovative devices made of bimetal, aluminum and steel.
The working pressure inside cast iron batteries is eight atmospheres. As for the optimal location of these units, it is best to place them in the space under the window openings, which will increase heat transfer rates.
In order for the volume of transferred heat to be as large as possible, the correct solution would be to periodically wash the inner surface of the batteries to clean it of rust and other harmful substances. This will increase the productivity of the equipment, and at the same time extend the service life of cast iron heating batteries.