Types of battery mounting
Wall bracket for cast iron radiator
Designs for fixing heating sections are usually divided into two types. Each of them performs its own function and is used in individual conditions.
Wall mounts for heating radiators are considered quite reliable, provided that the partition is of normal strength. The list of such fasteners includes:
- Anchor brackets. They come in long and short depending on the size and weight of the heater you need to install.
- Special elements with the ability to adjust the height of the battery. The design includes a special plate and a moving mechanism.
- Anti-noise holders. The design is standard in appearance and has rubberized parts. With their help, noise and vibration emanating from radiators and walls are absorbed.
- Corner fasteners. These are small metal structures designed to mount small-sized batteries with a low mass index.
Floor bracket for radiator
Floor brackets for heating radiators are used in individual cases. For example, if it is not possible to fix the battery on the wall due to the structural features of the room. Among these details are:
- Stands with soles. They are designed for heavy radiators and are screwed directly to the floor with long dowels.
- Additional floor mounts, which are used in case the wall mounts are not enough to hold the battery.
- Racks with and without regulator. Their design provides hooks that are fixed not only to the floor, but also to the wall.
- Details in the form of an ordinary stand with a wide sole. They are not fixed to the floor. Used for small heaters.
- Tripod holders. Convenient, stable floor bracket. This is often used if the radiator needs to be installed away from the partition.
Floor structures are also used if the room has panoramic windows or the walls are made of plasterboard. Such elements are not able to withstand radiators.
Classification of heating batteries
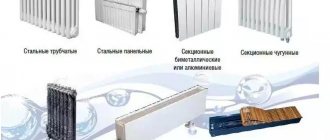
To understand what heating devices are, you need to study their classification. Types of radiators are distinguished depending on the material of manufacture:
- cast iron;
- steel;
- aluminum;
- bimetallic.
Each type has its own advantages over other models. Therefore, it is difficult to say that any of them is definitely better.
Cast iron models
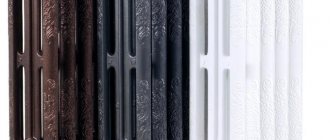
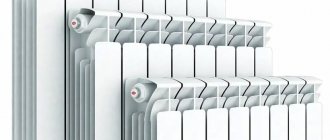
Batteries made of cast iron are massive, have the ability to retain heat for a longer time, and are not susceptible to corrosion. A definite plus is resistance to large pressure surges. Cast iron radiators are the most suitable option for apartment buildings. The service life is at least 50 years, sometimes longer. Instead of regular models, you can install ones decorated with patterns.
It is worth considering that due to the large mass, it is necessary to select a reinforced mount for cast iron heating radiators.
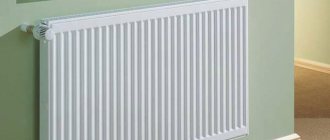
Steel radiators
A steel battery is a steel casing, inside of which there are plates and pipes made of the same metal. Structures are divided into panel and tubular. A well-thought-out structure allows air to actively circulate, so the room quickly warms up. But the device cools down quickly after the heating supply is stopped, which can be considered a significant drawback. Due to its low weight, mounting the radiator to the wall is not particularly difficult. Compared to cast iron representatives, steel appliances consume one third less coolant, which makes them very economical.
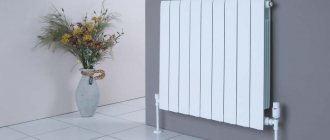
Aluminum radiators
The complex design of the convector allows for efficient circulation of air masses. The thermostat quickly responds to commands, which allows you to change the room temperature in a short time. Depending on the production method, structures are divided into injection molding and extrusion. The first ones are of better quality, but expensive. The latter are cheaper, but cannot be repaired. They are relatively lightweight, which greatly simplifies the installation process. These batteries look attractive, but are not very easy to clean.
Bimetallic radiators
An improved version of aluminum batteries is bimetallic. The system is reinforced with steel elements, which make them resistant to higher pressures. Convectors quickly warm up and begin to give off heat. They weigh a little, making them easy to install. The surface is easy to clean from various contaminants, unlike cast iron models. These devices are more resistant to corrosion. But bimetallic heat exchangers are more demanding on the quality of incoming water.
Marking the installation site
Determining the location for installing the battery
Before purchasing a mount for radiators, you need to decide on the method that will be used for fixation. After this, they begin marking, taking into account the requirements from SNiP.
- When installing a wall-mounted radiator, it is worth considering that its center should be located in the center of the window sill. The permissible error is no more than 20 mm.
- It is recommended to purchase radiators whose dimensions will correspond to 75% of the length of the window sill.
- The distance from the floor covering to the bottom of the battery must be at least 60 mm. This is important to consider when marking before installing the bracket.
- There must be a gap between the wall and the radiator. Estimated distance 30-50 mm.
- The gap from the window sill to the radiator must be left at least 50 mm.
- The number of fasteners should be selected depending on the number of sections. For example, for 8 pieces it is enough to place two brackets at the top and one at the bottom. The type of fastening can be any.
Carrying out markings for the mounting locations of the new battery
When installing a floor radiator battery, markings are made on the finishing or rough coating. To accommodate the battery in six sections, you will need two brackets. The greater the number of sections, the more fasteners.
After considering all the placement standards, they begin to draw auxiliary lines.
- Having chosen the middle of the window, draw a vertical line from the window sill to the floor.
- If there is a lower wiring, make a horizontal line; the upper edge of the battery will run along it.
- If there is additional lateral wiring, make another horizontal line, which will become the border of the lower part of the radiator.
Using these lines as a guide, the brackets are installed. The distance between the bottom and top must be at least 300 mm. The distance from the wall to the seat is 80 mm. As a result, a mounted battery on a holder should occupy no more than 130 mm of space from the edge of the window sill.
Any wall-mounted radiator battery can be installed on floor holders. In this case, the height from the floor to the middle of the heating equipment should be 140-190 mm.
Selection of brackets for radiators
When choosing fasteners to be used when installing heating radiators, it is necessary to take into account some features of both the heating devices and the rooms in which they will be installed. By design, radiator brackets can be designed for mounting batteries on straight and corner sections of walls. Their shape (degree of curvature and structure) must correspond to the configuration of battery sections of different types. Radiator brackets also differ in the material of manufacture, which directly affects the maximum permissible loads:
- for heavy cast iron structures, fastenings must be massive, durable, made of high-quality steel;
- for less massive aluminum and bimetallic products, more elegant radiator brackets made from durable light alloys are quite suitable.
How to hang a radiator on a bracket
Installing a bracket for a cast iron radiator
Methods for attaching radiators vary depending on the type of battery selected. Each option has its own step-by-step instructions.
Often, cast iron radiators are installed under the window. This makes it possible to achieve proper air circulation throughout the room.
- First of all, the points where the fastenings should be installed are determined. The bracket for the cast iron radiator should be located exactly in the place where the sections of the cast iron radiator are connected to each other.
- Fix the bracket for cast iron batteries 2-3 mm above the center of the section of the heating inlet pipe into the battery. All fasteners are installed in the same way.
- The lower holders are installed using the same technology.
- In order for the brackets to have a tight adhesion to the wall, it is necessary to first drill a hole of the required length with a diameter 1-1.5 mm less than the diameter of the thread of the fastener.
- Dowels are inserted into the prepared holes, into which threaded brackets are subsequently screwed.
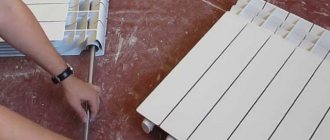
- After making sure that the installed elements are reliable, hang the cast iron radiator. After it is securely seated in the grooves, you can begin soldering the heating communications.
Bracket for fastening sectional radiators to the floor
Steel radiators are mounted on wall and floor brackets. This work is carried out in stages.
- The holes are prepared and self-tapping screws are screwed into them. The gap between the cap and the wall should be 3-5 mm.
- Next, the brackets are hung on the wall, after which the screws are screwed in until they stop.
- The radiator is hung on wall fasteners.
- The floor clamp is installed and adjusted to the battery.
After installing the battery, solder the pipes and additional radiator elements - thermostats, regulators.
In private homes, it is customary to install steel heating radiators on long metal brackets. They are intended for both lower and upper fixation. Installed on the wall using self-tapping screws.
Attaching a bracket for an aluminum radiator to the wall
Aluminum batteries have a special holder directly on the case. Brackets are often included. To hang a radiator on the wall, you must:
- Measure the center of the window and correlate it with the axial part of the heating device.
- Place boundaries with a simple pencil on the wall in accordance with the dimensions of the structure.
- Step back two sections from the edges of the battery, mark the distance taken and transfer it to the wall from the drawn border of the radiator.
- Drill holes in the indicated places, and then fix the brackets in them.
- After this, the batteries are hung and connected to the general heating system.
Before installing a bimetallic radiator on the wall, be sure to install brackets that will support the weight of the heating structure. It is important to follow the following rules here.
- The distance from the radiator to the wall must be at least 50 mm.
- The structure is hung with a slight slope forward; accordingly, the fastenings are installed in a similar way.
- The plugs must be located exactly at the same level as the system pipes.
The slope is made to prevent airing in bimetallic radiators. In this case, the installation principle remains the same as for other batteries.
How to correctly mark and install brackets for a new heating radiator?
A few days ago, my old client, let’s call him Andrey, whose batteries I recently changed, called me with an unusual question.
The crux of the matter was this: he and his friend decided to replace the old batteries themselves. They knew in a nutshell how and what was needed for this, and Andrei generally observed my actions when I was working. If there was something unclear, he always asked, and I, without hiding too much, told him in detail the features of the work. But, here’s how to correctly make the markings and make sure that the centers of the radiator and pipe axes coincide - they didn’t pay attention. That's why they turned to me.
In the evening, Andrey sent a letter of gratitude and photographs of the work done. It turned out great, no worse than mine.
This life episode is firmly embedded in my memory. Probably, Andrey is not the only person who has encountered such a problem. Therefore, I decided to tell you in more detail how I mark and install brackets for aluminum or bimetallic radiators.
How to prepare for replacing a radiator, what is needed for replacement and what tools are needed, I wrote here. I won’t repeat myself, but will get straight to the point. Having dismantled the old battery, we will see the following picture:
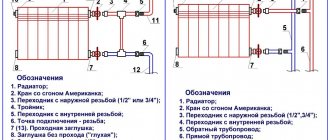
On a horizontal pipe, unscrew the couplings; if there are no couplings, cut the threads and install transition connections. In this case, replacement is made with polypropylene pipes. I use flax and Unipak paste as a sealing material for carvings.
Now we place the radiator near the window. Some people like it when the radiator hangs in the center of the window, others move it closer to the edge. How exactly to place it is your choice.
Personally, I like it when the radiator hangs in the center.
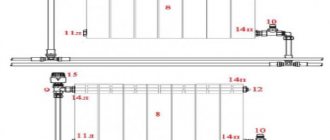
Next, on the wall between the sections we make marks for installing brackets. There are three of them: the center and between the two outer sections.
By the way, the question is often asked: how many brackets are needed for a radiator? Practice has shown that for an aluminum radiator of up to 12 sections, three fastening points are sufficient: two on top and one on the bottom. And if there are more than twelve sections, then four attachment points will be needed. And yet, bimetallic radiators are heavier, so such radiators of up to 10 sections are installed on three brackets. Well, if there are more than 10 sections, then four.
READ How to install imo
We move the radiator to the side; we won’t need it for now. We take a building level, place it in the center of the horizontal pipe on which the transition coupling was previously installed, and make a mark on the wall. There is no need to calculate the center with a ruler; it is enough to determine it by eye.
Approximately one centimeter below our mark we draw a horizontal line. Brackets will be installed on this line. Why lower? In order for the centers of the radiator and pipe axes to coincide.
Now we draw vertical lines to this line. It will turn out like this:
It remains to note the location of the lower central bracket. We mark 50 cm from the top line and make a mark.
It is best to choose a flat bracket for the radiator, with a dowel. Unlike other brackets, these allow you to easily adjust the distance of the radiator from the wall and align it in planes.
Next we install the radiator
If necessary, align the radiator by bending the bracket up or down.
When adjusting the radiator, do not forget to monitor the axes of the radiator and pipe, they must be at the same level.
Source
For high-quality operation of the radiator, you need to choose the right brackets. There are many fasteners. They all differ in type of design, installation method, and functionality. Some are made specifically for a specific design.
How many brackets are needed?
The number of fasteners is calculated taking into account the number of radiator sections. Batteries typically consist of six sections, so you will need two brackets on each side (bottom and top).
When choosing a mount, the weight of the radiator must be taken into account. After hanging, it should not bend or dangle in the prepared hole. If the walls do not allow for reliable fixation of the heaters, it is better to use the floor mounting option.
Kinds
It is possible to select the following options for floor brackets for radiators:
- Fixed with plastic cover.
- Adjustable, which will also be equipped with a plastic cover.
- Combined models.
- Special ones with a width of 80-100 mm.
Fixing bimetallic and aluminum batteries
If we talk about the mass of bimetallic and aluminum radiators, then in terms of this parameter they are almost identical. Therefore, a bracket for a bimetallic radiator can be successfully used to mount an aluminum battery.
A fastening element of this type is practically no different from a stand for a heating radiator made of cast iron. The only difference is the lower load-bearing capacity. As a rule, such clamps are universal corners, one side of which is fixed to the wall, and the other contains recesses on both sides. This configuration allows such fasteners to be mounted in any direction.
It is noteworthy that bimetallic and aluminum batteries do not initially provide for the possibility of floor mounting. However, attaching radiators to surfaces such as glass, plasterboard or sandwich panels is not possible. In this case, a floor bracket for aluminum radiators is used, similar to racks for cast iron batteries.
Fasteners for cast iron batteries
Since these are the heaviest heating devices, the holders for them are the most massive: they must hold considerable weight for years. These can be individual or curved pins attached to a bar. In any case, when making mounts for cast iron batteries, thicker metal is used. In price lists it usually comes with the addition of “reinforced”. Can be painted (standard color is white) or not. Some manufacturers paint it in the desired color upon request (when ordering a radiator, specify the type of fastener and its color).
The mount for a cast iron battery is made reinforced: made of thicker metal
When purchasing, you will need to take into account the dimensions: fastenings for sections of different depths are made specially, since it is necessary to ensure a distance to the wall of at least 3-5 cm.
In addition to brackets for cast iron radiators, they also produce hooks. They are sold in pairs with dowels. Installation is standard: a hole is drilled, a dowel is inserted into it, and a hook is screwed into the dowel (there is a thread on one side).
There are mounting strips for cast iron radiators that make installation easier
In addition to wall mounting, there are legs for floor installation. They come with adjustable height or not. The upper arcs that fix the section to the stop are also different: there is an arc made of steel wire, and there is a chain of movably connected links. In both cases, the batteries are fixed to the support using these arcs and bolts.
Racks for floor installation of sectional radiators - any wall-mounted radiator can be installed on the floor
Installation features
Location. The radiator is most often installed under the windows.
Particular attention should be paid to the distance from the radiator to the floor, windows, and walls, so that after installation the thermal energy is spent on heating the air in the room.
The following location is considered optimal:
- From the floor – 10-15 cm;
- From the windowsill – 6-10 cm;
- From the wall - 3-5 cm.
For a small battery (up to 8-10 sections), two upper and one lower holder are installed. If the number of sections increases, another upper and lower bracket is added to each fragment. The battery fragment is calculated depending on the material:
- the cast iron fragment is equal to 6-7 sections;
- a battery fragment made of lighter materials (aluminum, steel) can reach 10 sections.